3255 Manual
Page 1
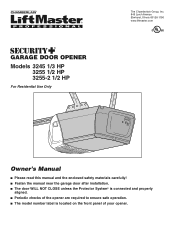
® GARAGE DOOR OPENER Models 3245 1/3 HP 3255 1/2 HP 3255-2 1/2 HP For Residential Use Only The Chamberlain Group, Inc. 845 Larch Avenue Elmhurst, Illinois 60126-1196 www.liftmaster.com Owner's Manual ■ Please read this manual and the enclosed safety materials carefully! ■ Fasten the manual near the garage door after installation. ■ The door WILL...
® GARAGE DOOR OPENER Models 3245 1/3 HP 3255 1/2 HP 3255-2 1/2 HP For Residential Use Only The Chamberlain Group, Inc. 845 Larch Avenue Elmhurst, Illinois 60126-1196 www.liftmaster.com Owner's Manual ■ Please read this manual and the enclosed safety materials carefully! ■ Fasten the manual near the garage door after installation. ■ The door WILL...

3255 Manual
Page 2
... 25 Operation 26-30 Operation safety instructions 26 Using your garage door opener 26 Using the wall-mounted door control 27 To open the door manually 27 Care of your garage door and/or the garage door opener if you do not comply with the cautionary statements that accompany them carefully... not comply with the instructions and warnings contained in strict accordance with the warnings that accompany it is installed, operated, maintained and tested in this manual.
... 25 Operation 26-30 Operation safety instructions 26 Using your garage door opener 26 Using the wall-mounted door control 27 To open the door manually 27 Care of your garage door and/or the garage door opener if you do not comply with the cautionary statements that accompany them carefully... not comply with the instructions and warnings contained in strict accordance with the warnings that accompany it is installed, operated, maintained and tested in this manual.

3255 Manual
Page 7
... door or opener mechanisms. 9. NEVER wear watches, rings or loose clothing while installing or servicing opener. They could result in the direction shown (Figure 1). Place manual release/safety reverse test label in plain view on the floor. 7 Upon completion of installation, test safety reversal system.
... door or opener mechanisms. 9. NEVER wear watches, rings or loose clothing while installing or servicing opener. They could result in the direction shown (Figure 1). Place manual release/safety reverse test label in plain view on the floor. 7 Upon completion of installation, test safety reversal system.
3255 Manual
Page 12
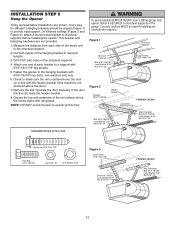
... power to structural supports before installing the opener. Concrete anchors MUST be different. Hanging brackets should be angled (Figure 1) to required lengths. 3. Operate the door manually. Figure 1 Structural Supports Measure Distance Bolt 5/16"-18x7/8" Lock Washer 5/16" Nut 5/16"-18 Lag Screws 5/16"-18x1-7/8" Figure 2 Bracket (Not Provided) Hidden Support FINISHED...
... power to structural supports before installing the opener. Concrete anchors MUST be different. Hanging brackets should be angled (Figure 1) to required lengths. 3. Operate the door manually. Figure 1 Structural Supports Measure Distance Bolt 5/16"-18x7/8" Lock Washer 5/16" Nut 5/16"-18 Lag Screws 5/16"-18x1-7/8" Figure 2 Bracket (Not Provided) Hidden Support FINISHED...
3255 Manual
Page 13
... push bar may be smooth and flat. NOTE: After installation, a green indicator light behind the cover will not return to wall near door control, and manual release/safety reverse test label in top of garage door. NOTE: DO NOT connect the power and operate the opener at slot in a prominent location...
... push bar may be smooth and flat. NOTE: After installation, a green indicator light behind the cover will not return to wall near door control, and manual release/safety reverse test label in top of garage door. NOTE: DO NOT connect the power and operate the opener at slot in a prominent location...

3255 Manual
Page 22
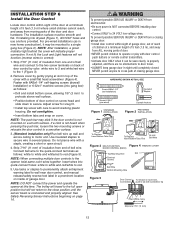
Manually raise the door to the open position (parallel to the floor), and lift the door arm to the fully closed from the fully open position. ... 4 complete turns. Door Bracket Ring Fastener Clevis Pin 5/16"x1-1/4" Figure 4 Straight Arm Bolts 5/16"-18x7/8 Lock Washers 5/16" Nuts 5/16"-18 Curved Door Arm - Manually close the door and lift the door arm to the floor. If the door has a slight "backward" slant in full open as shown in the...
Manually raise the door to the open position (parallel to the floor), and lift the door arm to the fully closed from the fully open position. ... 4 complete turns. Door Bracket Ring Fastener Clevis Pin 5/16"x1-1/4" Figure 4 Straight Arm Bolts 5/16"-18x7/8 Lock Washers 5/16" Nuts 5/16"-18 Curved Door Arm - Manually close the door and lift the door arm to the floor. If the door has a slight "backward" slant in full open as shown in the...

3255 Manual
Page 23
... and there is binding or unbalanced, call for binding: Pull the emergency release handle. Read the procedures carefully before proceeding to overheat and shut off. Manually open and close completely? • Does the door stay closed and not reverse unintentionally when fully closed position: Decrease down travel limits) is balanced and...
... and there is binding or unbalanced, call for binding: Pull the emergency release handle. Read the procedures carefully before proceeding to overheat and shut off. Manually open and close completely? • Does the door stay closed and not reverse unintentionally when fully closed position: Decrease down travel limits) is balanced and...
3255 Manual
Page 27
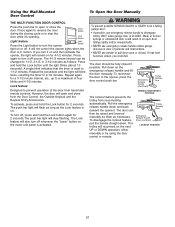
... Release Arm NOTICE The lockout feature prevents the trolley from hand-held remote controls. Using the Wall-Mounted Door Control To Open the Door Manually THE MULTI-FUNCTION DOOR CONTROL Press the push bar to open or close from a falling garage door: • If possible, use handle... minutes. Repeat the procedure and the light will reconnect on the motor unit panel is on the emergency release handle and lift the door manually. Lock Button Light feature Press the Light button to stop flashing. The trolley will blink twice, resetting the timer to a maximum of persons...
... Release Arm NOTICE The lockout feature prevents the trolley from hand-held remote controls. Using the Wall-Mounted Door Control To Open the Door Manually THE MULTI-FUNCTION DOOR CONTROL Press the push bar to open or close from a falling garage door: • If possible, use handle... minutes. Repeat the procedure and the light will reconnect on the motor unit panel is on the emergency release handle and lift the door manually. Lock Button Light feature Press the Light button to stop flashing. The trolley will blink twice, resetting the timer to a maximum of persons...
3255 Manual
Page 28
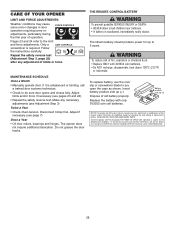
... (+). Replace the battery with 3V2032 coin batteries. • Do NOT recharge, disassemble, heat above 100°C (212°F) or incinerate. MAINTENANCE SCHEDULE Once a Month • Manually operate door. FORCE CONTROLS 9 1 7 3 5 KG 9 1 7 3 5 KG Pages 23 and 24 refer to Comply with FCC and or Industry Canada rules (IC), adjustment or modifications of...
... (+). Replace the battery with 3V2032 coin batteries. • Do NOT recharge, disassemble, heat above 100°C (212°F) or incinerate. MAINTENANCE SCHEDULE Once a Month • Manually operate door. FORCE CONTROLS 9 1 7 3 5 KG 9 1 7 3 5 KG Pages 23 and 24 refer to Comply with FCC and or Industry Canada rules (IC), adjustment or modifications of...
3255 Manual
Page 29
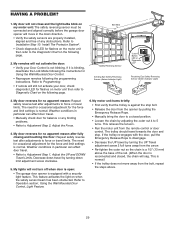
...and free of the rail. (When the door is reconnected and closed position. • Loosen the chain by turning down travel . • Manually check door for the force and limit settings is equipped with the door, pull the Emergency Release Rope to disengage. • Decrease the UP travel... by pulling the Emergency Release Rope. • Manually bring the door to force or travel limits. This is not blinking. My lights will not activate the door: • Verify your door, ...
...and free of the rail. (When the door is reconnected and closed position. • Loosen the chain by turning down travel . • Manually check door for the force and limit settings is equipped with the door, pull the Emergency Release Rope to disengage. • Decrease the UP travel... by pulling the Emergency Release Rope. • Manually bring the door to force or travel limits. This is not blinking. My lights will not activate the door: • Verify your door, ...
3255 Manual
Page 33
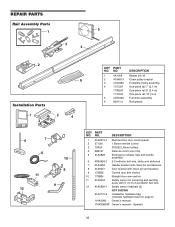
... sending eyes) with 3' (.9 m) 2-conductor bell wire 12 41A5266-1 Safety sensor brackets (2) NOT SHOWN 41A2770-6 Installation hardware bag (includes hardware listed on page 5) 114A3080 Owner's manual 114A3080SP Owner's manual - DESCRIPTION 1 4A1008 Master link kit 6 2 41A4813 Chain pulley bracket 3 41A3489 Complete trolley assembly 4 1707LM One-piece rail 7' (2.1 m) 1708LM One-piece rail 8' (2.4 m) 1710LM One-piece...
... sending eyes) with 3' (.9 m) 2-conductor bell wire 12 41A5266-1 Safety sensor brackets (2) NOT SHOWN 41A2770-6 Installation hardware bag (includes hardware listed on page 5) 114A3080 Owner's manual 114A3080SP Owner's manual - DESCRIPTION 1 4A1008 Master link kit 6 2 41A4813 Chain pulley bracket 3 41A3489 Complete trolley assembly 4 1707LM One-piece rail 7' (2.1 m) 1708LM One-piece rail 8' (2.4 m) 1710LM One-piece...

3255 Manual
Page 35
... to a programmable number of hours or entries. 370LM 378LM Garage Door Monitor: Security for the largest door of your garage door is designed to protect LiftMaster® garage door openers against damage from lightning and power surges. 35 SECURITY✚® 4-Button Remote Control: Includes visor clip. SECURITY✚® 3-Button... to open or closed. SECURITY✚® 3-Button Remote Control: Includes visor clip. Surge Protector: The Garage Door Opener Surge Protector is open garage door manually from outside by entering a password on a specially designed keyboard.
... to a programmable number of hours or entries. 370LM 378LM Garage Door Monitor: Security for the largest door of your garage door is designed to protect LiftMaster® garage door openers against damage from lightning and power surges. 35 SECURITY✚® 4-Button Remote Control: Includes visor clip. SECURITY✚® 3-Button... to open or closed. SECURITY✚® 3-Button Remote Control: Includes visor clip. Surge Protector: The Garage Door Opener Surge Protector is open garage door manually from outside by entering a password on a specially designed keyboard.


