1355 Manual
Page 1
The Chamberlain Group, Inc. 845 Larch Avenue Elmhurst, Illinois 60126-1196 www.liftmaster.com ® GARAGE DOOR OPENER Model Series 1300 For Residential Use Only Model 1356 - 1/2HP Model 1346 - 1/3HP Model 1355 - 1/2HP Model 1345 - 1/3HP Owner's Manual ■ Please read this manual and the enclosed safety materials carefully! ■ Fasten the manual near the garage ... unless the Protector System® is connected and properly aligned. ■ Periodic checks of the opener are required to ensure safe operation. ■ The model number label is located on the front panel of your opener.
The Chamberlain Group, Inc. 845 Larch Avenue Elmhurst, Illinois 60126-1196 www.liftmaster.com ® GARAGE DOOR OPENER Model Series 1300 For Residential Use Only Model 1356 - 1/2HP Model 1346 - 1/3HP Model 1355 - 1/2HP Model 1345 - 1/3HP Owner's Manual ■ Please read this manual and the enclosed safety materials carefully! ■ Fasten the manual near the garage ... unless the Protector System® is connected and properly aligned. ■ Periodic checks of the opener are required to ensure safe operation. ■ The model number label is located on the front panel of your opener.
1355 Manual
Page 4
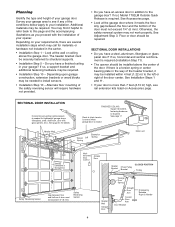
... fastening hardware may call for lightweight garage doors (fiberglass, steel, aluminum, door with the installation of your garage area to the garage door? If not, Model 1702LM Outside Quick Release is required. See Accessories page. • Look at the wall or ceiling above the center of door must be repaired. Otherwise...
... fastening hardware may call for lightweight garage doors (fiberglass, steel, aluminum, door with the installation of your garage area to the garage door? If not, Model 1702LM Outside Quick Release is required. See Accessories page. • Look at the wall or ceiling above the center of door must be repaired. Otherwise...
1355 Manual
Page 6
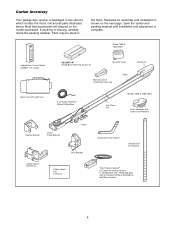
Parts may be stuck in two cartons which contain the motor unit and all parts illustrated below. Model 1355 & 1345 ONLY Lighted Door Control Button w/6ABx1-1/2" screws SECURITY✚® Single-Button Remote Control (1) Sprocket Cover Remote Control Transmitter...White/Red CEILING MOUNT ONLY UP Header Bracket Chain Pulley Bracket Trolley Safety Sensor Bracket (2) Door Bracket Safety Labels and Literature One-Piece Rail Models 1346 & 1356 ONLY Chain Spreader with Screws and Washers Curved Door Arm Section Straight Door Arm Section The Protector System® (2) Safety ...
Parts may be stuck in two cartons which contain the motor unit and all parts illustrated below. Model 1355 & 1345 ONLY Lighted Door Control Button w/6ABx1-1/2" screws SECURITY✚® Single-Button Remote Control (1) Sprocket Cover Remote Control Transmitter...White/Red CEILING MOUNT ONLY UP Header Bracket Chain Pulley Bracket Trolley Safety Sensor Bracket (2) Door Bracket Safety Labels and Literature One-Piece Rail Models 1346 & 1356 ONLY Chain Spreader with Screws and Washers Curved Door Arm Section Straight Door Arm Section The Protector System® (2) Safety ...
1355 Manual
Page 8
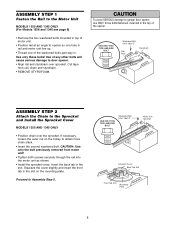
..."-18x1/2" Motor Unit Sprocket Sprocket Cover Back Tab Slot Front Tab Slot Mounting Plate 8 ASSEMBLY STEP 1 Fasten the Rail to the Motor Unit MODELS 1355 AND 1345 ONLY (For Models 1356 and 1346 see page 9) • Remove the two washered bolts mounted in top of motor unit. • Position rail at an angle... of the washered bolts part way in the top of any other bolts will cause serious damage to the Sprocket and Install the Sprocket Cover MODELS 1355 AND 1345 ONLY • Position chain over sprocket.
..."-18x1/2" Motor Unit Sprocket Sprocket Cover Back Tab Slot Front Tab Slot Mounting Plate 8 ASSEMBLY STEP 1 Fasten the Rail to the Motor Unit MODELS 1355 AND 1345 ONLY (For Models 1356 and 1346 see page 9) • Remove the two washered bolts mounted in top of motor unit. • Position rail at an angle... of the washered bolts part way in the top of any other bolts will cause serious damage to the Sprocket and Install the Sprocket Cover MODELS 1355 AND 1345 ONLY • Position chain over sprocket.
1355 Manual
Page 9
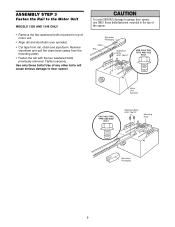
... Sprocket USE ONLY THIS TYPE AND SIZE BOLT Washered Bolts 5/16"-18x1/2" Mounting Plate Styrofoam Packaging 9 ASSEMBLY STEP 3 Fasten the Rail to the Motor Unit MODELS 1356 AND 1346 ONLY • Remove the two washered bolts mounted in the top of motor unit. • Align rail and styrofoam over sprocket. •...
... Sprocket USE ONLY THIS TYPE AND SIZE BOLT Washered Bolts 5/16"-18x1/2" Mounting Plate Styrofoam Packaging 9 ASSEMBLY STEP 3 Fasten the Rail to the Motor Unit MODELS 1356 AND 1346 ONLY • Remove the two washered bolts mounted in the top of motor unit. • Align rail and styrofoam over sprocket. •...
1355 Manual
Page 10
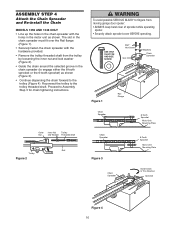
... In This Direction Sprocket Figure 4 10 Proceed to Assembly Step 3 for chain tightening instructions. ASSEMBLY STEP 4 Attach the Chain Spreader and Re-install the Chain MODELS 1356 AND 1346 ONLY • Line up the holes in the chain spreader with the hardware provided. • Remove the trolley threaded shaft from CAUTION...
... In This Direction Sprocket Figure 4 10 Proceed to Assembly Step 3 for chain tightening instructions. ASSEMBLY STEP 4 Attach the Chain Spreader and Re-install the Chain MODELS 1356 AND 1346 ONLY • Line up the holes in the chain spreader with the hardware provided. • Remove the trolley threaded shaft from CAUTION...

1355 Manual
Page 11
.... Door MUST reverse on contact with the door closed. ASSEMBLY STEP 5 Tighten the Chain Outer Nut To Tighten Outer Nut Lock Washer Inner Nut ALL MODELS • Spin the inner nut and lock washer down the trolley threaded shaft, away from ALL moving parts of the door. 10. If the chain...
.... Door MUST reverse on contact with the door closed. ASSEMBLY STEP 5 Tighten the Chain Outer Nut To Tighten Outer Nut Lock Washer Inner Nut ALL MODELS • Spin the inner nut and lock washer down the trolley threaded shaft, away from ALL moving parts of the door. 10. If the chain...
1355 Manual
Page 33
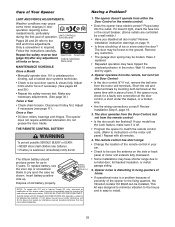
... or back panel of wire. Wait 15 minutes and try again. 2. If the opener runs, check for up . Care of the remote control in your model has the Lock feature, make sure it is off. • Program the opener to match the remote control code. (Refer to instructions on the motor...
... or back panel of wire. Wait 15 minutes and try again. 2. If the opener runs, check for up . Care of the remote control in your model has the Lock feature, make sure it is off. • Program the opener to match the remote control code. (Refer to instructions on the motor...

1355 Manual
Page 40
... sole option. Please include a brief description of the problem and a dated proof-of this product, for the residence in your local LIFTMASTER/CHAMBERLAIN dealer. THIS LIMITED WARRANTY ALSO DOES NOT COVER ANY PROBLEMS CAUSED BY INTERFERENCE. ANY SERVICE CALL THAT DETERMINES THE PROBLEM HAS BEEN CAUSED... THE IMPLIED WARRANTIES WITH RESPECT TO THE MOTOR, WHICH ARE LIMITED IN DURATION TO THE 48 MONTHS (4 YEARS) FOR MODELS 1356 & 1355 AND 24 MONTHS (2 YEARS) FOR MODELS 1346 & 1345 LIMITED WARRANTY PERIOD FOR THE MOTOR], AND NO IMPLIED WARRANTIES WILL EXIST OR APPLY AFTER SUCH PERIOD. THIS...
... sole option. Please include a brief description of the problem and a dated proof-of this product, for the residence in your local LIFTMASTER/CHAMBERLAIN dealer. THIS LIMITED WARRANTY ALSO DOES NOT COVER ANY PROBLEMS CAUSED BY INTERFERENCE. ANY SERVICE CALL THAT DETERMINES THE PROBLEM HAS BEEN CAUSED... THE IMPLIED WARRANTIES WITH RESPECT TO THE MOTOR, WHICH ARE LIMITED IN DURATION TO THE 48 MONTHS (4 YEARS) FOR MODELS 1356 & 1355 AND 24 MONTHS (2 YEARS) FOR MODELS 1346 & 1345 LIMITED WARRANTY PERIOD FOR THE MOTOR], AND NO IMPLIED WARRANTIES WILL EXIST OR APPLY AFTER SUCH PERIOD. THIS...


