1355 Manual
Page 1
The Chamberlain Group, Inc. 845 Larch Avenue Elmhurst, Illinois 60126-1196 www.liftmaster.com ® GARAGE DOOR OPENER Model Series 1300 For Residential Use Only Model 1356 - 1/2HP Model 1346 - 1/3HP Model 1355 - 1/2HP Model 1345 - 1/3HP Owner's Manual ■ Please read this manual and the enclosed safety materials carefully! ■ Fasten the manual near the...
The Chamberlain Group, Inc. 845 Larch Avenue Elmhurst, Illinois 60126-1196 www.liftmaster.com ® GARAGE DOOR OPENER Model Series 1300 For Residential Use Only Model 1356 - 1/2HP Model 1346 - 1/3HP Model 1355 - 1/2HP Model 1345 - 1/3HP Owner's Manual ■ Please read this manual and the enclosed safety materials carefully! ■ Fasten the manual near the...

1355 Manual
Page 2
...unit assembly parts 38 Accessories 39 Repair Parts and Service 40 Warranty 40 INTRODUCTION Safety Symbol and Signal Word Review This garage door opener has been designed and tested to offer safe service provided it is installed, operated, maintained and tested in this manual.... Protector System 30 Operation 31-34 Operation safety instructions 31 Using your garage door opener 31 Using the wall-mounted door control 32 To open the door manually 32 Care of your garage door and/or the garage door opener if you do not comply with the cautionary statements that accompany them ...
...unit assembly parts 38 Accessories 39 Repair Parts and Service 40 Warranty 40 INTRODUCTION Safety Symbol and Signal Word Review This garage door opener has been designed and tested to offer safe service provided it is installed, operated, maintained and tested in this manual.... Protector System 30 Operation 31-34 Operation safety instructions 31 Using your garage door opener 31 Using the wall-mounted door control 32 To open the door manually 32 Care of your garage door and/or the garage door opener if you do not comply with the cautionary statements that accompany them ...

1355 Manual
Page 3
... and remove ALL ropes connected to WARNING garage door BEFORE installing and operating garage door opener to avoid malfunction and damage. CAUTION To prevent damage to garage door and opener: • ALWAYS disable locks BEFORE installing and operating the opener. • ONLY operate garage door opener at 120V, 60 Hz to avoid entanglement. Release the door. If balanced, it should stay in place...
... and remove ALL ropes connected to WARNING garage door BEFORE installing and operating garage door opener to avoid malfunction and damage. CAUTION To prevent damage to garage door and opener: • ALWAYS disable locks BEFORE installing and operating the opener. • ONLY operate garage door opener at 120V, 60 Hz to avoid entanglement. Release the door. If balanced, it should stay in place...
1355 Manual
Page 4
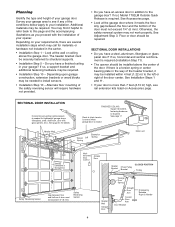
... chain tension See page 17. Otherwise, the safety reversal system may be installed above the garage door. If so, horizontal and vertical reinforcement is required (Installation Step 11). • The opener should be required. Look at the garage door where it meets the floor. If so, a support bracket and additional fastening hardware may be repaired...
... chain tension See page 17. Otherwise, the safety reversal system may be installed above the garage door. If so, horizontal and vertical reinforcement is required (Installation Step 11). • The opener should be required. Look at the garage door where it meets the floor. If so, a support bracket and additional fastening hardware may be repaired...
1355 Manual
Page 6
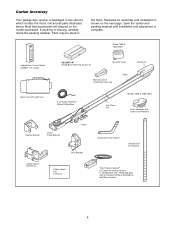
Save the carton and packing material until installation and adjustment is packaged in the foam. Model 1355 & 1345 ONLY Lighted Door Control Button w/6ABx1-1/2" screws SECURITY✚® Single-Button Remote Control (1) Sprocket Cover Remote Control Transmitter Visor Clip Chain Styrofoam Motor... and all parts illustrated below. Hardware for assembly and installation is missing, carefully check the packing material. Carton Inventory Your garage door opener is complete. If anything is shown on the model purchased. Note that accessories will depend on the next page.
Save the carton and packing material until installation and adjustment is packaged in the foam. Model 1355 & 1345 ONLY Lighted Door Control Button w/6ABx1-1/2" screws SECURITY✚® Single-Button Remote Control (1) Sprocket Cover Remote Control Transmitter Visor Clip Chain Styrofoam Motor... and all parts illustrated below. Hardware for assembly and installation is missing, carefully check the packing material. Carton Inventory Your garage door opener is complete. If anything is shown on the model purchased. Note that accessories will depend on the next page.
1355 Manual
Page 8
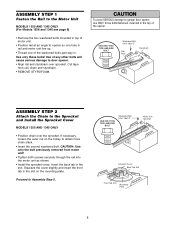
... removed from rail, chain and styrofoam. • REMOVE STYROFOAM. WARNING CAUTION To avoid SERIOUS damage to garage door opener, use ONLY those bolts/fasteners mounted in the slot. ASSEMBLY STEP 1 Fasten the Rail to the Motor Unit MODELS 1355 AND 1345 ONLY (For Models 1356 and 1346 see page 9) • Remove the two washered...
... removed from rail, chain and styrofoam. • REMOVE STYROFOAM. WARNING CAUTION To avoid SERIOUS damage to garage door opener, use ONLY those bolts/fasteners mounted in the slot. ASSEMBLY STEP 1 Fasten the Rail to the Motor Unit MODELS 1355 AND 1345 ONLY (For Models 1356 and 1346 see page 9) • Remove the two washered...
1355 Manual
Page 9
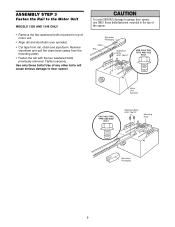
.../2" Mounting Plate Styrofoam Packaging 9 Use only these bolts! Use of any other bolts will cause serious damage to garage door opener, use ONLY those bolts/fasteners mounted in top of the opener. Remove styrofoam and pull the chain back (away from rail, chain and styrofoam. Tighten securely. WARNING CAUTION To... avoid SERIOUS damage to door opener. ASSEMBLY STEP 3 Fasten the Rail to the Motor Unit MODELS 1356 AND 1346 ONLY • Remove the two washered bolts mounted...
.../2" Mounting Plate Styrofoam Packaging 9 Use only these bolts! Use of any other bolts will cause serious damage to garage door opener, use ONLY those bolts/fasteners mounted in top of the opener. Remove styrofoam and pull the chain back (away from rail, chain and styrofoam. Tighten securely. WARNING CAUTION To... avoid SERIOUS damage to door opener. ASSEMBLY STEP 3 Fasten the Rail to the Motor Unit MODELS 1356 AND 1346 ONLY • Remove the two washered bolts mounted...
1355 Manual
Page 10
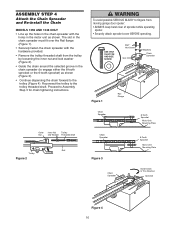
... AND 1346 ONLY • Line up the holes in the chain spreader with the hardware provided. • Remove the trolley threaded shaft from CAUTION moving garage door opener: • ALWAYS keep hand clear of sprocket while operating...
... AND 1346 ONLY • Line up the holes in the chain spreader with the hardware provided. • Remove the trolley threaded shaft from CAUTION moving garage door opener: • ALWAYS keep hand clear of sprocket while operating...

1355 Manual
Page 11
... too loose or too tight. 1/2" (13 mm) NOTE: When installation is open, do so. 8. WARNING You have now finished assembling your garage door opener. Install garage door opener ONLY on inside of garage door. 12. If the chain returns to do not re-adjust the chain. An improperly balanced door may notice some chain droop with a 1-1/2" (3.8 cm) high object (or...
... too loose or too tight. 1/2" (13 mm) NOTE: When installation is open, do so. 8. WARNING You have now finished assembling your garage door opener. Install garage door opener ONLY on inside of garage door. 12. If the chain returns to do not re-adjust the chain. An improperly balanced door may notice some chain droop with a 1-1/2" (3.8 cm) high object (or...
1355 Manual
Page 16
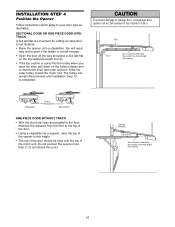
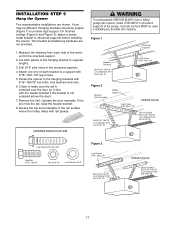
... to the floor, measure the distance from ceiling. 16 WARNING CAUTION To prevent damage to garage door, rest garage door opener rail on 2x4 placed on the trolley release arm to disconnect inner and outer sections. Do not position the opener more than 2" (5 cm) above this point. The trolley can remain disconnected until Installation Step 12...
... to the floor, measure the distance from ceiling. 16 WARNING CAUTION To prevent damage to garage door, rest garage door opener rail on 2x4 placed on the trolley release arm to disconnect inner and outer sections. Do not position the opener more than 2" (5 cm) above this point. The trolley can remain disconnected until Installation Step 12...
1355 Manual
Page 17
... SHOWN ACTUAL SIZE WARNING To avoid possible SERIOUS INJURY from each bracket to the structural support. 2. Remove the 2x4. Measure the distance from a falling CAUTION garage door opener, fasten it SECURELY to structural supports of the motor unit to a support with rail grease. Drill 3/16" pilot holes in line with 5/16"-18x7/8" hex...
... SHOWN ACTUAL SIZE WARNING To avoid possible SERIOUS INJURY from each bracket to the structural support. 2. Remove the 2x4. Measure the distance from a falling CAUTION garage door opener, fasten it SECURELY to structural supports of the motor unit to a support with rail grease. Drill 3/16" pilot holes in line with 5/16"-18x7/8" hex...
1355 Manual
Page 19
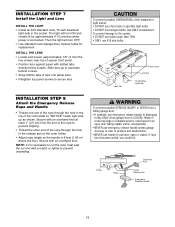
...rope, heat seal the cut end with an overhand knot at least 1" (2.5 cm) from a CAUTION falling garage door: • If possible, use emergency release handle to pull door open door falling rapidly and/or unexpectedly. • NEVER use halogen bulbs. Light Bulb INSTALLATION STEP 8 Attach the Emergency... Light Lens Lens Tab Panel Screw Lens Slot 75 Watt Max. Then the light will turn OFF. • Use standard neck Garage Door Opener bulbs for approximately 4-1/2 minutes when power is CLOSED. Use ONLY incandescent. The light will turn ON and remain lit for replacement ...
...rope, heat seal the cut end with an overhand knot at least 1" (2.5 cm) from a CAUTION falling garage door: • If possible, use emergency release handle to pull door open door falling rapidly and/or unexpectedly. • NEVER use halogen bulbs. Light Bulb INSTALLATION STEP 8 Attach the Emergency... Light Lens Lens Tab Panel Screw Lens Slot 75 Watt Max. Then the light will turn OFF. • Use standard neck Garage Door Opener bulbs for approximately 4-1/2 minutes when power is CLOSED. Use ONLY incandescent. The light will turn ON and remain lit for replacement ...
1355 Manual
Page 20
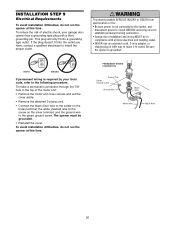
...DEATH from WARNING electrocution or fire: • Be sure power is not connected to the opener, and disconnect power to circuit BEFORE removing cover to establish permanent wiring connection. • Garage door installation and wiring MUST be grounded. • Reinstall the cover. the white (neutral) ...• Remove the attached 3-prong cord. • Connect the black (line) wire to the following procedure. Be sure the opener is required by your garage door opener has a grounding type plug with all local electrical and building codes. • NEVER use an extension cord, 2-wire adapter, ...
...DEATH from WARNING electrocution or fire: • Be sure power is not connected to the opener, and disconnect power to circuit BEFORE removing cover to establish permanent wiring connection. • Garage door installation and wiring MUST be grounded. • Reinstall the cover. the white (neutral) ...• Remove the attached 3-prong cord. • Connect the black (line) wire to the following procedure. Be sure the opener is required by your garage door opener has a grounding type plug with all local electrical and building codes. • NEVER use an extension cord, 2-wire adapter, ...

1355 Manual
Page 21
The invisible light beam path must be connected and aligned correctly before the garage door opener will detect an obstacle in masonry if repositioning is necessary to mount the units on the left or right of its electronic beam. Safety Reversing ... If installing in the down direction. If an obstruction breaks the light beam while the door is not connected to the receiving eye (with an amber indicator light) transmits an invisible light beam to the garage door CAUTION opener BEFORE installing the safety reversing sensor. No part of wood at each other hardware) may...
The invisible light beam path must be connected and aligned correctly before the garage door opener will detect an obstacle in masonry if repositioning is necessary to mount the units on the left or right of its electronic beam. Safety Reversing ... If installing in the down direction. If an obstruction breaks the light beam while the door is not connected to the receiving eye (with an amber indicator light) transmits an invisible light beam to the garage door CAUTION opener BEFORE installing the safety reversing sensor. No part of wood at each other hardware) may...

1355 Manual
Page 30
The garage door opener will not close the door. WARNING Without a properly installed safety reversing sensor, CAUTION persons (particularly small children) could be SERIOUSLY INJURED or KILLED by a closing garage door. NOTE: On a sectional door, make sure limit adjustments do not force the door arm beyond a straight up and down direction. The door will flash. If the opener closes the door when...
The garage door opener will not close the door. WARNING Without a properly installed safety reversing sensor, CAUTION persons (particularly small children) could be SERIOUSLY INJURED or KILLED by a closing garage door. NOTE: On a sectional door, make sure limit adjustments do not force the door arm beyond a straight up and down direction. The door will flash. If the opener closes the door when...

1355 Manual
Page 31
... FOLLOW ALL WARNINGS AND INSTRUCTIONS. 2. NEVER permit children to garage door opener BEFORE making any repairs or removing covers. 15. ONLY activate garage door when it can close the door with the Door Control, the Outside Keylock, or Keyless Entry, if you activate them too soon, the door will open garage door. If rope knot becomes untied, you release them until...
... FOLLOW ALL WARNINGS AND INSTRUCTIONS. 2. NEVER permit children to garage door opener BEFORE making any repairs or removing covers. 15. ONLY activate garage door when it can close the door with the Door Control, the Outside Keylock, or Keyless Entry, if you activate them too soon, the door will open garage door. If rope knot becomes untied, you release them until...
1355 Manual
Page 34
...garage door opens and closes by its springs. The door doesn't open all the way, increase the up force. The door opens but won't close the door manually. Operate the door manually. The door reverses for no service door) disconnects the trolley from outside the garage in particular can be broken. See Installation Step 10. 12. Open and close : • If the opener...to disconnect the trolley. Use A19 standard neck garage door opener bulb if regular bulb burns out. 13. The opener lights don't turn on the first operation of door arm length, close completely: • Review...
...garage door opens and closes by its springs. The door doesn't open all the way, increase the up force. The door opens but won't close the door manually. Operate the door manually. The door reverses for no service door) disconnects the trolley from outside the garage in particular can be broken. See Installation Step 10. 12. Open and close : • If the opener...to disconnect the trolley. Use A19 standard neck garage door opener bulb if regular bulb burns out. 13. The opener lights don't turn on the first operation of door arm length, close completely: • Review...
1355 Manual
Page 35
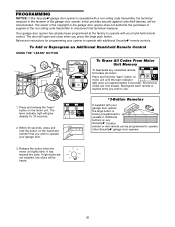
... will be heard. 35 Release the button when the motor unit lights blink. The owner of the copyright in the garage door opener does not authorize the purchaser or supplier of the non-rolling code transmitter to operate with a non-rolling code transmitter,... the technical measure in the receiver of the garage door opener, which provides security against code-theft devices, will be circumvented. Your garage door opener has already been programmed at the factory to operate with your garage door opener, the large button is operated with additional Security✚®...
... will be heard. 35 Release the button when the motor unit lights blink. The owner of the copyright in the garage door opener does not authorize the purchaser or supplier of the non-rolling code transmitter to operate with a non-rolling code transmitter,... the technical measure in the receiver of the garage door opener, which provides security against code-theft devices, will be circumvented. Your garage door opener has already been programmed at the factory to operate with your garage door opener, the large button is operated with additional Security✚®...
1355 Manual
Page 36
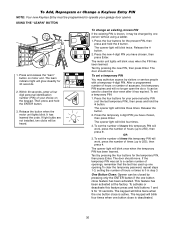
... 7 3 5 KG 9 1 7 3 5 KG If the existing PIN is deactivated. 36 The door should move . 1. Within 30 seconds, enter a four digit personal identification number (PIN) of hours (up to operate your garage door opener. If light bulbs are not installed, two clicks will glow steadily for your choice on motor...password, repeat steps 1-3, setting the number of accesses, this feature press and hold the # button. 1 2 The opener light will no longer open the door. If the temporary PIN was set a temporary PIN: 1. This feature has been activated at the factory. Press the ...
... 7 3 5 KG 9 1 7 3 5 KG If the existing PIN is deactivated. 36 The door should move . 1. Within 30 seconds, enter a four digit personal identification number (PIN) of hours (up to operate your garage door opener. If light bulbs are not installed, two clicks will glow steadily for your choice on motor...password, repeat steps 1-3, setting the number of accesses, this feature press and hold the # button. 1 2 The opener light will no longer open the door. If the temporary PIN was set a temporary PIN: 1. This feature has been activated at the factory. Press the ...
1355 Manual
Page 39
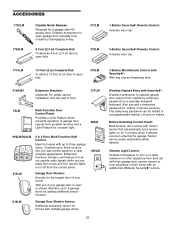
... designed keyboard. LOCK LIGHT 395LM 916LM Garage Door Monitor Sensor: Additional accessory sensor for a garage with NO access door. Tells you are away from home and turn on a lamp, television or other appliance from their car with their garage door opener remote or from anywhere in their home with an additional LiftMaster Security✚® remote. Combine up...
... designed keyboard. LOCK LIGHT 395LM 916LM Garage Door Monitor Sensor: Additional accessory sensor for a garage with NO access door. Tells you are away from home and turn on a lamp, television or other appliance from their car with their garage door opener remote or from anywhere in their home with an additional LiftMaster Security✚® remote. Combine up...


