1355 Manual
Page 1
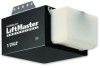
The Chamberlain Group, Inc. 845 Larch Avenue Elmhurst, Illinois 60126-1196 www.liftmaster.com ® GARAGE DOOR OPENER Model Series 1300 For Residential Use Only Model 1356 - 1/2HP Model 1346 - 1/3HP Model 1355 - 1/2HP Model 1345 - 1/3HP Owner's Manual ■ Please read this manual and the enclosed safety materials carefully! ■ Fasten the manual near the garage ... unless the Protector System® is connected and properly aligned. ■ Periodic checks of the opener are required to ensure safe operation. ■ The model number label is located on the front panel of your opener.
The Chamberlain Group, Inc. 845 Larch Avenue Elmhurst, Illinois 60126-1196 www.liftmaster.com ® GARAGE DOOR OPENER Model Series 1300 For Residential Use Only Model 1356 - 1/2HP Model 1346 - 1/3HP Model 1355 - 1/2HP Model 1345 - 1/3HP Owner's Manual ■ Please read this manual and the enclosed safety materials carefully! ■ Fasten the manual near the garage ... unless the Protector System® is connected and properly aligned. ■ Periodic checks of the opener are required to ensure safe operation. ■ The model number label is located on the front panel of your opener.
1355 Manual
Page 4
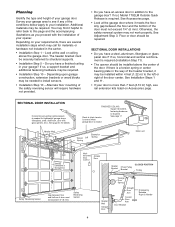
... securely fastened to the garage door? Slack in your garage door. Depending on Accessories page. If so, horizontal and vertical reinforcement is required. If not, Model 1702LM Outside Quick Release is required (Installation Step 11). • The opener should be installed above the garage door. Do you proceed with glass panels...
... securely fastened to the garage door? Slack in your garage door. Depending on Accessories page. If so, horizontal and vertical reinforcement is required. If not, Model 1702LM Outside Quick Release is required (Installation Step 11). • The opener should be installed above the garage door. Do you proceed with glass panels...
1355 Manual
Page 6
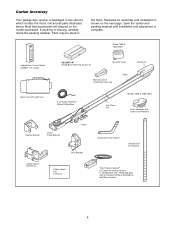
If anything is complete. Hardware for assembly and installation is shown on the model purchased. Model 1355 & 1345 ONLY Lighted Door Control Button w/6ABx1-1/2" screws SECURITY✚® Single-Button Remote Control (1) Sprocket Cover Remote Control Transmitter...White/Red CEILING MOUNT ONLY UP Header Bracket Chain Pulley Bracket Trolley Safety Sensor Bracket (2) Door Bracket Safety Labels and Literature One-Piece Rail Models 1346 & 1356 ONLY Chain Spreader with Screws and Washers Curved Door Arm Section Straight Door Arm Section The Protector System® (2) Safety Reversing...
If anything is complete. Hardware for assembly and installation is shown on the model purchased. Model 1355 & 1345 ONLY Lighted Door Control Button w/6ABx1-1/2" screws SECURITY✚® Single-Button Remote Control (1) Sprocket Cover Remote Control Transmitter...White/Red CEILING MOUNT ONLY UP Header Bracket Chain Pulley Bracket Trolley Safety Sensor Bracket (2) Door Bracket Safety Labels and Literature One-Piece Rail Models 1346 & 1356 ONLY Chain Spreader with Screws and Washers Curved Door Arm Section Straight Door Arm Section The Protector System® (2) Safety Reversing...
1355 Manual
Page 8
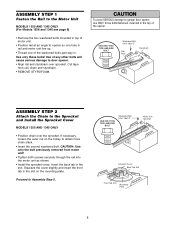
Use of any other bolts will cause serious damage to the Sprocket and Install the Sprocket Cover MODELS 1355 AND 1345 ONLY • Position chain over sprocket. Cut tape from motor unit! • Tighten both screws securely through the rail into the motor unit ... motor unit line up. • Thread one of the washered bolts part way in. ASSEMBLY STEP 1 Fasten the Rail to the Motor Unit MODELS 1355 AND 1345 ONLY (For Models 1356 and 1346 see page 9) • Remove the two washered bolts mounted in top of motor unit. • Position rail at an angle...
Use of any other bolts will cause serious damage to the Sprocket and Install the Sprocket Cover MODELS 1355 AND 1345 ONLY • Position chain over sprocket. Cut tape from motor unit! • Tighten both screws securely through the rail into the motor unit ... motor unit line up. • Thread one of the washered bolts part way in. ASSEMBLY STEP 1 Fasten the Rail to the Motor Unit MODELS 1355 AND 1345 ONLY (For Models 1356 and 1346 see page 9) • Remove the two washered bolts mounted in top of motor unit. • Position rail at an angle...
1355 Manual
Page 9
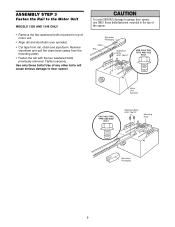
... tape from the mounting plate). • Fasten the rail with the two washered bolts previously removed. ASSEMBLY STEP 3 Fasten the Rail to the Motor Unit MODELS 1356 AND 1346 ONLY • Remove the two washered bolts mounted in the top of the opener.
... tape from the mounting plate). • Fasten the rail with the two washered bolts previously removed. ASSEMBLY STEP 3 Fasten the Rail to the Motor Unit MODELS 1356 AND 1346 ONLY • Remove the two washered bolts mounted in the top of the opener.
1355 Manual
Page 10
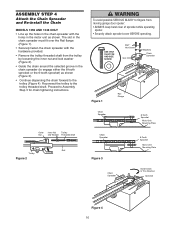
... dispensing the chain forward to the trolley (Figure 4). Proceed to the trolley threaded shaft. ASSEMBLY STEP 4 Attach the Chain Spreader and Re-install the Chain MODELS 1356 AND 1346 ONLY • Line up the holes in the chain spreader with the hardware provided. • Remove the trolley threaded shaft from CAUTION...
... dispensing the chain forward to the trolley (Figure 4). Proceed to the trolley threaded shaft. ASSEMBLY STEP 4 Attach the Chain Spreader and Re-install the Chain MODELS 1356 AND 1346 ONLY • Line up the holes in the chain spreader with the hardware provided. • Remove the trolley threaded shaft from CAUTION...

1355 Manual
Page 11
... warning label on properly balanced and lubricated garage door. ASSEMBLY STEP 5 Tighten the Chain Outer Nut To Tighten Outer Nut Lock Washer Inner Nut ALL MODELS • Spin the inner nut and lock washer down the trolley threaded shaft, away from ALL moving parts of the door. 10. AS YOU TURN...
... warning label on properly balanced and lubricated garage door. ASSEMBLY STEP 5 Tighten the Chain Outer Nut To Tighten Outer Nut Lock Washer Inner Nut ALL MODELS • Spin the inner nut and lock washer down the trolley threaded shaft, away from ALL moving parts of the door. 10. AS YOU TURN...
1355 Manual
Page 33
... WARNING panel.) Repeat with FCC Standards FOR HOME OR OFFICE USE. Battery positive side up of home: • If operational noise is disturbing in your model has the Lock feature, make sure it replaced. • Repeated operation may be sure the antenna on page 11. • Is there a build-up (+) NOTICE...
... WARNING panel.) Repeat with FCC Standards FOR HOME OR OFFICE USE. Battery positive side up of home: • If operational noise is disturbing in your model has the Lock feature, make sure it replaced. • Repeated operation may be sure the antenna on page 11. • Is there a build-up (+) NOTICE...

1355 Manual
Page 40
... THE IMPLIED WARRANTIES WITH RESPECT TO THE MOTOR, WHICH ARE LIMITED IN DURATION TO THE 48 MONTHS (4 YEARS) FOR MODELS 1356 & 1355 AND 24 MONTHS (2 YEARS) FOR MODELS 1346 & 1345 LIMITED WARRANTY PERIOD FOR THE MOTOR], AND NO IMPLIED WARRANTIES WILL EXIST OR APPLY AFTER SUCH PERIOD. ...at prevailing prices and you will be advised of 48 months (4years) for models 1356 & 1355 and 24 months (2 years) for warranty repair. You will be billed accordingly. The proper operation of purchase]. LIFTMASTER® SERVICE IS ON CALL OUR LARGE SERVICE ORGANIZATION SPANS AMERICA INSTALLATION AND ...
... THE IMPLIED WARRANTIES WITH RESPECT TO THE MOTOR, WHICH ARE LIMITED IN DURATION TO THE 48 MONTHS (4 YEARS) FOR MODELS 1356 & 1355 AND 24 MONTHS (2 YEARS) FOR MODELS 1346 & 1345 LIMITED WARRANTY PERIOD FOR THE MOTOR], AND NO IMPLIED WARRANTIES WILL EXIST OR APPLY AFTER SUCH PERIOD. ...at prevailing prices and you will be advised of 48 months (4years) for models 1356 & 1355 and 24 months (2 years) for warranty repair. You will be billed accordingly. The proper operation of purchase]. LIFTMASTER® SERVICE IS ON CALL OUR LARGE SERVICE ORGANIZATION SPANS AMERICA INSTALLATION AND ...


