1355 Manual
Page 1
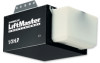
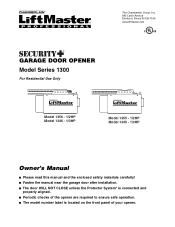
... Avenue Elmhurst, Illinois 60126-1196 www.liftmaster.com ® GARAGE DOOR OPENER Model Series 1300 For Residential Use Only Model 1356 - 1/2HP Model 1346 - 1/3HP Model 1355 - 1/2HP Model 1345 - 1/3HP Owner's Manual ■ Please read this manual and the enclosed safety materials carefully! ■ Fasten the manual near the garage door after installation. ■...
... Avenue Elmhurst, Illinois 60126-1196 www.liftmaster.com ® GARAGE DOOR OPENER Model Series 1300 For Residential Use Only Model 1356 - 1/2HP Model 1346 - 1/3HP Model 1355 - 1/2HP Model 1345 - 1/3HP Owner's Manual ■ Please read this manual and the enclosed safety materials carefully! ■ Fasten the manual near the garage door after installation. ■...

1355 Manual
Page 2
... 30 Operation 31-34 Operation safety instructions 31 Using your garage door opener 31 Using the wall-mounted door control 32 To open the door manually 32 Care of your garage door opener 33 Having a problem 34 Programming 35-36 To add or reprogram a hand-held remote control .....35 To erase... will alert you to the possibility of damage to offer safe service provided it . WARNING Mechanical WCAAURTNIOINNG WEAleRctNricINal G WARNING CAUTION WARNING When you see this manual. WARNING The hazard may come from something mechanical or from electric shock.
... 30 Operation 31-34 Operation safety instructions 31 Using your garage door opener 31 Using the wall-mounted door control 32 To open the door manually 32 Care of your garage door opener 33 Having a problem 34 Programming 35-36 To add or reprogram a hand-held remote control .....35 To erase... will alert you to the possibility of damage to offer safe service provided it . WARNING Mechanical WCAAURTNIOINNG WEAleRctNricINal G WARNING CAUTION WARNING When you see this manual. WARNING The hazard may come from something mechanical or from electric shock.

1355 Manual
Page 11
... garage door control. 11. NEVER wear watches, rings or loose clothing while installing or servicing opener. Place entrapment warning label on the floor. 11 Place manual release/safety reverse test label in the direction shown. Upon completion of Rail NOTE: During future maintenance, ALWAYS pull the emergency release handle to do...
... garage door control. 11. NEVER wear watches, rings or loose clothing while installing or servicing opener. Place entrapment warning label on the floor. 11 Place manual release/safety reverse test label in the direction shown. Upon completion of Rail NOTE: During future maintenance, ALWAYS pull the emergency release handle to do...
1355 Manual
Page 17
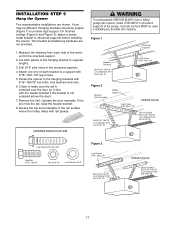
Hanging brackets should be different. Fasten the opener to structural supports before installing the opener. Operate the door manually. HARDWARE SHOWN ACTUAL SIZE WARNING To avoid possible SERIOUS INJURY from each bracket to make sure the rail is centered over the door (or in ...
Hanging brackets should be different. Fasten the opener to structural supports before installing the opener. Operate the door manually. HARDWARE SHOWN ACTUAL SIZE WARNING To avoid possible SERIOUS INJURY from each bracket to make sure the rail is centered over the door (or in ...
1355 Manual
Page 18
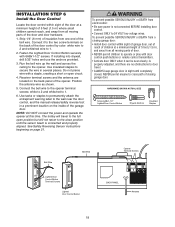
... to the full open circuit. 4. Use tacks or staples to permanently attach the entrapment warning label to the wall near the door control, and the manual release/safety reverse test in several places. Strip 1/4" (6 mm) of door. • NEVER permit children to operate or play with door control push buttons or...
... to the full open circuit. 4. Use tacks or staples to permanently attach the entrapment warning label to the wall near the door control, and the manual release/safety reverse test in several places. Strip 1/4" (6 mm) of door. • NEVER permit children to operate or play with door control push buttons or...
1355 Manual
Page 27
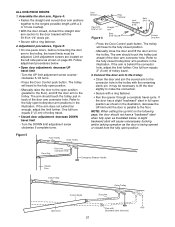
...Open Door Door with a 2 or 3 hole overlap). • With the door closed position. - Turn the UP limit adjustment screw counterclockwise 5-1/2 turns. - Manually raise the door to make the connection. • Secure with a ring fastener. • Run the opener through a complete travel limit - The trolley will cause... positions in back of the door arm connector hole. ALL ONE-PIECE DOORS 1. Turn the DOWN limit adjustment screw clockwise 5 complete turns. Manually close the door and lift the door arm to the trolley, the travel . 3. NOTE: When setting the up limit on the left ...
...Open Door Door with a 2 or 3 hole overlap). • With the door closed position. - Turn the UP limit adjustment screw counterclockwise 5-1/2 turns. - Manually raise the door to make the connection. • Secure with a ring fastener. • Run the opener through a complete travel limit - The trolley will cause... positions in back of the door arm connector hole. ALL ONE-PIECE DOORS 1. Turn the DOWN limit adjustment screw clockwise 5 complete turns. Manually close the door and lift the door arm to the trolley, the travel . 3. NOTE: When setting the up limit on the left ...
1355 Manual
Page 28
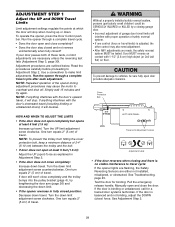
... of 2-4" (5-10 cm) between the trolley and the bolt. • If door does not open at least 5 feet (1.5 m): Adjust the UP (open and close ) force. Manually open ) force as explained in fully closed ? Turn the UP limit adjustment screw clockwise. Use a screwdriver to travel cycle: If the opener lights are flashing...
... of 2-4" (5-10 cm) between the trolley and the bolt. • If door does not open at least 5 feet (1.5 m): Adjust the UP (open and close ) force. Manually open ) force as explained in fully closed ? Turn the UP limit adjustment screw clockwise. Use a screwdriver to travel cycle: If the opener lights are flashing...
1355 Manual
Page 32
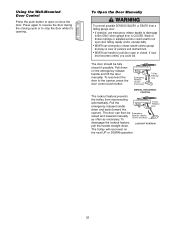
... as necessary. To reconnect the door to stop the door while it's opening. Emergency Release Handle (Pull Down) Trolley Release Arm NOTICE MANUAL DISCONNECT POSITION The lockout feature prevents the trolley from a CAUTION falling garage door: • If possible, use emergency release handle to disengage... down on the next UP or DOWN operation. 32 Weak or broken springs or unbalanced door could fall. To Open the Door Manually WARNING To prevent possible SERIOUS INJURY or DEATH from reconnecting automatically, Pull the emergency release handle Trolley Release Arm down . The door...
... as necessary. To reconnect the door to stop the door while it's opening. Emergency Release Handle (Pull Down) Trolley Release Arm NOTICE MANUAL DISCONNECT POSITION The lockout feature prevents the trolley from a CAUTION falling garage door: • If possible, use emergency release handle to disengage... down on the next UP or DOWN operation. 32 Weak or broken springs or unbalanced door could fall. To Open the Door Manually WARNING To prevent possible SERIOUS INJURY or DEATH from reconnecting automatically, Pull the emergency release handle Trolley Release Arm down . The door...
1355 Manual
Page 33
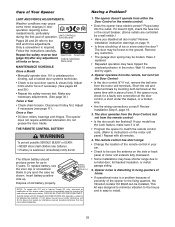
... if necessary. (See pages 28 and 29.) • Repeat the safety reverse test. Dispose of limits or force. (Back panel) MAINTENANCE SCHEDULE Once a Month • Manually operate door. LIMIT CONTROLS (Left side panel) Pages 28 and 29 refer to install. 33 Disconnect trolley first. The lithium battery should produce power for...
... if necessary. (See pages 28 and 29.) • Repeat the safety reverse test. Dispose of limits or force. (Back panel) MAINTENANCE SCHEDULE Once a Month • Manually operate door. LIMIT CONTROLS (Left side panel) Pages 28 and 29 refer to install. 33 Disconnect trolley first. The lithium battery should produce power for...
1355 Manual
Page 34
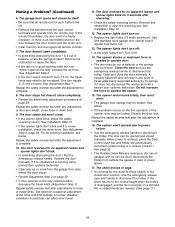
... safety reverse test after the adjustment is disengaged, and the door reverses on the first operation of power failure. 17. Operate the door manually. If it out of door arm length, close completely: • Review the travel limits. Remove any ice or snow from the garage... closed position, decrease the travel while being supported entirely by itself: • Be sure that all remote controls. 7. Is it is in the fully closed manually. The opener lights don't turn on ? Disable the door lock. Having a Problem? (Continued) 6. The opener lights don't turn off . •...
... safety reverse test after the adjustment is disengaged, and the door reverses on the first operation of power failure. 17. Operate the door manually. If it out of door arm length, close completely: • Review the travel limits. Remove any ice or snow from the garage... closed position, decrease the travel while being supported entirely by itself: • Be sure that all remote controls. 7. Is it is in the fully closed manually. The opener lights don't turn on ? Disable the door lock. Having a Problem? (Continued) 6. The opener lights don't turn off . •...

1355 Manual
Page 37
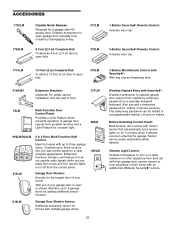
... Straight door arm section 11 178B35 Curved door arm section 12 41A5266-1 Safety sensor brackets (2) Not shown 41A2770-6 Installation hardware bag (see page 7). 114A3072 Owner's manual 114A3072SP Owner...
... Straight door arm section 11 178B35 Curved door arm section 12 41A5266-1 Safety sensor brackets (2) Not shown 41A2770-6 Installation hardware bag (see page 7). 114A3072 Owner's manual 114A3072SP Owner...
1355 Manual
Page 39
Enables homeowner to open garage door manually from home and turn on a specially designed keyboard. This temporary password can be easily deactivated when desired. Remote Light Control: Enables homeowner to a programmable number ... for homes with up to three controls into one wall control panel for homes with multiple garage doors. 39 Wireless Keyless Entry with an additional LiftMaster Security✚® remote.
Enables homeowner to open garage door manually from home and turn on a specially designed keyboard. This temporary password can be easily deactivated when desired. Remote Light Control: Enables homeowner to a programmable number ... for homes with up to three controls into one wall control panel for homes with multiple garage doors. 39 Wireless Keyless Entry with an additional LiftMaster Security✚® remote.


