
User's Guide
Page 2
The safety features of specific Lexmark components. For complete descriptions: • Windows users-See the User's Guide. • Macintosh users-If your product supports Macintosh, see the Mac Help installed with the use of other than those described in the user documentation, to meet strict global ...or make any electrical or cabling connections, such as the power supply cord or telephone, during a lightning storm. SAVE THESE INSTRUCTIONS. Lexmark is not responsible for the use of some parts may not always be obvious. Refer service or repairs, other replacement parts. Connect...
The safety features of specific Lexmark components. For complete descriptions: • Windows users-See the User's Guide. • Macintosh users-If your product supports Macintosh, see the Mac Help installed with the use of other than those described in the user documentation, to meet strict global ...or make any electrical or cabling connections, such as the power supply cord or telephone, during a lightning storm. SAVE THESE INSTRUCTIONS. Lexmark is not responsible for the use of some parts may not always be obvious. Refer service or repairs, other replacement parts. Connect...
User's Guide
Page 4
...an image as a multiple-page poster 30 Maintaining the printer 31 Changing print cartridges...31 Removing a used print cartridge...31 Installing print cartridges...32 Achieving better print quality...33 Improving print quality ...33 Aligning the print cartridges ...33 Cleaning the print cartridge... print cartridges...35 Ordering supplies...35 Using genuine Lexmark print cartridges 36 Refilling a print cartridge...37 Recycling Lexmark products...37 Troubleshooting...38 Setup troubleshooting...38 Power light is not lit...38 Software does not install ...38 Page does not print ...39 Print ...
...an image as a multiple-page poster 30 Maintaining the printer 31 Changing print cartridges...31 Removing a used print cartridge...31 Installing print cartridges...32 Achieving better print quality...33 Improving print quality ...33 Aligning the print cartridges ...33 Cleaning the print cartridge... print cartridges...35 Ordering supplies...35 Using genuine Lexmark print cartridges 36 Refilling a print cartridge...37 Recycling Lexmark products...37 Troubleshooting...38 Setup troubleshooting...38 Power light is not lit...38 Software does not install ...38 Page does not print ...39 Print ...
User's Guide
Page 8
...; Faxing (if supported by drive. Tips Œ Help, or Help Œ Help Topics. It installs with photos If the link to the User's Guide is included on To access the Lexmark Solution Center: your CD-ROM • Connecting the printer to a network (if supported by your printer...) • Maintaining the printer The installation screen appears. site at www.lexmark.com. scanning, faxing, paper jams, and misfeeds 3 Click Yes. Help Description Where to find The Help gives you instructions for...
...; Faxing (if supported by drive. Tips Œ Help, or Help Œ Help Topics. It installs with photos If the link to the User's Guide is included on To access the Lexmark Solution Center: your CD-ROM • Connecting the printer to a network (if supported by your printer...) • Maintaining the printer The installation screen appears. site at www.lexmark.com. scanning, faxing, paper jams, and misfeeds 3 Click Yes. Help Description Where to find The Help gives you instructions for...
User's Guide
Page 11
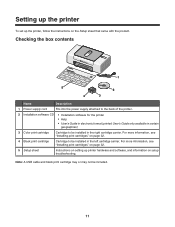
...electronic format (printed User's Guide only available in certain geographies) 3 Color print cartridge Cartridge to be installed in the right cartridge carrier. For more information, see "Installing print cartridges" on the Setup sheet that came with the product. Setting up the printer To set up... printer hardware and software, and information on setup troubleshooting. For more information, see "Installing print cartridges" on page 32. 5 Setup sheet Instructions on setting up the printer, follow the instructions on page 32. 4 Black...
...electronic format (printed User's Guide only available in certain geographies) 3 Color print cartridge Cartridge to be installed in the right cartridge carrier. For more information, see "Installing print cartridges" on the Setup sheet that came with the product. Setting up the printer To set up... printer hardware and software, and information on setup troubleshooting. For more information, see "Installing print cartridges" on page 32. 5 Setup sheet Instructions on setting up the printer, follow the instructions on page 32. 4 Black...
User's Guide
Page 12
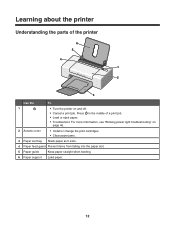
... or eject paper. • Troubleshoot. Press in the middle of the printer 6 5 4 1 2 3 Use the To 1 • Turn the printer on page 46. 2 Access cover • Install or change the print cartridges. • Clear paper jams. 3 Paper exit tray Stack paper as it exits. 4 Paper feed guard Prevent items from falling into...
... or eject paper. • Troubleshoot. Press in the middle of the printer 6 5 4 1 2 3 Use the To 1 • Turn the printer on page 46. 2 Access cover • Install or change the print cartridges. • Clear paper jams. 3 Paper exit tray Stack paper as it exits. 4 Paper feed guard Prevent items from falling into...
User's Guide
Page 16
You can • Learn tips about the current status. • Solve printer problems. • Install a new print cartridge. • View shopping options for new cartridges. • Print a test page. • Clean to fix horizontal streaks. • Align to fix blurry ...
You can • Learn tips about the current status. • Solve printer problems. • Install a new print cartridge. • View shopping options for new cartridges. • Print a test page. • Clean to fix horizontal streaks. • Align to fix blurry ...
User's Guide
Page 32
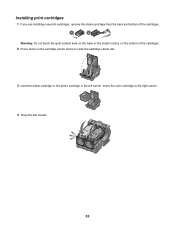
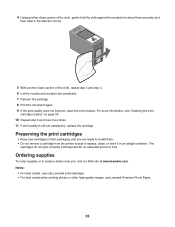
Insert the color cartridge in the left carrier. Installing print cartridges 1 If you are installing new print cartridges, remove the sticker and tape from the back and bottom of the cartridges. 1 2 Warning: Do not touch the gold contact area on the back or the metal nozzles on the bottom of the cartridges. 2 Press down on the cartridge carrier levers to raise the cartridge carrier lids. 3 Insert the black cartridge or the photo cartridge in the right carrier. 4 Snap the lids closed. 32
Insert the color cartridge in the left carrier. Installing print cartridges 1 If you are installing new print cartridges, remove the sticker and tape from the back and bottom of the cartridges. 1 2 Warning: Do not touch the gold contact area on the back or the metal nozzles on the bottom of the cartridges. 2 Press down on the cartridge carrier levers to raise the cartridge carrier lids. 3 Insert the black cartridge or the photo cartridge in the right carrier. 4 Snap the lids closed. 32
User's Guide
Page 33
Use Lexmark Premium Photo Paper if you want, follow these steps: 1 Align the print cartridges. For more information, see "Aligning the print cartridges" on page 34. If ... quality has not improved, continue to step 4. 4 Wipe the print nozzles and contacts. For more information, see "Removing a used print cartridge" on page 31 and "Installing print cartridges" on page 34. For more information, see "Ordering supplies" on page 35.
Use Lexmark Premium Photo Paper if you want, follow these steps: 1 Align the print cartridges. For more information, see "Aligning the print cartridges" on page 34. If ... quality has not improved, continue to step 4. 4 Wipe the print nozzles and contacts. For more information, see "Removing a used print cartridge" on page 31 and "Installing print cartridges" on page 34. For more information, see "Ordering supplies" on page 35.
User's Guide
Page 35
... two more information, see "Cleaning the print cartridge nozzles" on page 34. 10 Repeat step 9 up to locate a dealer near you are ready to install them. • Do not remove a cartridge from the printer except to replace, clean, or store it in the direction shown. 5 With another clean ...improve, clean the print nozzles. Preserving the print cartridges • Keep new cartridges in their packaging until you , visit our Web site at www.lexmark.com. The cartridges do not print correctly if left exposed for about three seconds, and then wipe in an airtight container. Notes: • ...
... two more information, see "Cleaning the print cartridge nozzles" on page 34. 10 Repeat step 9 up to locate a dealer near you are ready to install them. • Do not remove a cartridge from the printer except to replace, clean, or store it in the direction shown. 5 With another clean ...improve, clean the print nozzles. Preserving the print cartridges • Keep new cartridges in their packaging until you , visit our Web site at www.lexmark.com. The cartridges do not print correctly if left exposed for about three seconds, and then wipe in an airtight container. Notes: • ...
User's Guide
Page 38
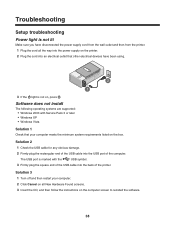
... all New Hardware Found screens. 3 Insert the CD, and then follow the instructions on the computer screen to reinstall the software. 38 Software does not install The following operating systems are supported: • Windows 2000 with the USB symbol. 3 Firmly plug the square end of the USB cable into the back...
... all New Hardware Found screens. 3 Insert the CD, and then follow the instructions on the computer screen to reinstall the software. 38 Software does not install The following operating systems are supported: • Windows 2000 with the USB symbol. 3 Firmly plug the square end of the USB cable into the back...
User's Guide
Page 39
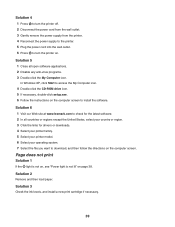
Solution 6 1 Visit our Web site at www.lexmark.com to download, and then follow the directions on the computer screen....applications. 2 Disable any anti-virus programs. 3 Double-click the My Computer icon. Solution 3 Check the ink levels, and install a new print cartridge if necessary. 39 Solution 2 Remove and then load paper. In Windows XP, click Start to access the...the printer. 4 Reconnect the power supply to the printer. 5 Plug the power cord into the wall outlet. 6 Press to install the software. Page does not print Solution 1 If the light is not on, see "Power light is not lit" on...
Solution 6 1 Visit our Web site at www.lexmark.com to download, and then follow the directions on the computer screen....applications. 2 Disable any anti-virus programs. 3 Double-click the My Computer icon. Solution 3 Check the ink levels, and install a new print cartridge if necessary. 39 Solution 2 Remove and then load paper. In Windows XP, click Start to access the...the printer. 4 Reconnect the power supply to the printer. 5 Plug the power cord into the wall outlet. 6 Press to install the software. Page does not print Solution 1 If the light is not on, see "Power light is not lit" on...
User's Guide
Page 40
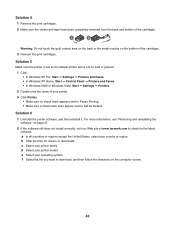
... not touch the gold contact area on the back or the metal nozzles on page 47. 2 If the software still does not install correctly, visit our Web site at www.lexmark.com to Set As Default. For more information, see "Removing and reinstalling the software" on the bottom of the cartridges. 3 Reinsert...
... not touch the gold contact area on the back or the metal nozzles on page 47. 2 If the software still does not install correctly, visit our Web site at www.lexmark.com to Set As Default. For more information, see "Removing and reinstalling the software" on the bottom of the cartridges. 3 Reinsert...
User's Guide
Page 41
... bright white, or coated. • Select a higher print quality. For more information, see "Removing a used print cartridge" on page 31 and "Installing print cartridges" on page 32. Print speed is slow Solution 1 Close all applications not in the document. Solution 5 1 From the software application, click..., see "Cleaning the print cartridge nozzles" on page 33. For more information, see "Aligning the print cartridges" on page 34. Use Lexmark Premium Photo Paper if you are not satisfied with your computer. Solution 2 Try minimizing the number and size of a document, make sure you...
... bright white, or coated. • Select a higher print quality. For more information, see "Removing a used print cartridge" on page 31 and "Installing print cartridges" on page 32. Print speed is slow Solution 1 Close all applications not in the document. Solution 5 1 From the software application, click..., see "Cleaning the print cartridge nozzles" on page 33. For more information, see "Aligning the print cartridges" on page 34. Use Lexmark Premium Photo Paper if you are not satisfied with your computer. Solution 2 Try minimizing the number and size of a document, make sure you...
User's Guide
Page 42
.... 4 Click Borderless. f Select the file you want to check for the latest software. Poor quality at www.lexmark.com to download, and follow the directions on page 47. 2 If the software still does not install correctly, visit our Web site at the edges of the page Solution 1 Unless you are using the...
.... 4 Click Borderless. f Select the file you want to check for the latest software. Poor quality at www.lexmark.com to download, and follow the directions on page 47. 2 If the software still does not install correctly, visit our Web site at the edges of the page Solution 1 Unless you are using the...
User's Guide
Page 43
... dark bands in print • Skewed lines • Smudges • Streaks • White lines in print Solution 1 Check the ink levels, and install a new print cartridge if necessary. Solution 3 To avoid ink smudging when you are working with the following media, remove each sheet as it exits, ... for drivers and downloads. 43 Solution 2 See "Improving print quality" on page 47. 2 If the software still does not install correctly, visit our Web site at www.lexmark.com to dry. Solution 5 Use only new, unwrinkled paper. Poor text and graphic quality Examples of paper. a In all ...
... dark bands in print • Skewed lines • Smudges • Streaks • White lines in print Solution 1 Check the ink levels, and install a new print cartridge if necessary. Solution 3 To avoid ink smudging when you are working with the following media, remove each sheet as it exits, ... for drivers and downloads. 43 Solution 2 See "Improving print quality" on page 47. 2 If the software still does not install correctly, visit our Web site at www.lexmark.com to dry. Solution 5 Use only new, unwrinkled paper. Poor text and graphic quality Examples of paper. a In all ...

User's Guide
Page 46
...the paper jam. Black cartridge replacement required A new black print cartridge needs to be installed. For more paper. Load more information, see "Removing a used print cartridge" on page 31 and "Installing print cartridges" on page 35 in your computer screen. Power light blinks rapidly There ...needs to be replaced soon. You can also see "Removing a used print cartridge" on page 31 and "Installing print cartridges" on page 32. 3 Print again. Follow these steps to be installed. 6 Select Portrait or Landscape. 7 Click OK. 8 Click OK or Print. Cartridge Alert One of a...
...the paper jam. Black cartridge replacement required A new black print cartridge needs to be installed. For more paper. Load more information, see "Removing a used print cartridge" on page 31 and "Installing print cartridges" on page 35 in your computer screen. Power light blinks rapidly There ...needs to be replaced soon. You can also see "Removing a used print cartridge" on page 31 and "Installing print cartridges" on page 32. 3 Print again. Follow these steps to be installed. 6 Select Portrait or Landscape. 7 Click OK. 8 Click OK or Print. Cartridge Alert One of a...

User's Guide
Page 47
... Color cartridge replacement required New print cartridges need to remove and reinstall the printer software. 1 Click Start ΠPrograms or All Programs ΠLexmark 1300 Series. 2 Select Uninstall. 3 Follow the instructions on the computer screen to remove the printer software. 4 Restart the computer before reinstalling the... the instructions on page 35 in the middle of paper in this guide. Note: If the install screen does not appear automatically after you may need to be installed. Follow these steps to replace the color print cartridge in this guide. The print job has ...
... Color cartridge replacement required New print cartridges need to remove and reinstall the printer software. 1 Click Start ΠPrograms or All Programs ΠLexmark 1300 Series. 2 Select Uninstall. 3 Follow the instructions on the computer screen to remove the printer software. 4 Restart the computer before reinstalling the... the instructions on page 35 in the middle of paper in this guide. Note: If the install screen does not appear automatically after you may need to be installed. Follow these steps to replace the color print cartridge in this guide. The print job has ...
User's Guide
Page 50
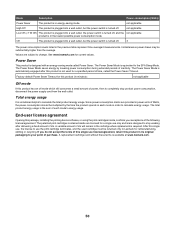
not applicable High Off The product is plugged into a wall outlet, but the power switch is in energy-saving mode. Mode Description Power consumption (Watts) Power Saver The product is turned off. not applicable Low Off (
not applicable High Off The product is plugged into a wall outlet, but the power switch is in energy-saving mode. Mode Description Power consumption (Watts) Power Saver The product is turned off. not applicable Low Off (
User's Guide
Page 51
...Photo Library 14 C cards printing 23 Cartridge Alert 46 cartridge, print cleaning 34 removing 31 wiping 34 cartridges, print aligning 33 installing 32 preserving 35 cleaning print cartridge nozzles 34 coated paper, loading 20 collating copies 24 Color cartridge replacement required 46 Contact Information...Library 14 Imaging Studio, using 14 index cards loading 20 printing 23 information, finding 7 ink levels, checking 15 ink, ordering 15 installing print cartridges 32 printer software 47 iron-on transfers, loading 20 iron-on transfers, printing 25 J jams and misfeeds troubleshooting banner ...
...Photo Library 14 C cards printing 23 Cartridge Alert 46 cartridge, print cleaning 34 removing 31 wiping 34 cartridges, print aligning 33 installing 32 preserving 35 cleaning print cartridge nozzles 34 coated paper, loading 20 collating copies 24 Color cartridge replacement required 46 Contact Information...Library 14 Imaging Studio, using 14 index cards loading 20 printing 23 information, finding 7 ink levels, checking 15 ink, ordering 15 installing print cartridges 32 printer software 47 iron-on transfers, loading 20 iron-on transfers, printing 25 J jams and misfeeds troubleshooting banner ...
User's Guide
Page 52
...order 25 transparencies 25 Web page 26 Web page, photos only 26 printing poster 30 publications, finding 7 Q Quality/Copies tab 17 R recycling Lexmark products 37 WEEE statement 49 removing print cartridge 31 reverse page order 25 S safety information 2 setup troubleshooting page does not print 39 power ...light is not lit 38 software does not install 38 slideshow creating and viewing 29 viewing saved 30 Slideshow button 14 software Imaging Studio 14 Print Properties 16 removing and reinstalling 47 ...
...order 25 transparencies 25 Web page 26 Web page, photos only 26 printing poster 30 publications, finding 7 Q Quality/Copies tab 17 R recycling Lexmark products 37 WEEE statement 49 removing print cartridge 31 reverse page order 25 S safety information 2 setup troubleshooting page does not print 39 power ...light is not lit 38 software does not install 38 slideshow creating and viewing 29 viewing saved 30 Slideshow button 14 software Imaging Studio 14 Print Properties 16 removing and reinstalling 47 ...


