
User's Guide (7.1 MB)
Page 3
Table of Contents Table of Contents Introduction xi Trademarks xiii Getting Started Setting Up Your Printer 1 Identifying Your Printer, Features, and Options 1 Optra S 1255 and Optra S 1625 2 Optra S 1855 3 Optra S 2455 4 Unpacking the Printer 5 Determining What to Install Next 7 Installing the Dual 500-Sheet Drawer 7 Attaching the Decals 11 Removing the Print Cartridge Packaging 12 Removing...
Table of Contents Table of Contents Introduction xi Trademarks xiii Getting Started Setting Up Your Printer 1 Identifying Your Printer, Features, and Options 1 Optra S 1255 and Optra S 1625 2 Optra S 1855 3 Optra S 2455 4 Unpacking the Printer 5 Determining What to Install Next 7 Installing the Dual 500-Sheet Drawer 7 Attaching the Decals 11 Removing the Print Cartridge Packaging 12 Removing...
User's Guide (7.1 MB)
Page 11
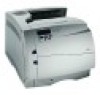
... printer model with illustrations of your specific printer. Introduction xi Note: The illustrations represent the Optra S 2455 unless indicated otherwise. Using Your Printer This section helps you have a question about the Optra S laser printer family (Optra S 2455, Optra S 1855, Optra S 1625 and Optra S 1255). This information includes printer menus and settings, printer messages, paper handling features, and print...
... printer model with illustrations of your specific printer. Introduction xi Note: The illustrations represent the Optra S 2455 unless indicated otherwise. Using Your Printer This section helps you have a question about the Optra S laser printer family (Optra S 2455, Optra S 1855, Optra S 1625 and Optra S 1255). This information includes printer menus and settings, printer messages, paper handling features, and print...
User's Guide (7.1 MB)
Page 17
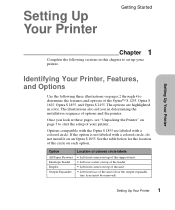
... 1 Complete the following three illustrations on top of the unit • Left front face of the Optra™ S 1255, Optra S 1625, Optra S 1855, and Optra S 2455. The options are labeled with a colored circle, do not install it on an Optra S 1855. The illustrations also aid you look at these pages, see "Unpacking the Printer" on each...
... 1 Complete the following three illustrations on top of the unit • Left front face of the Optra™ S 1255, Optra S 1625, Optra S 1855, and Optra S 2455. The options are labeled with a colored circle, do not install it on an Optra S 1855. The illustrations also aid you look at these pages, see "Unpacking the Printer" on each...
User's Guide (7.1 MB)
Page 21
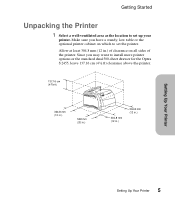
... the optional printer cabinet on all sides of clearance on which to install more printer options or the standard dual 500-sheet drawer for the Optra S 2455, leave 137.16 cm (4 ½ ft) clearance above the printer. 137.16 cm (4 ½ ft) 304.8 mm (12 in.) 508 mm (20 in.) 304.8 mm...
... the optional printer cabinet on all sides of clearance on which to install more printer options or the standard dual 500-sheet drawer for the Optra S 2455, leave 137.16 cm (4 ½ ft) clearance above the printer. 137.16 cm (4 ½ ft) 304.8 mm (12 in.) 508 mm (20 in.) 304.8 mm...

User's Guide (7.1 MB)
Page 22
... fingers are missing, contact the place where you set it down. CD Diskettes (May be included with certain models.) Power Cord Dual 500-sheet Drawer (Optra S 2455 only) Printer Setting Up Your Printer 6 Setting Up Your Printer
... fingers are missing, contact the place where you set it down. CD Diskettes (May be included with certain models.) Power Cord Dual 500-sheet Drawer (Optra S 2455 only) Printer Setting Up Your Printer 6 Setting Up Your Printer
User's Guide (7.1 MB)
Page 23
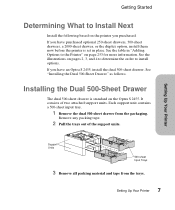
... Next Install the following based on page 253 for more information. See the table in place. Setting Up Your Printer 7 If you have an Optra S 2455, install the dual 500-sheet drawer. Each support unit contains a 500-sheet input tray. 1 Remove the dual 500-sheet drawer from the trays.... Installing the Dual 500-Sheet Drawer The dual 500-sheet drawer is set in "Adding Options to install options. See the illustrations on the Optra S 2455. It consists of the support units. Remove any packing tape. 2 Pull the trays out of two attached support units. If you have purchased...
... Next Install the following based on page 253 for more information. See the table in place. Setting Up Your Printer 7 If you have an Optra S 2455, install the dual 500-sheet drawer. Each support unit contains a 500-sheet input tray. 1 Remove the dual 500-sheet drawer from the trays.... Installing the Dual 500-Sheet Drawer The dual 500-sheet drawer is set in "Adding Options to install options. See the illustrations on the Optra S 2455. It consists of the support units. Remove any packing tape. 2 Pull the trays out of two attached support units. If you have purchased...
User's Guide (7.1 MB)
Page 27
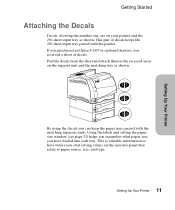
... By using the decals you received a sheet of decals keeps the 250-sheet input tray paired with the matching supports units. If you purchased an Optra S 2455 or optional drawers, you can keep the paper trays paired with the printer. Peel the decals from the sheet and attach them to have loaded...
... By using the decals you received a sheet of decals keeps the 250-sheet input tray paired with the matching supports units. If you purchased an Optra S 2455 or optional drawers, you can keep the paper trays paired with the printer. Peel the decals from the sheet and attach them to have loaded...
User's Guide (7.1 MB)
Page 82
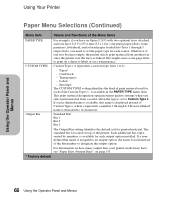
... Your Printer Paper Menu Selections (Continued) Menu Item Values and Functions of the Menu Items PAPER TYPE CUSTOM TYPES For example, if you have an Optra S 2455 with two optional trays attached, and you have , see "Paper Exits (Output Bins)" on top of the printer. Labels - If a userdefined bin name is assigned...
... Your Printer Paper Menu Selections (Continued) Menu Item Values and Functions of the Menu Items PAPER TYPE CUSTOM TYPES For example, if you have an Optra S 2455 with two optional trays attached, and you have , see "Paper Exits (Output Bins)" on top of the printer. Labels - If a userdefined bin name is assigned...

User's Guide (7.1 MB)
Page 126
...The serial interface uses DSR to prevent any stray characters from printing. * Factory Default Network Menu Three option cards can be installed in the Optra S 2455, two option cards can be installed in the Network Option 1 menu. Press Select. If Network Option cards are installed, you see NETWORK ... only data received while the DSR signal is treated as a value in the Network Option 3 menu. This electrical noise can be installed in the Optra S 1855, and one of each other. If Honor DSR is Off, data received on pin 3 of serial interface is installed in connector 1 ...
...The serial interface uses DSR to prevent any stray characters from printing. * Factory Default Network Menu Three option cards can be installed in the Optra S 2455, two option cards can be installed in the Network Option 1 menu. Press Select. If Network Option cards are installed, you see NETWORK ... only data received while the DSR signal is treated as a value in the Network Option 3 menu. This electrical noise can be installed in the Optra S 1855, and one of each other. If Honor DSR is Off, data received on pin 3 of serial interface is installed in connector 1 ...
User's Guide (7.1 MB)
Page 156
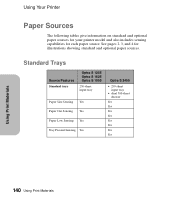
... 250-sheet input tray Paper Size Sensing Yes Paper Out Sensing Yes Paper Low Sensing Yes Tray Present Sensing Yes Optra S 2455 • 250-sheet input tray • dual 500-sheet drawer Yes Yes Yes Yes Yes Yes Yes Yes Using Print Materials 140 Using Print Materials ...
... 250-sheet input tray Paper Size Sensing Yes Paper Out Sensing Yes Paper Low Sensing Yes Tray Present Sensing Yes Optra S 2455 • 250-sheet input tray • dual 500-sheet drawer Yes Yes Yes Yes Yes Yes Yes Yes Using Print Materials 140 Using Print Materials ...
User's Guide (7.1 MB)
Page 161
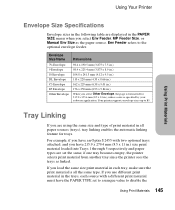
For example, if you have an Optra S 2455 with a different print material must have 215.9 x 279.4 mm (8.5 x 11 in.) size print material loaded into Trays 1 through 5 respectively and paper types are set to a ...
For example, if you have an Optra S 2455 with a different print material must have 215.9 x 279.4 mm (8.5 x 11 in.) size print material loaded into Trays 1 through 5 respectively and paper types are set to a ...

User's Guide (7.1 MB)
Page 169
.... Using Your Printer Paper Exits (Output Bins) The following table gives information on standard and optional paper exits for your printer model: Optra S 1255 and Exit Optra S 1625 Optra S 1855 Optra S 2455 Standard Bin located on the number of optional output expanders installed for up to three output expanders.2 up to three output expanders.2 the...
.... Using Your Printer Paper Exits (Output Bins) The following table gives information on standard and optional paper exits for your printer model: Optra S 1255 and Exit Optra S 1625 Optra S 1855 Optra S 2455 Standard Bin located on the number of optional output expanders installed for up to three output expanders.2 up to three output expanders.2 the...

User's Guide (7.1 MB)
Page 170
Bin 3 Bin 2 Bin 1 Standard Bin See "Installing an Optional Output Expander" on page 282 for the Optra S 2455. Using Print Materials Using Your Printer The following illustration shows standard and optional (highlighted) paper exits for more information. 154 Using Print Materials
Bin 3 Bin 2 Bin 1 Standard Bin See "Installing an Optional Output Expander" on page 282 for the Optra S 2455. Using Print Materials Using Your Printer The following illustration shows standard and optional (highlighted) paper exits for more information. 154 Using Print Materials

User's Guide (7.1 MB)
Page 220
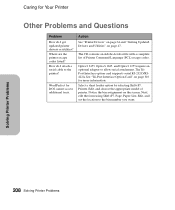
... between optional output expanders are made securely. Make sure the print material is securely installed. Reinstall each time it is compatible with an Optra S 1855. See "Installing the Envelope Feeder" on page 273. See "Installing the Duplex Option" on page 262. Optional Output Expander... Feeder" on page 282. Duplex Option: Make sure the connection between the duplex option and the printer is secure. Caring for the Optra S 2455) or the connection between a drawer and the printer is secure. Make sure the envelopes are listed in the Installed Options list on...
... between optional output expanders are made securely. Make sure the print material is securely installed. Reinstall each time it is compatible with an Optra S 1855. See "Installing the Envelope Feeder" on page 273. See "Installing the Duplex Option" on page 262. Optional Output Expander... Feeder" on page 282. Duplex Option: Make sure the connection between the duplex option and the printer is secure. Caring for the Optra S 2455) or the connection between a drawer and the printer is secure. Make sure the envelopes are listed in the Installed Options list on...
User's Guide (7.1 MB)
Page 224
... serial attachment. Select a sheet feeder option by selecting Shift+F7, Printer, Edit, and choose the appropriate model of Printer Command Language (PCL) escape codes. Optra S 2455, Optra S 1625, and Optra S 1255 require an optional adapter to the bin number you want. WordPerfect for DOS cannot access additional trays. Solving Printer Problems 208 Solving Printer...
... serial attachment. Select a sheet feeder option by selecting Shift+F7, Printer, Edit, and choose the appropriate model of Printer Command Language (PCL) escape codes. Optra S 2455, Optra S 1625, and Optra S 1255 require an optional adapter to the bin number you want. WordPerfect for DOS cannot access additional trays. Solving Printer Problems 208 Solving Printer...

User's Guide (7.1 MB)
Page 226
... Paper Jam 230 Paper Jam 24x Paper Jam Note: 24x Paper Jam may occur in the multipurpose feeder, you installed. Clearing Jams Caring for the Optra S 2455. x indicates the tray depending on how many trays are installed.
... Paper Jam 230 Paper Jam 24x Paper Jam Note: 24x Paper Jam may occur in the multipurpose feeder, you installed. Clearing Jams Caring for the Optra S 2455. x indicates the tray depending on how many trays are installed.

User's Guide (7.1 MB)
Page 227
If your printer has a multipurpose feeder, it is visible when the lower front door is installed) Duplex Front Access Cover Paper Trays Output Expander Rear Door Rear Door Duplex Rear Door 250-Sheet Input Tray Clearing Jams Clearing Jams 211 Caring for Your Printer Accessing Paper Jam Areas You open doors and covers, remove paper trays, and remove options to access paper jam areas. The following illustration shows the Optra S 2455. Upper Front Door Lower Front Door (down when Envelope Feeder is opened.
If your printer has a multipurpose feeder, it is visible when the lower front door is installed) Duplex Front Access Cover Paper Trays Output Expander Rear Door Rear Door Duplex Rear Door 250-Sheet Input Tray Clearing Jams Clearing Jams 211 Caring for Your Printer Accessing Paper Jam Areas You open doors and covers, remove paper trays, and remove options to access paper jam areas. The following illustration shows the Optra S 2455. Upper Front Door Lower Front Door (down when Envelope Feeder is opened.

User's Guide (7.1 MB)
Page 240
... number where the jam has occurred. Paper jams in trays may be: • on the incline surface of the door. Clearing Jams Caring for the Optra S 2455) • between three trays (this happens if you must clear all paper from the paper path. 224 Clearing Jams size paper in a 24x attendance message...
... number where the jam has occurred. Paper jams in trays may be: • on the incline surface of the door. Clearing Jams Caring for the Optra S 2455) • between three trays (this happens if you must clear all paper from the paper path. 224 Clearing Jams size paper in a 24x attendance message...
User's Guide (7.1 MB)
Page 263
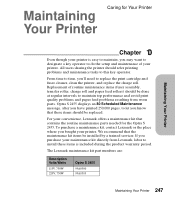
... warranty period. Caring for the Optra S 2455. For your printer. All users sharing the printer should be replaced. To purchase a maintenance kit, contact Lexmark or the place where you 'll need to this key operator. The Lexmark maintenance kit part numbers are: Description... Volts/Watts 115V, 750W 220V, 750W Optra S 2455 99A0500 99A0503 Maintaining Your Printer 247 From time to...
... warranty period. Caring for the Optra S 2455. For your printer. All users sharing the printer should be replaced. To purchase a maintenance kit, contact Lexmark or the place where you 'll need to this key operator. The Lexmark maintenance kit part numbers are: Description... Volts/Watts 115V, 750W 220V, 750W Optra S 2455 99A0500 99A0503 Maintaining Your Printer 247 From time to...
User's Guide (7.1 MB)
Page 270
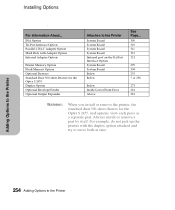
...the printer with Adapter Option Infrared Adapter Option Printer Memory Option Flash Memory Option Optional Drawers Standard Dual 500-sheet Drawer for the Optra S 2455 Duplex Option Optional Envelope Feeder Optional Output Expander Attaches to the Printer System Board System Board System Board System Board Infrared port on...299 304 255 7 or 256 273 261 281 WARNING: When you install or remove the printer, the standard dual 500-sheet drawer for the Optra S 2455, and options, view each piece as a separate part. Always install or remove a part by itself. For Information About... INA Option Tri-...
...the printer with Adapter Option Infrared Adapter Option Printer Memory Option Flash Memory Option Optional Drawers Standard Dual 500-sheet Drawer for the Optra S 2455 Duplex Option Optional Envelope Feeder Optional Output Expander Attaches to the Printer System Board System Board System Board System Board Infrared port on...299 304 255 7 or 256 273 261 281 WARNING: When you install or remove the printer, the standard dual 500-sheet drawer for the Optra S 2455, and options, view each piece as a separate part. Always install or remove a part by itself. For Information About... INA Option Tri-...