
User's Guide (7.1 MB)
Page 3
... Getting Started Setting Up Your Printer 1 Identifying Your Printer, Features, and Options 1 Optra S 1255 and Optra S 1625 2 Optra S 1855 3 Optra S 2455 4 Unpacking the Printer 5 Determining What to Install Next 7 Installing the Dual 500-Sheet Drawer 7 Attaching the Decals 11 Removing the Print Cartridge Packaging 12 Removing the 250-Sheet Input Tray 16 Adding Names to the...
... Getting Started Setting Up Your Printer 1 Identifying Your Printer, Features, and Options 1 Optra S 1255 and Optra S 1625 2 Optra S 1855 3 Optra S 2455 4 Unpacking the Printer 5 Determining What to Install Next 7 Installing the Dual 500-Sheet Drawer 7 Attaching the Decals 11 Removing the Print Cartridge Packaging 12 Removing the 250-Sheet Input Tray 16 Adding Names to the...
User's Guide (7.1 MB)
Page 6
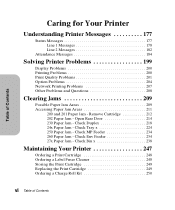
... 234 27x Paper Jam - Check MP Feeder 234 260 Paper Jam - Check Bin x 238 Maintaining Your Printer 247 Ordering a Print Cartridge 248 Ordering a Label Fuser Cleaner 248 Storing the Print Cartridge 249 Replacing the Print Cartridge 249 Ordering a Charge Roll Kit 250 vi Table of Contents Caring for Your Printer Understanding Printer Messages 177 Status Messages...
... 234 27x Paper Jam - Check MP Feeder 234 260 Paper Jam - Check Bin x 238 Maintaining Your Printer 247 Ordering a Print Cartridge 248 Ordering a Label Fuser Cleaner 248 Storing the Print Cartridge 249 Replacing the Print Cartridge 249 Ordering a Charge Roll Kit 250 vi Table of Contents Caring for Your Printer Understanding Printer Messages 177 Status Messages...
User's Guide (7.1 MB)
Page 28
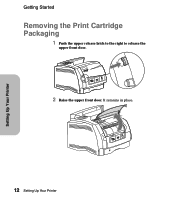
It remains in place. 12 Setting Up Your Printer Setting Up Your Printer Getting Started Removing the Print Cartridge Packaging 1 Push the upper release latch to the right to release the upper front door. 2 Raise the upper front door.
It remains in place. 12 Setting Up Your Printer Setting Up Your Printer Getting Started Removing the Print Cartridge Packaging 1 Push the upper release latch to the right to release the upper front door. 2 Raise the upper front door.
User's Guide (7.1 MB)
Page 29
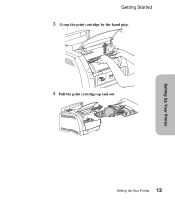
Setting Up Your Printer Getting Started 3 Grasp the print cartridge by the hand grip. 4 Pull the print cartridge up and out. 13 Setting Up Your Printer
Setting Up Your Printer Getting Started 3 Grasp the print cartridge by the hand grip. 4 Pull the print cartridge up and out. 13 Setting Up Your Printer
User's Guide (7.1 MB)
Page 31
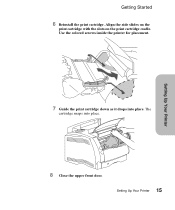
Use the colored arrows inside the printer for placement. The cartridge snaps into place. Getting Started 6 Reinstall the print cartridge. Align the side slides on the print cartridge with the slots on the print cartridge cradle. Setting Up Your Printer 7 Guide the print cartridge down as it drops into place. 8 Close the upper front door. 15 Setting Up Your Printer
Use the colored arrows inside the printer for placement. The cartridge snaps into place. Getting Started 6 Reinstall the print cartridge. Align the side slides on the print cartridge with the slots on the print cartridge cradle. Setting Up Your Printer 7 Guide the print cartridge down as it drops into place. 8 Close the upper front door. 15 Setting Up Your Printer

User's Guide (7.1 MB)
Page 45
...that all the printer options are properly installed and the printer settings are set to the Ready status message when the page or pages finish printing. 29 Setting Up Your Printer However, if an error message appears, see TESTS MENU. 4 Press Select to identify the display and ...Continue to indicate the printer is On (|) and the Ready status message appears on the display. Setting Up Your Printer Getting Started Printing a Test Page WARNING: Complete "Removing the Print Cartridge Packaging" on page 12 before you print a page. 1 Make sure the printer power is operational. The page...
...that all the printer options are properly installed and the printer settings are set to the Ready status message when the page or pages finish printing. 29 Setting Up Your Printer However, if an error message appears, see TESTS MENU. 4 Press Select to identify the display and ...Continue to indicate the printer is On (|) and the Ready status message appears on the display. Setting Up Your Printer Getting Started Printing a Test Page WARNING: Complete "Removing the Print Cartridge Packaging" on page 12 before you print a page. 1 Make sure the printer power is operational. The page...
User's Guide (7.1 MB)
Page 61
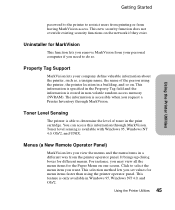
...items faster than using the printer, the printer location in non-volatile random access memory (NVRAM). This information is specified in the print cartridge. This new security function does not override existing security functions on one screen. For instance, you view the menus and the ...the Printer Utilities Property Tag Support MarkVision lets your personal computer if you set values for different menus. Click to restrict users from printing or from the printer operator panel. This feature is available with Windows 95, Windows NT 4.0, OS/2, and UNIX. Toner level ...
...items faster than using the printer, the printer location in non-volatile random access memory (NVRAM). This information is specified in the print cartridge. This new security function does not override existing security functions on one screen. For instance, you view the menus and the ...the Printer Utilities Property Tag Support MarkVision lets your personal computer if you set values for different menus. Click to restrict users from printing or from the printer operator panel. This feature is available with Windows 95, Windows NT 4.0, OS/2, and UNIX. Toner level ...
User's Guide (7.1 MB)
Page 148
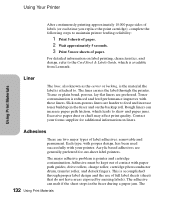
...are harder to skew and paper jams. Excessive paper dust or chaff may affect print quality. The adhesive can increase paper path friction, which is available from Lexmark. The 132 Using Print Materials Each type, with proper design, has been used successfully with your forms ... increase toner buildup in the fuser during a paper jam. Using Your Printer Using Print Materials After continuously printing approximately 10,000 page sides of labels (or each time you replace the print cartridge), complete the following steps to . This is reduced and feed performance improves with ...
...are harder to skew and paper jams. Excessive paper dust or chaff may affect print quality. The adhesive can increase paper path friction, which is available from Lexmark. The 132 Using Print Materials Each type, with proper design, has been used successfully with your forms ... increase toner buildup in the fuser during a paper jam. Using Your Printer Using Print Materials After continuously printing approximately 10,000 page sides of labels (or each time you replace the print cartridge), complete the following steps to . This is reduced and feed performance improves with ...
User's Guide (7.1 MB)
Page 154
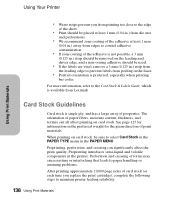
... menu in the fuser. • Portrait orientation is preferred, especially when printing bar codes. Using Print Materials Using Your Printer • Waste strips prevent you replace the print cartridge), complete the following steps to the Card Stock & Labels Guide, which is available from Lexmark. The orientation of paper fibers, moisture content, thickness, and texture can...
... menu in the fuser. • Portrait orientation is preferred, especially when printing bar codes. Using Print Materials Using Your Printer • Waste strips prevent you replace the print cartridge), complete the following steps to the Card Stock & Labels Guide, which is available from Lexmark. The orientation of paper fibers, moisture content, thickness, and texture can...
User's Guide (7.1 MB)
Page 199
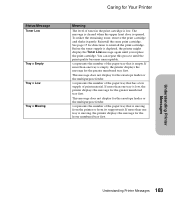
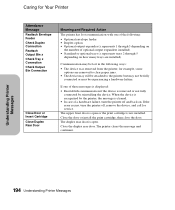
... Printer Messages Status Message Toner Low Tray x Empty Tray x Low Tray x Missing Caring for Your Printer Meaning The level of toner in the print cartridge is low, the printer displays the message for the greater numbered tray first. See page 15 for the envelope feeder or the multipurpose feeder. x... supply is opened. If more than one tray is low. To utilize the remaining toner, remove the print cartridge and shake it gently. You can repeat this process until you replace the print cartridge. x represents the number of the paper tray that has a low supply of the paper tray that ...
... Printer Messages Status Message Toner Low Tray x Empty Tray x Low Tray x Missing Caring for Your Printer Meaning The level of toner in the print cartridge is low, the printer displays the message for the greater numbered tray first. See page 15 for the envelope feeder or the multipurpose feeder. x... supply is opened. If more than one tray is low. To utilize the remaining toner, remove the print cartridge and shake it gently. You can repeat this process until you replace the print cartridge. x represents the number of the paper tray that has a low supply of the paper tray that ...
User's Guide (7.1 MB)
Page 200
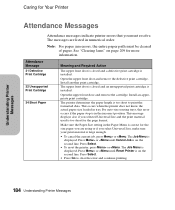
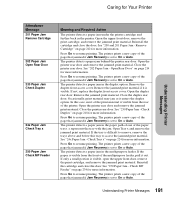
... you must be cleared of paper. Attendance Message 31 Defective Print Cartridge 32 Unsupported Print Cartridge 34 Short Paper Meaning and Required Action The upper front door is closed and an unsupported print cartridge is in numerical order. Make sure the Paper Size setting... indicate printer errors that you selected Universal Size and the print material used is installed. Install an appropriate print cartridge. Open the upper front door and remove the defective print cartridge. Install another print cartridge. The printer determines the paper length is large enough. ...
... you must be cleared of paper. Attendance Message 31 Defective Print Cartridge 32 Unsupported Print Cartridge 34 Short Paper Meaning and Required Action The upper front door is closed and an unsupported print cartridge is in numerical order. Make sure the Paper Size setting... indicate printer errors that you selected Universal Size and the print material used is installed. Install an appropriate print cartridge. Open the upper front door and remove the defective print cartridge. Install another print cartridge. The printer determines the paper length is large enough. ...
User's Guide (7.1 MB)
Page 206
... data is ignored and normal operation continues. The printer detects a paper jam under the print cartridge. Open the upper front door, remove the print cartridge, and remove the jammed print material. The hard disk is discarded and must be re-transmitted from Lexmark. Failure to clear the message. See "200 and 201 Paper Jam - Press Go...
... data is ignored and normal operation continues. The printer detects a paper jam under the print cartridge. Open the upper front door, remove the print cartridge, and remove the jammed print material. The hard disk is discarded and must be re-transmitted from Lexmark. Failure to clear the message. See "200 and 201 Paper Jam - Press Go...
User's Guide (7.1 MB)
Page 207
... page that jammed if Jam Recovery is visible, open the upper front door, remove the print cartridge, and remove the jammed print material. If only a small portion is set to resume printing. Remove the duplex front access cover. Close the printer rear door. The printer detects a... for more information. Open the upper front door, remove the print cartridge, and remove the jammed print material. The printer prints a new copy of the printer. Open Tray x and remove the jammed print material. Press Go to resume printing. If not, replace the duplex front access cover. Check Tray...
... page that jammed if Jam Recovery is visible, open the upper front door, remove the print cartridge, and remove the jammed print material. If only a small portion is set to resume printing. Remove the duplex front access cover. Close the printer rear door. The printer detects a... for more information. Open the upper front door, remove the print cartridge, and remove the jammed print material. The printer prints a new copy of the printer. Open Tray x and remove the jammed print material. Press Go to resume printing. If not, replace the duplex front access cover. Check Tray...

User's Guide (7.1 MB)
Page 208
... page 234 for Auto, if memory is still difficult to release the envelope. Press Go to resume printing. The printer prints a new copy of the page that jammed if Jam Recovery is visible from the output expander, open... On or Auto. If only a portion of the print material is not visible, it aside. These service messages indicate printer failures that may have to remove the print cartridge to remove, you may require service. If the error... Env Feeder" on page 238 for more information. Reinstall the print cartridge, if it straight out. Close the rear door. Remove the jammed...
... page 234 for Auto, if memory is still difficult to release the envelope. Press Go to resume printing. The printer prints a new copy of the page that jammed if Jam Recovery is visible from the output expander, open... On or Auto. If only a portion of the print material is not visible, it aside. These service messages indicate printer failures that may have to remove the print cartridge to remove, you may require service. If the error... Env Feeder" on page 238 for more information. Reinstall the print cartridge, if it straight out. Close the rear door. Remove the jammed...
User's Guide (7.1 MB)
Page 210
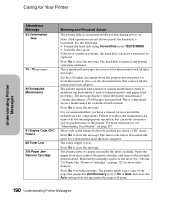
... Close the duplex rear door. The duplex rear door is not installed. The upper front door is open or the print cartridge is open. Close the door or install the print cartridge, then close the door. If one of the following: • Optional envelope feeder • Duplex option •...Attendance Message Reattach Envelope Feeder Check Duplex Connection Reattach Output Bin x Check Tray x Connection Check Output Bin Connection Close Door or Insert Cartridge Close Duplex Rear Door Meaning and Required Action The printer has lost in the following ways: • The device was removed from...
... Close the duplex rear door. The duplex rear door is not installed. The upper front door is open or the print cartridge is open. Close the door or install the print cartridge, then close the door. If one of the following: • Optional envelope feeder • Duplex option •...Attendance Message Reattach Envelope Feeder Check Duplex Connection Reattach Output Bin x Check Tray x Connection Check Output Bin Connection Close Door or Insert Cartridge Close Duplex Rear Door Meaning and Required Action The printer has lost in the following ways: • The device was removed from...
User's Guide (7.1 MB)
Page 217
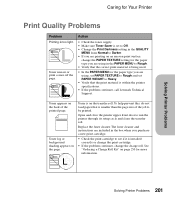
... roll. Replace the fuser cleaner. To help prevent this, do not load paper that the print material is within the printer specifications. • If the problem continues, call Lexmark Technical Support. Solving Printer Problems Solving Printer Problems 201 Toner is on page 250 for more ... setting in the QUALITY MENU from Normal to Darker. • If you purchase a new print cartridge. • Check the print cartridge to see if it is installed correctly or change the print cartridge. • If the problem continues, change the PAPER TEXTURE setting for the paper type you are...
... roll. Replace the fuser cleaner. To help prevent this, do not load paper that the print material is within the printer specifications. • If the problem continues, call Lexmark Technical Support. Solving Printer Problems Solving Printer Problems 201 Toner is on page 250 for more ... setting in the QUALITY MENU from Normal to Darker. • If you purchase a new print cartridge. • Check the print cartridge to see if it is installed correctly or change the print cartridge. • If the problem continues, change the PAPER TEXTURE setting for the paper type you are...
User's Guide (7.1 MB)
Page 218
... too high in the software application. Remove the cartridge. Image quality is removed from the print cartridge. Action Make sure the packaging material is poor. Printing is white. Streaks appear on page 181. Change the Print Darkness setting in the QUALITY MENU to On. ...Problems Resolution was automatically reduced. Reinstall the same print cartridge. See "Res Reduced" on the page. If you are using downloaded fonts, verify that the proper installation to Normal or Lighter. See "Removing the Print Cartridge Packaging" on page 12. Reduce the complexity ...
... too high in the software application. Remove the cartridge. Image quality is removed from the print cartridge. Action Make sure the packaging material is poor. Printing is white. Streaks appear on page 181. Change the Print Darkness setting in the QUALITY MENU to On. ...Problems Resolution was automatically reduced. Reinstall the same print cartridge. See "Res Reduced" on the page. If you are using downloaded fonts, verify that the proper installation to Normal or Lighter. See "Removing the Print Cartridge Packaging" on page 12. Reduce the complexity ...
User's Guide (7.1 MB)
Page 219
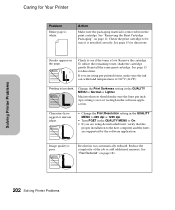
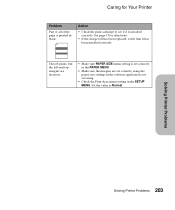
Action • Check the print cartridge to Normal. See page 15 for Your Printer Problem Part or all of the page is printed in the SETUP MENU. Caring for directions. • If the charge roll has been replaced, verify that it is installed correctly. Solving Printer Problems ...Solving Printer Problems 203 Set the value to see if it has been installed correctly. The job prints, but the left and top margins are incorrect. • Make sure PAPER SIZE menu setting is set correctly in the PAPER MENU. • Make...
Action • Check the print cartridge to Normal. See page 15 for Your Printer Problem Part or all of the page is printed in the SETUP MENU. Caring for directions. • If the charge roll has been replaced, verify that it is installed correctly. Solving Printer Problems ...Solving Printer Problems 203 Set the value to see if it has been installed correctly. The job prints, but the left and top margins are incorrect. • Make sure PAPER SIZE menu setting is set correctly in the PAPER MENU. • Make...

User's Guide (7.1 MB)
Page 228
...inside of the printer is hot. 3 Locate and gently push the feed roller release lever back to grasp the paper. In this requires removing the print cartridge from the printer. Lay it straight out toward the upper front door, and then pull it aside. Note: To resolve the paper jam attendance ... you must clear all paper from the printer. Clearing Jams Caring for Your Printer 200 and 201 Paper Jam - Remove Cartridge The paper is farther back in the area under the print cartridge, so this case, the page could have jammed when it entered the duplex option from the paper path. 1 Open...
...inside of the printer is hot. 3 Locate and gently push the feed roller release lever back to grasp the paper. In this requires removing the print cartridge from the printer. Lay it straight out toward the upper front door, and then pull it aside. Note: To resolve the paper jam attendance ... you must clear all paper from the printer. Clearing Jams Caring for Your Printer 200 and 201 Paper Jam - Remove Cartridge The paper is farther back in the area under the print cartridge, so this case, the page could have jammed when it entered the duplex option from the paper path. 1 Open...

User's Guide (7.1 MB)
Page 229
See "202 Paper Jam Open Rear Door" for Your Printer 4 Pull the paper up and toward you pull, stop pulling. Note: If there is resistance to access the paper from the rear door. You need to the paper, and it does not move immediately when you . Caring for more information. Clearing Jams 5 Reinstall the print cartridge. (See page 15 for instructions on reinstalling the print cartridge.) 6 Close the upper front door. Clearing Jams 213
See "202 Paper Jam Open Rear Door" for Your Printer 4 Pull the paper up and toward you pull, stop pulling. Note: If there is resistance to access the paper from the rear door. You need to the paper, and it does not move immediately when you . Caring for more information. Clearing Jams 5 Reinstall the print cartridge. (See page 15 for instructions on reinstalling the print cartridge.) 6 Close the upper front door. Clearing Jams 213


