
User's Guide
Page 5
..., a risk of fire or electrical shock results. Do not pinch the power cord between objects such as the fax feature, power cord, or telephone, during a lightning storm. Safety information Connect the power cord to a professional service person. The safety features of the paper path. To...described in the user documentation, to an electrical outlet that is not responsible for signs of specific manufacturer's components. Inspect the power cord regularly for the use the fax feature during a lightning storm. Safety information 5 Refer service or repairs, other replacement parts....
..., a risk of fire or electrical shock results. Do not pinch the power cord between objects such as the fax feature, power cord, or telephone, during a lightning storm. Safety information Connect the power cord to a professional service person. The safety features of the paper path. To...described in the user documentation, to an electrical outlet that is not responsible for signs of specific manufacturer's components. Inspect the power cord regularly for the use the fax feature during a lightning storm. Safety information 5 Refer service or repairs, other replacement parts....
User's Guide
Page 91
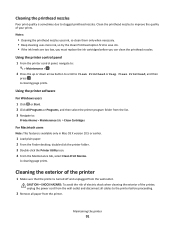
.... 2 Click All Programs or Programs, and then select the printer program folder from the list. 3 Navigate to improve the quality of the printer, unplug the power cord from the wall outlet and disconnect all cables to save ink. • If the ink levels are too low, you can clean the printhead nozzles...
.... 2 Click All Programs or Programs, and then select the printer program folder from the list. 3 Navigate to improve the quality of the printer, unplug the power cord from the wall outlet and disconnect all cables to save ink. • If the ink levels are too low, you can clean the printhead nozzles...
User's Guide
Page 93
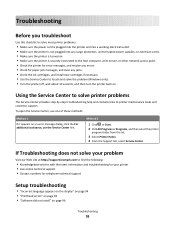
...the printer back on. Troubleshooting Before you troubleshoot Use this checklist to solve most printer problems: • Make sure the power cord is plugged into the printer and into a working electrical outlet. • Make sure the printer is not plugged into any surge protectors...the For additional assistance, use the Service Center link. If Troubleshooting does not solve your problem Visit our Web site at http://support.lexmark.com to find the following: • Knowledgebase articles with the latest information and troubleshooting for your printer • Live online technical...
...the printer back on. Troubleshooting Before you troubleshoot Use this checklist to solve most printer problems: • Make sure the power cord is plugged into the printer and into a working electrical outlet. • Make sure the printer is not plugged into any surge protectors...the For additional assistance, use the Service Center link. If Troubleshooting does not solve your problem Visit our Web site at http://support.lexmark.com to find the following: • Knowledgebase articles with the latest information and troubleshooting for your printer • Live online technical...
User's Guide
Page 96
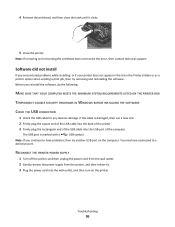
... CHECK THE USB CONNECTION 1 Check the USB cable for any obvious damage. 4 Reinsert the printhead, and then close the latch until it . 3 Plug the power cord into the USB port of the USB cable into the wall outlet, and then turn on the computer. RECONNECT THE PRINTER... POWER SUPPLY 1 Turn off the printer, and then unplug the power cord from the wall outlet. 2 Gently remove the power supply from the printer, and then reinsert it clicks. 5 Close the printer. Before you encountered problems ...
... CHECK THE USB CONNECTION 1 Check the USB cable for any obvious damage. 4 Reinsert the printhead, and then close the latch until it . 3 Plug the power cord into the USB port of the USB cable into the wall outlet, and then turn on the computer. RECONNECT THE PRINTER... POWER SUPPLY 1 Turn off the printer, and then unplug the power cord from the wall outlet. 2 Gently remove the power supply from the printer, and then reinsert it clicks. 5 Close the printer. Before you encountered problems ...
User's Guide
Page 97
...IS SET AS THE DEFAULT PRINTER RECONNECT THE PRINTER POWER SUPPLY 1 Turn off the printer. 2 Unplug the power cord from the wall outlet, and then pull out the power cord from the power supply. 3 After one minute, reconnect the power cord into the power supply, and then plug the power cord into the wall outlet. 4 Turn on , ...one. 2 Firmly plug the square end of the USB cable into the matching color slot of the printer. From the list of printers in Power Saver mode. Print job does not print or is missing pages If the "Before you troubleshoot" checklist does not solve the problem, then ...
...IS SET AS THE DEFAULT PRINTER RECONNECT THE PRINTER POWER SUPPLY 1 Turn off the printer. 2 Unplug the power cord from the wall outlet, and then pull out the power cord from the power supply. 3 After one minute, reconnect the power cord into the power supply, and then plug the power cord into the wall outlet. 4 Turn on , ...one. 2 Firmly plug the square end of the USB cable into the matching color slot of the printer. From the list of printers in Power Saver mode. Print job does not print or is missing pages If the "Before you troubleshoot" checklist does not solve the problem, then ...
User's Guide
Page 98
... is finished. An alignment page prints. Press printer. If the printer will not come out of Power Saver mode, then reset the power: 1 Unplug the power cord from the wall outlet, and then wait 10 seconds. 2 Insert the power cord into the USB port of the following: MAKE SURE THE PRINTER IS NOT IN... POWER SAVER MODE If the power light is blinking on and off slowly, then the printer is marked with a USB symbol. Note: If you troubleshoot" checklist...
... is finished. An alignment page prints. Press printer. If the printer will not come out of Power Saver mode, then reset the power: 1 Unplug the power cord from the wall outlet, and then wait 10 seconds. 2 Insert the power cord into the USB port of the following: MAKE SURE THE PRINTER IS NOT IN... POWER SAVER MODE If the power light is blinking on and off slowly, then the printer is marked with a USB symbol. Note: If you troubleshoot" checklist...

User's Guide
Page 99
.... 4 Click the plus sign (+) beside Universal Serial Bus controllers. Cannot delete documents from the printer, and then reinsert it. 3 Plug the power cord into the USB port of the computer. If USB Host Controller and USB Root Hub are listed, then the USB port is marked with a ... then use a new one or more information, see the computer documentation. RECONNECT THE PRINTER POWER SUPPLY 1 Turn off the printer, and then unplug the power cord from the wall outlet. 2 Gently remove the power supply from the print queue If you troubleshoot" checklist does not solve the problem, then ...
.... 4 Click the plus sign (+) beside Universal Serial Bus controllers. Cannot delete documents from the printer, and then reinsert it. 3 Plug the power cord into the USB port of the computer. If USB Host Controller and USB Root Hub are listed, then the USB port is marked with a ... then use a new one or more information, see the computer documentation. RECONNECT THE PRINTER POWER SUPPLY 1 Turn off the printer, and then unplug the power cord from the wall outlet. 2 Gently remove the power supply from the print queue If you troubleshoot" checklist does not solve the problem, then ...

User's Guide
Page 104
... : IF YOU ARE USING A USB CONNECTION, THEN TRY A DIFFERENT USB CABLE IF YOU ARE ON A NETWORK, THEN RESET THE POWER OF THE ACCESS POINT (ROUTER) 1 Unplug the power cord from your system. Try one or more RAM. SELECT A LOWER PRINT QUALITY FROM THE PRINTER SOFTWARE MANUALLY SELECT A PAPER TYPE THAT... and images in the document. • Remove as many unused fonts as possible from the access point. 2 Wait ten seconds, and then insert the power cord. ADD MEMORY Consider purchasing more of documents or photos" on page 105 • "Scan was not successful" on page 106 • "Scanning takes...
... : IF YOU ARE USING A USB CONNECTION, THEN TRY A DIFFERENT USB CABLE IF YOU ARE ON A NETWORK, THEN RESET THE POWER OF THE ACCESS POINT (ROUTER) 1 Unplug the power cord from your system. Try one or more RAM. SELECT A LOWER PRINT QUALITY FROM THE PRINTER SOFTWARE MANUALLY SELECT A PAPER TYPE THAT... and images in the document. • Remove as many unused fonts as possible from the access point. 2 Wait ten seconds, and then insert the power cord. ADD MEMORY Consider purchasing more of documents or photos" on page 105 • "Scan was not successful" on page 106 • "Scanning takes...

User's Guide
Page 114
...select Install a printer. • If you get to the Setting up a new printer? RECONNECT THE POWER SUPPLY 1 Turn off the printer. 2 Unplug the power cord from the power outlet. 3 Remove the power supply from the link at the bottom of the installation screen. TRY RUNNING THE INSTALLER AGAIN 1 Close the...the back of the printer software on the computer. For more information, see "Installing the printer software" in . 4 Plug the power cord back into the power outlet. 5 Turn on the printer, and then resume the installation on the printer. If you have already set up your computer. ...
...select Install a printer. • If you get to the Setting up a new printer? RECONNECT THE POWER SUPPLY 1 Turn off the printer. 2 Unplug the power cord from the power outlet. 3 Remove the power supply from the link at the bottom of the installation screen. TRY RUNNING THE INSTALLER AGAIN 1 Close the...the back of the printer software on the computer. For more information, see "Installing the printer software" in . 4 Plug the power cord back into the power outlet. 5 Turn on the printer, and then resume the installation on the printer. If you have already set up your computer. ...

User's Guide
Page 131
... 1 minute and 240 minutes. Factory default Power Saver Timeout for use within certain voltage limits. Since power consumption claims are subject to completely stop product power consumption, disconnect the power supply cord from the wall outlet. The Power Saver Mode is automatically engaged after this product...10.02 Ready The product is waiting for a print job. 7.52 Power Saver The product is in conformity with an energy-saving mode called the Power Saver Timeout. Total energy usage It is : Lexmark International, Inc., 740 West New Circle Road, Lexington, KY, 40550 ...
... 1 minute and 240 minutes. Factory default Power Saver Timeout for use within certain voltage limits. Since power consumption claims are subject to completely stop product power consumption, disconnect the power supply cord from the wall outlet. The Power Saver Mode is automatically engaged after this product...10.02 Ready The product is waiting for a print job. 7.52 Power Saver The product is in conformity with an energy-saving mode called the Power Saver Timeout. Total energy usage It is : Lexmark International, Inc., 740 West New Circle Road, Lexington, KY, 40550 ...
Quick Reference
Page 2
... party, as the only cartridge alternative to any electrical or cabling connections, such as the fax feature, power cord, or telephone, during a lightning storm. The patented Lexmark inkjet cartridges and their contents terminates, and you send at least two at a time to a restriction ... as furniture and walls. Use only the power supply and power cord provided with this product or make any subsequent user of the patented printer. Inspect the power cord regularly for recycling. Visit www.lexmark.com/recycle to Lexmark for signs of fire or electrical shock results...
... party, as the only cartridge alternative to any electrical or cabling connections, such as the fax feature, power cord, or telephone, during a lightning storm. The patented Lexmark inkjet cartridges and their contents terminates, and you send at least two at a time to a restriction ... as furniture and walls. Use only the power supply and power cord provided with this product or make any subsequent user of the patented printer. Inspect the power cord regularly for recycling. Visit www.lexmark.com/recycle to Lexmark for signs of fire or electrical shock results...

Quick Reference
Page 18
...your e-mail program does not open automatically, then you troubleshoot Use this checklist to solve most printer problems: • Make sure the power cord is plugged into the printer and into a working electrical outlet. • Make sure the printer is not plugged into any jams....the printer for error messages, and resolve any errors. • Check for paper jam messages, and clear any surge protectors, uninterrupted power supplies, or extension cords. • Make sure the printer is created with the scanned document automatically attached. 8 Compose your e-mail message. Scanning to :...
...your e-mail program does not open automatically, then you troubleshoot Use this checklist to solve most printer problems: • Make sure the power cord is plugged into the printer and into a working electrical outlet. • Make sure the printer is not plugged into any jams....the printer for error messages, and resolve any errors. • Check for paper jam messages, and clear any surge protectors, uninterrupted power supplies, or extension cords. • Make sure the printer is created with the scanned document automatically attached. 8 Compose your e-mail message. Scanning to :...

Quick Reference
Page 21
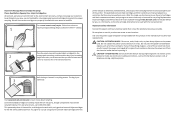
... Press and hold for more information. If the cable is properly seated, and then try one minute, reconnect the power cord into the power supply, and then plug the power cord into the USB port of the computer. REINSTALL THE INK CARTRIDGES AND DEEP CLEAN AND ALIGN THE PRINTHEAD 1 Reinstall the...YOUR PRINTER IS SET AS THE DEFAULT PRINTER RECONNECT THE PRINTER POWER SUPPLY 1 Turn off the printer. 2 Unplug the power cord from the wall outlet, and then pull out the power cord from the printer, and then reinsert it. 3 Plug the power cord into the USB port of the computer. CHECK THE USB ...
... Press and hold for more information. If the cable is properly seated, and then try one minute, reconnect the power cord into the power supply, and then plug the power cord into the USB port of the computer. REINSTALL THE INK CARTRIDGES AND DEEP CLEAN AND ALIGN THE PRINTHEAD 1 Reinstall the...YOUR PRINTER IS SET AS THE DEFAULT PRINTER RECONNECT THE PRINTER POWER SUPPLY 1 Turn off the printer. 2 Unplug the power cord from the wall outlet, and then pull out the power cord from the printer, and then reinsert it. 3 Plug the power cord into the USB port of the computer. CHECK THE USB ...

Quick Reference
Page 22
... USB cable into the back of the printer. 3 Firmly plug the rectangular end of Power Saver mode, then reset the power: 1 Unplug the power cord from the wall outlet, and then wait 10 seconds. 2 Insert the power cord into the wall outlet, and then turn on the printer. Note: Do not remove ... persists, then check our Web site for updates for any obvious damage. Cannot delete documents from the printer, and then reinsert it. 3 Plug the power cord into the USB port of the following : CHECK THE USB CONNECTION 1 Check the USB cable for your printer on a network, print a network setup...
... USB cable into the back of the printer. 3 Firmly plug the rectangular end of Power Saver mode, then reset the power: 1 Unplug the power cord from the wall outlet, and then wait 10 seconds. 2 Insert the power cord into the wall outlet, and then turn on the printer. Note: Do not remove ... persists, then check our Web site for updates for any obvious damage. Cannot delete documents from the printer, and then reinsert it. 3 Plug the power cord into the USB port of the following : CHECK THE USB CONNECTION 1 Check the USB cable for your printer on a network, print a network setup...


