
User's Guide
Page 5
...power cord from the wall outlet and disconnect all cables from the electrical outlet before proceeding. Inspect the power cord regularly for clearing a paper jam. Refer service or repairs, other replacement parts. SAVE THESE INSTRUCTIONS. Do not pinch the power cord between objects such as part of... or telephone, during a lightning storm. Do not set up this product or make any of these things happen, a risk of the paper path. To avoid injury, use caution when accessing this product near the product and easily accessible. This product is near water or wet locations...
...power cord from the wall outlet and disconnect all cables from the electrical outlet before proceeding. Inspect the power cord regularly for clearing a paper jam. Refer service or repairs, other replacement parts. SAVE THESE INSTRUCTIONS. Do not pinch the power cord between objects such as part of... or telephone, during a lightning storm. Do not set up this product or make any of these things happen, a risk of the paper path. To avoid injury, use caution when accessing this product near the product and easily accessible. This product is near water or wet locations...
User's Guide
Page 10
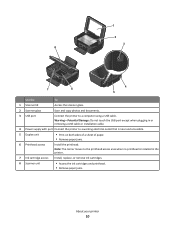
... is installed in the printer. 7 Ink cartridge access Install, replace, or remove ink cartridges. 8 Scanner unit • Access the ink cartridges and printhead. • Remove paper jams. About your printer 10 Note: The carrier moves to a computer using a USB cable. 1 2 3 8 7 6 4 5 Use the To 1 Scanner lid Access the scanner glass. 2 Scanner glass ...Connect the printer to the printhead access area when no printhead is near and accessible. 5 Duplex unit • Print on both sides of a sheet of paper. • Remove paper jams. 6 Printhead access Install the printhead.
... is installed in the printer. 7 Ink cartridge access Install, replace, or remove ink cartridges. 8 Scanner unit • Access the ink cartridges and printhead. • Remove paper jams. About your printer 10 Note: The carrier moves to a computer using a USB cable. 1 2 3 8 7 6 4 5 Use the To 1 Scanner lid Access the scanner glass. 2 Scanner glass ...Connect the printer to the printhead access area when no printhead is near and accessible. 5 Duplex unit • Print on both sides of a sheet of paper. • Remove paper jams. 6 Printhead access Install the printhead.

User's Guide
Page 36
...of the label sheet. • Use full label sheets. Printing on the labels does not extend to peel off during printing, resulting in a paper jam. If no paper size matches the label sheet size, then set a custom size. 4 Select an orientation, and then click OK. 5 From the menu bar,... For Macintosh users 1 With a document open , click File > Print. 2 Click Properties, Preferences, Options, or Setup. 3 Navigate to: Print Setup tab > Paper Size list > select Custom Size 4 Adjust the settings as needed to create a custom size, and then click OK. 5 Click OK to close any printer software...
...of the label sheet. • Use full label sheets. Printing on the labels does not extend to peel off during printing, resulting in a paper jam. If no paper size matches the label sheet size, then set a custom size. 4 Select an orientation, and then click OK. 5 From the menu bar,... For Macintosh users 1 With a document open , click File > Print. 2 Click Properties, Preferences, Options, or Setup. 3 Navigate to: Print Setup tab > Paper Size list > select Custom Size 4 Adjust the settings as needed to create a custom size, and then click OK. 5 Click OK to close any printer software...
User's Guide
Page 93
... solve your problem Visit our Web site at http://support.lexmark.com to find the following: • Knowledgebase articles with the latest information and troubleshooting for your printer • Live online technical support • Contact numbers for paper jam messages, and clear any jams. • Check the ink cartridges, and install new cartridges if...
... solve your problem Visit our Web site at http://support.lexmark.com to find the following: • Knowledgebase articles with the latest information and troubleshooting for your printer • Live online technical support • Contact numbers for paper jam messages, and clear any jams. • Check the ink cartridges, and install new cartridges if...

User's Guide
Page 99
...Search or Run box, type devmgmt.msc. 3 Press Enter, or click OK. REMOVE AND REINSTALL THE PRINTER SOFTWARE Jams and misfeeds troubleshooting • "Paper jam in the printer" on page 100 • "Paper jam in the print queue and cannot delete them to get other jobs to print, then the computer and printer may...then unplug the power cord from the wall outlet. 2 Gently remove the power supply from the print queue If you have jobs stuck in the paper support" on page 100 Troubleshooting 99 The USB port is enabled. Note: If you troubleshoot" checklist does not solve the problem, then try ...
...Search or Run box, type devmgmt.msc. 3 Press Enter, or click OK. REMOVE AND REINSTALL THE PRINTER SOFTWARE Jams and misfeeds troubleshooting • "Paper jam in the printer" on page 100 • "Paper jam in the print queue and cannot delete them to get other jobs to print, then the computer and printer may...then unplug the power cord from the wall outlet. 2 Gently remove the power supply from the print queue If you have jobs stuck in the paper support" on page 100 Troubleshooting 99 The USB port is enabled. Note: If you troubleshoot" checklist does not solve the problem, then try ...

User's Guide
Page 100
... printer Note: The parts inside the printer are sensitive. Avoid unnecessarily touching these parts while clearing jams. Troubleshooting 100 • "Paper jam in the duplex unit" on page 100 • "Paper or specialty media misfeeds" on page 102 Paper jam in the duplex unit Note: The parts inside the printer are sensitive. Note: Be careful not...
... printer Note: The parts inside the printer are sensitive. Avoid unnecessarily touching these parts while clearing jams. Troubleshooting 100 • "Paper jam in the duplex unit" on page 100 • "Paper or specialty media misfeeds" on page 102 Paper jam in the duplex unit Note: The parts inside the printer are sensitive. Note: Be careful not...

User's Guide
Page 101
Note: Be careful not to tear the paper while removing it out. 1 Push down the duplex latches and pull out the duplex unit. Troubleshooting 101 CAUTION-POTENTIAL INJURY: The area behind the duplex cover has protruding ribs as part of the paper path. To avoid injury, use caution when accessing this area for clearing a paper jam. 2 Firmly grasp the paper, and then gently pull it . 3 Reinsert the duplex unit. 4 Touch DONE or press , depending on your printer model. 5 From your computer, resume the print job.
Note: Be careful not to tear the paper while removing it out. 1 Push down the duplex latches and pull out the duplex unit. Troubleshooting 101 CAUTION-POTENTIAL INJURY: The area behind the duplex cover has protruding ribs as part of the paper path. To avoid injury, use caution when accessing this area for clearing a paper jam. 2 Firmly grasp the paper, and then gently pull it . 3 Reinsert the duplex unit. 4 Touch DONE or press , depending on your printer model. 5 From your computer, resume the print job.

User's Guide
Page 144
...printer on wireless network 67 infrastructure network 81 ink conserving 6 ink cartridge access 10 ink cartridges ordering 11 replacing 12 using genuine Lexmark 11 ink levels checking 89 inserting a memory card or flash drive 37 installation cable 80, 81 installing network printer 87 installing ...IP address 86, 87 configuring 70 IP address, assigning 87 iron-on transfers 29 J jams and misfeeds troubleshooting paper jam in the duplex unit 100 paper jam in the paper support 100 paper jam in the printer 100 paper or specialty media 102 K key index 88 L labels 28 printing 35 language changing 94...
...printer on wireless network 67 infrastructure network 81 ink conserving 6 ink cartridge access 10 ink cartridges ordering 11 replacing 12 using genuine Lexmark 11 ink levels checking 89 inserting a memory card or flash drive 37 installation cable 80, 81 installing network printer 87 installing ...IP address 86, 87 configuring 70 IP address, assigning 87 iron-on transfers 29 J jams and misfeeds troubleshooting paper jam in the duplex unit 100 paper jam in the paper support 100 paper jam in the printer 100 paper or specialty media 102 K key index 88 L labels 28 printing 35 language changing 94...
User's Guide
Page 145
... 29 photo cards 28 photo/glossy paper 28 plain paper 27 postcards 28 transparencies 29 paper and other supplies ordering 13 paper default settings saving 29 paper exit tray 9 paper feed guard 9 paper guides 9 paper jam in the duplex unit 100 paper jam in the paper support 100 paper jam in the printer 100 paper or specialty media misfeeds 102 paper support 9 partial document or photo...
... 29 photo cards 28 photo/glossy paper 28 plain paper 27 postcards 28 transparencies 29 paper and other supplies ordering 13 paper default settings saving 29 paper exit tray 9 paper feed guard 9 paper guides 9 paper jam in the duplex unit 100 paper jam in the paper support 100 paper jam in the printer 100 paper or specialty media misfeeds 102 paper support 9 partial document or photo...
User's Guide
Page 147
... scanned image quality 105 scan not successful 106 scanning takes too long or freezes the computer 106 troubleshooting, jams and misfeeds paper jam in the duplex unit 100 paper jam in the paper support 100 paper jam in the printer 100 paper or specialty media 102 troubleshooting, memory card cannot print from a flash drive 108 checklist 107 nothing happens...
... scanned image quality 105 scan not successful 106 scanning takes too long or freezes the computer 106 troubleshooting, jams and misfeeds paper jam in the duplex unit 100 paper jam in the paper support 100 paper jam in the printer 100 paper or specialty media 102 troubleshooting, memory card cannot print from a flash drive 108 checklist 107 nothing happens...
Quick Reference
Page 6
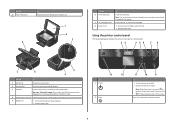
... guard To Prevent items from falling into the paper slot. 1 2 3 8 7 6 4 5 Use the To 1 Scanner lid Access the scanner glass. 2 Scanner glass Scan and copy photos and documents. 3 USB port Connect the printer to ... the printer. Install, replace, or remove ink cartridges. • Access the ink cartridges and printhead. • Remove paper jams. Using the printer control panel The following diagrams explain the sections of paper. • Remove paper jams. Use the 6 Printhead access 7 Ink cartridge access 8 Scanner unit To Install the printhead. Press and hold for three...
... guard To Prevent items from falling into the paper slot. 1 2 3 8 7 6 4 5 Use the To 1 Scanner lid Access the scanner glass. 2 Scanner glass Scan and copy photos and documents. 3 USB port Connect the printer to ... the printer. Install, replace, or remove ink cartridges. • Access the ink cartridges and printhead. • Remove paper jams. Using the printer control panel The following diagrams explain the sections of paper. • Remove paper jams. Use the 6 Printhead access 7 Ink cartridge access 8 Scanner unit To Install the printhead. Press and hold for three...

Quick Reference
Page 18
... computer, print server, or other network access point. • Check the printer for error messages, and resolve any errors. • Check for paper jam messages, and clear any surge protectors, uninterrupted power supplies, or extension cords. • Make sure the printer is turned on. • Make ... scanned?" When the scan is finished, a new e-mail message is being scanned?" For Macintosh users 1 Load an original document faceup into any jams. • Check the ink cartridges, and install new cartridges if necessary. • Use the Service Center to locate and solve the problem (...
... computer, print server, or other network access point. • Check the printer for error messages, and resolve any errors. • Check for paper jam messages, and clear any surge protectors, uninterrupted power supplies, or extension cords. • Make sure the printer is turned on. • Make ... scanned?" When the scan is finished, a new e-mail message is being scanned?" For Macintosh users 1 Load an original document faceup into any jams. • Check the ink cartridges, and install new cartridges if necessary. • Use the Service Center to locate and solve the problem (...


