
User's Guide
Page 2
... cartridges...12 Replacing ink cartridges...13 Ordering paper and other supplies...14 Recycling Lexmark products...15 Using the printer control panel buttons and menus 16 Using the printer control panel...16 Changing temporary settings into new default settings 18 Changing the Power Saver timeout...19 Saving paper and energy with Eco-Mode 20...
... cartridges...12 Replacing ink cartridges...13 Ordering paper and other supplies...14 Recycling Lexmark products...15 Using the printer control panel buttons and menus 16 Using the printer control panel...16 Changing temporary settings into new default settings 18 Changing the Power Saver timeout...19 Saving paper and energy with Eco-Mode 20...
User's Guide
Page 3
... Making copies...53 Copying photos...53 Enlarging or reducing images...54 Adjusting copy quality...54 Making a copy lighter or darker...54 Collating copies using the printer control panel 55 Repeating an image on one page...55 Copying multiple pages on one sheet...56 Making a duplex copy...56 Canceling copy jobs...57... drive or memory card 59 Scanning photos into an editing application 59 Scanning documents into an editing application 61 Scanning directly to e-mail using the printer software 62 Scanning to a PDF...62 Scanning FAQ...63 Canceling scan jobs...64 Faxing...65 Setting up the...
... Making copies...53 Copying photos...53 Enlarging or reducing images...54 Adjusting copy quality...54 Making a copy lighter or darker...54 Collating copies using the printer control panel 55 Repeating an image on one page...55 Copying multiple pages on one sheet...56 Making a duplex copy...56 Canceling copy jobs...57... drive or memory card 59 Scanning photos into an editing application 59 Scanning documents into an editing application 61 Scanning directly to e-mail using the printer software 62 Scanning to a PDF...62 Scanning FAQ...63 Canceling scan jobs...64 Faxing...65 Setting up the...
User's Guide
Page 4
... Receiving faxes...81 Faxing FAQ...82 Networking 89 Installing the printer on a wireless network 89 Advanced wireless setup...94 Networking FAQ...100 Maintaining the printer 112 Maintaining ink cartridges...112 Cleaning the exterior of the printer...114 Cleaning the scanner glass...115 Troubleshooting 116 Before you troubleshoot......116 Using the Service Center to solve printer problems 116 If Troubleshooting does not solve your problem 116 Setup troubleshooting...116 Jams and misfeeds troubleshooting...122 Print...
... Receiving faxes...81 Faxing FAQ...82 Networking 89 Installing the printer on a wireless network 89 Advanced wireless setup...94 Networking FAQ...100 Maintaining the printer 112 Maintaining ink cartridges...112 Cleaning the exterior of the printer...114 Cleaning the scanner glass...115 Troubleshooting 116 Before you troubleshoot......116 Using the Service Center to solve printer problems 116 If Troubleshooting does not solve your problem 116 Setup troubleshooting...116 Jams and misfeeds troubleshooting...122 Print...
User's Guide
Page 5
...this product to the public switched telephone network. SAVE THESE INSTRUCTIONS. Do not pinch the power cord between objects such as part of the printer, unplug the power cord from the wall outlet and disconnect all cables from the electrical outlet before proceeding. Safety information 5 Use only the... properly grounded electrical outlet that is near water or wet locations. To avoid injury, use of such problems. Remove the power cord from the printer before inspecting it. CAUTION-POTENTIAL INJURY: Do not cut, twist, bind, crush, or place heavy objects on the power cord. Do not ...
...this product to the public switched telephone network. SAVE THESE INSTRUCTIONS. Do not pinch the power cord between objects such as part of the printer, unplug the power cord from the wall outlet and disconnect all cables from the electrical outlet before proceeding. Safety information 5 Use only the... properly grounded electrical outlet that is near water or wet locations. To avoid injury, use of such problems. Remove the power cord from the printer before inspecting it. CAUTION-POTENTIAL INJURY: Do not cut, twist, bind, crush, or place heavy objects on the power cord. Do not ...
User's Guide
Page 6
...to protecting the environment and are the reason we do what we do, and your suggestions help you are continually improving our printers to reduce your printer's environmental impact even further. The "Pages per sheet" feature allows you 're satisfied. We're committed to delivering performance ... do it will be able to reduce their environmental impact. The Power Saver feature puts the printer in Toolbars, the Print or Print Preview dialog, or the printer display (depending on your printer model). • Scan and save them to a computer program, application, or flash drive ...
...to protecting the environment and are the reason we do what we do, and your suggestions help you are continually improving our printers to reduce your printer's environmental impact even further. The "Pages per sheet" feature allows you 're satisfied. We're committed to delivering performance ... do it will be able to reduce their environmental impact. The Power Saver feature puts the printer in Toolbars, the Print or Print Preview dialog, or the printer display (depending on your printer model). • Scan and save them to a computer program, application, or flash drive ...
User's Guide
Page 7
...ink cartridges, try using less ink than normal and are ideal for reuse or recycling through the Lexmark Cartridge Collection Program. Finding information about the printer Publications What are mostly text. • Use High Yield cartridges. Conserving ink • Use Quick... Print or Draft Mode. Before replacing and recycling your old printer instead of your printer 7 Follow the instructions to www.lexmark.com/recycle. Initial setup instructions: • Connecting the printer • Installing the printer software Find it away. • Recycle paper from discarded print...
...ink cartridges, try using less ink than normal and are ideal for reuse or recycling through the Lexmark Cartridge Collection Program. Finding information about the printer Publications What are mostly text. • Use High Yield cartridges. Conserving ink • Use Quick... Print or Draft Mode. Before replacing and recycling your old printer instead of your printer 7 Follow the instructions to www.lexmark.com/recycle. Initial setup instructions: • Connecting the printer • Installing the printer software Find it away. • Recycle paper from discarded print...
User's Guide
Page 8
...8226; Machine Type number • Serial number • Date purchased • Store where purchased In the US, call us at http://support.lexmark.com. Lexmark Support Web site- Record the following information (located on the store receipt and the back of operation for ? Click ? to view the ... for your region or country can be found on the Support Web site (http://support.lexmark.com) or on the printed warranty that came with the printer software. • The printer software is available on your printer. http://support.lexmark.com Note: Select your region, and then select your...
...8226; Machine Type number • Serial number • Date purchased • Store where purchased In the US, call us at http://support.lexmark.com. Lexmark Support Web site- Record the following information (located on the store receipt and the back of operation for ? Click ? to view the ... for your region or country can be found on the Support Web site (http://support.lexmark.com) or on the printed warranty that came with the printer software. • The printer software is available on your printer. http://support.lexmark.com Note: Select your region, and then select your...
User's Guide
Page 9
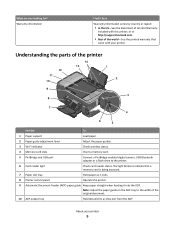
... on the ADF tray to the width of the original document. 10 ADF output tray Hold documents as it exits. 8 Printer control panel Operate the printer. 9 Automatic Document Feeder (ADF) paper guide Keep paper straight when feeding it here Warranty information varies by country or region...: • In the US-See the Statement of Limited Warranty included with this printer, or at http://support.lexmark.com. • Rest of the printer 12 11 10 14 13 1 2 9 8 WI F I PRINTING 3 7 WI F I PRINTING 4 6 5 Use the To 1 Paper support...
... on the ADF tray to the width of the original document. 10 ADF output tray Hold documents as it exits. 8 Printer control panel Operate the printer. 9 Automatic Document Feeder (ADF) paper guide Keep paper straight when feeding it here Warranty information varies by country or region...: • In the US-See the Statement of Limited Warranty included with this printer, or at http://support.lexmark.com. • Rest of the printer 12 11 10 14 13 1 2 9 8 WI F I PRINTING 3 7 WI F I PRINTING 4 6 5 Use the To 1 Paper support...

User's Guide
Page 10
...F I PRINTING 2 3 4 5 6 7 Use the To 1 Scanner lid Access the scanner glass. 2 Scanner glass Scan and copy photos and documents. 3 Power supply with port Connect the printer to a properly grounded electrical outlet that is near and easily accessible. 4 Duplex unit • Print on both sides of a sheet of paper. • Remove paper...glass. Use the 11 ADF tray 12 ADF 13 Paper feed guard 14 Paper guides To Load original documents in your printer 10 Recommended for the printer, and if this port if you do not have a dedicated fax line for scanning, copying, or faxing multiple-...
...F I PRINTING 2 3 4 5 6 7 Use the To 1 Scanner lid Access the scanner glass. 2 Scanner glass Scan and copy photos and documents. 3 Power supply with port Connect the printer to a properly grounded electrical outlet that is near and easily accessible. 4 Duplex unit • Print on both sides of a sheet of paper. • Remove paper...glass. Use the 11 ADF tray 12 ADF 13 Paper feed guard 14 Paper guides To Load original documents in your printer 10 Recommended for the printer, and if this port if you do not have a dedicated fax line for scanning, copying, or faxing multiple-...
User's Guide
Page 11
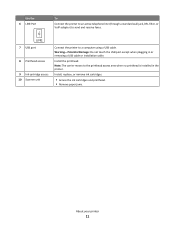
...is installed in or removing a USB cable or installation cable. Warning-Potential Damage: Do not touch the USB port except when plugging in the printer. Install, replace, or remove ink cartridges. • Access the ink cartridges and printhead. • Remove paper jams. About your... printer 11 Note: The carrier moves to a computer using a USB cable. Use the 6 LINE Port To Connect the printer to an active telephone line (through a standard wall jack, DSL filter, or VoIP adapter) to send...
...is installed in or removing a USB cable or installation cable. Warning-Potential Damage: Do not touch the USB port except when plugging in the printer. Install, replace, or remove ink cartridges. • Access the ink cartridges and printhead. • Remove paper jams. About your... printer 11 Note: The carrier moves to a computer using a USB cable. Use the 6 LINE Port To Connect the printer to an active telephone line (through a standard wall jack, DSL filter, or VoIP adapter) to send...
User's Guide
Page 12
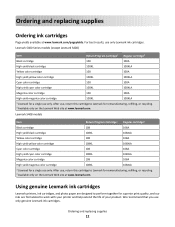
.... After use, return this cartridge to perform together for a single use only. Using genuine Lexmark ink cartridges Lexmark printers, ink cartridges, and photo paper are designed to Lexmark for a single use only. We recommend that you use only Lexmark ink cartridges. Lexmark S408 models Item Return Program Cartridge1 Regular cartridge2 Black cartridge 108 108A High yield...
.... After use, return this cartridge to perform together for a single use only. Using genuine Lexmark ink cartridges Lexmark printers, ink cartridges, and photo paper are designed to Lexmark for a single use only. We recommend that you use only Lexmark ink cartridges. Lexmark S408 models Item Return Program Cartridge1 Regular cartridge2 Black cartridge 108 108A High yield...

User's Guide
Page 13
Ordering and replacing supplies 13 If your printer. 2 Open the printer. You must install new cartridges immediately after removing the old ones, or the ink remaining in the printhead nozzles may dry out. 1 Turn on your ..., and then remove the protective cap from the ink cartridge. Replacing ink cartridges Make sure you have a new ink cartridge or cartridges before you begin. Lexmark's warranty does not cover damage caused by non...
Ordering and replacing supplies 13 If your printer. 2 Open the printer. You must install new cartridges immediately after removing the old ones, or the ink remaining in the printhead nozzles may dry out. 1 Turn on your ..., and then remove the protective cap from the ink cartridge. Replacing ink cartridges Make sure you have a new ink cartridge or cartridges before you begin. Lexmark's warranty does not cover damage caused by non...

User's Guide
Page 14
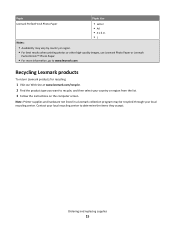
... after removing the protective cap to avoid exposing the ink to install the black cartridge. Use two hands to air. 6 Close the printer. Part Number 1021294 Paper Paper size Lexmark Photo Paper • Letter • A4 • 4 x 6 in. •L Notes: • Availability may vary by country or ... or to locate a dealer near you, visit our Web site at www.lexmark.com. Ordering paper and other high-quality images, use Lexmark Photo Paper or Lexmark PerfectFinishTM Photo Paper. • For more information, go to www.lexmark.com. Item USB cable For more information, go to www...
... after removing the protective cap to avoid exposing the ink to install the black cartridge. Use two hands to air. 6 Close the printer. Part Number 1021294 Paper Paper size Lexmark Photo Paper • Letter • A4 • 4 x 6 in. •L Notes: • Availability may vary by country or ... or to locate a dealer near you, visit our Web site at www.lexmark.com. Ordering paper and other high-quality images, use Lexmark Photo Paper or Lexmark PerfectFinishTM Photo Paper. • For more information, go to www.lexmark.com. Item USB cable For more information, go to www...
User's Guide
Page 15
...Note: Printer supplies and hardware not listed in . •L Notes: • Availability may be recycled through your local recycling center to recycle, and then select your country or region from the list. 3 Follow the instructions on the computer screen. Paper Paper size Lexmark PerfectFinish ...Photo Paper • Letter • A4 • 4 x 6 in a Lexmark collection program may vary by country or region. • For best results when printing photos or...
...Note: Printer supplies and hardware not listed in . •L Notes: • Availability may be recycled through your local recycling center to recycle, and then select your country or region from the list. 3 Follow the instructions on the computer screen. Paper Paper size Lexmark PerfectFinish ...Photo Paper • Letter • A4 • 4 x 6 in a Lexmark collection program may vary by country or region. • For best results when printing photos or...

User's Guide
Page 16
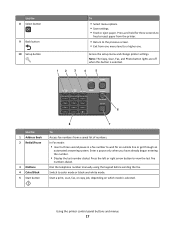
...seconds to turn off . • Switch to Power Saver mode. Access the copy menu and make copies. Note: When the printer is turned off in Power Saver mode. • Printer status • Messages • Menus 7 Arrow buttons Choose a menu or submenu item that appears on the display. Access ... the photo menu and print photos. 6 Display View: Note: The display is on, press to switch to Power Saver mode. Using the printer control panel buttons and menus Using the printer control panel 1 23 4 5 Use the 1 Power button 2 Copy button 3 Scan button 10 9 8 7 6 To • Turn the...
...seconds to turn off . • Switch to Power Saver mode. Access the copy menu and make copies. Note: When the printer is turned off in Power Saver mode. • Printer status • Messages • Menus 7 Arrow buttons Choose a menu or submenu item that appears on the display. Access ... the photo menu and print photos. 6 Display View: Note: The display is on, press to switch to Power Saver mode. Using the printer control panel buttons and menus Using the printer control panel 1 23 4 5 Use the 1 Power button 2 Copy button 3 Scan button 10 9 8 7 6 To • Turn the...
User's Guide
Page 17
... Dial the telephone number manually using the keypad before sending the fax. Switch to wait for three seconds to feed or eject paper from the printer. • Return to the previous screen. • Exit from a saved list of numbers. Enter a pause only when you have already begun... Eco-Mode Cancel 6 Use the 1 Address Book 2 Redial/Pause 3 Dialtone 4 Color/Black 5 Start button 8 7 To Access fax numbers from one . Using the printer control panel buttons and menus 17 Use the 8 Select button 9 Back button 10 Setup button 12 3 To • Select menu options. • Save settings. •...
... Dial the telephone number manually using the keypad before sending the fax. Switch to wait for three seconds to feed or eject paper from the printer. • Return to the previous screen. • Exit from a saved list of numbers. Enter a pause only when you have already begun... Eco-Mode Cancel 6 Use the 1 Address Book 2 Redial/Pause 3 Dialtone 4 Color/Black 5 Start button 8 7 To Access fax numbers from one . Using the printer control panel buttons and menus 17 Use the 8 Select button 9 Back button 10 Setup button 12 3 To • Select menu options. • Save settings. •...

User's Guide
Page 18
... prints you want to make. Use the To 6 2-Sided/Eco-Mode Activate 2-Sided to: • Print on both sides of inactivity or after the printer is turned off: Copy menu Scan menu Fax menu (selected models only) • Copies • Quality • Lighter/Darker • Resize •... Pages per Sheet • Copies per Sheet • Content Type • Quality • Original Size • Lighter/Darker • Quality Using the printer control panel buttons and menus 18 Activate Eco-Mode to: • Print on both sides of the paper (duplex). • Change to Power Saver mode...
... prints you want to make. Use the To 6 2-Sided/Eco-Mode Activate 2-Sided to: • Print on both sides of inactivity or after the printer is turned off: Copy menu Scan menu Fax menu (selected models only) • Copies • Quality • Lighter/Darker • Resize •... Pages per Sheet • Copies per Sheet • Content Type • Quality • Original Size • Lighter/Darker • Quality Using the printer control panel buttons and menus 18 Activate Eco-Mode to: • Print on both sides of the paper (duplex). • Change to Power Saver mode...

User's Guide
Page 19
...Current. 5 Press until you exit Setup, or press another mode button. To save the most energy, select the lowest Power Saver timeout. 1 From the printer control panel, press . 2 Press the arrow buttons to scroll to Device Setup, and then press . 3 Press the arrow buttons to scroll to Power ... is removed. • Photo Effects • Photo Size • Layout • Quality To change the temporary settings into new default settings 1 From the printer control panel, press . 2 Press the arrow buttons to scroll to Defaults, and then press . 3 Press the arrow buttons to scroll to Set Defaults, ...
...Current. 5 Press until you exit Setup, or press another mode button. To save the most energy, select the lowest Power Saver timeout. 1 From the printer control panel, press . 2 Press the arrow buttons to scroll to Device Setup, and then press . 3 Press the arrow buttons to scroll to Power ... is removed. • Photo Effects • Photo Size • Layout • Quality To change the temporary settings into new default settings 1 From the printer control panel, press . 2 Press the arrow buttons to scroll to Defaults, and then press . 3 Press the arrow buttons to scroll to Set Defaults, ...
User's Guide
Page 20
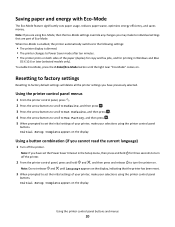
... to Set Defaults, and then press . 4 Press the arrow buttons to scroll to Use Factory, and then press . 5 When prompted to turn off the printer. Using a button combination (if you have previously selected. Note: Do not release and until the light near "Eco-Mode" comes on the display. Using the...To enable Eco-Mode, press the 2-Sided/Eco-Mode button until Language appears on . Note: If you cannot read the current language) 1 Turn off the printer. 2 From the printer control panel, press and hold and , and then press and release to Power Saver mode after ten minutes. • The...
... to Set Defaults, and then press . 4 Press the arrow buttons to scroll to Use Factory, and then press . 5 When prompted to turn off the printer. Using a button combination (if you have previously selected. Note: Do not release and until the light near "Eco-Mode" comes on the display. Using the...To enable Eco-Mode, press the 2-Sided/Eco-Mode button until Language appears on . Note: If you cannot read the current language) 1 Turn off the printer. 2 From the printer control panel, press and hold and , and then press and release to Power Saver mode after ten minutes. • The...
User's Guide
Page 21
...printer software requires up the printer using the installation software CD, all the necessary software was installed. If you did not install these additional programs during printer installation When you set up to 500MB of various software programs and what they can help you do. Using the printer... software 21 Using the Windows printer software Software installed during initial installation, then reinsert the installation... Linux Fedora 10 (Web only)* * The printer driver for this operating system is available only at http://support...
...printer software requires up the printer using the installation software CD, all the necessary software was installed. If you did not install these additional programs during printer installation When you set up to 500MB of various software programs and what they can help you do. Using the printer... software 21 Using the Windows printer software Software installed during initial installation, then reinsert the installation... Linux Fedora 10 (Web only)* * The printer driver for this operating system is available only at http://support...


