Lexmark 4227 User's Guide
Page 3
... or Offline 46 Stopping the Printer 46 Advancing the Paper 46 Using Tear-Off 47 Auto Tear-Off Set to do Next 24 Chapter 2 - Getting Started 1 Unpacking 1 Installing the Ribbon Cartridge 4 Connecting the Power Cord 9 Connecting the Parallel Cable 10 Connecting ...the Serial Cable 12 Changing the Serial Settings 14 Verifying Serial Interface Settings 15 Printing the Demonstration Page 16 Setting the Language of Printer 29 Supplies 30 Chapter 3 -...
... or Offline 46 Stopping the Printer 46 Advancing the Paper 46 Using Tear-Off 47 Auto Tear-Off Set to do Next 24 Chapter 2 - Getting Started 1 Unpacking 1 Installing the Ribbon Cartridge 4 Connecting the Power Cord 9 Connecting the Parallel Cable 10 Connecting ...the Serial Cable 12 Changing the Serial Settings 14 Verifying Serial Interface Settings 15 Printing the Demonstration Page 16 Setting the Language of Printer 29 Supplies 30 Chapter 3 -...
Lexmark 4227 User's Guide
Page 5
...97 Loading Paper in the Tractor 2 Feeder 102 Parking Continuous Forms and Changing Tractor Feeders. . 111 Removing the Tractor 2 Feeder 113 Chapter 6 - Statement of Limited Warranty . . . 141 Contents v Solving Printer Problems 115 Testing the Printer 116 Clearing Paper Jams 117 Problem Conditions 118 Problems Indicated ... Operator Panel Button Problem 125 Display Messages 126 Chapter 7 - Contents Chapter 5 - Notices 133 Appendix B - Maintaining Your Printer 129 Cleaning the Printer 129 Cleaning the Auto Sheet Feeder Rollers 130 Removing the Ribbon Cartridge 131 Appendix A -
...97 Loading Paper in the Tractor 2 Feeder 102 Parking Continuous Forms and Changing Tractor Feeders. . 111 Removing the Tractor 2 Feeder 113 Chapter 6 - Statement of Limited Warranty . . . 141 Contents v Solving Printer Problems 115 Testing the Printer 116 Clearing Paper Jams 117 Problem Conditions 118 Problems Indicated ... Operator Panel Button Problem 125 Display Messages 126 Chapter 7 - Contents Chapter 5 - Notices 133 Appendix B - Maintaining Your Printer 129 Cleaning the Printer 129 Cleaning the Auto Sheet Feeder Rollers 130 Removing the Ribbon Cartridge 131 Appendix A -

Lexmark 4227 User's Guide
Page 7
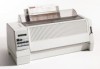
User's Guide Reference Card Acoustic Cover Printer Registration Card Ribbon Cartridge Power Cord If any items are missing or damaged, contact your point of purchase. Chapter 1: Getting Started 1 Getting Started Getting Started Chapter 1 Unpacking 1 Remove the printer from the carton. If you need to purchase a parallel printer cable, we recommend Lexmark part number 1180786 (6.1 m or 20...
User's Guide Reference Card Acoustic Cover Printer Registration Card Ribbon Cartridge Power Cord If any items are missing or damaged, contact your point of purchase. Chapter 1: Getting Started 1 Getting Started Getting Started Chapter 1 Unpacking 1 Remove the printer from the carton. If you need to purchase a parallel printer cable, we recommend Lexmark part number 1180786 (6.1 m or 20...
Lexmark 4227 User's Guide
Page 10
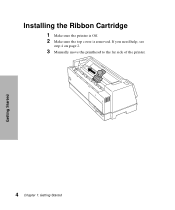
Getting Started Installing the Ribbon Cartridge 1 Make sure the printer is Off. 2 Make sure the top cover is removed. If you need help, see step 4 on page 2. 3 Manually move the printhead to the far side of the printer. 4 Chapter 1: Getting Started
Getting Started Installing the Ribbon Cartridge 1 Make sure the printer is Off. 2 Make sure the top cover is removed. If you need help, see step 4 on page 2. 3 Manually move the printhead to the far side of the printer. 4 Chapter 1: Getting Started
Lexmark 4227 User's Guide
Page 11
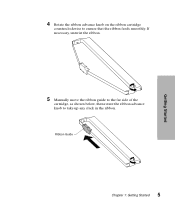
Ribbon Guide Chapter 1: Getting Started 5 Getting Started 5 Manually move the ribbon guide to the far side of the cartridge, as shown below, then rotate the ribbon advance knob to ensure that the ribbon feeds smoothly. If necessary, untwist the ribbon. 4 Rotate the ribbon advance knob on the ribbon cartridge counterclockwise to take up any slack in the ribbon.
Ribbon Guide Chapter 1: Getting Started 5 Getting Started 5 Manually move the ribbon guide to the far side of the cartridge, as shown below, then rotate the ribbon advance knob to ensure that the ribbon feeds smoothly. If necessary, untwist the ribbon. 4 Rotate the ribbon advance knob on the ribbon cartridge counterclockwise to take up any slack in the ribbon.
Lexmark 4227 User's Guide
Page 12
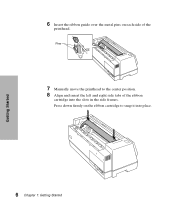
Press down firmly on each side of the ribbon cartridge into place. 6 Chapter 1: Getting Started Pins 7 Manually move the printhead to snap it into the slots in the side frames. Getting Started 6 Insert the ribbon guide over the metal pins on the ribbon cartridge to the center position. 8 Align and insert the left and right side tabs of the printhead.
Press down firmly on each side of the ribbon cartridge into place. 6 Chapter 1: Getting Started Pins 7 Manually move the printhead to snap it into the slots in the side frames. Getting Started 6 Insert the ribbon guide over the metal pins on the ribbon cartridge to the center position. 8 Align and insert the left and right side tabs of the printhead.
Lexmark 4227 User's Guide
Page 13
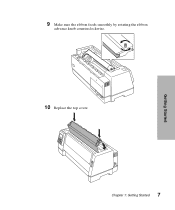
Getting Started Chapter 1: Getting Started 7 9 Make sure the ribbon feeds smoothly by rotating the ribbon advance knob counterclockwise. 10 Replace the top cover.
Getting Started Chapter 1: Getting Started 7 9 Make sure the ribbon feeds smoothly by rotating the ribbon advance knob counterclockwise. 10 Replace the top cover.

Lexmark 4227 User's Guide
Page 34
Selects the paper type: • Cut form sheets ( ) • Continuous forms ( ) Supports cut form sheet. Switches power On or Off. Features and Functions 28 Chapter 2: Features and Functions Covers the ribbon cartridge and internal components. Part Name Paper guides Paper select lever Paper supports Power switch Top cover Function Aligns the margins of a cut forms when they are ejected from the printer.
Selects the paper type: • Cut form sheets ( ) • Continuous forms ( ) Supports cut form sheet. Switches power On or Off. Features and Functions 28 Chapter 2: Features and Functions Covers the ribbon cartridge and internal components. Part Name Paper guides Paper select lever Paper supports Power switch Top cover Function Aligns the margins of a cut forms when they are ejected from the printer.
Lexmark 4227 User's Guide
Page 36
... Functions Supplies A parallel or serial cable, ribbon cartridges, and paper are the only supplies you need for the types and sizes of paper you can order a serial cable from Lexmark. See "Paper Types and Sizes" on page 55 for your printer. 30 Chapter 2: Features and Functions You ...can use with your printer. You can order a parallel cable from Lexmark. Order Lexmark part number 1180786 (6.1 m or 20 ft.) and part...
... Functions Supplies A parallel or serial cable, ribbon cartridges, and paper are the only supplies you need for the types and sizes of paper you can order a serial cable from Lexmark. See "Paper Types and Sizes" on page 55 for your printer. 30 Chapter 2: Features and Functions You ...can use with your printer. You can order a parallel cable from Lexmark. Order Lexmark part number 1180786 (6.1 m or 20 ft.) and part...
Lexmark 4227 User's Guide
Page 83
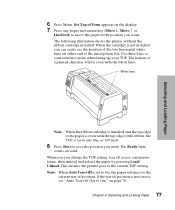
... one line, or 1/6 inch. 8 Press Store to the current tear off excess continuous forms, then unload and reload the paper by pressing Load/ Unload. The following illustration shows the printer without the ribbon cartridge installed. Use these lines as your reference point when lining up your TOF. This ...ensures the printer goes to On)" on solid. If the tear off position is set to ...
... one line, or 1/6 inch. 8 Press Store to the current tear off excess continuous forms, then unload and reload the paper by pressing Load/ Unload. The following illustration shows the printer without the ribbon cartridge installed. Use these lines as your reference point when lining up your TOF. This ...ensures the printer goes to On)" on solid. If the tear off position is set to ...
Lexmark 4227 User's Guide
Page 122
... connected to your computer, make sure paper and ribbon are installed. If the menu settings do not print, contact your point of purchase or see the printer registration card for the number appropriate for your printer is turned on , it performs an internal check, or Power-On ...Self Test, of its settings. Solving Printer Problems Testing the Printer Each time you test the printer, make sure the computer is not connected to your computer. The menu settings print. The printer can run a printer test: 1 Turn the printer On. 2 Press Menu. 3 Press Item ↓ until ...
... connected to your computer, make sure paper and ribbon are installed. If the menu settings do not print, contact your point of purchase or see the printer registration card for the number appropriate for your printer is turned on , it performs an internal check, or Power-On ...Self Test, of its settings. Solving Printer Problems Testing the Printer Each time you test the printer, make sure the computer is not connected to your computer. The menu settings print. The printer can run a printer test: 1 Turn the printer On. 2 Press Menu. 3 Press Item ↓ until ...
Lexmark 4227 User's Guide
Page 123
If the forms are blocked by the ribbon, remove the ribbon cartridge before attempting to remove the forms. For instructions on removing and loading the ribbon cartridge, see "Loading Continuous Forms" on the display. Solving Printer Problems Clearing Paper Jams Use the following procedures to remove paper jams from...bar and front bottom openings of the printer. When jams occur, the Check light is removed from inside the printer, then close the top cover. 6 Reload the forms (see "Removing the Ribbon Cartridge" on page 131 or "Installing the Ribbon Cartridge" on page 4. 5 Make sure...
If the forms are blocked by the ribbon, remove the ribbon cartridge before attempting to remove the forms. For instructions on removing and loading the ribbon cartridge, see "Loading Continuous Forms" on the display. Solving Printer Problems Clearing Paper Jams Use the following procedures to remove paper jams from...bar and front bottom openings of the printer. When jams occur, the Check light is removed from inside the printer, then close the top cover. 6 Reload the forms (see "Removing the Ribbon Cartridge" on page 131 or "Installing the Ribbon Cartridge" on page 4. 5 Make sure...
Lexmark 4227 User's Guide
Page 124
.... Problem Conditions Perform the steps listed for each condition to correct the problem. Action: Change the ribbon cartridge. Action: Turn off the printer and remove the jammed paper from the printer (see "Clearing Paper Jams" on page 55. • Ribbon guide is broken. Action: Load forms or paper in the printer and press Start/ Stop. •...
.... Problem Conditions Perform the steps listed for each condition to correct the problem. Action: Change the ribbon cartridge. Action: Turn off the printer and remove the jammed paper from the printer (see "Clearing Paper Jams" on page 55. • Ribbon guide is broken. Action: Load forms or paper in the printer and press Start/ Stop. •...
Lexmark 4227 User's Guide
Page 127
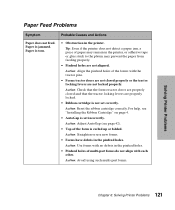
...not aligned. Action: Avoid using such multi-part forms. Chapter 6: Solving Printer Problems 121 Paper is torn. • Obstruction in the pinfeed holes. • Pinfeed holes of the forms with each other. Action: Adjust AutoGap (see "Installing the Ribbon Cartridge" on page 4. • AutoGap is ...set correctly. Tip: Even if the printer does not detect a paper jam, a piece of the form is not set incorrectly. Paper is jammed...
...not aligned. Action: Avoid using such multi-part forms. Chapter 6: Solving Printer Problems 121 Paper is torn. • Obstruction in the pinfeed holes. • Pinfeed holes of the forms with each other. Action: Adjust AutoGap (see "Installing the Ribbon Cartridge" on page 4. • AutoGap is ...set correctly. Tip: Even if the printer does not detect a paper jam, a piece of the form is not set incorrectly. Paper is jammed...
Lexmark 4227 User's Guide
Page 128
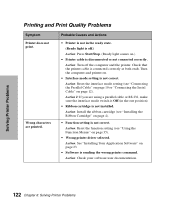
... or not connected correctly. Action: Reset the function setting (see "Installing the Ribbon Cartridge" on page 12). Turn the computer and printer on page 35). • Wrong printer driver selected. Probable Causes and Actions • Printer is not in the out position) • Ribbon cartridge is not correct. Action: Turn off .) Action: Press Start/Stop...
... or not connected correctly. Action: Reset the function setting (see "Installing the Ribbon Cartridge" on page 12). Turn the computer and printer on page 35). • Wrong printer driver selected. Probable Causes and Actions • Printer is not in the out position) • Ribbon cartridge is not correct. Action: Turn off .) Action: Press Start/Stop...

Lexmark 4227 User's Guide
Page 129
... worn or dry. Action: Replace the ribbon cartridge. Action: Replace the ribbon cartridge. For help , see "Installing the Ribbon Cartridge" on page 4. • Ribbon is twisted or ribbon edge is not working. Chapter 6: Solving Printer Problems 123 Action: Adjust AutoGap (see "Installing the Ribbon Cartridge" on page 4. • Printhead is folded. Forms are missing. Tip: Mark the date...
... worn or dry. Action: Replace the ribbon cartridge. Action: Replace the ribbon cartridge. For help , see "Installing the Ribbon Cartridge" on page 4. • Ribbon is twisted or ribbon edge is not working. Chapter 6: Solving Printer Problems 123 Action: Adjust AutoGap (see "Installing the Ribbon Cartridge" on page 4. • Printhead is folded. Forms are missing. Tip: Mark the date...
Lexmark 4227 User's Guide
Page 130
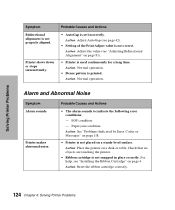
...to indicate the following error conditions: - Action: Place the printer on page 81). • Printer is used continuously for a long time. Action: Adjust AutoGap (see "Installing the Ribbon Cartridge" on a sturdy level surface. Printer makes abnormal noise. Action: See "Problems Indicated by Error... that no objects are touching the printer. • Ribbon cartridge is printed. For help, see page 42). • Setting of the Print Adjust value is not properly aligned. Action: Reset the ribbon cartridge correctly. 124 Chapter 6: Solving Printer Problems Action: Normal operation. EOF ...
...to indicate the following error conditions: - Action: Place the printer on page 81). • Printer is used continuously for a long time. Action: Adjust AutoGap (see "Installing the Ribbon Cartridge" on a sturdy level surface. Printer makes abnormal noise. Action: See "Problems Indicated by Error... that no objects are touching the printer. • Ribbon cartridge is printed. For help, see page 42). • Setting of the Print Adjust value is not properly aligned. Action: Reset the ribbon cartridge correctly. 124 Chapter 6: Solving Printer Problems Action: Normal operation. EOF ...
Lexmark 4227 User's Guide
Page 135
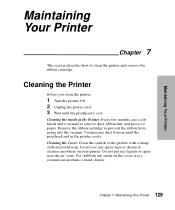
... and mild soap. Cleaning the inside of the Printer: Every few months, use a commercial mechanic's hand cleaner. Remove the ribbon cartridge to clean the printer and remove the ribbon cartridge. Cleaning the Cover: Clean the outside of paper. Cleaning the Printer Before you clean the printer: 1 Turn the printer Off. 2 Unplug the power cord. 3 Wait until the...
... and mild soap. Cleaning the inside of the Printer: Every few months, use a commercial mechanic's hand cleaner. Remove the ribbon cartridge to clean the printer and remove the ribbon cartridge. Cleaning the Cover: Clean the outside of paper. Cleaning the Printer Before you clean the printer: 1 Turn the printer Off. 2 Unplug the power cord. 3 Wait until the...
Lexmark 4227 User's Guide
Page 137
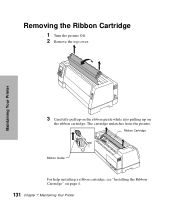
Ribbon Cartridge Ribbon Guide For help installing a ribbon cartridge, see "Installing the Ribbon Cartridge" on the ribbon cartridge. The cartridge unlatches from the printer. Maintaining Your Printer Removing the Ribbon Cartridge 1 Turn the printer Off. 2 Remove the top cover. 3 Carefully pull up on the ribbon guide while also pulling up on page 4. 131 Chapter 7: Maintaining Your Printer
Ribbon Cartridge Ribbon Guide For help installing a ribbon cartridge, see "Installing the Ribbon Cartridge" on the ribbon cartridge. The cartridge unlatches from the printer. Maintaining Your Printer Removing the Ribbon Cartridge 1 Turn the printer Off. 2 Remove the top cover. 3 Carefully pull up on the ribbon guide while also pulling up on page 4. 131 Chapter 7: Maintaining Your Printer
Lexmark 4227 User's Guide
Page 156
... installing application software 23 auto sheet feeder 87 ribbon cartridge 4-7 Interface Options 44 J jams, clearing 117 L language, setting 21 left margin, aligning continuous forms 75 envelopes 74 single sheets 74 Load Macro 39 loading continuous forms tractor 70 tractor 2 feeder 102 envelopes manual ...feed 59 with continuous forms 65 single sheets manual feed 59 tractor 2 feeder 107 with continuous forms 65 locking font 51 pitch 51 M Macro x Options 40 macros, setting and using 52 maintenance cleaning printer 129 ribbon cartridge 131 Manual AutoGap settings 50 margins,...
... installing application software 23 auto sheet feeder 87 ribbon cartridge 4-7 Interface Options 44 J jams, clearing 117 L language, setting 21 left margin, aligning continuous forms 75 envelopes 74 single sheets 74 Load Macro 39 loading continuous forms tractor 70 tractor 2 feeder 102 envelopes manual ...feed 59 with continuous forms 65 single sheets manual feed 59 tractor 2 feeder 107 with continuous forms 65 locking font 51 pitch 51 M Macro x Options 40 macros, setting and using 52 maintenance cleaning printer 129 ribbon cartridge 131 Manual AutoGap settings 50 margins,...

