
Lexmark 4227 User's Guide
Page 4
... Sizes 55 Single Sheets 56 Multiple Part Single Sheets 56 Single Continuous Forms 57 Multiple Part Continuous Forms 57 Envelopes 58 Multiple Part Forms 58 Loading a Single Sheet or Envelope 59 Loading a Single Sheet or Envelope into the Manual Feed . . . 59 Setting Auto Cut Sheet Load 64 Loading... a Single Sheet or Envelope With Continuous Forms Already Loaded 65 Loading Continuous Forms 70 Aligning the Left Margin 74 Top-Of-Form (TOF 76 Setting TOF for Continuous Forms 76 Setting TOF for Single...
... Sizes 55 Single Sheets 56 Multiple Part Single Sheets 56 Single Continuous Forms 57 Multiple Part Continuous Forms 57 Envelopes 58 Multiple Part Forms 58 Loading a Single Sheet or Envelope 59 Loading a Single Sheet or Envelope into the Manual Feed . . . 59 Setting Auto Cut Sheet Load 64 Loading... a Single Sheet or Envelope With Continuous Forms Already Loaded 65 Loading Continuous Forms 70 Aligning the Left Margin 74 Top-Of-Form (TOF 76 Setting TOF for Continuous Forms 76 Setting TOF for Single...
Lexmark 4227 User's Guide
Page 10
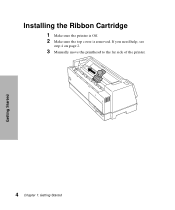
If you need help, see step 4 on page 2. 3 Manually move the printhead to the far side of the printer. 4 Chapter 1: Getting Started Getting Started Installing the Ribbon Cartridge 1 Make sure the printer is Off. 2 Make sure the top cover is removed.
If you need help, see step 4 on page 2. 3 Manually move the printhead to the far side of the printer. 4 Chapter 1: Getting Started Getting Started Installing the Ribbon Cartridge 1 Make sure the printer is Off. 2 Make sure the top cover is removed.
Lexmark 4227 User's Guide
Page 11
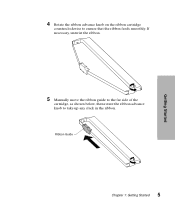
4 Rotate the ribbon advance knob on the ribbon cartridge counterclockwise to take up any slack in the ribbon. If necessary, untwist the ribbon. Getting Started 5 Manually move the ribbon guide to the far side of the cartridge, as shown below, then rotate the ribbon advance knob to ensure that the ribbon feeds smoothly. Ribbon Guide Chapter 1: Getting Started 5
4 Rotate the ribbon advance knob on the ribbon cartridge counterclockwise to take up any slack in the ribbon. If necessary, untwist the ribbon. Getting Started 5 Manually move the ribbon guide to the far side of the cartridge, as shown below, then rotate the ribbon advance knob to ensure that the ribbon feeds smoothly. Ribbon Guide Chapter 1: Getting Started 5
Lexmark 4227 User's Guide
Page 12
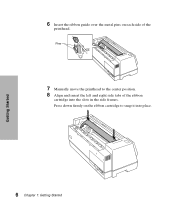
Pins 7 Manually move the printhead to snap it into the slots in the side frames. Getting Started 6 Insert the ribbon guide over the metal pins on the ribbon cartridge to the center position. 8 Align and insert the left and right side tabs of the printhead. Press down firmly on each side of the ribbon cartridge into place. 6 Chapter 1: Getting Started
Pins 7 Manually move the printhead to snap it into the slots in the side frames. Getting Started 6 Insert the ribbon guide over the metal pins on the ribbon cartridge to the center position. 8 Align and insert the left and right side tabs of the printhead. Press down firmly on each side of the ribbon cartridge into place. 6 Chapter 1: Getting Started

Lexmark 4227 User's Guide
Page 23
Chapter 1: Getting Started 17 Getting Started 4 Open the manual feed door.
Chapter 1: Getting Started 17 Getting Started 4 Open the manual feed door.

Lexmark 4227 User's Guide
Page 33
Front View of printer functions simple and convenient. 27 Chapter 2: Features and Functions Covers the continuous forms tractor. Manual feed of cut forms. Indicates printer status and makes control of Printer Operator Panel Top Cover Manual Feed Door Paper Supports Acoustic Cover Features and Functions Paper Guides Front Cover Paper Select Lever Power Switch Part Name Acoustic cover Front cover Manual feed door Operator panel Function Lowers noise level produced by the printer.
Front View of printer functions simple and convenient. 27 Chapter 2: Features and Functions Covers the continuous forms tractor. Manual feed of cut forms. Indicates printer status and makes control of Printer Operator Panel Top Cover Manual Feed Door Paper Supports Acoustic Cover Features and Functions Paper Guides Front Cover Paper Select Lever Power Switch Part Name Acoustic cover Front cover Manual feed door Operator panel Function Lowers noise level produced by the printer.

Lexmark 4227 User's Guide
Page 48
printed upon . - Allows you to manually specify the thickness of the paper being printed upon . - - Adjusts the printhead to the paper thickness: • when you turn the printer on, • when you want to specify how thick the paper is. Select this option when... select lever. - Using the Operator Panel 42 Chapter 3: Using the Operator Panel Manual Position: 1, 2, 3, 4, 5, 6, 7 Single Open, Fixed - Automatically adjusts the printer "Default Macro", this option when you want the printer to the thickness of the paper being appears in - Select this item to check...
printed upon . - Allows you to manually specify the thickness of the paper being printed upon . - - Adjusts the printhead to the paper thickness: • when you turn the printer on, • when you want to specify how thick the paper is. Select this option when... select lever. - Using the Operator Panel 42 Chapter 3: Using the Operator Panel Manual Position: 1, 2, 3, 4, 5, 6, 7 Single Open, Fixed - Automatically adjusts the printer "Default Macro", this option when you want the printer to the thickness of the paper being appears in - Select this item to check...

Lexmark 4227 User's Guide
Page 53
...-Off Set to On When Auto Tear-Off is set to the TOF position The continuous form remains at the tear-off position until the printer receives the next print request. At that time, the continuous form moves from the tear-off position when Auto Tear-Off is set Auto Tear-Off, see... page 41. Tear-Off can be set to move a continuous form automatically to the tear-off position when Auto Tear-Off is set to On, or it can be set so you can move a continuous form manually to the tear-off position to the TOF (load position) to the tear...
...-Off Set to On When Auto Tear-Off is set to the TOF position The continuous form remains at the tear-off position until the printer receives the next print request. At that time, the continuous form moves from the tear-off position when Auto Tear-Off is set Auto Tear-Off, see... page 41. Tear-Off can be set to move a continuous form automatically to the tear-off position when Auto Tear-Off is set to On, or it can be set so you can move a continuous form manually to the tear-off position to the TOF (load position) to the tear...

Lexmark 4227 User's Guide
Page 54
... "Auto Tear-Off (Set to Off)" on page 80. You can manually advance the perforation of space that the printer places between the printhead and the paper. Setting AutoGap The AutoGap function determines the amount of a continuous form to the tear-off position if a print job ends and no data is...received within one second, continuous form paper automatically advances to the tear-off position by pressing Tear Off, assuming the print position is still on page 80. Manual Tear-Off (Auto Tear-Off Set to Off) When Auto Tear-Off is set to On, the printer automatically sets itself to the...
... "Auto Tear-Off (Set to Off)" on page 80. You can manually advance the perforation of space that the printer places between the printhead and the paper. Setting AutoGap The AutoGap function determines the amount of a continuous form to the tear-off position if a print job ends and no data is...received within one second, continuous form paper automatically advances to the tear-off position by pressing Tear Off, assuming the print position is still on page 80. Manual Tear-Off (Auto Tear-Off Set to Off) When Auto Tear-Off is set to On, the printer automatically sets itself to the...
Lexmark 4227 User's Guide
Page 55
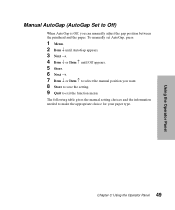
... appears. 5 Store. 6 Next →. 7 Item ↓ or Item ↑ to select the manual position you can manually adjust the gap position between the printhead and the paper. The following table gives the manual setting choices and the information needed to exit the function menu. Using the Operator Panel... Manual AutoGap (AutoGap Set to Off) When AutoGap is Off, you want. 8 Store to save the setting...
... appears. 5 Store. 6 Next →. 7 Item ↓ or Item ↑ to select the manual position you can manually adjust the gap position between the printhead and the paper. The following table gives the manual setting choices and the information needed to exit the function menu. Using the Operator Panel... Manual AutoGap (AutoGap Set to Off) When AutoGap is Off, you want. 8 Store to save the setting...

Lexmark 4227 User's Guide
Page 56
... paper's thickness when you turn the printer on several cut sheets of the same thickness while using the Auto Sheet Feeder. Using the Operator Panel Manual AutoGap Settings Paper Type Paper Thickness Weight of Paper Manual Setting Single Forms (Single Sheets or Continuous Forms) Thin Normal Thick Multiple-Part Forms __ When the setting is 4 or...
... paper's thickness when you turn the printer on several cut sheets of the same thickness while using the Auto Sheet Feeder. Using the Operator Panel Manual AutoGap Settings Paper Type Paper Thickness Weight of Paper Manual Setting Single Forms (Single Sheets or Continuous Forms) Thin Normal Thick Multiple-Part Forms __ When the setting is 4 or...

Lexmark 4227 User's Guide
Page 65
...4 Move the paper select lever up to On or Single AutoGap. If continuous forms are currently loaded, park them by pressing Load/Unload. 3 Make sure AutoGap is clear. Loading a Single Sheet or Envelope into the manual feed. Note: If you have installed the optional Auto Sheet Feeder or Tractor ...for paper loading instructions. Selecting and Loading Paper Loading a Single Sheet or Envelope Single sheets or multi-part forms can be loaded one at a time into the Manual Feed 1 Turn the printer On. 2 Make sure the paper path is set to the single sheets position. 59 Chapter 4: Selecting and...
...4 Move the paper select lever up to On or Single AutoGap. If continuous forms are currently loaded, park them by pressing Load/Unload. 3 Make sure AutoGap is clear. Loading a Single Sheet or Envelope into the manual feed. Note: If you have installed the optional Auto Sheet Feeder or Tractor ...for paper loading instructions. Selecting and Loading Paper Loading a Single Sheet or Envelope Single sheets or multi-part forms can be loaded one at a time into the Manual Feed 1 Turn the printer On. 2 Make sure the paper path is set to the single sheets position. 59 Chapter 4: Selecting and...

Lexmark 4227 User's Guide
Page 66
5 Pull the paper supports up. Paper Supports Paper Select Lever 6 Open the manual feed door. Selecting and Loading Paper 60 Chapter 4: Selecting and Loading Paper
5 Pull the paper supports up. Paper Supports Paper Select Lever 6 Open the manual feed door. Selecting and Loading Paper 60 Chapter 4: Selecting and Loading Paper

Lexmark 4227 User's Guide
Page 72
Manual Feed Door Paper Select Lever 66 Chapter 4: Selecting and Loading Paper Selecting and Loading Paper 6 Open the manual feed door. 7 Move the paper select lever up to the single sheets position.
Manual Feed Door Paper Select Lever 66 Chapter 4: Selecting and Loading Paper Selecting and Loading Paper 6 Open the manual feed door. 7 Move the paper select lever up to the single sheets position.

Lexmark 4227 User's Guide
Page 80
Manually-Loaded Single Sheets or Envelopes To set the left margin for single sheets or envelopes, move the left...Loading Paper For example, if you make a left margin setting in your application software, the printer begins printing 2 inches from your application software, it is indicated by the [A symbol. You can manually change the first print position at 1 inch (2.54 cm) in your application software. Selecting ... is added to the left margin. If you set the left margin at 1 inch (2.54 cm) on the printer, and also have the left margin set at the left margin setting on the...
Manually-Loaded Single Sheets or Envelopes To set the left margin for single sheets or envelopes, move the left...Loading Paper For example, if you make a left margin setting in your application software, the printer begins printing 2 inches from your application software, it is indicated by the [A symbol. You can manually change the first print position at 1 inch (2.54 cm) in your application software. Selecting ... is added to the left margin. If you set the left margin at 1 inch (2.54 cm) on the printer, and also have the left margin set at the left margin setting on the...

Lexmark 4227 User's Guide
Page 84
... position. 4 Load a cut sheet paper. For help , see "Setting and Using a Macro" on page 52. 2 Set Top of paper or envelope through the manual feed. Selecting and Loading Paper Setting TOF for Single Sheets and Envelopes" on solid. Setting TOF in the currently selected macro. 78 Chapter 4: Selecting and...from minus 2.54 cm (1 in.) to plus 55.88 cm (22 in.) from the top of cut sheet of Form. To set and save TOF: 1 Turn the printer On. 2 Make sure continuous forms are parked (press Load/Unload.) The operator panel displays a Paper Empty/Add Paper message. 3 Move the paper select ...
... position. 4 Load a cut sheet paper. For help , see "Setting and Using a Macro" on page 52. 2 Set Top of paper or envelope through the manual feed. Selecting and Loading Paper Setting TOF for Single Sheets and Envelopes" on solid. Setting TOF in the currently selected macro. 78 Chapter 4: Selecting and...from minus 2.54 cm (1 in.) to plus 55.88 cm (22 in.) from the top of cut sheet of Form. To set and save TOF: 1 Turn the printer On. 2 Make sure continuous forms are parked (press Load/Unload.) The operator panel displays a Paper Empty/Add Paper message. 3 Move the paper select ...

Lexmark 4227 User's Guide
Page 86
... and Loading Paper Auto Tear-Off (Set to Off) When Auto Tear-Off is off, press Tear Off/Store to manually move the continuous form paper to the tear-off position. The printer beeps twice. The paper rolls backward, then goes to the new tear-off position. 1 When your application software has ... is out of range. 3 Press Start/Stop to set to one second, Auto Tear-Off automatically moves the continuous form paper to function in One-Second mode: 1 Press Start/Stop to take the printer offline. 2 Press Micro ↓ or Micro ↑ to move the paper to the tear-off position. To...
... and Loading Paper Auto Tear-Off (Set to Off) When Auto Tear-Off is off, press Tear Off/Store to manually move the continuous form paper to the tear-off position. The printer beeps twice. The paper rolls backward, then goes to the new tear-off position. 1 When your application software has ... is out of range. 3 Press Start/Stop to set to one second, Auto Tear-Off automatically moves the continuous form paper to function in One-Second mode: 1 Press Start/Stop to take the printer offline. 2 Press Micro ↓ or Micro ↑ to move the paper to the tear-off position. To...

Lexmark 4227 User's Guide
Page 91
If you can also print on continuous forms loaded in the printer's tractor feeder while the Auto Sheet Feeder is located on the printer, and load paper in a tray instead of manually feeding each sheet. Front Cover Front Paper Supports Wire Paper Supports Chapter 5: Printer Options 85 With the Auto Sheet Feeder installed, you need to...
If you can also print on continuous forms loaded in the printer's tractor feeder while the Auto Sheet Feeder is located on the printer, and load paper in a tray instead of manually feeding each sheet. Front Cover Front Paper Supports Wire Paper Supports Chapter 5: Printer Options 85 With the Auto Sheet Feeder installed, you need to...

Lexmark 4227 User's Guide
Page 92
The paper you use in .) paper width or less. Printer Options 86 Chapter 5: Printer Options Manual Insertion Mode (Single-/Multi-part Form) Length 139.7 mm (5.5 in.) minimum 355.6 mm (14.0 in.) maximum1 558.8 mm (22 in.)2 Width 76.2 mm (3.0 in.) minimum 420 mm (16.5 in.) maximum ... 90 g/m2 (16 ~ 24 lbs) 1 Paper width greater than 215.9 mm (8.5 in.). 2 For 215.9 mm (8.5 in.) paper width or less. . Automatic Feed Mode (Single-part Form) Length 139.7 mm (5.5 in.) minimum 355.6 mm (14.0 in.) maximum1 558.8 mm (22 in.)2 Width 105 mm (4.13 in.) minimum 364 mm (14.3 in.) maximum...
The paper you use in .) paper width or less. Printer Options 86 Chapter 5: Printer Options Manual Insertion Mode (Single-/Multi-part Form) Length 139.7 mm (5.5 in.) minimum 355.6 mm (14.0 in.) maximum1 558.8 mm (22 in.)2 Width 76.2 mm (3.0 in.) minimum 420 mm (16.5 in.) maximum ... 90 g/m2 (16 ~ 24 lbs) 1 Paper width greater than 215.9 mm (8.5 in.). 2 For 215.9 mm (8.5 in.) paper width or less. . Automatic Feed Mode (Single-part Form) Length 139.7 mm (5.5 in.) minimum 355.6 mm (14.0 in.) maximum1 558.8 mm (22 in.)2 Width 105 mm (4.13 in.) minimum 364 mm (14.3 in.) maximum...

Lexmark 4227 User's Guide
Page 96
...allow paper to On. The option also includes a manual feed tray that lets you print from single sheets of paper stacked in the feeder. For help parking continuous forms, see "Setting Auto- Locking Lever 90 Chapter 5: Printer Options Loading Paper for loading paper in the automatic ...sheet feeder and the automatic sheet feeder's manual feed tray. Printer Options Loading Paper in the Auto Sheet Feeder The Auto...
...allow paper to On. The option also includes a manual feed tray that lets you print from single sheets of paper stacked in the feeder. For help parking continuous forms, see "Setting Auto- Locking Lever 90 Chapter 5: Printer Options Loading Paper for loading paper in the automatic ...sheet feeder and the automatic sheet feeder's manual feed tray. Printer Options Loading Paper in the Auto Sheet Feeder The Auto...


