

User Guide
Page 2
Contents 2 Contents Safety information 6 Learning about the printer 7 Printer overview...7 Applying control panel overlays...8 Understanding the printer features and functions 9 Printing a demonstration page...11 Printing a network setup page...13 Printing from Windows or DOS...13 Using IBM emulation mode...13 Using Epson ...Setting the forms thickness lever...22 Paper paths...24 Using the Tear Off function...24 Loading continuous paper...25 Loading continuous forms using the push tractor 25 Front loading continuous forms using the pull tractor 28 Bottom loading continuous forms using the...
Contents 2 Contents Safety information 6 Learning about the printer 7 Printer overview...7 Applying control panel overlays...8 Understanding the printer features and functions 9 Printing a demonstration page...11 Printing a network setup page...13 Printing from Windows or DOS...13 Using IBM emulation mode...13 Using Epson ...Setting the forms thickness lever...22 Paper paths...24 Using the Tear Off function...24 Loading continuous paper...25 Loading continuous forms using the push tractor 25 Front loading continuous forms using the pull tractor 28 Bottom loading continuous forms using the...
User Guide
Page 13
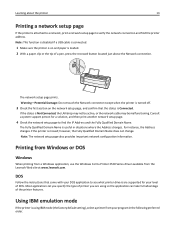
Printing from Windows or DOS Windows When printing from a Windows application, use the Windows Forms Printer 2500 Series driver available from your level of the printer features. The network setup page prints. Using IBM emulation mode If the printer is using so the application can take full advantage... another network setup page. 4 Check the network setup page to see what printer drivers are using IBM mode (the factory default setting), select a printer from the Lexmark Web site at www.lexmark.com. Consult a system support person for your program in situations where the ...
Printing from Windows or DOS Windows When printing from a Windows application, use the Windows Forms Printer 2500 Series driver available from your level of the printer features. The network setup page prints. Using IBM emulation mode If the printer is using so the application can take full advantage... another network setup page. 4 Check the network setup page to see what printer drivers are using IBM mode (the factory default setting), select a printer from the Lexmark Web site at www.lexmark.com. Consult a system support person for your program in situations where the ...

User Guide
Page 66
... are touching the printer. • Make sure the printer is noisy These are possible solutions. Try one of more of ink. • Turn the printer off and then back on. The paper remains at www.lexmark.com. • If you are using Windows, use the Windows Forms Printer 2500 Series driver ...available from the Lexmark Web site at the new Top‑Of‑Form position until the printer beeps and the light blinks....
... are touching the printer. • Make sure the printer is noisy These are possible solutions. Try one of more of ink. • Turn the printer off and then back on. The paper remains at www.lexmark.com. • If you are using Windows, use the Windows Forms Printer 2500 Series driver ...available from the Lexmark Web site at the new Top‑Of‑Form position until the printer beeps and the light blinks....
User Guide
Page 68
... the printer cable is changing If you are possible solutions. If possible, use the Windows Forms Printer 2500 Series driver available from the Character Options selection of the continuous forms These are using Windows, use resident fonts and/or pitches. Selected font or pitch is not printing or is properly shielded and correctly connected at www.lexmark...
... the printer cable is changing If you are possible solutions. If possible, use the Windows Forms Printer 2500 Series driver available from the Character Options selection of the continuous forms These are using Windows, use resident fonts and/or pitches. Selected font or pitch is not printing or is properly shielded and correctly connected at www.lexmark...
User Guide
Page 83
...print 66 printer speed slows 67 printing continues beyond edges of continuous forms 68 printer cleaning 56 features and functions 9 overview 7 parts 7 test 61 printer status checking 62 printer test page interrupting or stopping 61 running 61 printing demonstration page 11 from DOS 13 from Windows 13 network ...tractor converting 44 paper paths 24 R recycling Lexmark products 57 WEEE statement 78 ribbon cartridge removing 56 S safety information 6 security supporting IPSec 59 supporting SNMPv3 59 using 802.1x authentication 60 setting Top‑Of‑Form 39, 40, 41 Setup mode Control options...
...print 66 printer speed slows 67 printing continues beyond edges of continuous forms 68 printer cleaning 56 features and functions 9 overview 7 parts 7 test 61 printer status checking 62 printer test page interrupting or stopping 61 running 61 printing demonstration page 11 from DOS 13 from Windows 13 network ...tractor converting 44 paper paths 24 R recycling Lexmark products 57 WEEE statement 78 ribbon cartridge removing 56 S safety information 6 security supporting IPSec 59 supporting SNMPv3 59 using 802.1x authentication 60 setting Top‑Of‑Form 39, 40, 41 Setup mode Control options...
User Guide
Page 84
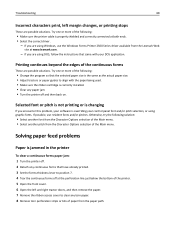
... fed in Auto Sheet Feeder jams at printer entrance 69 paper jammed in Auto Sheet Feeder 69 printer does not feed from Auto Sheet Feeder 70 printer does not feed paper 69 troubleshooting, print...printer alarm sounds 66 printer is noisy 66 printer power switch is on, but the power light is off 67 printer sounds like it is printing, but does not print 66 printer speed slows 67 printing continues beyond edges of continuous forms... not start at left margin 67 print is too light 72 printer goes to Tear Off position before job finishes 66 smudged forms or print too dark 73 specified font or pitch is not...
... fed in Auto Sheet Feeder jams at printer entrance 69 paper jammed in Auto Sheet Feeder 69 printer does not feed from Auto Sheet Feeder 70 printer does not feed paper 69 troubleshooting, print...printer alarm sounds 66 printer is noisy 66 printer power switch is on, but the power light is off 67 printer sounds like it is printing, but does not print 66 printer speed slows 67 printing continues beyond edges of continuous forms... not start at left margin 67 print is too light 72 printer goes to Tear Off position before job finishes 66 smudged forms or print too dark 73 specified font or pitch is not...
Card Stock & Label Guide
Page 10
... to ensure adequate fusing. When designing labels, round all corners to prevent delamination of the form to avoid separating the form in the printer path, resulting in a temperature range of 15.5-32°C (60 to 80%. General information 10 Lexmark printers are designed to operate in a jam. Preprinted inks must withstand a fuser temperature up to... problems if curl is lightly snapped as micro-perfs or data-perfs) provide greater stability and are also not recommended. Back splits and pop-out windows are preferred.
... to ensure adequate fusing. When designing labels, round all corners to prevent delamination of the form to avoid separating the form in the printer path, resulting in a temperature range of 15.5-32°C (60 to 80%. General information 10 Lexmark printers are designed to operate in a jam. Preprinted inks must withstand a fuser temperature up to... problems if curl is lightly snapped as micro-perfs or data-perfs) provide greater stability and are also not recommended. Back splits and pop-out windows are preferred.
Network Scan Drivers
Page 3
... or Ubuntu Linux 6 Checking if the network scan driver is installed 6 Scanning using a network printer...6 Removing the network scan driver...6 Scanning...7 Scanning using applications...7 Scanning using XSane...7 Scanning using OpenOffice.org...7 Scanning using GIMP ...8 Scanning using a terminal window ...8 Scanning multiple pages...8 Scanning both sides of a page...10 Canceling a scan...11 Adjusting scan...
... or Ubuntu Linux 6 Checking if the network scan driver is installed 6 Scanning using a network printer...6 Removing the network scan driver...6 Scanning...7 Scanning using applications...7 Scanning using XSane...7 Scanning using OpenOffice.org...7 Scanning using GIMP ...8 Scanning using a terminal window ...8 Scanning multiple pages...8 Scanning both sides of a page...10 Canceling a scan...11 Adjusting scan...
Network Scan Drivers
Page 6
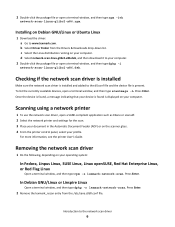
... network-scan-linux-glibc2-x86.deb, and then download it to www.lexmark.com. For more information, see the printer User's Guide. In Debian GNU/Linux or Linspire Linux Open a terminal window, and then type dpkg -r lexmark-network-scan. Removing the network scan driver 1 Do the following, depending... on the scanner glass. 4 From the printer control panel, select your device is found , a message indicating that your ...
... network-scan-linux-glibc2-x86.deb, and then download it to www.lexmark.com. For more information, see the printer User's Guide. In Debian GNU/Linux or Linspire Linux Open a terminal window, and then type dpkg -r lexmark-network-scan. Removing the network scan driver 1 Do the following, depending... on the scanner glass. 4 From the printer control panel, select your device is found , a message indicating that your ...
Network Scan Drivers
Page 7
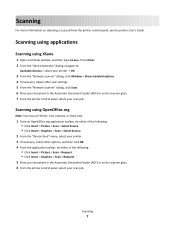
... then type xsane. Press Enter. 2 From the "device detection" dialog, navigate to: Available devices > select your printer > OK 3 From the "Network:scanner" dialog, click Window > Show standard options. 4 If necessary, adjust other options, and then click OK. 4 From the application toolbar, do either of the following : • Click Insert > Picture > ...
... then type xsane. Press Enter. 2 From the "device detection" dialog, navigate to: Available devices > select your printer > OK 3 From the "Network:scanner" dialog, click Window > Show standard options. 4 If necessary, adjust other options, and then click OK. 4 From the application toolbar, do either of the following : • Click Insert > Picture > ...
Network Scan Drivers
Page 8
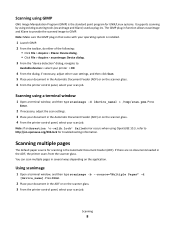
... dialog. • Click File > Acquire > xscanimage: Device dialog. 3 From the "device detection" dialog, navigate to: Available devices > select your printer > OK 4 From the dialog, if necessary, adjust other scan settings, and then click Scan. 5 Place your document in the Automatic Document Feeder (...window, and then type scanimage -d [device_name] > /tmp/scan.pnm. Press Enter. 2 Place your scan job. The GIMP plug-in that came with your operating system is the Automatic Document Feeder (ADF). You can scan multiple pages in several ways depending on the scanner glass. 3 From the printer...
... dialog. • Click File > Acquire > xscanimage: Device dialog. 3 From the "device detection" dialog, navigate to: Available devices > select your printer > OK 4 From the dialog, if necessary, adjust other scan settings, and then click Scan. 5 Place your document in the Automatic Document Feeder (...window, and then type scanimage -d [device_name] > /tmp/scan.pnm. Press Enter. 2 Place your scan job. The GIMP plug-in that came with your operating system is the Automatic Document Feeder (ADF). You can scan multiple pages in several ways depending on the scanner glass. 3 From the printer...
Network Scan Drivers
Page 9
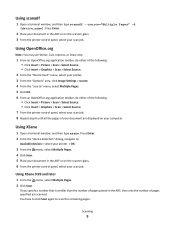
...are displayed on your scan job. Using scanadf 1 Open a terminal window, and then type scanadf --source="Multiple Pages" -d [device_name]. Press Enter. 2 Place your document in the ADF or on the scanner glass. 3 From the printer control panel, select your document are scanned. Using XSane 1 Open... a terminal window, and then type xsane. Using XSane 0.99 and later 1 From the menu, select Multiple Pages. 2 Click Scan...
...are displayed on your scan job. Using scanadf 1 Open a terminal window, and then type scanadf --source="Multiple Pages" -d [device_name]. Press Enter. 2 Place your document in the ADF or on the scanner glass. 3 From the printer control panel, select your document are scanned. Using XSane 1 Open... a terminal window, and then type xsane. Using XSane 0.99 and later 1 From the menu, select Multiple Pages. 2 Click Scan...
Network Scan Drivers
Page 10
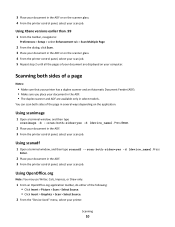
... are available only in select models. Press Enter. 2 Place your document in the ADF. 3 From the printer control panel, select your scan job. Using scanadf 1 Open a terminal window, and then type scanadf --scan-both sides of the page in several ways depending on the scanner glass. .... You can scan both -sides=yes -d [device_name]. Scanning 10 Using scanimage 1 Open a terminal window, and then type scanimage -b --scan-both sides of a page Notes: • Make sure that your printer has a duplex scanner and an Automatic Document Feeder (ADF). • Make sure you place your ...
... are available only in select models. Press Enter. 2 Place your document in the ADF. 3 From the printer control panel, select your scan job. Using scanadf 1 Open a terminal window, and then type scanadf --scan-both sides of the page in several ways depending on the scanner glass. .... You can scan both -sides=yes -d [device_name]. Scanning 10 Using scanimage 1 Open a terminal window, and then type scanimage -b --scan-both sides of a page Notes: • Make sure that your printer has a duplex scanner and an Automatic Document Feeder (ADF). • Make sure you place your ...
Network Scan Drivers
Page 11
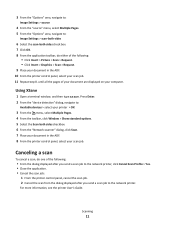
... Cancel the scan from the dialog displayed after you send a scan job to : Available devices > select your printer > OK 3 From the menu, select Multiple Pages. 4 From the toolbar, click Window > Show standard options. 5 Select the Scan both -sides check box. 7 Click OK. 8 From the ...Scanning 11 Press Enter. 2 From the "device detection" dialog, navigate to the network printer. Canceling a scan To cancel a scan, do either of your document are displayed on your computer. For more information, see the printer User's Guide. Using XSane 1 Open a terminal window, and then type xsane.
... Cancel the scan from the dialog displayed after you send a scan job to : Available devices > select your printer > OK 3 From the menu, select Multiple Pages. 4 From the toolbar, click Window > Show standard options. 5 Select the Scan both -sides check box. 7 Click OK. 8 From the ...Scanning 11 Press Enter. 2 From the "device detection" dialog, navigate to the network printer. Canceling a scan To cancel a scan, do either of your document are displayed on your computer. For more information, see the printer User's Guide. Using XSane 1 Open a terminal window, and then type xsane.

Network Scan Drivers
Page 12
...displayed as options. Original Size or original-size Document sizes for all the printers are displayed as options. Make sure the printer supports the size you select. Click Insert > Picture > Scan > Select Source. - Click Window > Show standard options. - Select a document size. Scan both sides or... to access the scan options: • Using XSane 1 Open a terminal window, and then type xsane. Note: The icon is found on the application, do either of the following to : Available devices > select your printer > OK 3 From the "Network:scanner" main dialog, do either of the...
...displayed as options. Original Size or original-size Document sizes for all the printers are displayed as options. Make sure the printer supports the size you select. Click Insert > Picture > Scan > Select Source. - Click Window > Show standard options. - Select a document size. Scan both sides or... to access the scan options: • Using XSane 1 Open a terminal window, and then type xsane. Note: The icon is found on the application, do either of the following to : Available devices > select your printer > OK 3 From the "Network:scanner" main dialog, do either of the...
Network Scan Drivers
Page 17
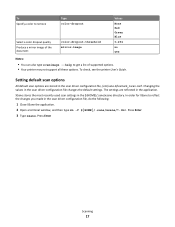
...help to reflect the changes you made in the scan driver configuration file, do the following: 1 Close XSane the application. 2 Open a terminal window, and then type rm -f ${HOME}/.sane/xsane/*.drc. Changing the values in the ${HOME}/.sane/xsane directory. Press Enter Scanning 17 Setting default ... are stored in the scan driver configuration file, /etc/sane.d/lexmark_nscan.conf. Press Enter 3 Type xsane. To check, see the printer User's Guide. To Specify a color to remove Type color-dropout Select a color dropout quality Produce a mirror image of supported options. • ...
...help to reflect the changes you made in the scan driver configuration file, do the following: 1 Close XSane the application. 2 Open a terminal window, and then type rm -f ${HOME}/.sane/xsane/*.drc. Changing the values in the ${HOME}/.sane/xsane directory. Press Enter Scanning 17 Setting default ... are stored in the scan driver configuration file, /etc/sane.d/lexmark_nscan.conf. Press Enter 3 Type xsane. To check, see the printer User's Guide. To Specify a color to remove Type color-dropout Select a color dropout quality Produce a mirror image of supported options. • ...
Network Scan Drivers
Page 18
... password combination is received when sending a scan job to your network interface card. 1 Open a terminal window, and then type hostname. Press Enter, and then take note of your computer matches the IP address assigned to the printer, then you can open specific ports with your operating system. Press Enter. If the IP...
... password combination is received when sending a scan job to your network interface card. 1 Open a terminal window, and then type hostname. Press Enter, and then take note of your computer matches the IP address assigned to the printer, then you can open specific ports with your operating system. Press Enter. If the IP...

Network Scan Drivers
Page 20
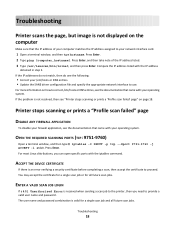
Troubleshooting 20 Note: If you may need to version 0.90 or higher so it will work correctly with non-English languages. • For some SANE installations, you are running Linpus Linux, upgrade XSane to set the LD_LIBRARY_PATH: 1 Open a terminal window, and then type export LD_LIBRARY_PATH=/usr/lib. 2 Press Enter. XSane displays garbage characters Run XSane version 0.90 or higher, which supports more languages than its earlier versions.
Troubleshooting 20 Note: If you may need to version 0.90 or higher so it will work correctly with non-English languages. • For some SANE installations, you are running Linpus Linux, upgrade XSane to set the LD_LIBRARY_PATH: 1 Open a terminal window, and then type export LD_LIBRARY_PATH=/usr/lib. 2 Press Enter. XSane displays garbage characters Run XSane version 0.90 or higher, which supports more languages than its earlier versions.
Print Drivers for UNIX and LINUX Systems
Page 15
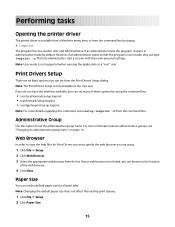
...printer driver The printer driver is only available to the root user. This lets administrators start the program in administrative mode by using . 1 Click File Œ Setup. 2 Click Web Browser. 3 Select the appropriate web browser from the command line. Note: The Print Drivers Setup is available from a Windows...two modes: User and Administrative. Print Drivers Setup There are using the command line. • /usr/local/lexmark/setup.lexprint • /opt/lexmark/setup.lexprint • /usr/lpp/lexprint/setup.lexprint Note: For more information about administrative groups, see "...
...printer driver The printer driver is only available to the root user. This lets administrators start the program in administrative mode by using . 1 Click File Œ Setup. 2 Click Web Browser. 3 Select the appropriate web browser from the command line. Note: The Print Drivers Setup is available from a Windows...two modes: User and Administrative. Print Drivers Setup There are using the command line. • /usr/local/lexmark/setup.lexprint • /opt/lexmark/setup.lexprint • /usr/lpp/lexprint/setup.lexprint Note: For more information about administrative groups, see "...
Print Drivers for UNIX and LINUX Systems
Page 23
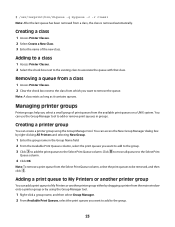
... can access the New Group Manager dialog box by using the Group Manager tool. Note: To remove a print queue from the main window onto a printer group or by right-clicking All Printers and selecting New Group. 1 Enter the group name in groups. # /usr/lexprint/bin/chqueue -q myqueue -c -r class1 Note: ...box next to the class from which you select a small group of the new class. Adding a print queue to My Printers or another printer group either by dragging a printer from the Select Print Queue column, select the print queues to add or remove print queues in the Group Name field. ...
... can access the New Group Manager dialog box by using the Group Manager tool. Note: To remove a print queue from the main window onto a printer group or by right-clicking All Printers and selecting New Group. 1 Enter the group name in groups. # /usr/lexprint/bin/chqueue -q myqueue -c -r class1 Note: ...box next to the class from which you select a small group of the new class. Adding a print queue to My Printers or another printer group either by dragging a printer from the Select Print Queue column, select the print queues to add or remove print queues in the Group Name field. ...

