
Quick Reference
Page 22
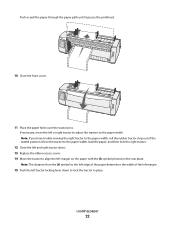
Push or pull the paper through the paper path until it passes the printhead. 10 Close the front cover. 11 Place the paper holes over the tractor pins. Note: The distance from the [A symbol to the left tractor locking ...
Push or pull the paper through the paper path until it passes the printhead. 10 Close the front cover. 11 Place the paper holes over the tractor pins. Note: The distance from the [A symbol to the left tractor locking ...
Quick Reference
Page 26
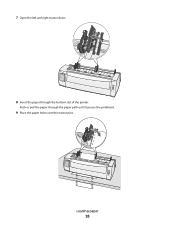
Push or pull the paper through the bottom slot of the printer. Loading paper 26 7 Open the left and right tractor doors. 8 Insert the paper through the paper path until it passes the printhead. 9 Place the paper holes over the tractor pins.
Push or pull the paper through the bottom slot of the printer. Loading paper 26 7 Open the left and right tractor doors. 8 Insert the paper through the paper path until it passes the printhead. 9 Place the paper holes over the tractor pins.
Quick Reference
Page 48
...maintain optimum print quality. Cleaning the printer Preparing the printer for cleaning 1 Turn the printer off . 2 Lift the left and right release latches on the ribbon access cover to remove it. 3 Place the ribbon access cover on a flat surface. 4 Set the forms thickness lever to position 7. 5 Squeeze...11A3550 (2500 series high yield re-inking ribbon) Note: Printer ribbons can be hot. Removing the ribbon cartridge 1 Turn the printer off . 2 Unplug the power cord from the Lexmark Web site at www.lexmark.com. CAUTION-HOT SURFACE: The printhead may be ordered from the wall outlet. If so, ...
...maintain optimum print quality. Cleaning the printer Preparing the printer for cleaning 1 Turn the printer off . 2 Lift the left and right release latches on the ribbon access cover to remove it. 3 Place the ribbon access cover on a flat surface. 4 Set the forms thickness lever to position 7. 5 Squeeze...11A3550 (2500 series high yield re-inking ribbon) Note: Printer ribbons can be hot. Removing the ribbon cartridge 1 Turn the printer off . 2 Unplug the power cord from the Lexmark Web site at www.lexmark.com. CAUTION-HOT SURFACE: The printhead may be ordered from the wall outlet. If so, ...

User Guide
Page 6
...HAZARD: Do not set up this product or make any electrical or cabling connections, such as furniture and walls. CAUTION-POTENTIAL INJURY: The printhead may not always be hot. CAUTION-SHOCK HAZARD: Make sure that is misused, a risk of fire or electrical shock results. CAUTION-...subject the power cord to cool before inspecting it to abrasion or stress. Inspect the power cord regularly for the use of specific Lexmark components. Safety information 6 Safety information Connect the power supply cord to a properly grounded electrical outlet that all external connections (such as...
...HAZARD: Do not set up this product or make any electrical or cabling connections, such as furniture and walls. CAUTION-POTENTIAL INJURY: The printhead may not always be hot. CAUTION-SHOCK HAZARD: Make sure that is misused, a risk of fire or electrical shock results. CAUTION-...subject the power cord to cool before inspecting it to abrasion or stress. Inspect the power cord regularly for the use of specific Lexmark components. Safety information 6 Safety information Connect the power supply cord to a properly grounded electrical outlet that all external connections (such as...

User Guide
Page 30
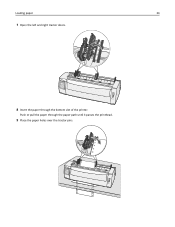
... the paper determines the width of the seated position. Loading paper 30 Push or pull the paper through the paper path until it passes the printhead. 10 Close the front cover. 11 Place the paper holes over the tractor pins. If necessary, move the left or right tractor to adjust the...
... the paper determines the width of the seated position. Loading paper 30 Push or pull the paper through the paper path until it passes the printhead. 10 Close the front cover. 11 Place the paper holes over the tractor pins. If necessary, move the left or right tractor to adjust the...
User Guide
Page 34
Push or pull the paper through the bottom slot of the printer. Loading paper 34 7 Open the left and right tractor doors. 8 Insert the paper through the paper path until it passes the printhead. 9 Place the paper holes over the tractor pins.
Push or pull the paper through the bottom slot of the printer. Loading paper 34 7 Open the left and right tractor doors. 8 Insert the paper through the paper path until it passes the printhead. 9 Place the paper holes over the tractor pins.

User Guide
Page 56
... the forms thickness lever to remove dust, ribbon lint, and pieces of the printer. Cleaning the inside the printer. Removing the ribbon cartridge 1 Turn the printer off . 2 Unplug the power cord from the Lexmark Web site at www.lexmark.com. Ordering supplies Use the listed part numbers to maintain optimum print quality. CAUTION-HOT SURFACE: The printhead...
... the forms thickness lever to remove dust, ribbon lint, and pieces of the printer. Cleaning the inside the printer. Removing the ribbon cartridge 1 Turn the printer off . 2 Unplug the power cord from the Lexmark Web site at www.lexmark.com. Ordering supplies Use the listed part numbers to maintain optimum print quality. CAUTION-HOT SURFACE: The printhead...
User Guide
Page 58
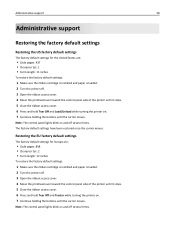
... pages: 858 • Character Set: 2 • Form length: 12 inches To restore the factory default settings: 1 Make sure the ribbon cartridge is installed and paper is loaded. 2 Turn the printer off. 3 Open the ribbon access cover. 4 Move the printhead over toward the control panel side of the printer until it stops. 5 Close the ribbon...
... pages: 858 • Character Set: 2 • Form length: 12 inches To restore the factory default settings: 1 Make sure the ribbon cartridge is installed and paper is loaded. 2 Turn the printer off. 3 Open the ribbon access cover. 4 Move the printhead over toward the control panel side of the printer until it stops. 5 Close the ribbon...
User Guide
Page 67
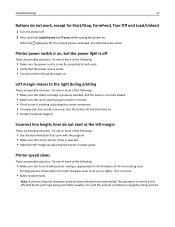
... • Verify that came with the program. • Make sure the correct printer driver is on . Incorrect line length; Printer speed slows These are possible solutions. Note: Automatic thermal slowdown protects the printhead from overheating. This is set at 4 or higher. When the light goes off... affected by adjusting the tractor or paper guide. lines do not work, except for the thickness of the forms being printed. Printing speed is slower when the forms thickness lever is normal. • Select resident fonts. This operation is normal and is appropriate for Start/...
... • Verify that came with the program. • Make sure the correct printer driver is on . Incorrect line length; Printer speed slows These are possible solutions. Note: Automatic thermal slowdown protects the printhead from overheating. This is set at 4 or higher. When the light goes off... affected by adjusting the tractor or paper guide. lines do not work, except for the thickness of the forms being printed. Printing speed is slower when the forms thickness lever is normal. • Select resident fonts. This operation is normal and is appropriate for Start/...
Technical Reference
Page 49
... 1B 46 Select/Cancel Double-Strike Mode This command selects and cancels the double-strike mode. Double-strike print results in a darker print because the printhead strikes the character twice.
... 1B 46 Select/Cancel Double-Strike Mode This command selects and cancels the double-strike mode. Double-strike print results in a darker print because the printhead strikes the character twice.
Technical Reference
Page 52
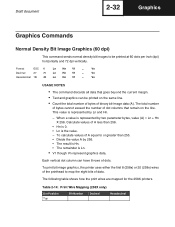
...• Count the total number of bytes of binary bit-image data (A). The following table shows how the print wires are mapped for the 258X printers. Calculate values of A equal to be printed on the line. Draft document 2-32 Graphics Graphics Commands Normal Density Bit Image Graphics (60 dpi)...When a value is represented by two parameter bytes, value (A) = Ln + Hn X 256. To print bit image graphics, the printer uses either the first 8 (258x) or 20 (259x) wires of the printhead to map the eight bits of dots. Format ESC K Ln Hn V1 ... Vn Hexadecimal 1B 4B Ln Hn V1 ... Each...
...• Count the total number of bytes of binary bit-image data (A). The following table shows how the print wires are mapped for the 258X printers. Calculate values of A equal to be printed on the line. Draft document 2-32 Graphics Graphics Commands Normal Density Bit Image Graphics (60 dpi)...When a value is represented by two parameter bytes, value (A) = Ln + Hn X 256. To print bit image graphics, the printer uses either the first 8 (258x) or 20 (259x) wires of the printhead to map the eight bits of dots. Format ESC K Ln Hn V1 ... Vn Hexadecimal 1B 4B Ln Hn V1 ... Each...


