
User's Guide
Page 10
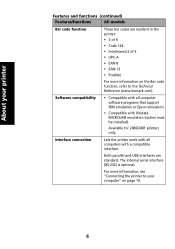
...; PostNet For more information, see "Connecting the printer to the Technical Reference (www.lexmark.com). For more information on page 14. 6 About your computer" on the Bar code function, refer to your printer Features and functions (continued) Features/functions All models... Lets the printer work with all computer software programs that support IBM emulation or Epson emulation. • Compatible with a compatible interface. Software compatibility • Compatible with all computers with Okidata MICROLINE emulation (option must be installed). The internal...
...; PostNet For more information, see "Connecting the printer to the Technical Reference (www.lexmark.com). For more information on page 14. 6 About your computer" on the Bar code function, refer to your printer Features and functions (continued) Features/functions All models... Lets the printer work with all computer software programs that support IBM emulation or Epson emulation. • Compatible with a compatible interface. Software compatibility • Compatible with all computers with Okidata MICROLINE emulation (option must be installed). The internal...

User's Guide
Page 21
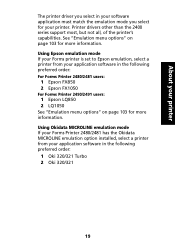
Note: Instructions for installing drivers are using a Windows program, use the Windows Forms Printer 2400 Series driver available from the Lexmark Web site at www.lexmark.com. Setting up your printer Connecting the serial cable For installation and connection instructions, see the optional serial interface manual. About your Windows and DOS application software Windows-based applications If you are in the readme.1st file included in the download package. 17
Note: Instructions for installing drivers are using a Windows program, use the Windows Forms Printer 2400 Series driver available from the Lexmark Web site at www.lexmark.com. Setting up your printer Connecting the serial cable For installation and connection instructions, see the optional serial interface manual. About your Windows and DOS application software Windows-based applications If you are in the readme.1st file included in the download package. 17
User's Guide
Page 23
... emulation mode If your Forms Printer 2480/2481 has the Okidata MICROLINE emulation option installed, select a printer from your application software in the following preferred order: For Forms Printer 2480/2481 users: 1 Epson FX850 2 Epson FX1050 For Forms Printer 2490/2491 users: 1 Epson LQ850 2 LQ1050 See "Emulation menu options" on page 103 for more information. Printer drivers other than the...
... emulation mode If your Forms Printer 2480/2481 has the Okidata MICROLINE emulation option installed, select a printer from your application software in the following preferred order: For Forms Printer 2480/2481 users: 1 Epson FX850 2 Epson FX1050 For Forms Printer 2490/2491 users: 1 Epson LQ850 2 LQ1050 See "Emulation menu options" on page 103 for more information. Printer drivers other than the...
User's Guide
Page 28
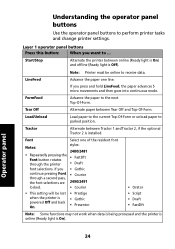
...Understanding the operator panel buttons Use the operator panel buttons to the next Top-Of-Form. Start/Stop Alternate the printer between online (Ready light is On) and offline (Ready light is installed. Layer 1 operator panel buttons Press this button: When you want to parked position...into continuous mode. If you continue pressing Font through the printer font selections. LineFeed Advance the paper one of the resident font styles: 2480/2481 • FastDft • Draft • Gothic • Courier 2490/2491 • Courier • This setting will be online to...
...Understanding the operator panel buttons Use the operator panel buttons to the next Top-Of-Form. Start/Stop Alternate the printer between online (Ready light is On) and offline (Ready light is installed. Layer 1 operator panel buttons Press this button: When you want to parked position...into continuous mode. If you continue pressing Font through the printer font selections. LineFeed Advance the paper one of the resident font styles: 2480/2481 • FastDft • Draft • Gothic • Courier 2490/2491 • Courier • This setting will be online to...

User's Guide
Page 31
...downloaded font is offline. Blinking The printer is loaded in the printer. Understanding the operator panel lights The following table describes the light patterns on page 31. 27 Tractor 2 On Tractor 2 is activated. (The optional Tractor 2 Feeder must be installed.) Paper Out Off Paper is ...receiving data. On A printer error occurred. Font On You (or your software application from changing the font you selected on pag e30....
...downloaded font is offline. Blinking The printer is loaded in the printer. Understanding the operator panel lights The following table describes the light patterns on page 31. 27 Tractor 2 On Tractor 2 is activated. (The optional Tractor 2 Feeder must be installed.) Paper Out Off Paper is ...receiving data. On A printer error occurred. Font On You (or your software application from changing the font you selected on pag e30....
User's Guide
Page 34
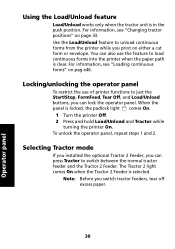
...Tractor while turning the printer On. For information, see "Changing tractor positions" on pag e46. Using the Load/Unload feature Load/Unload works only when the tractor unit is clear. You can press Tractor to load continuous forms into the printer when the paper path... position. Note: Before you can also use of printer functions to unload continuous forms from the printer while you can lock the operator panel. For information, see "Loading continuous forms" on page 33. Selecting Tractor mode If you installed the optional Tractor 2 Feeder, you switch tractor feeders...
...Tractor while turning the printer On. For information, see "Changing tractor positions" on pag e46. Using the Load/Unload feature Load/Unload works only when the tractor unit is clear. You can press Tractor to load continuous forms into the printer when the paper path... position. Note: Before you can also use of printer functions to unload continuous forms from the printer while you can lock the operator panel. For information, see "Loading continuous forms" on page 33. Selecting Tractor mode If you installed the optional Tractor 2 Feeder, you switch tractor feeders...

User's Guide
Page 37
3 Changing tractor positions This section describes how to change the tractor unit position.This a tractor unit. Tractor positions 33 To view an illustration of the tractor positions and paper paths available, see "Paper paths for the push tractor" on page 47. Left latching lever Pin Left tractor door Left locking lever Rubber tractor stop You can install the tractor unit in the push tractor position or the pull tractor position.
3 Changing tractor positions This section describes how to change the tractor unit position.This a tractor unit. Tractor positions 33 To view an illustration of the tractor positions and paper paths available, see "Paper paths for the push tractor" on page 47. Left latching lever Pin Left tractor door Left locking lever Rubber tractor stop You can install the tractor unit in the push tractor position or the pull tractor position.

User's Guide
Page 38
Push tractor position The printer is shipped with the tractor unit installed at the front of the printer. This position lets you use the Tear Off feature of the printer, which is the push tractor position. Front cover Push tractor position 34 Tractor positions
Push tractor position The printer is shipped with the tractor unit installed at the front of the printer. This position lets you use the Tear Off feature of the printer, which is the push tractor position. Front cover Push tractor position 34 Tractor positions

User's Guide
Page 39
Pull tractor position Front cover 35 Tractor positions Pull tractor position When the tractor unit is installed at the top of the printer, it functions as a pull tractor and supports front and bottom paper loading.
Pull tractor position Front cover 35 Tractor positions Pull tractor position When the tractor unit is installed at the top of the printer, it functions as a pull tractor and supports front and bottom paper loading.
User's Guide
Page 42
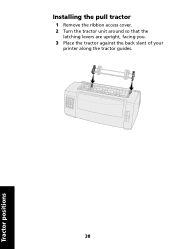
Installing the pull tractor 1 Remove the ribbon access cover. 2 Turn the tractor unit around so that the latching levers are upright, facing you. 3 Place the tractor against the back slant of your printer along the tractor guides. 38 Tractor positions
Installing the pull tractor 1 Remove the ribbon access cover. 2 Turn the tractor unit around so that the latching levers are upright, facing you. 3 Place the tractor against the back slant of your printer along the tractor guides. 38 Tractor positions

User's Guide
Page 50
Note: If you have installed the optional Auto Sheet Feeder or Tractor 2 Feeder, refer to the documentation shipped with your option for paper loading instructions. 46 Loading paper Loading continuous forms You can load continuous paper utilizing four different paper paths, depending on whether you have the push tractor installed or the pull tractor installed.
Note: If you have installed the optional Auto Sheet Feeder or Tractor 2 Feeder, refer to the documentation shipped with your option for paper loading instructions. 46 Loading paper Loading continuous forms You can load continuous paper utilizing four different paper paths, depending on whether you have the push tractor installed or the pull tractor installed.
User's Guide
Page 76
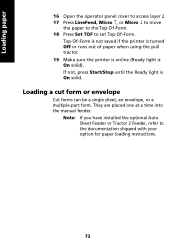
... using the pull tractor. 19 Make sure the printer is online (Ready light is On solid. They are placed one at a time into the manual feeder. If not, press Start/Stop until the Ready light is On solid). Loading a cut form or envelope Cut forms can be a single sheet, an envelope, or a ... layer 2. 17 Press LineFeed, Micro ↑, or Micro ↓ to move the paper to the Top-Of-Form. 18 Press Set TOF to the documentation shipped with your option for paper loading instructions. 72 Note: If you have installed the optional Auto Sheet Feeder or Tractor 2 Feeder, refer to set Top-Of...
... using the pull tractor. 19 Make sure the printer is online (Ready light is On solid. They are placed one at a time into the manual feeder. If not, press Start/Stop until the Ready light is On solid). Loading a cut form or envelope Cut forms can be a single sheet, an envelope, or a ... layer 2. 17 Press LineFeed, Micro ↑, or Micro ↓ to move the paper to the Top-Of-Form. 18 Press Set TOF to the documentation shipped with your option for paper loading instructions. 72 Note: If you have installed the optional Auto Sheet Feeder or Tractor 2 Feeder, refer to set Top-Of...
User's Guide
Page 101
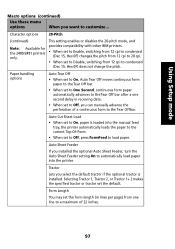
... Lets you installed the optional Auto Sheet Feeder, turn the Auto Sheet Feeder setting On to automatically load paper into the manual feed tray, the printer automatically loads the paper to the current Top-Of-Form. • When set to One Second, continuous form paper automatically advances...press FormFeed to load paper. Auto Sheet Feeder If you select the default tractor if the optional tractor is loaded into the printer. Form Length You may set the form length (in receiving data. • When set the default. Selecting Tractor 1, Tractor 2, or Tractor 1+ 2 makes the ...
... Lets you installed the optional Auto Sheet Feeder, turn the Auto Sheet Feeder setting On to automatically load paper into the manual feed tray, the printer automatically loads the paper to the current Top-Of-Form. • When set to One Second, continuous form paper automatically advances...press FormFeed to load paper. Auto Sheet Feeder If you select the default tractor if the optional tractor is loaded into the printer. Form Length You may set the form length (in receiving data. • When set the default. Selecting Tractor 1, Tractor 2, or Tractor 1+ 2 makes the ...
User's Guide
Page 107
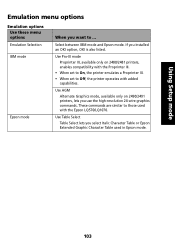
... options Emulation options Use these menu options Emulation Selection IBM mode Epson mode When you installed an OKI option, OKI is also listed. If you want to ... These commands are similar to Off, the printer operates with the Epson LQ570/LQ1070. Select between IBM mode and Epson mode. Use ...Pro-III mode Proprinter III, available only on 2490/2491 printers, lets you select Italic Character Table or Epson Extended Graphic Character Table used with added capabilities. Use Table Select Table Select lets you...
... options Emulation options Use these menu options Emulation Selection IBM mode Epson mode When you installed an OKI option, OKI is also listed. If you want to ... These commands are similar to Off, the printer operates with the Epson LQ570/LQ1070. Select between IBM mode and Epson mode. Use ...Pro-III mode Proprinter III, available only on 2490/2491 printers, lets you select Italic Character Table or Epson Extended Graphic Character Table used with added capabilities. Use Table Select Table Select lets you...

User's Guide
Page 108
... sets are also supported, but only through host commands used by Epson FX850/FX1050: • Japan • Norway • Denmark II • Korea (2480/2481 printers only) • Spain II • Latin America • Legal Okidata Emulation Use 7 or 8 Bit Graphics Note: Only appears if optional Okidata emulation is...
... sets are also supported, but only through host commands used by Epson FX850/FX1050: • Japan • Norway • Denmark II • Korea (2480/2481 printers only) • Spain II • Latin America • Legal Okidata Emulation Use 7 or 8 Bit Graphics Note: Only appears if optional Okidata emulation is...

User's Guide
Page 109
Using Setup mode Interface menu options Your computer and printer settings must match. Interface Automatically select the printer interface Use the parallel cable Use the USB cable Use the serial cable (only appears if optional serial interface is installed. 105 Data speed* • 300 bps &#... •1 •2 Protocol* • XON/XOFF • MultiXON/XOFF • DTR Pacing * Only appears if serial interface option is installed). Interface options Use these menu options When you want to ... Honor Init • Enable honors the init signal on the parallel port. &#...
Using Setup mode Interface menu options Your computer and printer settings must match. Interface Automatically select the printer interface Use the parallel cable Use the USB cable Use the serial cable (only appears if optional serial interface is installed. 105 Data speed* • 300 bps &#... •1 •2 Protocol* • XON/XOFF • MultiXON/XOFF • DTR Pacing * Only appears if serial interface option is installed). Interface options Use these menu options When you want to ... Honor Init • Enable honors the init signal on the parallel port. &#...
User's Guide
Page 113
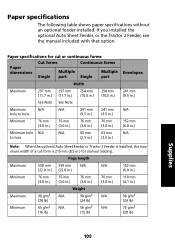
...2 Feeder, see the manual included with that option. Paper specifications for manual loading. Paper specifications The following table shows paper specifications without an optional feeder installed. Page length Maximum 559 mm 559 mm N/A N/A (22.0 in.) (22.0 in.) 152 mm (6.0 in.) Minimum 76 mm (3.0 in.) 76... mm (2.5 in.) Envelopes 241 mm (9.5 in.) N/A 152 mm (6.0 in.) N/A Note: When the optional Auto Sheet Feeder or Tractor 2 Feeder is installed, the maximum width of a cut form is 215 mm (8.5 in .) Maximum Minimum Weight 90 g/m2 N/A (24 lb) 90 g/m2 N/A (24 lb) 65 g/m2 N/A (16 lb)...
...2 Feeder, see the manual included with that option. Paper specifications for manual loading. Paper specifications The following table shows paper specifications without an optional feeder installed. Page length Maximum 559 mm 559 mm N/A N/A (22.0 in.) (22.0 in.) 152 mm (6.0 in.) Minimum 76 mm (3.0 in.) 76... mm (2.5 in.) Envelopes 241 mm (9.5 in.) N/A 152 mm (6.0 in.) N/A Note: When the optional Auto Sheet Feeder or Tractor 2 Feeder is installed, the maximum width of a cut form is 215 mm (8.5 in .) Maximum Minimum Weight 90 g/m2 N/A (24 lb) 90 g/m2 N/A (24 lb) 65 g/m2 N/A (16 lb)...
User's Guide
Page 118
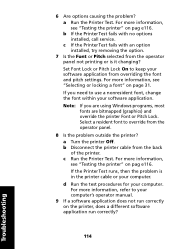
... not run correctly? b Disconnect the printer cable from the operator panel. 8 Is the problem outside the printer? c If the PrinterTest fails with no options installed, call service. If the Printer Test runs, then the problem is it changing? a Run the Printer Test. Select a resident font to ...the font within your computer. For more information, see "Testing the printer" on the printer, does a different software application run correctly on pag e116. b If the PrinterTest fails with an option installed, try removing the option. 7 Is the Font or Pitch selected ...
... not run correctly? b Disconnect the printer cable from the operator panel. 8 Is the problem outside the printer? c If the PrinterTest fails with no options installed, call service. If the Printer Test runs, then the problem is it changing? a Run the Printer Test. Select a resident font to ...the font within your computer. For more information, see "Testing the printer" on the printer, does a different software application run correctly on pag e116. b If the PrinterTest fails with an option installed, try removing the option. 7 Is the Font or Pitch selected ...

User's Guide
Page 120
...: 1 Make sure paper and the ribbon cartridge are installed 2 Turn the printer Off. 3 Press and hold LineFeed while you turn the printer On. 4 Release LineFeed when printing starts. Testing the printer Each time you stop the printer. Running the Printer Test produces a test printout that are installed. 2 Turn the printer Off. 3 Press and hold Tractor while you turn...
...: 1 Make sure paper and the ribbon cartridge are installed 2 Turn the printer Off. 3 Press and hold LineFeed while you turn the printer On. 4 Release LineFeed when printing starts. Testing the printer Each time you stop the printer. Running the Printer Test produces a test printout that are installed. 2 Turn the printer Off. 3 Press and hold Tractor while you turn...

User's Guide
Page 122
... ribbon cartridge" on pag e116. 7 If the Printer Test fails, call for paper dust or bits of your printer and whether you are printing continuous forms, make sure the paper select lever is a power supply problem. Checking the printer status Observe the operator panel lights and compare their ...required Norm0al operating condition. Note: If you installed the optional Tractor 2 Feeder and you need to be printed. Power Ready Paper Out Panel Lock Font Lock On Blinking Blinking Blinking Blinking 1 Check for service. Note: If the printer is not beeping, there is pushed down in...
... ribbon cartridge" on pag e116. 7 If the Printer Test fails, call for paper dust or bits of your printer and whether you are printing continuous forms, make sure the paper select lever is a power supply problem. Checking the printer status Observe the operator panel lights and compare their ...required Norm0al operating condition. Note: If you installed the optional Tractor 2 Feeder and you need to be printed. Power Ready Paper Out Panel Lock Font Lock On Blinking Blinking Blinking Blinking 1 Check for service. Note: If the printer is not beeping, there is pushed down in...


