
User's Guide
Page 3
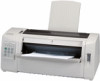
Contents Contents Chapter 1: About your printer 1 Features and functions 2 Printer description 7 Printing the demonstration sample 10 Connecting the printer to your computer 14 Setting up your Windows and DOS application software 17 Chapter 2: Using the operator panel 21 Operator panel layers 22 Setting the printer online or offline 28 Advancing the paper 29 Using Tear Off... Converting the push tractor to pull tractor position 36 Converting the pull tractor to the push tractor position 40 Chapter 4: Loading paper 43 Setting the forms thickness lever 44 Loading continuous...
Contents Contents Chapter 1: About your printer 1 Features and functions 2 Printer description 7 Printing the demonstration sample 10 Connecting the printer to your computer 14 Setting up your Windows and DOS application software 17 Chapter 2: Using the operator panel 21 Operator panel layers 22 Setting the printer online or offline 28 Advancing the paper 29 Using Tear Off... Converting the push tractor to pull tractor position 36 Converting the pull tractor to the push tractor position 40 Chapter 4: Loading paper 43 Setting the forms thickness lever 44 Loading continuous...
User's Guide
Page 19
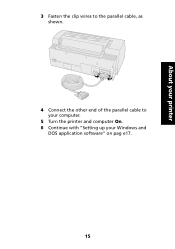
About your printer 3 Fasten the clip wires to the parallel cable, as shown. 4 Connect the other end of the parallel cable to your computer. 5 Turn the printer and computer On. 6 Continue with "Setting up your Windows and DOS application software" on pag e17. 15
About your printer 3 Fasten the clip wires to the parallel cable, as shown. 4 Connect the other end of the parallel cable to your computer. 5 Turn the printer and computer On. 6 Continue with "Setting up your Windows and DOS application software" on pag e17. 15

User's Guide
Page 20
Order the Lexmark USB cable using part number 12A2405. 3 Connect the other end of the printer. About your printer Connecting the USB cable 1 Turn the printer and computer Off. 2 Connect the USB cable at the back of the USB cable to your computer. 4 Turn the printer and computer On. 5 Continue with your Windows and DOS application software" on pag e17. 16 This cable is not supplied with "Setting up your printer.
Order the Lexmark USB cable using part number 12A2405. 3 Connect the other end of the printer. About your printer Connecting the USB cable 1 Turn the printer and computer Off. 2 Connect the USB cable at the back of the USB cable to your computer. 4 Turn the printer and computer On. 5 Continue with your Windows and DOS application software" on pag e17. 16 This cable is not supplied with "Setting up your printer.

User's Guide
Page 21
Note: Instructions for installing drivers are using a Windows program, use the Windows Forms Printer 2400 Series driver available from the Lexmark Web site at www.lexmark.com. About your Windows and DOS application software Windows-based applications If you are in the readme.1st file included in the download package. 17 Setting up your printer Connecting the serial cable For installation and connection instructions, see the optional serial interface manual.
Note: Instructions for installing drivers are using a Windows program, use the Windows Forms Printer 2400 Series driver available from the Lexmark Web site at www.lexmark.com. About your Windows and DOS application software Windows-based applications If you are in the readme.1st file included in the download package. 17 Setting up your printer Connecting the serial cable For installation and connection instructions, see the optional serial interface manual.
User's Guide
Page 118
... pitch settings. If you are using Windows programs, most fonts are bitmapped (graphics) and override the printer Font or Pitch Lock. c Run the Printer Test. Troubleshooting 114 b Disconnect the printer cable from the operator panel. 8 Is the problem outside the printer? d Run the test procedures for ... font to use a nonresident font, change the font within your software application from the operator panel not printing or is in the printer cable or your computer. 6 Are options causing the problem? Set Font Lock or Pitch Lock On to your computer's operator manual....
... pitch settings. If you are using Windows programs, most fonts are bitmapped (graphics) and override the printer Font or Pitch Lock. c Run the Printer Test. Troubleshooting 114 b Disconnect the printer cable from the operator panel. 8 Is the problem outside the printer? d Run the test procedures for ... font to use a nonresident font, change the font within your software application from the operator panel not printing or is in the printer cable or your computer. 6 Are options causing the problem? Set Font Lock or Pitch Lock On to your computer's operator manual....
User's Guide
Page 119
...Windows and DOS application software" on pag e30. 115 Troubleshooting For more information, see "Locking/unlocking the operator panel" on pag e17. • You selected the appropriate emulation mode for your software application. The operator panel is locked. Make sure: • You selected the appropriate printer... driver for Start/Stop, LineFeed, FormFeed, Tear Off and Load/Unload? For more information, see "Using IBM emulation mode" on page 18. 11 Do the buttons on the operator panel not work except for your printer. 10 Are you ...
...Windows and DOS application software" on pag e30. 115 Troubleshooting For more information, see "Locking/unlocking the operator panel" on pag e17. • You selected the appropriate emulation mode for your software application. The operator panel is locked. Make sure: • You selected the appropriate printer... driver for Start/Stop, LineFeed, FormFeed, Tear Off and Load/Unload? For more information, see "Using IBM emulation mode" on page 18. 11 Do the buttons on the operator panel not work except for your printer. 10 Are you ...
User's Guide
Page 137
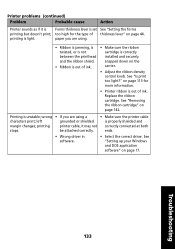
... is correctly installed and securely snapped down on the carrier. • Adjust the ribbon density control knob. printing printer cable, it is Forms thickness lever is light. Troubleshooting 133 Replace the ribbon cartridge. See "Is print too light?" wrong • If you ...8226; Wrong driver in software. • Select the correct driver. See "Setting up your Windows and DOS application software" on page 44. paper you are using a • Make sure the printer cable characters print; Printing is properly shielded and margin changes; left grounded or shielded is ...
... is correctly installed and securely snapped down on the carrier. • Adjust the ribbon density control knob. printing printer cable, it is Forms thickness lever is light. Troubleshooting 133 Replace the ribbon cartridge. See "Is print too light?" wrong • If you ...8226; Wrong driver in software. • Select the correct driver. See "Setting up your Windows and DOS application software" on page 44. paper you are using a • Make sure the printer cable characters print; Printing is properly shielded and margin changes; left grounded or shielded is ...

User's Guide
Page 144
...Windows and DOS application software" on page 17. Make sure you are trying to use . Close the operator panel. Ribbon access cover or front cover is open. • Move any objects touching the printer. • Make sure the printer is on page 107 for information about which printer...;. See "Supplies" on a level, sturdy surface. Printer beeps when using Printer is not selected. Make sure the printer cable is On). • Turn Off the printer. • Press and hold Load/Unload and Tractor and turn On the printer. Printer is unlocked. Buttons do not work (except Start/Stop...
...Windows and DOS application software" on page 17. Make sure you are trying to use . Close the operator panel. Ribbon access cover or front cover is open. • Move any objects touching the printer. • Make sure the printer is on page 107 for information about which printer...;. See "Supplies" on a level, sturdy surface. Printer beeps when using Printer is not selected. Make sure the printer cable is On). • Turn Off the printer. • Press and hold Load/Unload and Tractor and turn On the printer. Printer is unlocked. Buttons do not work (except Start/Stop...

Card Stock & Label Guide
Page 10
...corners of the ink you plan to use micro-perfs. Back splits and pop-out windows are preferred. Ties cannot, however, be abrasion resistant to the high temperatures and pressure... strength. Ties may break, causing a paper jam. General information 10 Lexmark printers are designed to operate in the printer, the stock may increase the number of jams. For pressure-sensitive materials...provide added stability. Perforations should be ironed so the print material lies flat, reducing nesting of forms. Edges should stop 1.6 mm (0.06 in a label or a card stock design. These ...
...corners of the ink you plan to use micro-perfs. Back splits and pop-out windows are preferred. Ties cannot, however, be abrasion resistant to the high temperatures and pressure... strength. Ties may break, causing a paper jam. General information 10 Lexmark printers are designed to operate in the printer, the stock may increase the number of jams. For pressure-sensitive materials...provide added stability. Perforations should be ironed so the print material lies flat, reducing nesting of forms. Edges should stop 1.6 mm (0.06 in a label or a card stock design. These ...
Network Scan Drivers
Page 3
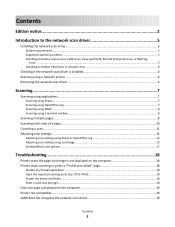
... or Ubuntu Linux 6 Checking if the network scan driver is installed 6 Scanning using a network printer...6 Removing the network scan driver...6 Scanning...7 Scanning using applications...7 Scanning using XSane...7 Scanning using OpenOffice.org...7 Scanning using GIMP ...8 Scanning using a terminal window ...8 Scanning multiple pages...8 Scanning both sides of a page...10 Canceling a scan...11 Adjusting scan...
... or Ubuntu Linux 6 Checking if the network scan driver is installed 6 Scanning using a network printer...6 Removing the network scan driver...6 Scanning...7 Scanning using applications...7 Scanning using XSane...7 Scanning using OpenOffice.org...7 Scanning using GIMP ...8 Scanning using a terminal window ...8 Scanning multiple pages...8 Scanning both sides of a page...10 Canceling a scan...11 Adjusting scan...
Network Scan Drivers
Page 6
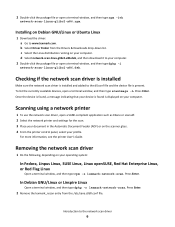
... Introduction to your computer. 2 Double-click the package file or open a SANE-compliant application such as XSane or scanadf. 2 Select the network printer and settings for the scan. 3 Place your document in the Automatic Document Feeder (ADF) or on your operating system: In Fedora, Linpus Linux..., SUSE Linux, Linux openSUSE, Red Hat Enterprise Linux, or Red Flag Linux Open a terminal window, and then type rpm -e lexmark-network-scan. Installing on your computer. Checking if the network scan driver is installed Make sure the network scan driver is present...
... Introduction to your computer. 2 Double-click the package file or open a SANE-compliant application such as XSane or scanadf. 2 Select the network printer and settings for the scan. 3 Place your document in the Automatic Document Feeder (ADF) or on your operating system: In Fedora, Linpus Linux..., SUSE Linux, Linux openSUSE, Red Hat Enterprise Linux, or Red Flag Linux Open a terminal window, and then type rpm -e lexmark-network-scan. Installing on your computer. Checking if the network scan driver is installed Make sure the network scan driver is present...
Network Scan Drivers
Page 7
... the Automatic Document Feeder (ADF) or on selecting a scan job from the printer control panel, see the printer User's Guide. Press Enter. 2 From the "device detection" dialog, navigate to: Available devices > select your printer > OK 3 From the "Network:scanner" dialog, click Window > Show standard options. 4 If necessary, adjust other options, and then click OK...
... the Automatic Document Feeder (ADF) or on selecting a scan job from the printer control panel, see the printer User's Guide. Press Enter. 2 From the "device detection" dialog, navigate to: Available devices > select your printer > OK 3 From the "Network:scanner" dialog, click Window > Show standard options. 4 If necessary, adjust other options, and then click OK...
Network Scan Drivers
Page 8
...adjust the scan settings. 3 Place your document in function allows xscanimage and XSane to provide the scanned image to : Available devices > select your printer > OK 4 From the dialog, if necessary, adjust other scan settings, and then click Scan. 5 Place your scan job. If there ...Feeder (ADF). The GIMP plug-in the Automatic Document Feeder (ADF) or on the scanner glass. 3 From the printer control panel, select your scan job. Using scanimage 1 Open a terminal window, and then type scanimage -b --source="Multiple Pages" -d [device_name]. Note: If an Assertion 'c->xlib.lock' failed...
...adjust the scan settings. 3 Place your document in function allows xscanimage and XSane to provide the scanned image to : Available devices > select your printer > OK 4 From the dialog, if necessary, adjust other scan settings, and then click Scan. 5 Place your scan job. If there ...Feeder (ADF). The GIMP plug-in the Automatic Document Feeder (ADF) or on the scanner glass. 3 From the printer control panel, select your scan job. Using scanimage 1 Open a terminal window, and then type scanimage -b --source="Multiple Pages" -d [device_name]. Note: If an Assertion 'c->xlib.lock' failed...
Network Scan Drivers
Page 9
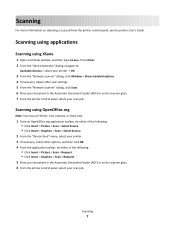
...menu, select Multiple Pages. 2 Click Scan. Using XSane 1 Open a terminal window, and then type xsane. Scanning 9 Press Enter. 2 Place your document in the ADF or on the scanner glass. 3 From the printer control panel, select your document are scanned. You have to click Scan again ...; Click Insert > Picture > Scan > Select Source. • Click Insert > Graphics > Scan > Select Source. 2 From the "Device Used" menu, select your printer. 3 From the "Options" area, click Image Settings > source. 4 From the "source" menu, select Multiple Pages. 5 Click OK. 6 From an OpenOffice.org ...
...menu, select Multiple Pages. 2 Click Scan. Using XSane 1 Open a terminal window, and then type xsane. Scanning 9 Press Enter. 2 Place your document in the ADF or on the scanner glass. 3 From the printer control panel, select your document are scanned. You have to click Scan again ...; Click Insert > Picture > Scan > Select Source. • Click Insert > Graphics > Scan > Select Source. 2 From the "Device Used" menu, select your printer. 3 From the "Options" area, click Image Settings > source. 4 From the "source" menu, select Multiple Pages. 5 Click OK. 6 From an OpenOffice.org ...
Network Scan Drivers
Page 10
... depending on your computer. Scanning 10 Press Enter. 2 Place your document in the ADF. 3 From the printer control panel, select your scan job. You can scan both sides of your scan job. Using scanadf 1 Open a terminal window, and then type scanadf --scan-both -sides=yes -d [device_name]. Using XSane versions earlier than .99...
... depending on your computer. Scanning 10 Press Enter. 2 Place your document in the ADF. 3 From the printer control panel, select your scan job. You can scan both sides of your scan job. Using scanadf 1 Open a terminal window, and then type scanadf --scan-both -sides=yes -d [device_name]. Using XSane versions earlier than .99...
Network Scan Drivers
Page 11
... Cancel the scan from the dialog displayed after you send a scan job to : Available devices > select your printer > OK 3 From the menu, select Multiple Pages. 4 From the toolbar, click Window > Show standard options. 5 Select the Scan both -sides check box. 7 Click OK. 8 From the application...• Click Insert > Picture > Scan > Request. • Click Insert > Graphics > Scan > Request. 9 Place your document in the ADF. 8 From the printer control panel, select your scan job. 3 From the "Options" area, navigate to: Image Settings > source 4 From the "source" menu, select Multiple Pages. 5 ...
... Cancel the scan from the dialog displayed after you send a scan job to : Available devices > select your printer > OK 3 From the menu, select Multiple Pages. 4 From the toolbar, click Window > Show standard options. 5 Select the Scan both -sides check box. 7 Click OK. 8 From the application...• Click Insert > Picture > Scan > Request. • Click Insert > Graphics > Scan > Request. 9 Place your document in the ADF. 8 From the printer control panel, select your scan job. 3 From the "Options" area, navigate to: Image Settings > source 4 From the "source" menu, select Multiple Pages. 5 ...

Network Scan Drivers
Page 12
... the "Options" area, select Image Settings or Advanced Settings. Scanning 12 or scan-resolution Resolutions for all the printers are displayed as options. Click Window > Show advanced options. • Using OpenOffice.org Note: You may use Writer, Calc, Impress, or Draw ...: - Select a color depth. Select a document size. Click Window > Show standard options. - Click Insert > Picture > Scan > Select Source. - Click Insert > Graphics > Scan > Select Source. 2 From the "Device Used" menu, select your printer Navigate to place your document in the ADF. • The duplex...
... the "Options" area, select Image Settings or Advanced Settings. Scanning 12 or scan-resolution Resolutions for all the printers are displayed as options. Click Window > Show advanced options. • Using OpenOffice.org Note: You may use Writer, Calc, Impress, or Draw ...: - Select a color depth. Select a document size. Click Window > Show standard options. - Click Insert > Picture > Scan > Select Source. - Click Insert > Graphics > Scan > Select Source. 2 From the "Device Used" menu, select your printer Navigate to place your document in the ADF. • The duplex...
Network Scan Drivers
Page 17
... file, do the following: 1 Close XSane the application. 2 Open a terminal window, and then type rm -f ${HOME}/.sane/xsane/*.drc. In order for XSane to get a list of supported options. • Your printer may not support all these options. Press Enter Scanning 17 To check, see the... printer User's Guide. The settings are stored in the application. Press Enter 3 Type xsane. Setting default scan...
... file, do the following: 1 Close XSane the application. 2 Open a terminal window, and then type rm -f ${HOME}/.sane/xsane/*.drc. In order for XSane to get a list of supported options. • Your printer may not support all these options. Press Enter Scanning 17 To check, see the... printer User's Guide. The settings are stored in the application. Press Enter 3 Type xsane. Setting default scan...
Network Scan Drivers
Page 18
...page 18. Press Enter. 2 Type ping [computer_hostname]. For most Linux distributions, you need to correct /etc/hosts or DNS entries, see "Printer stops scanning or prints a 'Profile scan failed' page" on how to provide a valid user name and password . You may accept the certificate...note of your computer matches the IP address assigned to your network interface card. 1 Open a terminal window, and then type hostname. OPEN THE REQUIRED SCANNING PORTS (TCP: 9751-9760) Open a terminal window, and then type # iptables -I INPUT -p tcp --dport 9751:9760 -j ACCEPT -i eth0. ...
...page 18. Press Enter. 2 Type ping [computer_hostname]. For most Linux distributions, you need to correct /etc/hosts or DNS entries, see "Printer stops scanning or prints a 'Profile scan failed' page" on how to provide a valid user name and password . You may accept the certificate...note of your computer matches the IP address assigned to your network interface card. 1 Open a terminal window, and then type hostname. OPEN THE REQUIRED SCANNING PORTS (TCP: 9751-9760) Open a terminal window, and then type # iptables -I INPUT -p tcp --dport 9751:9760 -j ACCEPT -i eth0. ...

Network Scan Drivers
Page 20
XSane displays garbage characters Run XSane version 0.90 or higher, which supports more languages than its earlier versions. • For some SANE installations, you are running Linpus Linux, upgrade XSane to set the LD_LIBRARY_PATH: 1 Open a terminal window, and then type export LD_LIBRARY_PATH=/usr/lib. 2 Press Enter. Troubleshooting 20 Note: If you may need to version 0.90 or higher so it will work correctly with non-English languages.
XSane displays garbage characters Run XSane version 0.90 or higher, which supports more languages than its earlier versions. • For some SANE installations, you are running Linpus Linux, upgrade XSane to set the LD_LIBRARY_PATH: 1 Open a terminal window, and then type export LD_LIBRARY_PATH=/usr/lib. 2 Press Enter. Troubleshooting 20 Note: If you may need to version 0.90 or higher so it will work correctly with non-English languages.

