
Wireless Setup Guide
Page 6
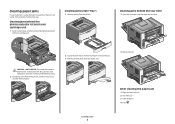
Firmly shake the cartridge side-to-side and front-toback several times to distribute toner. Setting up and out using the handle. Pull the toner cartridge up the printer 6 Remove the tape and packaging material from the printer. Remove the unit consisting of the photoconductor kit. Press the button on the base of the photoconductor kit and the toner cartridge from the unit. Reinsert the unit into the printer.
Firmly shake the cartridge side-to-side and front-toback several times to distribute toner. Setting up and out using the handle. Pull the toner cartridge up the printer 6 Remove the tape and packaging material from the printer. Remove the unit consisting of the photoconductor kit. Press the button on the base of the photoconductor kit and the toner cartridge from the unit. Reinsert the unit into the printer.

Wireless Setup Guide
Page 7
... back and forth to the sides of the tray. Do not fold or crease the paper. Push the toner cartridge until it clicks into the photoconductor kit by aligning the rollers on a level surface. Close the front door. Notice that the two width guides move in unison when you move just...
... back and forth to the sides of the tray. Do not fold or crease the paper. Push the toner cartridge until it clicks into the photoconductor kit by aligning the rollers on a level surface. Close the front door. Notice that the two width guides move in unison when you move just...
Quick Reference
Page 2
... under Tray 1 1 Remove the tray from the duplex area. 2 Remove the jam. Clearing jams behind the photoconductor kit and toner cartridge unit 1 Open the front door, and then remove the photoconductor kit and toner cartridge unit. CAUTION-HOT SURFACE: The inside of paper. 2 Locate the lever shown. After ...the surface to release the jam. 3 Pull the jammed sheets from the printer. Pull the level down to cool before touching. 2 Lift the flap at the front of the printer, and then remove any jammed sheets of the printer might be hot. Clearing paper jams If a jammed sheet is not ...
... under Tray 1 1 Remove the tray from the duplex area. 2 Remove the jam. Clearing jams behind the photoconductor kit and toner cartridge unit 1 Open the front door, and then remove the photoconductor kit and toner cartridge unit. CAUTION-HOT SURFACE: The inside of paper. 2 Locate the lever shown. After ...the surface to release the jam. 3 Pull the jammed sheets from the printer. Pull the level down to cool before touching. 2 Lift the flap at the front of the printer, and then remove any jammed sheets of the printer might be hot. Clearing paper jams If a jammed sheet is not ...
Print Defects
Page 1
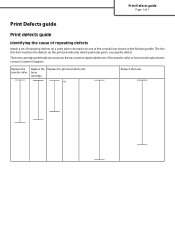
transfer roller. The toner cartridge and the photoconductor kit are customer replaceable items. If the transfer roller or fuser needs replacement, contact Customer Support. The line that best matches the defects on one ...of the vertical lines shown in the following table. or Replace the fuser. Replace the Replace the Replace the photoconductor kit. Print Defects guide Page 1 of 1 Print Defects guide Print defects guide Identifying the cause of repeating defects Match a set of repeating defects on a print...
transfer roller. The toner cartridge and the photoconductor kit are customer replaceable items. If the transfer roller or fuser needs replacement, contact Customer Support. The line that best matches the defects on one ...of the vertical lines shown in the following table. or Replace the fuser. Replace the Replace the Replace the photoconductor kit. Print Defects guide Page 1 of 1 Print Defects guide Print defects guide Identifying the cause of repeating defects Match a set of repeating defects on a print...

Supplies guide
Page 2
...following table for the maintenance kit part number for use only in all the items necessary to replace printer maintenance items. Order a maintenance kit when this time, order a photoconductor kit. The maintenance kit contains all geographies. • Using certain types of paper or specialty ... printer model, the printer issues a message or a light sequence to let you know the photoconductor kit is time to replace the fuser and transfer roller. Supplies guide Page 2 of 2 Part name For Latin America Toner cartridge High Yield Toner Cartridge Extra High Yield Toner Cartridge Lexmark ...
...following table for the maintenance kit part number for use only in all the items necessary to replace printer maintenance items. Order a maintenance kit when this time, order a photoconductor kit. The maintenance kit contains all geographies. • Using certain types of paper or specialty ... printer model, the printer issues a message or a light sequence to let you know the photoconductor kit is time to replace the fuser and transfer roller. Supplies guide Page 2 of 2 Part name For Latin America Toner cartridge High Yield Toner Cartridge Extra High Yield Toner Cartridge Lexmark ...

User Manual
Page 5
... ...137 Ordering a maintenance kit ...137 Replacing supplies...137 Replacing the toner cartridge ...137 Replacing the photoconductor kit ...139 Recycling Lexmark products...141 Moving the printer...142 Moving the printer to another location...142 Shipping the printer ...142 Administrative support 143 Finding advanced networking and administrator information 143 Using the Embedded Web Server...143 Checking the...
... ...137 Ordering a maintenance kit ...137 Replacing supplies...137 Replacing the toner cartridge ...137 Replacing the photoconductor kit ...139 Recycling Lexmark products...141 Moving the printer...142 Moving the printer to another location...142 Shipping the printer ...142 Administrative support 143 Finding advanced networking and administrator information 143 Using the Embedded Web Server...143 Checking the...

User Manual
Page 69
... 200 Try one or more of the following: • Remove Tray 1. • Open the front door, and then remove the photoconductor kit. 201 Open the front door, and then remove the photoconductor kit. 202 Open the front door, and then open the rear door. 231 Open the front door, and then open...
... 200 Try one or more of the following: • Remove Tray 1. • Open the front door, and then remove the photoconductor kit. 201 Open the front door, and then remove the photoconductor kit. 202 Open the front door, and then open the rear door. 231 Open the front door, and then open...

User Manual
Page 71
Clearing jams 71 3 If you do not see it, open the front door, and then remove the photoconductor kit and toner cartridge (unit). Note: When the photoconductor kit and toner cartridge are together, they are called a unit. 4 Lift the flap in front of the printer, and remove any jammed sheets. 5 Align and insert the unit. 6 Close the front door. 7 Insert the tray. 8 Press .
Clearing jams 71 3 If you do not see it, open the front door, and then remove the photoconductor kit and toner cartridge (unit). Note: When the photoconductor kit and toner cartridge are together, they are called a unit. 4 Lift the flap in front of the printer, and remove any jammed sheets. 5 Align and insert the unit. 6 Close the front door. 7 Insert the tray. 8 Press .
User Manual
Page 124
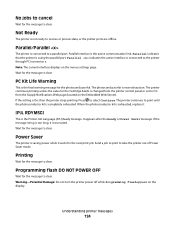
...If the message string is too long, it waits for the next print job. Understanding printer messages 124 The photoconductor kit is truncated. Warning-Potential Damage: Do not turn the printer power off while Programming flash appears on the menus settings page. No jobs to cancel Wait... the active interface is connected to the printer through PCI connector x. Wait for the message to print until the photoconductor kit is the final warning message for the photoconductor kit. PC Kit Life Warning This is completely exhausted. The printer continues to clear. It appears after the...
...If the message string is too long, it waits for the next print job. Understanding printer messages 124 The photoconductor kit is truncated. Warning-Potential Damage: Do not turn the printer power off while Programming flash appears on the menus settings page. No jobs to cancel Wait... the active interface is connected to the printer through PCI connector x. Wait for the message to print until the photoconductor kit is the final warning message for the photoconductor kit. PC Kit Life Warning This is completely exhausted. The printer continues to clear. It appears after the...
User Manual
Page 125
...POWER OFF Wait for the photoconductor kit. Remote Management Active DO NOT POWER OFF The printer settings are being configured. Replace PC Kit This is the early warning message for the message to clear. Warning-Potential Damage: Do not turn the printer power off while Programming ... Kit Life Warning appears, order a new photoconductor kit. Press to receive print jobs. Resetting without replacing may affect print quality. Remove paper from the "Verify PC unit replaced" screen. Wait for the message to clear. Resetting the printer Wait for the message to clear. Remove ...
...POWER OFF Wait for the photoconductor kit. Remote Management Active DO NOT POWER OFF The printer settings are being configured. Replace PC Kit This is the early warning message for the message to clear. Warning-Potential Damage: Do not turn the printer power off while Programming ... Kit Life Warning appears, order a new photoconductor kit. Press to receive print jobs. Resetting without replacing may affect print quality. Remove paper from the "Verify PC unit replaced" screen. Wait for the message to clear. Resetting the printer Wait for the message to clear. Remove ...
User Manual
Page 130
...the message and continue printing. 88.yy Replace cartridge The toner cartridge is exhausted. Understanding printer messages 130 Contact Customer Support, and report the message. 84 PC Kit life warning The photoconductor kit is near exhaustion. 56 Standard USB port disabled Try one or more of the ...following: • Turn the printer off, and then remove extra flash options: 1 Turn the printer off. 2 Unplug the power cord from the wall ...
...the message and continue printing. 88.yy Replace cartridge The toner cartridge is exhausted. Understanding printer messages 130 Contact Customer Support, and report the message. 84 PC Kit life warning The photoconductor kit is near exhaustion. 56 Standard USB port disabled Try one or more of the ...following: • Turn the printer off, and then remove extra flash options: 1 Turn the printer off. 2 Unplug the power cord from the wall ...

User Manual
Page 131
...: • Remove Tray 1. • Open the front door, and then remove the photoconductor kit and toner cartridge unit. 2 Remove the jam. 3 Replace the photoconductor kit and toner cartridge unit if you removed it. 4 Close any open doors or trays... the number of pages jammed. 1 Open the front door, and then remove the photoconductor kit and toner cartridge unit. 2 Remove the jam. 3 Replace the photoconductor kit and toner cartridge unit. 4 Close the front door. 5 Press to continue ... rear door. 3 Remove the jam. 4 Close both doors. 5 Press to continue printing. Understanding printer messages 131
...: • Remove Tray 1. • Open the front door, and then remove the photoconductor kit and toner cartridge unit. 2 Remove the jam. 3 Replace the photoconductor kit and toner cartridge unit if you removed it. 4 Close any open doors or trays... the number of pages jammed. 1 Open the front door, and then remove the photoconductor kit and toner cartridge unit. 2 Remove the jam. 3 Replace the photoconductor kit and toner cartridge unit. 4 Close the front door. 5 Press to continue ... rear door. 3 Remove the jam. 4 Close both doors. 5 Press to continue printing. Understanding printer messages 131

User Manual
Page 132
...the number of pages jammed. 1 Remove the jam from the standard exit bin. 2 Check the paper size to ensure that it is supported by the printer. 3 Press to continue printing. 24x.yy Paper jam The message indicates either where the paper is jammed or the number of pages jammed. 1 To ...one or more of the following: • Remove Tray 1. • Open the front door, and then remove the photoconductor kit and toner cartridge unit. • Remove Tray 2. 2 Remove the jam. 3 Replace the photoconductor kit and toner cartridge unit if you removed it. 4 Close any open doors or trays. 5 Press to continue ...
...the number of pages jammed. 1 Remove the jam from the standard exit bin. 2 Check the paper size to ensure that it is supported by the printer. 3 Press to continue printing. 24x.yy Paper jam The message indicates either where the paper is jammed or the number of pages jammed. 1 To ...one or more of the following: • Remove Tray 1. • Open the front door, and then remove the photoconductor kit and toner cartridge unit. • Remove Tray 2. 2 Remove the jam. 3 Replace the photoconductor kit and toner cartridge unit if you removed it. 4 Close any open doors or trays. 5 Press to continue ...
User Manual
Page 137
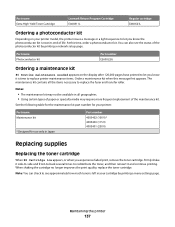
... not be available in all the items necessary to replace the fuser and transfer roller. Maintaining the printer 137 Part name Extra High Yield Toner Cartridge Lexmark Return Program Cartridge E460X11L Regular cartridge E460X21L Ordering a photoconductor kit Depending on the display after 120,000 pages have printed to let you know it is...
... not be available in all the items necessary to replace the fuser and transfer roller. Maintaining the printer 137 Part name Extra High Yield Toner Cartridge Lexmark Return Program Cartridge E460X11L Regular cartridge E460X21L Ordering a photoconductor kit Depending on the display after 120,000 pages have printed to let you know it is...

User Manual
Page 138
Maintaining the printer 138 Extended light exposure can cause print quality problems. 4 Rotate the cartridge in all directions to direct light for an extended period of the photoconductor kit, and then pull the toner cartridge out using the handle. 3 Unpack the new toner cartridge. Warning-Potential Damage: When replacing a toner cartridge, do not leave the photoconductor kit exposed to distribute the toner. To replace the toner cartridge: 1 Open the front door by pressing the button on the left side of the printer and lowering the door. 2 Press the button on the base of time.
Maintaining the printer 138 Extended light exposure can cause print quality problems. 4 Rotate the cartridge in all directions to direct light for an extended period of the photoconductor kit, and then pull the toner cartridge out using the handle. 3 Unpack the new toner cartridge. Warning-Potential Damage: When replacing a toner cartridge, do not leave the photoconductor kit exposed to distribute the toner. To replace the toner cartridge: 1 Open the front door by pressing the button on the left side of the printer and lowering the door. 2 Press the button on the base of time.
User Manual
Page 139
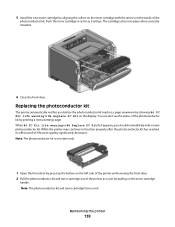
..., print quality significantly decreases. Replacing the photoconductor kit The printer automatically notifies you should immediately order a new photoconductor kit. While the printer may continue to function properly after the photoconductor kit has reached its official end-of the photoconductor kit. Push the toner cartridge in as... toner cartridge handle. You can also see the status of the printer as it will go. Note: The photoconductor kit and toner cartridge form a unit. Maintaining the printer 139 Note: The photoconductor kit is one item only. 1 Open the front door by ...
..., print quality significantly decreases. Replacing the photoconductor kit The printer automatically notifies you should immediately order a new photoconductor kit. While the printer may continue to function properly after the photoconductor kit has reached its official end-of the photoconductor kit. Push the toner cartridge in as... toner cartridge handle. You can also see the status of the printer as it will go. Note: The photoconductor kit and toner cartridge form a unit. Maintaining the printer 139 Note: The photoconductor kit is one item only. 1 Open the front door by ...

User Manual
Page 140
Maintaining the printer 140 Place the unit on a flat, clean surface. 3 Press the button on the base of the photoconductor kit. Be careful not to touch the photoconductor drum. Pull the toner cartridge up and out using the handle. 4 Unpack the new photoconductor kit.
Maintaining the printer 140 Place the unit on a flat, clean surface. 3 Press the button on the base of the photoconductor kit. Be careful not to touch the photoconductor drum. Pull the toner cartridge up and out using the handle. 4 Unpack the new photoconductor kit.

User Manual
Page 141
... unit with the arrows in the printer. Recycling Lexmark products To return Lexmark products to Lexmark for recycling: 1 Visit our Web site at www.lexmark.com/recycle. 2 Find the product type you replace the photoconductor kit, reset the photoconductor counter. Warning-Potential Damage: Resetting the photoconductor counter without replacing the photoconductor may damage your printer and void your country from...
... unit with the arrows in the printer. Recycling Lexmark products To return Lexmark products to Lexmark for recycling: 1 Visit our Web site at www.lexmark.com/recycle. 2 Find the product type you replace the photoconductor kit, reset the photoconductor counter. Warning-Potential Damage: Resetting the photoconductor counter without replacing the photoconductor may damage your printer and void your country from...

User Manual
Page 154
... or more information, contact Customer Support. Clipped images These are supported by the printer, the host computer, and the software program. For more of the following : • Remove and reinstall the toner cartridge. • Remove and reinstall the photoconductor kit. Characters have jagged or uneven edges If you are using downloaded fonts...
... or more information, contact Customer Support. Clipped images These are supported by the printer, the host computer, and the software program. For more of the following : • Remove and reinstall the toner cartridge. • Remove and reinstall the photoconductor kit. Characters have jagged or uneven edges If you are using downloaded fonts...

User Manual
Page 155
...photoconductor kit. CHECK THE MEDIA TYPE SETTING • For Windows users: From Print Properties, make sure the Media Type setting matches the paper loaded in the tray. • For Macintosh users: From the Print dialog, make sure the Paper Type setting matches the paper loaded in the tray. • From the printer...: From the print options, Copies & Pages, or General pop-up menu, choose Printer Features, and then choose the setting needed from the Toner Darkness pop-up menu. • From the printer control panel Quality menu, select a different Toner Darkness setting before sending the job to...
...photoconductor kit. CHECK THE MEDIA TYPE SETTING • For Windows users: From Print Properties, make sure the Media Type setting matches the paper loaded in the tray. • For Macintosh users: From the Print dialog, make sure the Paper Type setting matches the paper loaded in the tray. • From the printer...: From the print options, Copies & Pages, or General pop-up menu, choose Printer Features, and then choose the setting needed from the Toner Darkness pop-up menu. • From the printer control panel Quality menu, select a different Toner Darkness setting before sending the job to...


