Menus and Messages Guide
Page 31
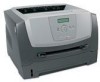
...Feed command, or additional data. • Press to clear the message and continue printing. Understanding printer messages Message Resetting Maint Cnt Value Resetting PC Cnt Value Resetting the Printer Res Reduced Restoring Factory Defaults Std Bin Full Toner Low Tray Missing USB Waiting 31 Missing or...deficient memory 37 Insufficient collation area 37 Insufficient Defrag memory 38 Memory Full Action The printer is resetting the counter that tracks wear on the photoconductor. The printer is resetting the counter that tracks wear on the display while the job prints. Res Reduced ...
...Feed command, or additional data. • Press to clear the message and continue printing. Understanding printer messages Message Resetting Maint Cnt Value Resetting PC Cnt Value Resetting the Printer Res Reduced Restoring Factory Defaults Std Bin Full Toner Low Tray Missing USB Waiting 31 Missing or...deficient memory 37 Insufficient collation area 37 Insufficient Defrag memory 38 Memory Full Action The printer is resetting the counter that tracks wear on the photoconductor. The printer is resetting the counter that tracks wear on the display while the job prints. Res Reduced ...
Menus and Messages Guide
Page 33
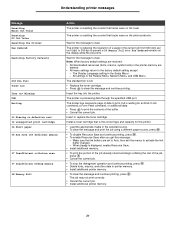
... reset the printer maintenance counter. If the service message recurs, call for service, and report the message number and description of the problem. 33 The microcode to be re-transmitted from the host. • To clear the message, and continue printing, press . • Replace the photoconductor unit... 3 Check the paper size to insure that it on . Understanding printer messages Message 58 Too many trays attached 80 Scheduled maintenance 81 Engine Code CFC Failure 84 Photoconduct life warning 84 Replace Photoconductor 84 PC unit abnormal 88 Toner low 200 Paper jam Remove Cartridge ...
... reset the printer maintenance counter. If the service message recurs, call for service, and report the message number and description of the problem. 33 The microcode to be re-transmitted from the host. • To clear the message, and continue printing, press . • Replace the photoconductor unit... 3 Check the paper size to insure that it on . Understanding printer messages Message 58 Too many trays attached 80 Scheduled maintenance 81 Engine Code CFC Failure 84 Photoconduct life warning 84 Replace Photoconductor 84 PC unit abnormal 88 Toner low 200 Paper jam Remove Cartridge ...
Quick Reference
Page 4
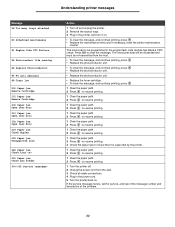
Common light sequences (continued) = On = Blinking = Slow blink Empty = Off Printer Condition Complex page Continue Toner Low / Error Replace PC Kit Load Paper Paper Jam Ready Cancel job/ Reset printer Load print media Load manual feeder Toner low Toner cartridge region mismatch Photoconductor kit life warning Replace photoconductor (printer hard stop) Programming engine code/ Programming system code Understanding the control panel lights 4
Common light sequences (continued) = On = Blinking = Slow blink Empty = Off Printer Condition Complex page Continue Toner Low / Error Replace PC Kit Load Paper Paper Jam Ready Cancel job/ Reset printer Load print media Load manual feeder Toner low Toner cartridge region mismatch Photoconductor kit life warning Replace photoconductor (printer hard stop) Programming engine code/ Programming system code Understanding the control panel lights 4
User's Guide
Page 39
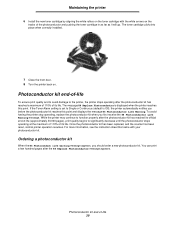
... reaches this point. The message 84 Replace Photoconductor is set to the printer, the printer stops operating after the photoconductor kit has reached a maximum of 110% of its life. Once the photoconductor kit has been replaced, and the counter has been reset, normal printer operation resumes. Photoconductor kit end-of the photoconductor and pushing the toner cartridge in as...
... reaches this point. The message 84 Replace Photoconductor is set to the printer, the printer stops operating after the photoconductor kit has reached a maximum of 110% of its life. Once the photoconductor kit has been replaced, and the counter has been reset, normal printer operation resumes. Photoconductor kit end-of the photoconductor and pushing the toner cartridge in as...

User's Guide
Page 41
... print cartridge assembly in as far as it will go . 7 Close the front door. 8 Turn the printer back on. 9 Reset the photoconductor counter (see Printing the menu settings page on page26. Photoconductor kit end-of-life 41 If Photoconductor is listed under Warnings, the photoconductor counter has not been properly reset. Note: Print your printer menu settings pages.
... print cartridge assembly in as far as it will go . 7 Close the front door. 8 Turn the printer back on. 9 Reset the photoconductor counter (see Printing the menu settings page on page26. Photoconductor kit end-of-life 41 If Photoconductor is listed under Warnings, the photoconductor counter has not been properly reset. Note: Print your printer menu settings pages.
Service Manual
Page 21
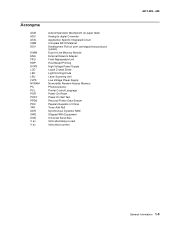
... Field Replaceable Unit Host Based Printing High Voltage Power Supply Liquid Crystal Diode Light Emitting Diode Laser Scanning Unit Low Voltage Power Supply Nonvolatile Random Access Memory Photoconductor Printer Control Language Power-On Reset Power-On Self Test Personal Printer Data Stream People's Republic of China Toner Add Roll Synchronous Dynamic RAM Shipped With Equipment...
... Field Replaceable Unit Host Based Printing High Voltage Power Supply Liquid Crystal Diode Light Emitting Diode Laser Scanning Unit Low Voltage Power Supply Nonvolatile Random Access Memory Photoconductor Printer Control Language Power-On Reset Power-On Self Test Personal Printer Data Stream People's Republic of China Toner Add Roll Synchronous Dynamic RAM Shipped With Equipment...
Service Manual
Page 29
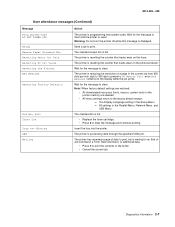
... to print the contents of a page in the Parallel Menu, Network Menu, and USB Menu The standard bin is resetting the counter that tracks wear on the photoconductor. Diagnostics information 2-7 Warning: Do not turn the printer off while this message is reducing the resolution of the buffer. • Cancel the current job. The...
... to print the contents of a page in the Parallel Menu, Network Menu, and USB Menu The standard bin is resetting the counter that tracks wear on the photoconductor. Diagnostics information 2-7 Warning: Do not turn the printer off while this message is reducing the resolution of the buffer. • Cancel the current job. The...

Service Manual
Page 56
.... Turn on page 3-3. "Energy Conserve" on the printer. 4. "Exit Config Menu" on page 3-3. Note: Permanent page count is not affected by this number should be reset via Reset Maint Count. "PPDS Emulation" on page 3-4. "Factory Defaults" on page 3-3. Reset PC Cnt When you install a new photoconductor, this operation. 3-2 Lexmark™ E350d, E352dn "Panel Menus" on page 3-3. Press...
.... Turn on page 3-3. "Energy Conserve" on the printer. 4. "Exit Config Menu" on page 3-3. Note: Permanent page count is not affected by this number should be reset via Reset Maint Count. "PPDS Emulation" on page 3-4. "Factory Defaults" on page 3-3. Reset PC Cnt When you install a new photoconductor, this operation. 3-2 Lexmark™ E350d, E352dn "Panel Menus" on page 3-3. Press...

