
User's Guide
Page 10
Contents Checking the toner and photoconductor levels 90 Recognizing the operator panel light sequences 91 How to change a toner cartridge 92 Recycling Lexmark products 95 How to change a photoconductor kit 96 Chapter 11: Troubleshooting 99 General problems ...99 Print quality problems 101 How to clean the printhead lens 105 Index ...108 10
Contents Checking the toner and photoconductor levels 90 Recognizing the operator panel light sequences 91 How to change a toner cartridge 92 Recycling Lexmark products 95 How to change a photoconductor kit 96 Chapter 11: Troubleshooting 99 General problems ...99 Print quality problems 101 How to clean the printhead lens 105 Index ...108 10
User's Guide
Page 54
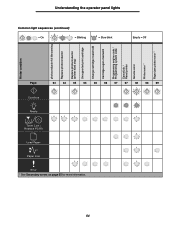
... Paper Jam Error * See Secondary errors on page 55 for more information. 64 Understanding the operator panel lights 64 65 = Blinking 65 54 Printer condition photoconductor kit life warning Replace photoconductor Replace photoconductor (printer hard stop) Unsupported print cartridge Change cartridge invalid refill Cartridge region mismatch Programming engine code / Programming system code Cancel job / Reset...
... Paper Jam Error * See Secondary errors on page 55 for more information. 64 Understanding the operator panel lights 64 65 = Blinking 65 54 Printer condition photoconductor kit life warning Replace photoconductor Replace photoconductor (printer hard stop) Unsupported print cartridge Change cartridge invalid refill Cartridge region mismatch Programming engine code / Programming system code Cancel job / Reset...
User's Guide
Page 64
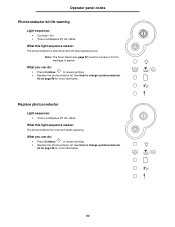
... Toner Low/Replace PC Kit-Blink What this light sequence means: The photoconductor kit is almost full and will need replacing soon. See How to change a photoconductor kit on for this message to change a photoconductor kit on page 96 for more information. Note: The Toner Alarm (...On • Toner Low/Replace PC Kit-Blink What this light sequence means: The photoconductor is full and needs replacing. What you can do : • Press Continue to resume printing. • Replace the photoconductor kit. What you can do : • Press Continue to resume printing. •...
... Toner Low/Replace PC Kit-Blink What this light sequence means: The photoconductor kit is almost full and will need replacing soon. See How to change a photoconductor kit on for this message to change a photoconductor kit on page 96 for more information. Note: The Toner Alarm (...On • Toner Low/Replace PC Kit-Blink What this light sequence means: The photoconductor is full and needs replacing. What you can do : • Press Continue to resume printing. • Replace the photoconductor kit. What you can do : • Press Continue to resume printing. •...
User's Guide
Page 65
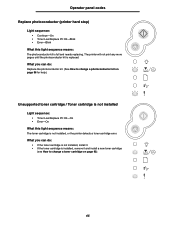
... light sequence means: The toner cartridge is not installed, or the printer detects a toner cartridge error. What you can do : Replace the photoconductor kit. (See How to change a photoconductor kit on page 92). 65 The printer will not print any more pages until the photoconductor kit is full and needs replacing. What you can do...
... light sequence means: The toner cartridge is not installed, or the printer detects a toner cartridge error. What you can do : Replace the photoconductor kit. (See How to change a photoconductor kit on page 92). 65 The printer will not print any more pages until the photoconductor kit is full and needs replacing. What you can do...
User's Guide
Page 84
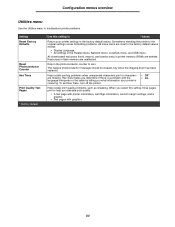
Configuration menus overview Utilities menu Use the Utilities menu to troubleshoot printer problems. Setting Reset Factory Defaults Reset Photoconductor Counter Hex Trace Print Quality Test Pages * Factory default Use this setting, three pages print to the factory default values except: &#..., Network menu, LocalTalk menu, and USB menu. Return the photoconductor counter to the factory default values. The replace photoconductor message should be cleared only when the imaging drum has been replaced. To exit Hex Trace, turn off the printer. • Off* • On Help isolate print quality ...
Configuration menus overview Utilities menu Use the Utilities menu to troubleshoot printer problems. Setting Reset Factory Defaults Reset Photoconductor Counter Hex Trace Print Quality Test Pages * Factory default Use this setting, three pages print to the factory default values except: &#..., Network menu, LocalTalk menu, and USB menu. Return the photoconductor counter to the factory default values. The replace photoconductor message should be cleared only when the imaging drum has been replaced. To exit Hex Trace, turn off the printer. • Off* • On Help isolate print quality ...
User's Guide
Page 88
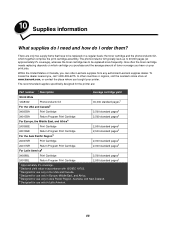
...Designed for use only in Asia Pacific Region, Australia, and New Zealand. 6 Designed for the printer are only two supply items that have on a regular basis: the toner cartridge and the photoconductor kit, which cartridge you purchase and the average amount of toner coverage you bought your print jobs....What supplies do I need and how do I order them? The photoconductor kit typically lasts up to 30,000 pages (at www.lexmark.com, or contact the place where you have to be replaced on your printer. How often the toner cartridge needs replacing depends on which together comprise ...
...Designed for use only in Asia Pacific Region, Australia, and New Zealand. 6 Designed for the printer are only two supply items that have on a regular basis: the toner cartridge and the photoconductor kit, which cartridge you purchase and the average amount of toner coverage you bought your print jobs....What supplies do I need and how do I order them? The photoconductor kit typically lasts up to 30,000 pages (at www.lexmark.com, or contact the place where you have to be replaced on your printer. How often the toner cartridge needs replacing depends on which together comprise ...
User's Guide
Page 89
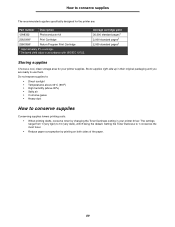
... up in their original packaging until you are : Part number Description 12A8302 Photoconductor kit 23820SW Print Cartridge 23800SW Return Program Print Cartridge 1 Approximately 5% coverage. 2 Declared yield value in your printer supplies. Do not expose supplies to: • Direct sunlight • Temperatures... standard pages2 Storing supplies Choose a cool, clean storage area for the printer are ready to use them. How to conserve supplies The recommended supplies specifically designed for your printer driver. Setting the Toner Darkness to 1 conserves the most toner. &#...
... up in their original packaging until you are : Part number Description 12A8302 Photoconductor kit 23820SW Print Cartridge 23800SW Return Program Print Cartridge 1 Approximately 5% coverage. 2 Declared yield value in your printer supplies. Do not expose supplies to: • Direct sunlight • Temperatures... standard pages2 Storing supplies Choose a cool, clean storage area for the printer are ready to use them. How to conserve supplies The recommended supplies specifically designed for your printer driver. Setting the Toner Darkness to 1 conserves the most toner. &#...
User's Guide
Page 90
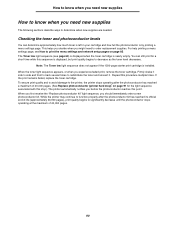
... When the toner light sequence appears, or when you should immediately order a new photoconductor kit. To ensure print quality and to avoid damage to the printer, the printer stops operating after the photoconductor kit has reached its official end-of-life (approximately 30,000 pages), print quality... begins to significantly decrease until the photoconductor stops operating at the maximum of 40,000 pages. (See Replace photoconductor (printer hard stop)* on page 85. This helps you decide when you might need new supplies The...
... When the toner light sequence appears, or when you should immediately order a new photoconductor kit. To ensure print quality and to avoid damage to the printer, the printer stops operating after the photoconductor kit has reached its official end-of-life (approximately 30,000 pages), print quality... begins to significantly decrease until the photoconductor stops operating at the maximum of 40,000 pages. (See Replace photoconductor (printer hard stop)* on page 85. This helps you decide when you might need new supplies The...
User's Guide
Page 91
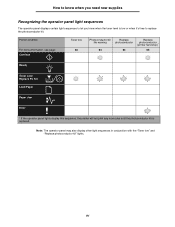
... PC Kit Load Paper Paper Jam Error * If the operator panel lights display this sequence, the printer will not print any more jobs until the photoconductor kit is low or when it's time to replace the photoconductor kit. Note: The operator panel may also display other light sequences in conjunction with the "Toner...
... PC Kit Load Paper Paper Jam Error * If the operator panel lights display this sequence, the printer will not print any more jobs until the photoconductor kit is low or when it's time to replace the photoconductor kit. Note: The operator panel may also display other light sequences in conjunction with the "Toner...

User's Guide
Page 94
How to change a toner cartridge 5 Install the new toner cartridge by aligning the white rollers on the toner cartridge with the white arrows on the tracks of the photoconductor and pushing the toner cartridge in as far as it will go. The cartridge clicks into place when correctly installed. 6 Close the front cover. 94
How to change a toner cartridge 5 Install the new toner cartridge by aligning the white rollers on the toner cartridge with the white arrows on the tracks of the photoconductor and pushing the toner cartridge in as far as it will go. The cartridge clicks into place when correctly installed. 6 Close the front cover. 94
User's Guide
Page 96
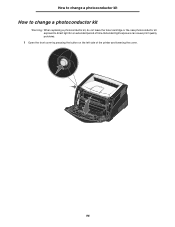
How to change a photoconductor kit How to change a photoconductor kit Warning: When replacing a photoconductor kit, do not leave the toner cartridge or the new photoconductor kit exposed to direct light for an extended period of the printer and lowering the cover. 96 Extended light exposure can cause print quality problems. 1 Open the front cover by pressing the button on the left side of time.
How to change a photoconductor kit How to change a photoconductor kit Warning: When replacing a photoconductor kit, do not leave the toner cartridge or the new photoconductor kit exposed to direct light for an extended period of the printer and lowering the cover. 96 Extended light exposure can cause print quality problems. 1 Open the front cover by pressing the button on the left side of time.
User's Guide
Page 97
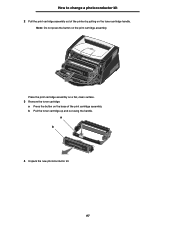
a b 4 Unpack the new photoconductor kit. 97 Note: Do not press the button on the toner cartridge handle. b Pull the toner cartridge up and out using the handle. Place the print cartridge assembly on a flat, clean surface. 3 Remove the toner cartridge: a Press the button on the base of the printer by pulling on the print cartridge assembly. How to change a photoconductor kit 2 Pull the print cartridge assembly out of the print cartridge assembly.
a b 4 Unpack the new photoconductor kit. 97 Note: Do not press the button on the toner cartridge handle. b Pull the toner cartridge up and out using the handle. Place the print cartridge assembly on a flat, clean surface. 3 Remove the toner cartridge: a Press the button on the base of the printer by pulling on the print cartridge assembly. How to change a photoconductor kit 2 Pull the print cartridge assembly out of the print cartridge assembly.
User's Guide
Page 98
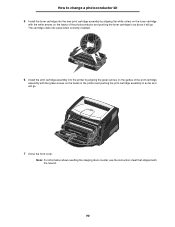
How to change a photoconductor kit 5 Install the toner cartridge into the printer by aligning the white rollers on the toner cartridge with the white arrows on the tracks of the print cartridge assembly with the new kit. ... guides of the photoconductor and pushing the toner cartridge in as far as it will go . 7 Close the front cover. The cartridge clicks into place when correctly installed. 6 Install the print cartridge assembly into the new print cartridge assembly by aligning the green arrows on the tracks in the printer and pushing...
How to change a photoconductor kit 5 Install the toner cartridge into the printer by aligning the white rollers on the toner cartridge with the white arrows on the tracks of the print cartridge assembly with the new kit. ... guides of the photoconductor and pushing the toner cartridge in as far as it will go . 7 Close the front cover. The cartridge clicks into place when correctly installed. 6 Install the print cartridge assembly into the new print cartridge assembly by aligning the green arrows on the tracks in the printer and pushing...

User's Guide
Page 108
... MAC Binary PS 82 NPA Mode 82 Set Card Speed 82 Parallel MAC Binary PS 83 Mode 2 83 NPA Mode 82 Protocol 82 printing the Printer Settings Configuration sheet 80 Setup Auto CR after LF 83 Auto LF after CR 83 USB MAC Binary PS 83 NPA Mode 83 Utilities Hex... Trace 84 Print Quality Test Pages 84 Reset Factory Defaults 84 Reset Photoconductor Counter 84 D duplex 39, 63 dust cover 31 E electronic emission statement 3 emission statement 3 envelopes 24 Error light 60, 61, 65, 66, 67, 68, 69, 71...
... MAC Binary PS 82 NPA Mode 82 Set Card Speed 82 Parallel MAC Binary PS 83 Mode 2 83 NPA Mode 82 Protocol 82 printing the Printer Settings Configuration sheet 80 Setup Auto CR after LF 83 Auto LF after CR 83 USB MAC Binary PS 83 NPA Mode 83 Utilities Hex... Trace 84 Print Quality Test Pages 84 Reset Factory Defaults 84 Reset Photoconductor Counter 84 D duplex 39, 63 dust cover 31 E electronic emission statement 3 emission statement 3 envelopes 24 Error light 60, 61, 65, 66, 67, 68, 69, 71...
User's Guide
Page 109
...62 Manual duplex 63 Not ready 61 Offline 61 Photoconductor kit near full 64 Print side two 63 Printer error 68 Programming engine code 67 Programming system code 67 Ready/Power Saver 58 Replace photoconductor kit 64, 65 Resetting printer 67 Restoring factory defaults 67 secondary error codes 70... 90 light sequences 91 ordering 88 recycling 95 Photoconductor kit near full light 64 ports parallel 82 USB 83 posters 43 print cartridge See toner cartridge print quality problems 101 Print Quality Test Pages (Utilities menu) 84 Printer Settings Configuration sheet printing 80 printhead lens, cleaning...
...62 Manual duplex 63 Not ready 61 Offline 61 Photoconductor kit near full 64 Print side two 63 Printer error 68 Programming engine code 67 Programming system code 67 Ready/Power Saver 58 Replace photoconductor kit 64, 65 Resetting printer 67 Restoring factory defaults 67 secondary error codes 70... 90 light sequences 91 ordering 88 recycling 95 Photoconductor kit near full light 64 ports parallel 82 USB 83 posters 43 print cartridge See toner cartridge print quality problems 101 Print Quality Test Pages (Utilities menu) 84 Printer Settings Configuration sheet printing 80 printhead lens, cleaning...

User's Guide
Page 110
... Reset Factory Defaults (Utilities menu) 84 Reset Photoconductor Counter (Utilities menu) 84 S safety information 3 secondary error codes 70 Complex page 74 Error communicating with the host computer 77 Font error 76 Host interface disabled 77 Insufficient collation area 75 Insufficient printer memory 74 Invalid engine code 79 Invalid network code...73 Paper jam in Tray 2 73 Paper jams as a printed job exits the tray 72 Paper jams as it exits the tray into the printer 72 PPDS font error 76 Short paper 78 service error lights 68 Set Card Speed (Network menu) 82 Setup menu 83 storing paper 26 ...
... Reset Factory Defaults (Utilities menu) 84 Reset Photoconductor Counter (Utilities menu) 84 S safety information 3 secondary error codes 70 Complex page 74 Error communicating with the host computer 77 Font error 76 Host interface disabled 77 Insufficient collation area 75 Insufficient printer memory 74 Invalid engine code 79 Invalid network code...73 Paper jam in Tray 2 73 Paper jams as a printed job exits the tray 72 Paper jams as it exits the tray into the printer 72 PPDS font error 76 Short paper 78 service error lights 68 Set Card Speed (Network menu) 82 Setup menu 83 storing paper 26 ...
Quick Reference
Page 2
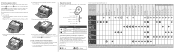
... assembly. 4 Lift the flap at the front of a duplex job Toner low Photoconductor kit life warning Replace photoconductor Replace photoconductor kit (printer hard stop) Unsupported print cartridge Change cartridge invalid refill Cartridge region mismatch Cancel job / Reset printer Service error Printer error * Paper jam printer error * Paper jam at the input sensor can be either after the...
... assembly. 4 Lift the flap at the front of a duplex job Toner low Photoconductor kit life warning Replace photoconductor Replace photoconductor kit (printer hard stop) Unsupported print cartridge Change cartridge invalid refill Cartridge region mismatch Cancel job / Reset printer Service error Printer error * Paper jam printer error * Paper jam at the input sensor can be either after the...


