Clearing Jams Guide
Page 1
...reinsert the staples and staple holder, and then close the stapler door. * After clearing the jam, press printing. CAUTION: The inside of the printer may be hot. 3 Lift and pull the print cartridge out of print media. Clearing jams Understanding jam messages Message What to do occur with.... Use the cartridge handle whenever you avoid jams: • Use only recommended print media. • Do not overload the print media sources. Lexmark™ T64x Clearing Jams Guide Avoiding jams The following hints can help you are holding the cartridge. 4 Place the print cartridge aside. Make sure...
...reinsert the staples and staple holder, and then close the stapler door. * After clearing the jam, press printing. CAUTION: The inside of the printer may be hot. 3 Lift and pull the print cartridge out of print media. Clearing jams Understanding jam messages Message What to do occur with.... Use the cartridge handle whenever you avoid jams: • Use only recommended print media. • Do not overload the print media sources. Lexmark™ T64x Clearing Jams Guide Avoiding jams The following hints can help you are holding the cartridge. 4 Place the print cartridge aside. Make sure...
Clearing Jams Guide
Page 2
Otherwise, continue with step 2. 2 Open the printer rear door. 23x Paper Jam Open Duplex Rear Door 1 Open the duplex rear door. 6 Align and reinstall the print cartridge. 7 Close the top front cover. 8 ... the jammed media. 3 Close the rear door. 4 Press . 3 Close the duplex rear door. Make sure it snaps into place. 4 Press . CAUTION: The inside of the printer may be hot. 5 Pull the print media up and toward you. 202 Paper Jam Open Rear Door 1 If the paper is exiting the...
Otherwise, continue with step 2. 2 Open the printer rear door. 23x Paper Jam Open Duplex Rear Door 1 Open the duplex rear door. 6 Align and reinstall the print cartridge. 7 Close the top front cover. 8 ... the jammed media. 3 Close the rear door. 4 Press . 3 Close the duplex rear door. Make sure it snaps into place. 4 Press . CAUTION: The inside of the printer may be hot. 5 Pull the print media up and toward you. 202 Paper Jam Open Rear Door 1 If the paper is exiting the...
Clearing Jams Guide
Page 3
...set it lightly rests against the edge of the media. 1 Lift the envelope weight. 2 Remove all envelopes. 1 2 If the jammed envelope has entered the printer and cannot be pulled out, remove the envelope feeder. See 270 and 280 Paper jams for more than one tray. Make sure it into place... cannot remove the envelope, the print cartridge will have to lower 5 Press . 260 Paper Jam Check Env Feeder The envelope feeder feeds envelopes from the printer. c Reinstall the envelope feeder. If it does not pull easily one that is neat and aligned. 5 Press . 250 Paper Jam Check MP Feeder 1 ...
...set it lightly rests against the edge of the media. 1 Lift the envelope weight. 2 Remove all envelopes. 1 2 If the jammed envelope has entered the printer and cannot be pulled out, remove the envelope feeder. See 270 and 280 Paper jams for more than one tray. Make sure it into place... cannot remove the envelope, the print cartridge will have to lower 5 Press . 260 Paper Jam Check Env Feeder The envelope feeder feeds envelopes from the printer. c Reinstall the envelope feeder. If it does not pull easily one that is neat and aligned. 5 Press . 250 Paper Jam Check MP Feeder 1 ...
Clearing Jams Guide
Page 4
Otherwise, continue with step 2. 2 Push the output bin rear door latches in the finisher: 2 Remove the jammed media. 3 Close the rear door, and make sure all doors are secure. 5 Press . 28x Paper Jam Check Finisher To clear a jam in toward the center. If you have a finisher, see 27x Paper Jam Check Bin x. 6 Lower the envelope weight. 1 2 1 If the paper is secure. 4 Lift the front edge of the finisher output bin cover until it locks into position. The rear doors will open and drop down . 7 Press . 270 and 280 Paper jams Paper jams in toward the center. If you may only ...
Otherwise, continue with step 2. 2 Push the output bin rear door latches in the finisher: 2 Remove the jammed media. 3 Close the rear door, and make sure all doors are secure. 5 Press . 28x Paper Jam Check Finisher To clear a jam in toward the center. If you have a finisher, see 27x Paper Jam Check Bin x. 6 Lower the envelope weight. 1 2 1 If the paper is secure. 4 Lift the front edge of the finisher output bin cover until it locks into position. The rear doors will open and drop down . 7 Press . 270 and 280 Paper jams Paper jams in toward the center. If you may only ...
Clearing Jams Guide
Page 5
Clearing staple jams 1 Lift the front edge of the finisher output bin cover until it locks into position. 2 Remove the print media. 5 Use the metal tab to remove the staple cartridge holder from the staple guard. 7 Look through the clear covering on the bottom of the cartridge holder to make sure no staples are jammed in the entry throat. 8 Press down on the staple guard until it snaps securely into place. 3 Press the latch to open the stapler access door. 9 Push the cartridge holder firmly into the stapler until the cartridge holder clicks into place. 4 Firmly pull the colored tab to...
Clearing staple jams 1 Lift the front edge of the finisher output bin cover until it locks into position. 2 Remove the print media. 5 Use the metal tab to remove the staple cartridge holder from the staple guard. 7 Look through the clear covering on the bottom of the cartridge holder to make sure no staples are jammed in the entry throat. 8 Press down on the staple guard until it snaps securely into place. 3 Press the latch to open the stapler access door. 9 Push the cartridge holder firmly into the stapler until the cartridge holder clicks into place. 4 Firmly pull the colored tab to...
Troubleshooting Guide
Page 1
...or Windows Server 2003 and using a USB device For information regarding tested and approved USB flash memory devices, see our Lexmark Web site at www.lexmark.com. The printer has received invalid data Delete the job. Solving printing problems The operator panel display is blank or displays only diamonds ... USB device unsupported appears when using a Windows 98/Me, Windows 2000, Windows XP, or Windows Server 2003 compatible printer driver. See the drivers CD or the Lexmark Web site for network printing. You are using the wrong interface cable, or the cable is not turned off and...
...or Windows Server 2003 and using a USB device For information regarding tested and approved USB flash memory devices, see our Lexmark Web site at www.lexmark.com. The printer has received invalid data Delete the job. Solving printing problems The operator panel display is blank or displays only diamonds ... USB device unsupported appears when using a Windows 98/Me, Windows 2000, Windows XP, or Windows Server 2003 compatible printer driver. See the drivers CD or the Lexmark Web site for network printing. You are using the wrong interface cable, or the cable is not turned off and...

Troubleshooting Guide
Page 2
...check to see the Menus and Messages Guide. Also, make sure you are using. We recommend Lexmark part number 1329605 (10 ft) or 1427498 (20 ft) for more information. Turn the printer off , wait for more information. See the Menus and Messages Guide for the standard parallel port.... Unexpected page breaks occur Set Print Timeout to a higher value from the Setup Menu. The following table lists printer options and suggested corrective action does not fix the problem, call your service representative. Note: The maximum number of pages in the tray...
...check to see the Menus and Messages Guide. Also, make sure you are using. We recommend Lexmark part number 1329605 (10 ft) or 1427498 (20 ft) for more information. Turn the printer off , wait for more information. See the Menus and Messages Guide for the standard parallel port.... Unexpected page breaks occur Set Print Timeout to a higher value from the Setup Menu. The following table lists printer options and suggested corrective action does not fix the problem, call your service representative. Note: The maximum number of pages in the tray...
Troubleshooting Guide
Page 3
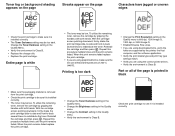
...tray to ensure the print media has been loaded properly. Move the guides in the printer paper path, and check the stack to the correct position. See the Card Stock & Label Guide available on the Lexmark Web site at the front of each output expander or the connection between the output ...stacker and the printer is listed on . The paper has absorbed moisture due to remove the top and bottom sheets...
...tray to ensure the print media has been loaded properly. Move the guides in the printer paper path, and check the stack to the correct position. See the Card Stock & Label Guide available on the Lexmark Web site at the front of each output expander or the connection between the output ...stacker and the printer is listed on . The paper has absorbed moisture due to remove the top and bottom sheets...

Troubleshooting Guide
Page 4
... suggestions still do not load print media that jammed does not reprint after you remove the jammed paper. Set Jam Recovery to run the printer setup cycle and clean the transfer roll. Original documents misfeed in the following table may help prevent this procedure multiple times until all the ...into the output bin Load the correct type media for repeating defects. Toner smears or print comes off . 2 Hold down and , and turn the printer on the operator panel until the print remains faded. Print is worn, replace the pick pad. Reinstall the cartridge and then press . The pages are...
... suggestions still do not load print media that jammed does not reprint after you remove the jammed paper. Set Jam Recovery to run the printer setup cycle and clean the transfer roll. Original documents misfeed in the following table may help prevent this procedure multiple times until all the ...into the output bin Load the correct type media for repeating defects. Toner smears or print comes off . 2 Hold down and , and turn the printer on the operator panel until the print remains faded. Print is worn, replace the pick pad. Reinstall the cartridge and then press . The pages are...
Troubleshooting Guide
Page 5
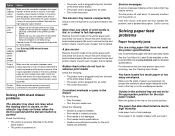
...dpi, or 2400 Image Q. • Enable Enhance Fine Lines. • If you are using downloaded fonts, verify the fonts are supported by the printer, the host computer, and the software application. • Verify the print media type and print tray type settings match. • Verify you are.... • Verify the environment is Class B. When the print remains faded replace the print cartridge. • If you are using the correct printer drivers. • Verify the environment is Class B. With the cartridge arrows pointing downward, firmly shake the print cartridge side-to-side and front...
...dpi, or 2400 Image Q. • Enable Enhance Fine Lines. • If you are using downloaded fonts, verify the fonts are supported by the printer, the host computer, and the software application. • Verify the print media type and print tray type settings match. • Verify you are.... • Verify the environment is Class B. When the print remains faded replace the print cartridge. • If you are using the correct printer drivers. • Verify the environment is Class B. With the cartridge arrows pointing downward, firmly shake the print cartridge side-to-side and front...

Troubleshooting Guide
Page 6
The job prints, but the top and side margins are set to Transparency. Transparency print quality is poor. • Use only transparencies recommended by the printer manufacturer. • Make sure the Paper Type setting in the Paper menu is correct. • Make sure the margins are incorrect • Make sure the ...
The job prints, but the top and side margins are set to Transparency. Transparency print quality is poor. • Use only transparencies recommended by the printer manufacturer. • Make sure the Paper Type setting in the Paper menu is correct. • Make sure the margins are incorrect • Make sure the ...

User's Guide
Page 1
All rights reserved. 740 West New Circle Road Lexington, Kentucky 40550 www.lexmark.com T640, T642, T644 User's Guide March 2005 Lexmark and Lexmark with diamond design are trademarks of Lexmark International, Inc., registered in the United States and/or other countries. © 2005 Lexmark International, Inc.
All rights reserved. 740 West New Circle Road Lexington, Kentucky 40550 www.lexmark.com T640, T642, T644 User's Guide March 2005 Lexmark and Lexmark with diamond design are trademarks of Lexmark International, Inc., registered in the United States and/or other countries. © 2005 Lexmark International, Inc.
User's Guide
Page 2
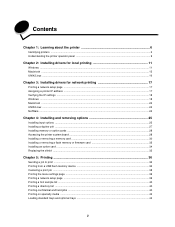
...cord or telephone, during a lightning storm. • Refer service or repairs, other replacement parts. • Your product uses a laser. Lexmark may be obvious. Any functionally equivalent product, program, or service that discusses the guidelines for the use or distribute any of the ... time. therefore, this publication to products, programs, or services do not allow disclaimer of operation in conjunction with local law: LEXMARK INTERNATIONAL, INC., PROVIDES THIS PUBLICATION "AS IS" WITHOUT WARRANTY OF ANY KIND, EITHER EXPRESS OR IMPLIED, INCLUDING, BUT NOT LIMITED...
...cord or telephone, during a lightning storm. • Refer service or repairs, other replacement parts. • Your product uses a laser. Lexmark may be obvious. Any functionally equivalent product, program, or service that discusses the guidelines for the use or distribute any of the ... time. therefore, this publication to products, programs, or services do not allow disclaimer of operation in conjunction with local law: LEXMARK INTERNATIONAL, INC., PROVIDES THIS PUBLICATION "AS IS" WITHOUT WARRANTY OF ANY KIND, EITHER EXPRESS OR IMPLIED, INCLUDING, BUT NOT LIMITED...
User's Guide
Page 3
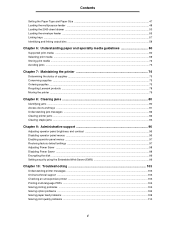
...Windows ...11 Macintosh ...15 UNIX/Linux ...16 Chapter 3: Installing drivers for network printing 17 Printing a network setup page ...17 Assigning a printer IP address ...17 Verifying the IP settings ...18 Windows ...18 Macintosh ...22 UNIX/Linux ...24 NetWare ...24 Chapter 4: Installing and ...removing options 25 Installing input options ...25 Installing a duplex unit ...27 Installing memory or option cards ...28 Accessing the printer system board ...28 Installing or removing a memory card ...30 Installing or removing a flash memory or firmware card 32 Installing an option...
...Windows ...11 Macintosh ...15 UNIX/Linux ...16 Chapter 3: Installing drivers for network printing 17 Printing a network setup page ...17 Assigning a printer IP address ...17 Verifying the IP settings ...18 Windows ...18 Macintosh ...22 UNIX/Linux ...24 NetWare ...24 Chapter 4: Installing and ...removing options 25 Installing input options ...25 Installing a duplex unit ...27 Installing memory or option cards ...28 Accessing the printer system board ...28 Installing or removing a memory card ...30 Installing or removing a flash memory or firmware card 32 Installing an option...
User's Guide
Page 4
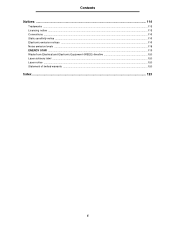
... Storing print media ...72 Avoiding jams ...73 Chapter 7: Maintaining the printer 74 Determining the status of supplies ...75 Conserving supplies ...75 Ordering supplies ...76 Recycling Lexmark products ...78 Moving the printer ...79 Chapter 8: Clearing jams 80 Identifying jams ...80 Access doors and... trays ...81 Understanding jam messages ...82 Clearing printer jams ...82 Clearing staple jams ...93 Chapter 9: ...
... Storing print media ...72 Avoiding jams ...73 Chapter 7: Maintaining the printer 74 Determining the status of supplies ...75 Conserving supplies ...75 Ordering supplies ...76 Recycling Lexmark products ...78 Moving the printer ...79 Chapter 8: Clearing jams 80 Identifying jams ...80 Access doors and... trays ...81 Understanding jam messages ...82 Clearing printer jams ...82 Clearing staple jams ...93 Chapter 9: ...
User's Guide
Page 5
Contents Notices ...114 Trademarks ...115 Licensing notice ...115 Conventions ...116 Static sensitivity notice ...116 Electronic emission notices ...116 Noise emission levels ...118 ENERGY STAR ...119 Waste from Electrical and Electronic Equipment (WEEE) directive 120 Laser advisory label ...120 Laser notice ...120 Statement of limited warranty ...120 Index ...123 5
Contents Notices ...114 Trademarks ...115 Licensing notice ...115 Conventions ...116 Static sensitivity notice ...116 Electronic emission notices ...116 Noise emission levels ...118 ENERGY STAR ...119 Waste from Electrical and Electronic Equipment (WEEE) directive 120 Laser advisory label ...120 Laser notice ...120 Statement of limited warranty ...120 Index ...123 5
User's Guide
Page 6
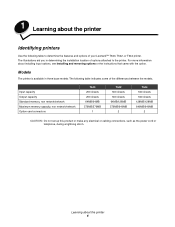
... of options attached to determine the features and options of the differences between the models. For more information about the printer 6 Input capacity Output capacity Standard memory, non network/network Maximum memory capacity, non network/network Option card connectors T640...as the power cord or telephone, during a lightning storm. 1 Learning about the printer Identifying printers Use the following table indicates some of your Lexmark™ T640, T642, or T644 printer. Learning about installing input options, see Installing and removing options or the instructions that...
... of options attached to determine the features and options of the differences between the models. For more information about the printer 6 Input capacity Output capacity Standard memory, non network/network Maximum memory capacity, non network/network Option card connectors T640...as the power cord or telephone, during a lightning storm. 1 Learning about the printer Identifying printers Use the following table indicates some of your Lexmark™ T640, T642, or T644 printer. Learning about installing input options, see Installing and removing options or the instructions that...

User's Guide
Page 7
Identifying printers 7 Duplex unit* Tray 2* (250 or 500 sheets) Tray 3* (250 or 500 sheets) Tray 4* (250 or 500 sheets) Tray 5* (2000-sheet drawer) CAUTION: Floor-mounted configurations require additional furniture for the T642 and T644. See www.lexmark.com/multifunctionprinters for more than one input option.... Items denoted with an asterisk (*) are using a 2000-sheet drawer, a duplex unit and an input option, or more information. You must use either a printer stand or printer base if you are options...
Identifying printers 7 Duplex unit* Tray 2* (250 or 500 sheets) Tray 3* (250 or 500 sheets) Tray 4* (250 or 500 sheets) Tray 5* (2000-sheet drawer) CAUTION: Floor-mounted configurations require additional furniture for the T642 and T644. See www.lexmark.com/multifunctionprinters for more than one input option.... Items denoted with an asterisk (*) are using a 2000-sheet drawer, a duplex unit and an input option, or more information. You must use either a printer stand or printer base if you are options...

User's Guide
Page 8
... book on the operator panel and the menus and items available under each menu. For more information about the printer A number of menus are available to make it easy for you to change printer settings. The diagram shows the menu index on the publications CD. Menu Paper Menu Reports Settings Paper Menu... Max Invalid PIN Job Expiration Help Print All Print Quality Printing Guide Supplies Guide Media Guide Menu Map Information Guide Connection Guide Moving Guide Identifying printers 8
... book on the operator panel and the menus and items available under each menu. For more information about the printer A number of menus are available to make it easy for you to change printer settings. The diagram shows the menu index on the publications CD. Menu Paper Menu Reports Settings Paper Menu... Max Invalid PIN Job Expiration Help Print All Print Quality Printing Guide Supplies Guide Media Guide Menu Map Information Guide Connection Guide Moving Guide Identifying printers 8
User's Guide
Page 9
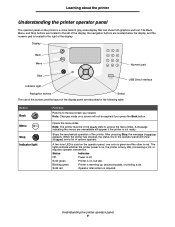
...up, processing data, or printing a job. Note: Changes made on a screen will not be in the operator panel will appear if the printer is not ready. Stops the mechanical operation of the display. A two-tone LED is used on the operator panel, one color is green ...message indicating the menus are described in the following table. After pressing Stop, the message Stopping appears. Learning about the printer Understanding the printer operator panel The operator panel on the printer is a 4-line back-lit gray scale display that can show Stopped, and a list of options appears. Display Back...
...up, processing data, or printing a job. Note: Changes made on a screen will not be in the operator panel will appear if the printer is not ready. Stops the mechanical operation of the display. A two-tone LED is used on the operator panel, one color is green ...message indicating the menus are described in the following table. After pressing Stop, the message Stopping appears. Learning about the printer Understanding the printer operator panel The operator panel on the printer is a 4-line back-lit gray scale display that can show Stopped, and a list of options appears. Display Back...