BIOS Windows Management Instrumentation Interface Deployment Guide
Page 11
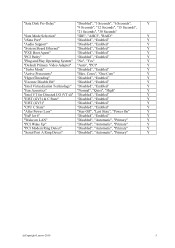
"Sata Disk Pre-Delay" "Disabled", "3 Seconds", "6 Seconds", Y "9 Seconds", "12 Seconds", "15 Seconds", "21 Seconds", "30 Seconds" "Sata Mode Selection" "IDE", "AHCI", "RAID" Y "eSata Port" "Disabled", "Enabled" Y "Audio Support" "Disabled", "Enabled" Y "System Board Ethernet" "Disabled", "Enabled" Y "PXE Boot Agent" "Disabled", "Enabled" Y "PCI Parity" "...Y "PCI Wake Up" "Disabled", "Automatic", "Primary" Y "PCI Modem Ring Detect" "Disabled", "Automatic", "Primary" Y "Serial Port A Ring Detect" "Disabled", "Automatic", "Primary" Y @Copyright Lenovo 2010 5
"Sata Disk Pre-Delay" "Disabled", "3 Seconds", "6 Seconds", Y "9 Seconds", "12 Seconds", "15 Seconds", "21 Seconds", "30 Seconds" "Sata Mode Selection" "IDE", "AHCI", "RAID" Y "eSata Port" "Disabled", "Enabled" Y "Audio Support" "Disabled", "Enabled" Y "System Board Ethernet" "Disabled", "Enabled" Y "PXE Boot Agent" "Disabled", "Enabled" Y "PCI Parity" "...Y "PCI Wake Up" "Disabled", "Automatic", "Primary" Y "PCI Modem Ring Detect" "Disabled", "Automatic", "Primary" Y "Serial Port A Ring Detect" "Disabled", "Automatic", "Primary" Y @Copyright Lenovo 2010 5
BIOS Windows Management Instrumentation Interface Deployment Guide
Page 15
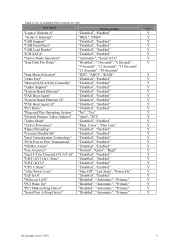
... ATA" Y "Sata Disk Pre-Delay" "Disabled", "3 Seconds", "6 Seconds", Y "9 Seconds", "12 Seconds", "15 Seconds", "21 Seconds", "30 Seconds" "Sata Mode Selection" "IDE", "AHCI", "RAID" Y "eSata Port" "Disabled", "Enabled" Y "Marvell SATA/SAS Controller" "Disabled", "Enabled" Y "Audio Support" "Disabled", "Enabled" Y "System Board Ethernet" "Disabled", "Enabled" Y "PXE Boot...Disabled", "Automatic", "Primary" Y "PCI Modem Ring Detect" "Disabled", "Automatic", "Primary" Y "Serial Port A Ring Detect" "Disabled", "Automatic", "Primary" Y @Copyright Lenovo 2010 9 Table 6.
... ATA" Y "Sata Disk Pre-Delay" "Disabled", "3 Seconds", "6 Seconds", Y "9 Seconds", "12 Seconds", "15 Seconds", "21 Seconds", "30 Seconds" "Sata Mode Selection" "IDE", "AHCI", "RAID" Y "eSata Port" "Disabled", "Enabled" Y "Marvell SATA/SAS Controller" "Disabled", "Enabled" Y "Audio Support" "Disabled", "Enabled" Y "System Board Ethernet" "Disabled", "Enabled" Y "PXE Boot...Disabled", "Automatic", "Primary" Y "PCI Modem Ring Detect" "Disabled", "Automatic", "Primary" Y "Serial Port A Ring Detect" "Disabled", "Automatic", "Primary" Y @Copyright Lenovo 2010 9 Table 6.

Windows XP Professional x64 Edition Recovery and Conversion Kit - Japan
Page 5
Ctrl+I (SATA S20 Ctrl+M (SAS D20 ·ͨ S20 b. εςοϓ 2. RAID RAID RAID a Ctrl+I 1 RAID Ctrl+M RAID c εςοϓ 3. Product Recovery Startup εςοϓ 4 εςοϓ 5 6. Product Recovery Disc 1 ʮOK 7. Product Recovery Disc 1 8 Windows Windows Microsoft Windows XP Recovery and Conversion Kit 5
Ctrl+I (SATA S20 Ctrl+M (SAS D20 ·ͨ S20 b. εςοϓ 2. RAID RAID RAID a Ctrl+I 1 RAID Ctrl+M RAID c εςοϓ 3. Product Recovery Startup εςοϓ 4 εςοϓ 5 6. Product Recovery Disc 1 ʮOK 7. Product Recovery Disc 1 8 Windows Windows Microsoft Windows XP Recovery and Conversion Kit 5
Windows XP Professional x64 Edition Recovery and Conversion Kit - English
Page 5
... is listed as an excluded device, select it is already listed as the first boot device. Use the left and right arrow keys to use RAID (Redundant Array of DVD device. From the Startup Sequence [Primary] menu, do the following to the startup sequence. If you are listed as the first... boot device. Press F10 to use as IDE CD. To configure RAID, do one time to add it to select the DVD device that internal DVD drives are planning to save and exit message displays, select Yes...
... is listed as an excluded device, select it is already listed as the first boot device. Use the left and right arrow keys to use RAID (Redundant Array of DVD device. From the Startup Sequence [Primary] menu, do the following to the startup sequence. If you are listed as the first... boot device. Press F10 to use as IDE CD. To configure RAID, do one time to add it to select the DVD device that internal DVD drives are planning to save and exit message displays, select Yes...

Windows XP Professional x64 Edition Recovery and Conversion Kit - English
Page 6
...If the Setup Utility program does not open, shut down list box and click Next. If you are using the Ctrl+M utility, select the RAID menu and follow the prompts. Insert the Product Recovery Startup disc and start the Setup Utility, do the following: a. Select a language from the.... c. Step 3. Step 6. Step 8. Follow the instructions on your computer. When prompted to restore the default setup values. a. Select I (for S20 with SATA drives) or Ctrl+M (for D20 or S20 with SAS drives). Insert Product Recovery Disc 1 when prompted and click OK. Step 7. Step 9.
...If the Setup Utility program does not open, shut down list box and click Next. If you are using the Ctrl+M utility, select the RAID menu and follow the prompts. Insert the Product Recovery Startup disc and start the Setup Utility, do the following: a. Select a language from the.... c. Step 3. Step 6. Step 8. Follow the instructions on your computer. When prompted to restore the default setup values. a. Select I (for S20 with SATA drives) or Ctrl+M (for D20 or S20 with SAS drives). Insert Product Recovery Disc 1 when prompted and click OK. Step 7. Step 9.

(Arabic) User guide
Page 3
SATA RAID SATA BIOS SATA RAID RAID RAID SAS RAID SAS Marvell BIOS Setup SAS RAID Marvell BIOS Setup SAS RAID 0 1 5 Marvell BIOS Setup Marvell BIOS Setup Marvell BIOS Setup BIOS BIOS POST/BIOS Lenovo Solution Center Lenovo ThinkVantage Toolbox PC-Doctor for Rescue and Recovery PC-Doctor for DOS Rescue and Recovery ...
SATA RAID SATA BIOS SATA RAID RAID RAID SAS RAID SAS Marvell BIOS Setup SAS RAID Marvell BIOS Setup SAS RAID 0 1 5 Marvell BIOS Setup Marvell BIOS Setup Marvell BIOS Setup BIOS BIOS POST/BIOS Lenovo Solution Center Lenovo ThinkVantage Toolbox PC-Doctor for Rescue and Recovery PC-Doctor for DOS Rescue and Recovery ...

(Arabic) User guide
Page 29
... SAS RAID Marvell SAS ThinkStation SAS Marvell SAS Ctrl+M Marvell BIOS Setup SAS RAID Marvell BIOS Setup SAS RAID 0 1 5 SAS RAID 0 1 5 Marvell BIOS Setup configuration utility SAS Ctrl+M Marvell BIOS Setup Marvell BIOS Setup RAID Config Enter RAID Config RAID Config Enter Enter RAID Enter RAID SAS RAID RAID 0 RAID 1 RAID 5 Enter Enter Y RAID...
... SAS RAID Marvell SAS ThinkStation SAS Marvell SAS Ctrl+M Marvell BIOS Setup SAS RAID Marvell BIOS Setup SAS RAID 0 1 5 SAS RAID 0 1 5 Marvell BIOS Setup configuration utility SAS Ctrl+M Marvell BIOS Setup Marvell BIOS Setup RAID Config Enter RAID Config RAID Config Enter Enter RAID Enter RAID SAS RAID RAID 0 RAID 1 RAID 5 Enter Enter Y RAID...

(Arabic) User guide
Page 30
Marvell BIOS Setup Marvell BIOS Setup Ctrl+M Marvell BIOS Setup Marvell BIOS Setup RAID Config Enter RAID Config RAID Config Spare Management Next Enter Y Marvell BIOS Setup Marvell BIOS Setup Ctrl+M Marvell BIOS Setup Marvell BIOS Setup RAID Config Enter RAID Config RAID Config Enter Next Enter Y ThinkStation
Marvell BIOS Setup Marvell BIOS Setup Ctrl+M Marvell BIOS Setup Marvell BIOS Setup RAID Config Enter RAID Config RAID Config Spare Management Next Enter Y Marvell BIOS Setup Marvell BIOS Setup Ctrl+M Marvell BIOS Setup Marvell BIOS Setup RAID Config Enter RAID Config RAID Config Enter Next Enter Y ThinkStation
English) User guide
Page 3
... 4. Installing hard disk drives and configuring RAID 21 Installing SATA hard disk drives and configuring RAID 21 Installing SATA hard disk drives 21 Configuring the system BIOS to enable SATA RAID functionality 21 Creating RAID volumes 22 Deleting RAID volumes 22 Installing SAS hard disk drives ... operating system 10 Installing other operating systems 10 Updating your Windows operating system 15 Software provided by Lenovo 15 Lenovo Solution Center 15 SimpleTap 16 Lenovo ThinkVantage Toolbox 16 PC-Doctor for DOS 30 Cleaning an optical mouse 30 Chapter 9. Using the ...
... 4. Installing hard disk drives and configuring RAID 21 Installing SATA hard disk drives and configuring RAID 21 Installing SATA hard disk drives 21 Configuring the system BIOS to enable SATA RAID functionality 21 Creating RAID volumes 22 Deleting RAID volumes 22 Installing SAS hard disk drives ... operating system 10 Installing other operating systems 10 Updating your Windows operating system 15 Software provided by Lenovo 15 Lenovo Solution Center 15 SimpleTap 16 Lenovo ThinkVantage Toolbox 16 PC-Doctor for DOS 30 Cleaning an optical mouse 30 Chapter 9. Using the ...
English) User guide
Page 27
... the new settings and exit. © Copyright Lenovo 2009, 2012 21 Better performance without fault tolerance • RAID Level 1 - Select Enabled and press Enter. 5. Improved read performance and 100% redundancy • RAID Level 5 - Press F10 to the installation procedure in "Replacing a hard disk drive" in the ThinkStation Hardware Installation and Replacement Guide. Installing hard...
... the new settings and exit. © Copyright Lenovo 2009, 2012 21 Better performance without fault tolerance • RAID Level 1 - Select Enabled and press Enter. 5. Improved read performance and 100% redundancy • RAID Level 5 - Press F10 to the installation procedure in "Replacing a hard disk drive" in the ThinkStation Hardware Installation and Replacement Guide. Installing hard...

English) User guide
Page 28
... creation. 8. Use the arrow keys to select the RAID volume to be reset, and then press Enter to complete the selection. When prompted, press Y to confirm the deletion of RAID below: 22 ThinkStation User Guide See "Creating RAID volumes" on page 22 for the supported level of ...the selected RAID volume. Installing SAS hard disk drives and configuring RAID This section contains information about the required number of SAS ...
... creation. 8. Use the arrow keys to select the RAID volume to be reset, and then press Enter to complete the selection. When prompted, press Y to confirm the deletion of RAID below: 22 ThinkStation User Guide See "Creating RAID volumes" on page 22 for the supported level of ...the selected RAID volume. Installing SAS hard disk drives and configuring RAID This section contains information about the required number of SAS ...
English) User guide
Page 29
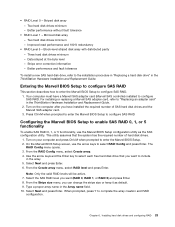
...striped at the byte level - Configuring the Marvell BIOS Setup to enable SAS RAID 0, 1, or 5 functionality To enable SAS RAID 0, 1, or 5 functionality, use the arrow keys to include in the ThinkStation Hardware Installation and Replacement Guide. 2. Two hard disk drives minimum - Block-level... size menu, you want to select RAID Config and press Enter. Type a proper array name in the ThinkStation Hardware Installation and Replacement Guide. Chapter 6. • RAID Level 0 - Entering the Marvell BIOS Setup to configure SAS RAID This section describes how to enter the...
...striped at the byte level - Configuring the Marvell BIOS Setup to enable SAS RAID 0, 1, or 5 functionality To enable SAS RAID 0, 1, or 5 functionality, use the arrow keys to include in the ThinkStation Hardware Installation and Replacement Guide. 2. Two hard disk drives minimum - Block-level... size menu, you want to select RAID Config and press Enter. Type a proper array name in the ThinkStation Hardware Installation and Replacement Guide. Chapter 6. • RAID Level 0 - Entering the Marvell BIOS Setup to configure SAS RAID This section describes how to enter the...

English) User guide
Page 30
... Next and press Enter. 6. On the Marvell BIOS Setup screen, use the arrow keys to enter the Marvell BIOS Setup. 2. From the RAID Config menu, select Delete array. 4. Use the arrow keys to delete the optional hot spare hard disk drive. On the Marvell BIOS Setup ... Y when prompted to select Next and press Enter. 6. The RAID Config menu opens. 3. Use the arrow keys to complete the deletion. 24 ThinkStation User Guide The RAID Config menu opens. 3. Use the arrow keys to delete an array: 1. From the RAID Config menu, select Spare Management. 4. Configuring the Marvell BIOS Setup...
... Next and press Enter. 6. On the Marvell BIOS Setup screen, use the arrow keys to enter the Marvell BIOS Setup. 2. From the RAID Config menu, select Delete array. 4. Use the arrow keys to delete the optional hot spare hard disk drive. On the Marvell BIOS Setup ... Y when prompted to select Next and press Enter. 6. The RAID Config menu opens. 3. Use the arrow keys to complete the deletion. 24 ThinkStation User Guide The RAID Config menu opens. 3. Use the arrow keys to delete an array: 1. From the RAID Config menu, select Spare Management. 4. Configuring the Marvell BIOS Setup...

(Korean) User guide
Page 3
...RAID BIOS 21 RAID 22 RAID 22 SAS RAID 구성 . 22 SAS 23 Marvell BIOS Setup SAS RAID 23 SAS RAID 0, 1 또는 5 Marvell BIOS Setup 23 Marvell BIOS Setup 24 Marvell BIOS Setup 24 Marvell BIOS Setup 24 제 7 25 25 BIOS 25 BIOS 26 POST/BIOS 26 제 8 27 27 28 Lenovo... Solution Center 29 Lenovo ThinkVantage Toolbox ...
...RAID BIOS 21 RAID 22 RAID 22 SAS RAID 구성 . 22 SAS 23 Marvell BIOS Setup SAS RAID 23 SAS RAID 0, 1 또는 5 Marvell BIOS Setup 23 Marvell BIOS Setup 24 Marvell BIOS Setup 24 Marvell BIOS Setup 24 제 7 25 25 BIOS 25 BIOS 26 POST/BIOS 26 제 8 27 27 28 Lenovo... Solution Center 29 Lenovo ThinkVantage Toolbox ...

(Korean) User guide
Page 27
...; Copyright Lenovo 2009, 2011 21 제 6 RAID 구성 RAID(Redundant Array of Independent Disks RAID Windows Linux RAID 구 Linux SATA와 SAS RAID 배열에 SATA와 SAS SAS SATA RAID 구성 RAID 및 SATA RAID SATA SATA RAID SATA RAID 레벨 0 - 최소 2 RAID 레벨 1 2 100 RAID 레벨 5 3 새로운 SATA ThinkStation SATA RAID BIOS 구...
...; Copyright Lenovo 2009, 2011 21 제 6 RAID 구성 RAID(Redundant Array of Independent Disks RAID Windows Linux RAID 구 Linux SATA와 SAS RAID 배열에 SATA와 SAS SAS SATA RAID 구성 RAID 및 SATA RAID SATA SATA RAID SATA RAID 레벨 0 - 최소 2 RAID 레벨 1 2 100 RAID 레벨 5 3 새로운 SATA ThinkStation SATA RAID BIOS 구...
(Korean) User guide
Page 29
... array 4 Enter 5. Marvell BIOS Setup RAID Config Enter RAID Config 3. SAS RAID SAS RAID 레벨 0 - 최소 2 RAID 레벨 1 2 100 RAID 레벨 5 3 새로운 SAS ThinkStation Marvell BIOS Setup SAS RAID 구성 Marvell BIOS Setup SAS RAID 1. Next Enter 6. Stripe size 9. Create array RAID level Enter RAID 7. 원하는 SAS RAID 레벨(RAID 0, RAID 1 또는 RAID 5 Enter 8.
... array 4 Enter 5. Marvell BIOS Setup RAID Config Enter RAID Config 3. SAS RAID SAS RAID 레벨 0 - 최소 2 RAID 레벨 1 2 100 RAID 레벨 5 3 새로운 SAS ThinkStation Marvell BIOS Setup SAS RAID 구성 Marvell BIOS Setup SAS RAID 1. Next Enter 6. Stripe size 9. Create array RAID level Enter RAID 7. 원하는 SAS RAID 레벨(RAID 0, RAID 1 또는 RAID 5 Enter 8.
(Korean) User guide
Page 30
Marvell BIOS Setup RAID Config Enter RAID Config 3. Marvell BIOS Setup RAID Config Enter RAID Config 3. RAID Config Delete array 4 Enter 5 Next Enter 6 Y 24 ThinkStation RAID Config Spare Management 4 5 Next Enter 6 Y Marvell BIOS Setup Marvell BIOS Setup 1 Ctrl+M을 눌러 Marvell BIOS Setup 2. Marvell BIOS Setup RAID Config Enter RAID Config 3. 10. RAID Config Spare Management 4 5 Next Enter 6 Y Marvell BIOS...
Marvell BIOS Setup RAID Config Enter RAID Config 3. Marvell BIOS Setup RAID Config Enter RAID Config 3. RAID Config Delete array 4 Enter 5 Next Enter 6 Y 24 ThinkStation RAID Config Spare Management 4 5 Next Enter 6 Y Marvell BIOS Setup Marvell BIOS Setup 1 Ctrl+M을 눌러 Marvell BIOS Setup 2. Marvell BIOS Setup RAID Config Enter RAID Config 3. 10. RAID Config Spare Management 4 5 Next Enter 6 Y Marvell BIOS...

(Greek) User guide
Page 30
RAID 24 RAID. Exit Enter. 24 ThinkStation RAID: 2 Create RAID Volume RAID Enter. 3 RAID Name Tab. 4 RAID RAID Level RAID Tab. 5 Stripe Size Tab. 6 Capacity Tab. 7 Enter 8 Y 9 2 RAID Exit Enter. 10 Y RAID Configuration Utility) του Intel Matrix Storage Manager Option ROM RAID (RAID volumes). 1 Ctrl+I Intel Matrix Storage Manager Option ROM. 1 F1 BIOS Setup Utility 19. 2 Devices ➙ IDE Drives Setup Enter. 3 SATA...
RAID 24 RAID. Exit Enter. 24 ThinkStation RAID: 2 Create RAID Volume RAID Enter. 3 RAID Name Tab. 4 RAID RAID Level RAID Tab. 5 Stripe Size Tab. 6 Capacity Tab. 7 Enter 8 Y 9 2 RAID Exit Enter. 10 Y RAID Configuration Utility) του Intel Matrix Storage Manager Option ROM RAID (RAID volumes). 1 Ctrl+I Intel Matrix Storage Manager Option ROM. 1 F1 BIOS Setup Utility 19. 2 Devices ➙ IDE Drives Setup Enter. 3 SATA...
(Greek) User guide
Page 33
2 Marvell BIOS Setup RAID Config RAID Enter RAID Config. 3 RAID Config Spare Management 4 5 Next Enter. 6 Y Marvell BIOS Setup array Marvell BIOS Setup: 1 Ctrl+M Marvell BIOS Setup. 2 Marvell BIOS Setup RAID Config RAID Enter RAID Config. 3 RAID Config Delete array 4 Enter 5 Next Enter. 6 Y 6 RAID 27
2 Marvell BIOS Setup RAID Config RAID Enter RAID Config. 3 RAID Config Spare Management 4 5 Next Enter. 6 Y Marvell BIOS Setup array Marvell BIOS Setup: 1 Ctrl+M Marvell BIOS Setup. 2 Marvell BIOS Setup RAID Config RAID Enter RAID Config. 3 RAID Config Delete array 4 Enter 5 Next Enter. 6 Y 6 RAID 27

(Simplified Chinese) User guide
Page 3
... 18 19 19 19 退出 Setup Utility 19 © Copyright Lenovo 2009, 2011 第 6 RAID . 21 安装 SATA RAID 21 安装 SATA 21 BIOS 以启用 SATA RAID 功能 . . 21 创建 RAID 21 删除 RAID 22 安装 SAS RAID 22 安装 SAS 22 进入 Marvell BIOS Setup...
... 18 19 19 19 退出 Setup Utility 19 © Copyright Lenovo 2009, 2011 第 6 RAID . 21 安装 SATA RAID 21 安装 SATA 21 BIOS 以启用 SATA RAID 功能 . . 21 创建 RAID 21 删除 RAID 22 安装 SAS RAID 22 安装 SAS 22 进入 Marvell BIOS Setup...


