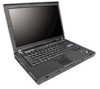
Hardware Maintenance Manual
Page 5
... discharge 4 Grounding requirements 5 Safety notices: multilingual translations . . . . . 5 Laser compliance statement 11 Important service information . . . . . 15 Strategy for replacing FRUs 15 Strategy for replacing a hard disk drive . . . . 16 Important notice for replacing a system board . . 16 How to use error message 16...error codes 36 Error messages 41 Beep symptoms 42 © Copyright Lenovo 2007, 2011 No-beep symptoms 42 LCD-related symptoms 43 Intermittent problems 43 Undetermined problems 44 ThinkPad T61, R61, and R61i (14.1-inch widescreen 45 Specifications 45 Status ...
Hardware Maintenance Manual
Page 7
About this manual along with the advanced diagnostic tests to troubleshoot problems effectively. ThinkPad T61 MT MT 1959, 6377, 6378, 6379, 6480, 6481, 7658, 7659, 7660, 7661, 7662, 7663, 7664, and 7665 ThinkPad R61 and R61i MT MT 7732, 7733, 7734, 7735, 7736, 7737, 7738, ...Safety information" on page 1 and "Important service information" on page 15. © Copyright Lenovo 2007, 2011 v Use this manual This manual contains service and reference information for trained servicers who are familiar with ThinkPad products. v The product-specific section includes service, reference, and ...
Hardware Maintenance Manual
Page 23
... Disassembly/Reassembly videos that show the FRU removals or replacements for replacing and servicing FRUs: © Copyright Lenovo 2007, 2008 15 "Strategy for CTO, CMV, and GAV" on the screen. 3. Customers in Canada should call the Customer...following support site: http://www.lenovoservicetraining.com/ion/ Advise customers to prevent unnecessary expense for the Lenovo® authorized service technicians are customer-installable. "How to http://www.lenovo.com/support 2. Important service information This chapter presents following important service information: v "Strategy for ...
Hardware Maintenance Manual
Page 54
...-MHz DDR2 SDRAM (PC2-5300) v PCI bus v PCI Express bus v DMI Graphic memory chip v Intel PM965/GM965 graphics Display v 15.4-inch, 16M colors, WXGA (1280 × 800 resolution) TFT color LCD v 15.4-inch, 16M colors, WXGA+ (1440 × 900 resolution) TFT color LCD Standard memory v 512-MB DDR2-667 SDRAM SO-DIMM... of the current 32-bit PC architecture, actual usable memory size is limited to 3 GB even though the physical installable memory size is 4 GB in ThinkPad T61, R61, and R61i (14.1-inch widescreen) (14.1-inch widescreen) computers. Table 7. CMOS RAM v 242 bytes 46...
Hardware Maintenance Manual
Page 76
... access, remove these FRUs in the slot and does not move easily. 68 ThinkPad T61, R61, and R61i (14.1-inch widescreen) Hardware Maintenance Manual Press the DIMM firmly, and pivot it until it is used on page 65 Table 15. Make sure that it snaps into the socket. Removal steps of dimm Note...
Hardware Maintenance Manual
Page 126
... Enhanced 10 Fingerprint reader (for some models) 11 TrackPoint pointing stick 12 TrackPoint buttons 13 Touch pad buttons 14 Touch pad 15 UltraNav 16 ThinkVantage button 17 Volume control buttons 18 Power switch 1 2 18 4 17 16 14 13 12 15 11 10 3 4 5 6 7 8 9 118 ThinkPad T61, R61, and R61i (14.1-inch widescreen) Hardware Maintenance Manual
Hardware Maintenance Manual
Page 130
Parts list-Overall No. d See "Miscellaneous parts" on page 219. 1 LCD unit (see "LCD FRUs" on page 198.) 3 4 5 c 6 7 8 9 10 11 12 13 14 15 16 17 FRU no. Overall 1 27 a 26 2 g b f 25 24 e 23 22 21 20 d 19 18 Table 36. FRU a - RoHS CRU ID ID 122 ThinkPad T61, R61, and R61i (14.1-inch widescreen) Hardware Maintenance Manual
Hardware Maintenance Manual
Page 158
Table 36. RoHS CRU ID ID 42T4530 R * 42T4532 R * 41W1491 R N 42T0112 R N 39T2683 R * 39T2681 R * 150 ThinkPad T61, R61, and R61i (14.1-inch widescreen) Hardware Maintenance Manual Parts list-Overall (continued) No. FRU 14 Battery pack, Li-ion (9 cell, 2.6 Ah) v 6378-CTO v 6379-...-CTO v 7735-CTO v 7736-CTO v 7737-CTO v 7738-CTO v 7742-CTO v 7743-CTO v 7744-CTO v 7751-CTO v 7753-CTO v 7754-CTO v 7755-CTO Sanyo Panasonic 15 USB sub card (Iida) USB sub card (Foxconn) 16 DVD drive, 9.5 mm v 6378-CTO v 6379-CTO v 6480-CTO v 7658-CTO v 7659-CTO v 7660-CTO v 7661...
(English) Access Connections Profile Deployment guide
Page 23
Working with the Administrator Feature 15 Notification for Global Settings Chapter 3. Figure 11.
(English) Access Connections Profile Deployment guide
Page 27
From the drop down menu, click Create Group. Working with the AID which is intended to included in the Group must be present on Available Pacs. On the Define PAC AID Groups panel, click Groups. 2. Chapter 3. Right click on the machine where the AID group is being created. 3. Figure 15. Create Distribution Package Create a new PAC AID Group by completing the following steps: 1. Note: The PAC with the Administrator Feature 19
(English) Access Connections Profile Deployment guide
Page 28
... click Remove. To add a group, select it has been installed. Deployment packages (consisting of *.loa and *.sig files) created with the check box on Figure 15 on the next reboot. 20 Access Connections Deployment Guide You can be copied to a distribution package. Figure 16.
Microsoft Windows XP Conversion Kit
Page 7
...; be trademarks or service marks of Microsoft in the United States, other countries, or both . Step 16. Step 17. d. Lenovo, the Lenovo logo, Rescue and Recovery, ThinkPad, and ThinkVantage are trademarks of others. When a message is displayed. b. When prompted, select Yes in the United States, other..., press and release the F1 key. Note: After the conversion process is apparent on the screen for details. Step 15. The remainder of Lenovo in the Setup Confirmation window and then press Enter. Follow the instructions on your computer. When the logo is required...
(Japanese) Power Manager Deployment Guide
Page 19
...)) Lower display brightness 16 Display Brightness 16 16 16 1 分 (Windows XP 2 分 (Windows XP 3 分 (Windows XP 5 分 (Windows XP 10 分 (Windows XP 15 分 • 20 分 • 25 分 • 30 分 • 45 分 • Never (なし) AC Windows 7 第 3 章. Active Directory と ADM...
(Japanese) Power Manager Deployment Guide
Page 23
... (DC DC)) 値を 0 Monitor off Timer Never Windows Windows XP 1分 • 2分 • 3分 • 5分 • 10 分 • 15 分 • 20 分 • 25 分 • 30 分 • 45 分 • 1 時間 • 2 時間 •...HDD AC)) 値を 0 Monitor off Timer Never Windows Windows XP 3分 • 5分 • 10 分 • 15 分 • 20 分 • 25 分 • 30 分 • 45 分 第 3 章. Active Directory と...
(Japanese) Power Manager Deployment Guide
Page 25
...AC AC)) Standby Timer (DC DC)) 説明 Windows Windows XP 1分 • 2分 • 3分 • 5分 • 10 分 • 15 分 • 20 分 • 25 分 • 30 分 • 45 分 • 1 時間 • 2 時間 ... 0 Standby Timer Never Windows Windows XP 1分 • 2分 • 3分 • 5分 • 10 分 • 15 分 • 20 分 • 25 分 • 30 分 • 45 分 • 1 時間 • 2 時間...
(Japanese) Power Manager Deployment Guide
Page 26
... (なし) Windows Vista および Windows 7 値を 0 Standby Timer Never Windows 1分 • 2分 • 3分 • 5分 • 10 分 • 15 分 • 20 分 • 25 分 • 30 分 • 45 分 • 1 時間 • 2 時間 • 3 時間 • 4 時間...
(Japanese) Power Manager Deployment Guide
Page 27
Active Directory と ADM/ADMX 21 表 2 Hibernation Timer (DC DC)) 説明 Windows 1分 • 2分 • 3分 • 5分 • 10 分 • 15 分 • 20 分 • 25 分 • 30 分 • 45 分 • 1 時間 • 2 時間 • 3 時間 • 4 時間 ...
(Japanese) Power Manager Deployment Guide
Page 51
Power Agenda Power Plan (Scheme ThinkPad LCD Brightness 16 (ThinkPad LCD 輝度 16) 説明 『Action Windows Vista/7 Windows XP 42 6『Power Agenda Action 注: 1 1 32 文字、2 16 2 Action Windows Vista/7 Windows XP 42 6『Power Agenda Action 16 0 から 15)。 『Action Change monitor brightness...
(Simplified Chinese) Power Manager Deployment Guide
Page 17
... 16 16 16 • 1 Windows XP) • 2 Windows XP) • 3 Windows XP) • 5 Windows XP) • 10 Windows XP) • 15 分钟 • 20 分钟 • 25 分钟 • 30 分钟 • 45 Lower display brightness 8 (DC 8 Windows 7 8 8 8 • 1 Windows XP)...
(Simplified Chinese) Power Manager Deployment Guide
Page 19
...; 2 小时 • 3 注: 1 2 Windows XP 2 分钟 • 5 分钟 • 10 分钟 • 15 分钟 • 30 分钟 • 45 分钟 • 1 小时 • 2 小时 • 3 注:...XP 1 分钟 • 2 分钟 • 3 分钟 • 5 分钟 • 10 分钟 • 15 分钟 • 20 分钟 • 25 分钟 • 30 分钟 • 45 分钟 • 1 ...