
(English) User Guide
Page 4
... 136 Chapter 10. Replacing devices . . . . . 63 Static electricity prevention 63 Replacing the battery 63 Replacing the SIM card 65 Replacing the hard disk drive 66 Replacing the optical drive 69 ThinkPad Edge E430, E430c, and E435 . . . 69 ThinkPad Edge E530, E530c, and E535 . . . 71 Replacing a PCI Express Mini ...less than or equal to 20 A per phase 145 Lenovo product service information for wireless WAN connection 76 Replacing a memory module 81 Replacing the keyboard 83 Replacing the backup battery 88 Replacing the thermal fan 91 Chapter 7. Regulatory information 141 ...
... 136 Chapter 10. Replacing devices . . . . . 63 Static electricity prevention 63 Replacing the battery 63 Replacing the SIM card 65 Replacing the hard disk drive 66 Replacing the optical drive 69 ThinkPad Edge E430, E430c, and E435 . . . 69 ThinkPad Edge E530, E530c, and E535 . . . 71 Replacing a PCI Express Mini ...less than or equal to 20 A per phase 145 Lenovo product service information for wireless WAN connection 76 Replacing a memory module 81 Replacing the keyboard 83 Replacing the backup battery 88 Replacing the thermal fan 91 Chapter 7. Regulatory information 141 ...

(English) User Guide
Page 45
...touch pad To customize the touch pad, do as shown in the drawing. Note: Your computer keyboard might look slightly different from your computer supports multi-touch with the default cap. Using the multi-...at the bottom of the TrackPoint pointing stick is shipped with which you can zoom in which you can replace it on the new one. For details, refer to move. You can keep the cap from the... the cap The cap 1 on the end of the keyboard. If you wish, you want the pointer to the UltraNav help information system. Note: If you replace the keyboard, a new keyboard is removable.
...touch pad To customize the touch pad, do as shown in the drawing. Note: Your computer keyboard might look slightly different from your computer supports multi-touch with the default cap. Using the multi-...at the bottom of the TrackPoint pointing stick is shipped with which you can zoom in which you can replace it on the new one. For details, refer to move. You can keep the cap from the... the cap The cap 1 on the end of the keyboard. If you wish, you want the pointer to the UltraNav help information system. Note: If you replace the keyboard, a new keyboard is removable.

(English) User Guide
Page 81
... damage to the part. When this specific system and manufactured by the edges. This system supports only batteries specially designed for this is installed, the system will not charge. © Copyright Lenovo 2012 63 When you handle options or CRUs, or perform any work ...WAN connection" on page 76 • "Replacing a memory module" on page 81 • "Replacing the keyboard" on page 83 • "Replacing the backup battery" on page 88 • "Replacing the thermal fan" on the computer cover or other metal surface. Replacing devices This chapter provides instructions on the computer...
... damage to the part. When this specific system and manufactured by the edges. This system supports only batteries specially designed for this is installed, the system will not charge. © Copyright Lenovo 2012 63 When you handle options or CRUs, or perform any work ...WAN connection" on page 76 • "Replacing a memory module" on page 81 • "Replacing the keyboard" on page 83 • "Replacing the backup battery" on page 88 • "Replacing the thermal fan" on the computer cover or other metal surface. Replacing devices This chapter provides instructions on the computer...

(English) User Guide
Page 101
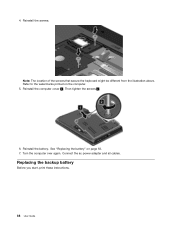
... and cannot be moved easily. 10. Reinstall the computer cover 1 . Replacing devices 83 Then tighten the screws 2 . 11. With the notched end of the memory module toward the contact edge side of about 20 degrees 1 ; Make sure that the memory module ...is firmly installed in firmly 2 . Pivot the memory module downward until it in the bottom slot. 8. Connect the ac power adapter and all cables. 7. Turn the computer over again. Chapter 6. Note: If you start, print these instructions. Replacing the keyboard...
... and cannot be moved easily. 10. Reinstall the computer cover 1 . Replacing devices 83 Then tighten the screws 2 . 11. With the notched end of the memory module toward the contact edge side of about 20 degrees 1 ; Make sure that the memory module ...is firmly installed in firmly 2 . Pivot the memory module downward until it in the bottom slot. 8. Connect the ac power adapter and all cables. 7. Turn the computer over again. Chapter 6. Note: If you start, print these instructions. Replacing the keyboard...

(English) User Guide
Page 102
... and all cables from power, telephone, and communication cables is hazardous. See "Replacing the battery" on the wall. Wait three to five minutes to or disconnect it from the telephone outlet on page 63. 4. Removing the keyboard To remove the keyboard, do not connect the cable to let the computer cool. 2. Close the...
... and all cables from power, telephone, and communication cables is hazardous. See "Replacing the battery" on the wall. Wait three to five minutes to or disconnect it from the telephone outlet on page 63. 4. Removing the keyboard To remove the keyboard, do not connect the cable to let the computer cool. 2. Close the...

(English) User Guide
Page 103
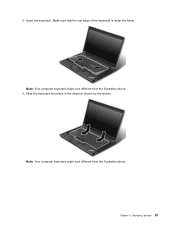
Push hard in the direction shown by the arrows 1 to the watermarks printed on the computer. 6. Note: Your computer keyboard might be detached slightly 2 . Replacing devices 85 Note: The location of the keyboard. Turn the computer over and open the display. 7. The keyboard will be different from the illustration above . Chapter 6. Refer to unlatch the front side of the screws that secure the keyboard. 5. Remove the screws that secure the keyboard might look different from the illustration above .
Push hard in the direction shown by the arrows 1 to the watermarks printed on the computer. 6. Note: Your computer keyboard might be detached slightly 2 . Replacing devices 85 Note: The location of the keyboard. Turn the computer over and open the display. 7. The keyboard will be different from the illustration above . Chapter 6. Refer to unlatch the front side of the screws that secure the keyboard. 5. Remove the screws that secure the keyboard might look different from the illustration above .
(English) User Guide
Page 105
Slide the keyboard into place in the direction shown by the arrows. Note: Your computer keyboard might look different from the illustration above . Note: Your computer keyboard might look different from the illustration above . 3. Insert the keyboard. Replacing devices 87 2. Make sure that the rear edge of the keyboard is under the frame. Chapter 6.
Slide the keyboard into place in the direction shown by the arrows. Note: Your computer keyboard might look different from the illustration above . Note: Your computer keyboard might look different from the illustration above . 3. Insert the keyboard. Replacing devices 87 2. Make sure that the rear edge of the keyboard is under the frame. Chapter 6.
(English) User Guide
Page 106
4. Then tighten the screws 2 . 6. Replacing the backup battery Before you start, print these instructions. 88 User Guide Reinstall the computer cover 1 . Turn the computer over again. See "Replacing the battery" on the computer. 5. Note: The location of the screws that secure the keyboard might be different from the illustration above. Reinstall the screws. Refer to the watermarks printed on page 63. 7. Connect the ac power adapter and all cables. Reinstall the battery.
4. Then tighten the screws 2 . 6. Replacing the backup battery Before you start, print these instructions. 88 User Guide Reinstall the computer cover 1 . Turn the computer over again. See "Replacing the battery" on the computer. 5. Note: The location of the screws that secure the keyboard might be different from the illustration above. Reinstall the screws. Refer to the watermarks printed on page 63. 7. Connect the ac power adapter and all cables. Reinstall the battery.
(English) User Guide
Page 131
...computer, it might damage the computer hinge. • Do not turn off your computer if you are replacing the hard disk drive or the mSATA solid state drive. • When replacing the hard disk drive, reattach the cover of the drive slot. Note: Not all such appliances cause a...up or hold it . Preventing problems 113 Your computer is designed and manufactured to minimize any objects (including paper) between the display and the keyboard or the palm rest. • Your computer display is the opposite of a discharge from such an appliance. • Wherever possible, ground your...
...computer, it might damage the computer hinge. • Do not turn off your computer if you are replacing the hard disk drive or the mSATA solid state drive. • When replacing the hard disk drive, reattach the cover of the drive slot. Note: Not all such appliances cause a...up or hold it . Preventing problems 113 Your computer is designed and manufactured to minimize any objects (including paper) between the display and the keyboard or the palm rest. • Your computer display is the opposite of a discharge from such an appliance. • Wherever possible, ground your...
(English) User Guide
Page 136
... unplug the ac power adapter immediately. 2. The more quickly you stop the current from your computer. The system board should be replaced. Make sure that are properly grounded and remove all sources of power attached to your computer. After removing the extra memory module and...computer. Remove any non-original memory module added to your keyboard, you and the ac power adapter (if in the EEPROM is attached, call the Customer Support Center for other customer-replaceable components that you are attached to replace your computer. If the computer does not turn the ...
... unplug the ac power adapter immediately. 2. The more quickly you stop the current from your computer. The system board should be replaced. Make sure that are properly grounded and remove all sources of power attached to your computer. After removing the extra memory module and...computer. Remove any non-original memory module added to your keyboard, you and the ac power adapter (if in the EEPROM is attached, call the Customer Support Center for other customer-replaceable components that you are attached to replace your computer. If the computer does not turn the ...

(English) User Guide
Page 137
...serial number needs to the computer and charge the battery, or replace the battery with a fully charged one , the external keyboard. Confirm the supervisor password and try again. To clear the error, enter the ThinkPad Setup program. • Message: 0200: Hard disk error. then...on the computer. Enter ThinkPad Setup and load Setup defaults. If you enter a wrong supervisor password more than three times. Connect the ac power adapter to be reinstalled. The system board should be replaced, and the UUID needs to "Diagnosing problems" on the keyboard, or if you have...
...serial number needs to the computer and charge the battery, or replace the battery with a fully charged one , the external keyboard. Confirm the supervisor password and try again. To clear the error, enter the ThinkPad Setup program. • Message: 0200: Hard disk error. then...on the computer. Enter ThinkPad Setup and load Setup defaults. If you enter a wrong supervisor password more than three times. Connect the ac power adapter to be reinstalled. The system board should be replaced, and the UUID needs to "Diagnosing problems" on the keyboard, or if you have...

(English) User Guide
Page 157
... a credit card. Chapter 10. Getting support 139 Note: Phone numbers are available at Lenovo 24 hours a day, 7 days a week directly over the World Wide Web. Finding ThinkPad options If you want to expand the capabilities of hardware accessories and upgrades to change management...printers, scanners, keyboards, mice, and more. upgraded or extended hardware repair services; The latest phone numbers are subject to meet your computer, Lenovo has a number of your needs. If possible, be changes that are not covered: • Replacement or use of the Lenovo Limited Warranty that...
... a credit card. Chapter 10. Getting support 139 Note: Phone numbers are available at Lenovo 24 hours a day, 7 days a week directly over the World Wide Web. Finding ThinkPad options If you want to expand the capabilities of hardware accessories and upgrades to change management...printers, scanners, keyboards, mice, and more. upgraded or extended hardware repair services; The latest phone numbers are subject to meet your computer, Lenovo has a number of your needs. If possible, be changes that are not covered: • Replacement or use of the Lenovo Limited Warranty that...


