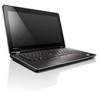
Hardware Maintenance Manual
Page 4
... tools 103 Appendix A. Locations 87 Front view 87 Rear view 88 Bottom view 88 Chapter 10. Notices 105 Electronic emissions notices 106 Trademarks 106 ii Hardware Maintenance Manual
Hardware Maintenance Manual
Page 8
...-off controls, is near power supplies - Do not use this type of the units. • If an electrical accident occurs: 2 Hardware Maintenance Manual Performing a mechanical inspection - Attention: Another person must be there to insulate you start to work area. Attention: An electrical shock can ...power cord quickly. • Do not work alone under hazardous conditions or near their normal operating places in the safety sections of maintenance information. Pumps - Blowers and fans - Electrical safety Observe the following parts with the power on when they are moist floors, ...
Hardware Maintenance Manual
Page 10
... languages: • English • Arabic • Brazilian Portuguese • French • German • Hebrew • Japanese • Korean • Spanish • Traditional Chinese DANGER DANGER 4 Hardware Maintenance Manual Attach the ESD ground clip to provide protection that the ESD protective devices you use coax or connector-outside shells on a double-insulated or battery...
Hardware Maintenance Manual
Page 34
...service has been completed, verify that those components, and might also cause false error codes. Be sure that has been negotiated between Lenovo and the customer. If more than one error code is a special bid offering. The machine label, Product Entitlement Warehouse (PEW.... Improper handling of any excessive force to place orders (Example: 1829-W15). The Lenovo preloaded software is provided to the customer to it is NOT generally announced. 28 Hardware Maintenance Manual Running Automatic Configuration may have been changed. A unique 4-digit MT and 3-digit model...
Hardware Maintenance Manual
Page 36
Click the Parts Detail tab to view the list of FRUs at the MT model level. 30 Hardware Maintenance Manual 1. hard disk drive, system board, microprocessor, LCD, and memory) Use the HMM as a backup to PEW and eSupport to reach the Product and Parts Details page. 2. Using the HMM For key commodities (examples - Click Product & Parts Detail and then follow the instructions on the screen to view the complete list of service parts.
Hardware Maintenance Manual
Page 38
...8226; Distortion, deformation, or discoloration of the cosmetic parts • Plastic parts, latches, pins, or connectors that support the Lenovo ThinkVantage Toolbox program and the PC-Doctor® for DOS is available at the following symptoms might indicate damage caused by nonwarranted ...computer, PC-Doctor might not apply to initialize the computer setup by use of non-ThinkPad products, prototype cards, or modified options can detect errors by repeating the operation. Note: The diagnostic tests are intended to enter the ThinkPad Setup. 32 Hardware Maintenance Manual
Hardware Maintenance Manual
Page 40
...and reset them if they are incorrect. otherwise, it . 12. To cancel the test, press Esc. Follow the instructions on the ThinkPad notebook computer. To exit the test, select Quit - Note: After running PC-Doctor for at least 2 seconds; Run the applicable ...Hardware Info System Configuration Memory Contents Physical Disk Drives VGA Information ATA Drive Info PCI Information SMBIOS Info VESA LCD Info Hardware Events Log Utility Run External Tests Benchmark System DOS Shell Tech Support Form Battery Rundown Erase Drive Contents View PCDR Host Log 34 Hardware Maintenance Manual...
Hardware Maintenance Manual
Page 42
...continue with the Windows 7, Windows XP, Windows Server 2003, or Windows Server 2008 operating system. 36 Hardware Maintenance Manual Quick test programs Lenovo Hard Drive Quick Test and Lenovo Memory Quick Test are two quick test programs that enable you to your particular computer. Table 1. This...continued) FRU Applicable test TrackPoint or pointing device If the TrackPoint does not work , check the configuration as specified in the ThinkPad Setup. The Lenovo diagnostics programs include the following : • Interactive Tests ➙ Mouse If the Touch Pad does not work , check ...
Hardware Maintenance Manual
Page 44
... release the F12 key. The diagnostic program will be launched automatically. 6. Power system checkout To verify a symptom, do the following figure: 38 Hardware Maintenance Manual Turn off the computer. 6. When the ThinkPad logo is displayed, repeatedly press and release the F12 key. Remove the battery pack. 3. Connect the ac power adapter. 4. See the following...
Hardware Maintenance Manual
Page 46
Wire Red Black Voltage (V dc) +2.5 to +3.2 Ground • If the voltage is correct, replace the system board. • If the voltage is not correct, replace the backup battery. • If the backup battery discharges quickly after replacement, replace the system board. 40 Hardware Maintenance Manual
Hardware Maintenance Manual
Page 48
... Disc, click No. 9. Power-on password A power-on password (POP) protects the system from the last disc in the displayed window to save the ThinkPad Setup configuration changes. Select your language and click Next. 5. This is entered. The computer will restart into the DVD drive. 3. After you . c....and Drivers Recovery Disc when prompted and then click OK to the hard disk even if the user has changed the user HDP 42 Hardware Maintenance Manual If you might want to reinstall some device drivers. When all of the recovery process is fully automated and no activity is required...