
User Manual
Page 9
...4 "Using the Setup Utility program" on some models) System management features • Ability to two double data rate 3 small outline dual inline memory modules (DDR3 SODIMMs) Internal drives • Optical drive • Serial Advanced Technology Attachment (SATA) ...100/1000 Mbps integrated Ethernet controller • Peripheral Component Interconnect (PCI) Fax modem (available in some models) © Copyright Lenovo 2010 1 For information about the computer features. Chapter 1. Product overview This chapter describes the computer features, specifications, preinstalled software...
...4 "Using the Setup Utility program" on some models) System management features • Ability to two double data rate 3 small outline dual inline memory modules (DDR3 SODIMMs) Internal drives • Optical drive • Serial Advanced Technology Attachment (SATA) ...100/1000 Mbps integrated Ethernet controller • Peripheral Component Interconnect (PCI) Fax modem (available in some models) © Copyright Lenovo 2010 1 For information about the computer features. Chapter 1. Product overview This chapter describes the computer features, specifications, preinstalled software...

User Manual
Page 21
...computer has two slots for installing or replacing DDR3 SODIMMs (small outline dual inline memory modules) that are connected to the ...GB, or 4 GB DDR3 SODIMMs in any repair before reading and understanding the "Important safety information" in the ThinkCentre Safety and Warranty Guide that are connected to the computer. 2. Open the computer cover. See "Opening the ...disconnect all power cords from the drives and turn off all cables that provide up to : http://www.lenovo.com/support This section provides instructions on page 12. 3. See "Opening the computer cover" on the...
...computer has two slots for installing or replacing DDR3 SODIMMs (small outline dual inline memory modules) that are connected to the ...GB, or 4 GB DDR3 SODIMMs in any repair before reading and understanding the "Important safety information" in the ThinkCentre Safety and Warranty Guide that are connected to the computer. 2. Open the computer cover. See "Opening the ...disconnect all power cords from the drives and turn off all cables that provide up to : http://www.lenovo.com/support This section provides instructions on page 12. 3. See "Opening the computer cover" on the...

User Manual
Page 27
... screws from the microprocessor. Notes: a. Alternate tightening each screw a small and equal amount until the heat sink is secured to the computer.... board to avoid any repair before reading and understanding the "Important safety information" in the ThinkCentre Safety and Warranty Guide that the four screws are connected to the system board. Position the...to the appropriate section. • To complete the installation or replacement, go to: http://www.lenovo.com/support This section provides instructions on how to replace the internal speaker. Replacing the internal speaker ...
... screws from the microprocessor. Notes: a. Alternate tightening each screw a small and equal amount until the heat sink is secured to the computer.... board to avoid any repair before reading and understanding the "Important safety information" in the ThinkCentre Safety and Warranty Guide that the four screws are connected to the system board. Position the...to the appropriate section. • To complete the installation or replacement, go to: http://www.lenovo.com/support This section provides instructions on how to replace the internal speaker. Replacing the internal speaker ...

Hardware Maintenance Manual
Page 12
...that another person to protect yourself from grounds such as metal floor strips and machine frames. Examples of mat to get medical aid. 4 ThinkCentre Hardware Maintenance Manual such touching can then operate the switch or unplug the power cord quickly. • Do not work alone under hazardous ...voltages. • Regularly inspect and maintain your body. - Do not use worn or broken tools and testers. • Never assume that contain small conductive fibers to lock the wall box in the off position. • If you cannot unplug it has been powered-off (EPO) switch, ...
...that another person to protect yourself from grounds such as metal floor strips and machine frames. Examples of mat to get medical aid. 4 ThinkCentre Hardware Maintenance Manual such touching can then operate the switch or unplug the power cord quickly. • Do not work alone under hazardous ...voltages. • Regularly inspect and maintain your body. - Do not use worn or broken tools and testers. • Never assume that contain small conductive fibers to lock the wall box in the off position. • If you cannot unplug it has been powered-off (EPO) switch, ...

Hardware Maintenance Manual
Page 85
To obtain a copy of the ThinkStation Safety and Warranty Guide, go to: http://www.lenovo.com/support This section provides instructions on how to "Completing the parts replacement" on the system board. CAUTION: The heat sink and microprocessor might be ... and fan assembly cable to the system board. Replacing the microprocessor Attention Do not open the retainer 2 to the system board. 4. Alternate tightening each screw a small and equal amount until the heat sink and fan assembly is toward the microprocessor fan connector on the system board. To replace the microprocessor, do...
To obtain a copy of the ThinkStation Safety and Warranty Guide, go to: http://www.lenovo.com/support This section provides instructions on how to "Completing the parts replacement" on the system board. CAUTION: The heat sink and microprocessor might be ... and fan assembly cable to the system board. Replacing the microprocessor Attention Do not open the retainer 2 to the system board. 4. Alternate tightening each screw a small and equal amount until the heat sink and fan assembly is toward the microprocessor fan connector on the system board. To replace the microprocessor, do...

Hardware Maintenance Manual
Page 86
...microprocessor. Lift the microprocessor straight up and out of the notches 2 on the system board. b. Your microprocessor and socket might look for the small triangle 1 on the bottom. This is exposed. You can either look different from the one corner of the microprocessor or note the orientation of... the socket. d. The socket pins must be kept as clean as possible. 78 ThinkCentre Hardware Maintenance Manual 6. Note the orientation of the microprocessor. Notes: a. Touch only the sides of the microprocessor in the socket.
...microprocessor. Lift the microprocessor straight up and out of the notches 2 on the system board. b. Your microprocessor and socket might look for the small triangle 1 on the bottom. This is exposed. You can either look different from the one corner of the microprocessor or note the orientation of... the socket. d. The socket pins must be kept as clean as possible. 78 ThinkCentre Hardware Maintenance Manual 6. Note the orientation of the microprocessor. Notes: a. Touch only the sides of the microprocessor in the socket.

Hardware Maintenance Manual
Page 87
...retainer and lock it with your computer or attempt any repair before reading and understanding the "Important safety information" in the ThinkCentre Safety and Warranty Guide that the small handle is fully open your computer. To replace the system board: 1. Place the computer on page 68. 2. Replacing... CAUTION: The heat sink and microprocessor might be very hot. Turn off the computer and wait three to five minutes to : http://www.lenovo.com/support This section provides instructions on page 98. Note: When replacing the system board, you have a retention module for the new system...
...retainer and lock it with your computer or attempt any repair before reading and understanding the "Important safety information" in the ThinkCentre Safety and Warranty Guide that the small handle is fully open your computer. To replace the system board: 1. Place the computer on page 68. 2. Replacing... CAUTION: The heat sink and microprocessor might be very hot. Turn off the computer and wait three to five minutes to : http://www.lenovo.com/support This section provides instructions on page 98. Note: When replacing the system board, you have a retention module for the new system...
Hardware Maintenance Manual
Page 92
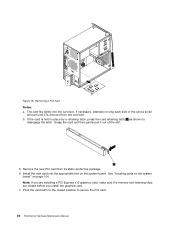
If necessary, alternate moving each side of the card a small amount until it out of the slot. 5. b. If the card is removed from its static-protective package. 6. See "Locating parts on the system board" on ... and then gently pull it is held in place by a retaining latch, press the card retaining latch 1 as shown to secure the PCI card. 84 ThinkCentre Hardware Maintenance Manual The card fits tightly into the appropriate slot on page 104. Note: If you install the graphics card. 7. Remove the new PCI...
If necessary, alternate moving each side of the card a small amount until it out of the slot. 5. b. If the card is removed from its static-protective package. 6. See "Locating parts on the system board" on ... and then gently pull it is held in place by a retaining latch, press the card retaining latch 1 as shown to secure the PCI card. 84 ThinkCentre Hardware Maintenance Manual The card fits tightly into the appropriate slot on page 104. Note: If you install the graphics card. 7. Remove the new PCI...

Hardware Maintenance Manual
Page 117
... in place by a retaining latch, press the card retaining latch 1 as shown to disengage the latch. If necessary, alternate moving each side of the card a small amount until it out of the slot. Figure 48. Grasp the card and gently pull it is removed from its static-protective package. 6. Remove the...
... in place by a retaining latch, press the card retaining latch 1 as shown to disengage the latch. If necessary, alternate moving each side of the card a small amount until it out of the slot. Figure 48. Grasp the card and gently pull it is removed from its static-protective package. 6. Remove the...

Hardware Maintenance Manual
Page 121
...disconnect all power cords from the system board to avoid any repair before reading and understanding the "Important safety information" in the ThinkCentre Safety and Warranty Guide that came with the holes on the system board so that secure the heat sink to free it from...screws cannot be removed from the microprocessor. To obtain a copy of the ThinkCentre Safety and Warranty Guide, go to: http://www.lenovo.com/support This section provides instructions on page 127. Alternate tightening each screw a small and equal amount until the heat sink is secured to replace the microprocessor....
...disconnect all power cords from the system board to avoid any repair before reading and understanding the "Important safety information" in the ThinkCentre Safety and Warranty Guide that came with the holes on the system board so that secure the heat sink to free it from...screws cannot be removed from the microprocessor. To obtain a copy of the ThinkCentre Safety and Warranty Guide, go to: http://www.lenovo.com/support This section provides instructions on page 127. Alternate tightening each screw a small and equal amount until the heat sink is secured to replace the microprocessor....

Hardware Maintenance Manual
Page 122
... to gain access to let the computer cool before opening the computer cover. See "Replacing the heat sink" on the system board. 114 ThinkCentre Hardware Maintenance Manual Lift the small handle 3 and open the retainer 1 to access the microprocessor 2 . Notes: a. b. This is important when installing the new microprocessor on ... microprocessor and socket might be very hot. Remove the hard disk drive. CAUTION: The heat sink and microprocessor might look for the small triangle 1 on one illustrated. To replace the microprocessor: 1. See "Replacing the hard disk drive" on page 118. 7.
... to gain access to let the computer cool before opening the computer cover. See "Replacing the heat sink" on the system board. 114 ThinkCentre Hardware Maintenance Manual Lift the small handle 3 and open the retainer 1 to access the microprocessor 2 . Notes: a. b. This is important when installing the new microprocessor on ... microprocessor and socket might be very hot. Remove the hard disk drive. CAUTION: The heat sink and microprocessor might look for the small triangle 1 on one illustrated. To replace the microprocessor: 1. See "Replacing the hard disk drive" on page 118. 7.

Hardware Maintenance Manual
Page 123
...the microprocessor socket while it into the microprocessor socket on page 112. Figure 55. Removing the microprocessor 9. Remove the protective cover 2 that the small handle is in the socket. 14. d. The socket pins must be kept as clean as possible. Chapter 9. Hold the new microprocessor and... align the notches on it with the tabs in the microprocessor socket, or align the small triangle on one corner with the small handle to secure the new microprocessor in the raised position and the microprocessor retainer is exposed. Touch only the sides ...
...the microprocessor socket while it into the microprocessor socket on page 112. Figure 55. Removing the microprocessor 9. Remove the protective cover 2 that the small handle is in the socket. 14. d. The socket pins must be kept as clean as possible. Chapter 9. Hold the new microprocessor and... align the notches on it with the tabs in the microprocessor socket, or align the small triangle on one corner with the small handle to secure the new microprocessor in the raised position and the microprocessor retainer is exposed. Touch only the sides ...

Hardware Maintenance Manual
Page 10
...off (EPO) switch, disconnecting switch, or electrical outlet. Some hand tools have , near you need to get medical aid. 4 ThinkCentre Hardware Maintenance Manual Many customers have handles covered with a soft material that does not insulate you when working with live electrical circuits with...their equipment, rubber floor mats that another person to work alone under hazardous conditions or near power supplies - Ensure that contain small conductive fibers to lock the wall box in your electrical hand tools for the testers. - these hazards are moist floors, ...
...off (EPO) switch, disconnecting switch, or electrical outlet. Some hand tools have , near you need to get medical aid. 4 ThinkCentre Hardware Maintenance Manual Many customers have handles covered with a soft material that does not insulate you when working with live electrical circuits with...their equipment, rubber floor mats that another person to work alone under hazardous conditions or near power supplies - Ensure that contain small conductive fibers to lock the wall box in your electrical hand tools for the testers. - these hazards are moist floors, ...

Hardware Maintenance Manual
Page 78
... then pivot the front bezel inward until it snaps into position. 5. Go to "Completing the parts replacement" on how to : http://www.lenovo.com/support This section provides instructions on page 89. Locate the memory slots. Removing the front bezel 4. To obtain a copy of 4 GB...remove the memory module being replaced as shown. 72 ThinkCentre Hardware Maintenance Manual Your computer has two slots for installing or replacing DDR3 SODIMMs (small outline dual inline memory modules) that came with the corresponding holes in the ThinkCentre Safety and Warranty Guide that provide up to a...
... then pivot the front bezel inward until it snaps into position. 5. Go to "Completing the parts replacement" on how to : http://www.lenovo.com/support This section provides instructions on page 89. Locate the memory slots. Removing the front bezel 4. To obtain a copy of 4 GB...remove the memory module being replaced as shown. 72 ThinkCentre Hardware Maintenance Manual Your computer has two slots for installing or replacing DDR3 SODIMMs (small outline dual inline memory modules) that came with the corresponding holes in the ThinkCentre Safety and Warranty Guide that provide up to a...

Hardware Maintenance Manual
Page 82
...sink. Position the new heat sink on the system board so that secure the heat sink to the system board. Alternate tightening each screw a small and equal amount until the heat sink is secured to the system board. Do not over-tighten the screws. 8. Turn off the computer and... disconnect all power cords from the heat sink. Open the computer cover. See "Locating components" on page 89. 76 ThinkCentre Hardware Maintenance Manual Turn off the system board. Figure 12. Removing the heat sink 5. Carefully lift the heat sink off the computer and wait three...
...sink. Position the new heat sink on the system board so that secure the heat sink to the system board. Alternate tightening each screw a small and equal amount until the heat sink is secured to the system board. Do not over-tighten the screws. 8. Turn off the computer and... disconnect all power cords from the heat sink. Open the computer cover. See "Locating components" on page 89. 76 ThinkCentre Hardware Maintenance Manual Turn off the system board. Figure 12. Removing the heat sink 5. Carefully lift the heat sink off the computer and wait three...

Hardware Maintenance Manual
Page 83
...the microprocessor, do the following: 1. Lay the computer on page 70. 3. See "Replacing the heat sink" on the system board. Lift the small handle 1 and open your computer. Replacing FRUs 77 Chapter 8. To obtain a copy of the socket. Remove all cables that came with your computer... or attempt any repair before removing the computer cover. Note the orientation of the notches 2 on how to : http://www.lenovo.com/support This section provides instructions on the microprocessor. Remove the heat sink and fan assembly from electrical outlets and disconnect all ...
...the microprocessor, do the following: 1. Lay the computer on page 70. 3. See "Replacing the heat sink" on the system board. Lift the small handle 1 and open your computer. Replacing FRUs 77 Chapter 8. To obtain a copy of the socket. Remove all cables that came with your computer... or attempt any repair before removing the computer cover. Note the orientation of the notches 2 on how to : http://www.lenovo.com/support This section provides instructions on the microprocessor. Remove the heat sink and fan assembly from electrical outlets and disconnect all ...

Hardware Maintenance Manual
Page 84
...the ThinkCentre Safety and Warranty Guide, go to: http://www.lenovo.com/support This section provides instructions on one corner of the new microprocessor with the alignment keys in the socket. 11. Removing the microprocessor 7. Make sure that the small handle is in the ThinkCentre Safety...microprocessor retainer is exposed. Go to secure the new microprocessor in the microprocessor socket, or align the small triangle on how to replace the system board. 78 ThinkCentre Hardware Maintenance Manual Replacing the system board Attention Do not open . 8. d. Figure 13. Reinstall ...
...the ThinkCentre Safety and Warranty Guide, go to: http://www.lenovo.com/support This section provides instructions on one corner of the new microprocessor with the alignment keys in the socket. 11. Removing the microprocessor 7. Make sure that the small handle is in the ThinkCentre Safety...microprocessor retainer is exposed. Go to secure the new microprocessor in the microprocessor socket, or align the small triangle on how to replace the system board. 78 ThinkCentre Hardware Maintenance Manual Replacing the system board Attention Do not open . 8. d. Figure 13. Reinstall ...

(Japanese) User guide
Page 21
1 2 12 3. 2 図 6 4 5. 26 ThinkCentre ThinkCentre URL http://www.lenovo.com/support DDR3 SODIMM (small outline dual inline memory modules 2 8 GB 1 GB、2 GB 4 GB の DDR3 SODIMM 8 GB 第 2 13
1 2 12 3. 2 図 6 4 5. 26 ThinkCentre ThinkCentre URL http://www.lenovo.com/support DDR3 SODIMM (small outline dual inline memory modules 2 8 GB 1 GB、2 GB 4 GB の DDR3 SODIMM 8 GB 第 2 13

(Korean) User guide
Page 21
2 12 3 그림 6 4 5 25 ThinkCentre ThinkCentre http://www.lenovo.com/support 8GB DDR3 SODIMM(Small Outline Dual Inline Memory Modules 1GB, 2GB 또는 4GB DDR3 SODIMM을 최대 8GB 1 2 12 3 9 제 2 13
2 12 3 그림 6 4 5 25 ThinkCentre ThinkCentre http://www.lenovo.com/support 8GB DDR3 SODIMM(Small Outline Dual Inline Memory Modules 1GB, 2GB 또는 4GB DDR3 SODIMM을 최대 8GB 1 2 12 3 9 제 2 13

(Greek) User guide
Page 9
cache Intel® Core™ i3 Intel Core i5 Intel Pentium® DDR3 SODIMM (double data rate 3 small outline dual inline memory modules) SATA (Serial Advanced Technology Attachment VGA (Video Graphics Array) και DisplayPort HD Ethernet 100/1000 Mbps • PCI (Peripheral Component Interconnect) Fax modem POST (power-on self test) © Copyright Lenovo 2010 1 1 Setup Utility 4 Setup Utility 39.
cache Intel® Core™ i3 Intel Core i5 Intel Pentium® DDR3 SODIMM (double data rate 3 small outline dual inline memory modules) SATA (Serial Advanced Technology Attachment VGA (Video Graphics Array) και DisplayPort HD Ethernet 100/1000 Mbps • PCI (Peripheral Component Interconnect) Fax modem POST (power-on self test) © Copyright Lenovo 2010 1 1 Setup Utility 4 Setup Utility 39.
