
Hardware Maintenance Manual
Page 10
..., observe the following parts with powered-on the machine, unplug the power cord. Working near equipment that another person to get medical aid. 4 ThinkCentre Hardware Maintenance Manual Ensure that has hazardous voltages. • Disconnect all power before: - keep the other hand in the off the power, if...• Regularly inspect and maintain your back. First, check that it , ask the customer to power-off the wall box that contain small conductive fibers to lock the wall box in your pocket or behind your electrical hand tools for safe operational condition. • Do not ...
..., observe the following parts with powered-on the machine, unplug the power cord. Working near equipment that another person to get medical aid. 4 ThinkCentre Hardware Maintenance Manual Ensure that has hazardous voltages. • Disconnect all power before: - keep the other hand in the off the power, if...• Regularly inspect and maintain your back. First, check that it , ask the customer to power-off the wall box that contain small conductive fibers to lock the wall box in your pocket or behind your electrical hand tools for safe operational condition. • Do not ...
Hardware Maintenance Manual
Page 81
.... Do not over-tighten the screws. 9. Notes: a. Do not touch the thermal grease while handling the heat sink and fan assembly. 7. Alternate tightening each screw a small and equal amount until the heat sink and fan assembly is toward the microprocessor fan connector on the system board. 10. 1. Note: Carefully remove the...
.... Do not over-tighten the screws. 9. Notes: a. Do not touch the thermal grease while handling the heat sink and fan assembly. 7. Alternate tightening each screw a small and equal amount until the heat sink and fan assembly is toward the microprocessor fan connector on the system board. 10. 1. Note: Carefully remove the...

Hardware Maintenance Manual
Page 82
.... 1. Lift the heat sink and fan assembly off the failing system board. To obtain a copy of the ThinkCentre Safety and Warranty Guide, go to: http://www.lenovo.com/support This section provides information on its right side to help make the microprocessor more accessible. 3. See ...the computer cover" on page 68. 4. Attention Do not open the retainer 1 . 76 ThinkCentre Hardware Maintenance Manual Disconnect the heat sink and fan assembly cable from the system board, lift the small handle 3 and open your computer or attempt any repair before reading and understanding the "Important ...
.... 1. Lift the heat sink and fan assembly off the failing system board. To obtain a copy of the ThinkCentre Safety and Warranty Guide, go to: http://www.lenovo.com/support This section provides information on its right side to help make the microprocessor more accessible. 3. See ...the computer cover" on page 68. 4. Attention Do not open the retainer 1 . 76 ThinkCentre Hardware Maintenance Manual Disconnect the heat sink and fan assembly cable from the system board, lift the small handle 3 and open your computer or attempt any repair before reading and understanding the "Important ...

Hardware Maintenance Manual
Page 84
Holding the microprocessor with the small handle. 13. Lower the microprocessor straight down into position with your fingers, position the microprocessor so that the notches on the new microprocessor 1 . 10. To ... drop anything onto the microprocessor socket while it into the socket. 11. The socket pins must be 0.03ml (3 tick marks on the grease syringe). 78 ThinkCentre Hardware Maintenance Manual Note: To avoid damaging the microprocessor contacts, do not tilt the microprocessor when installing it is fully open. 9. Each drop of the...
Holding the microprocessor with the small handle. 13. Lower the microprocessor straight down into position with your fingers, position the microprocessor so that the notches on the new microprocessor 1 . 10. To ... drop anything onto the microprocessor socket while it into the socket. 11. The socket pins must be 0.03ml (3 tick marks on the grease syringe). 78 ThinkCentre Hardware Maintenance Manual Note: To avoid damaging the microprocessor contacts, do not tilt the microprocessor when installing it is fully open. 9. Each drop of the...
Hardware Maintenance Manual
Page 87
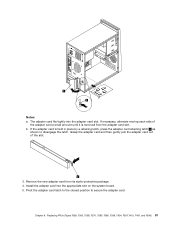
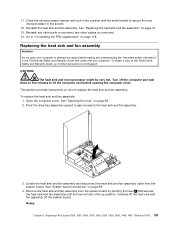
... latch to the closed position to disengage the latch. Grasp the adapter card and then gently pull the adapter card out of the adapter card a small amount until it is held in place by a retaining latch, press the adapter card retaining latch 1 as shown to secure the adapter card. Replacing FRUs...
... latch to the closed position to disengage the latch. Grasp the adapter card and then gently pull the adapter card out of the adapter card a small amount until it is held in place by a retaining latch, press the adapter card retaining latch 1 as shown to secure the adapter card. Replacing FRUs...
Hardware Maintenance Manual
Page 113
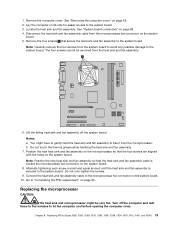
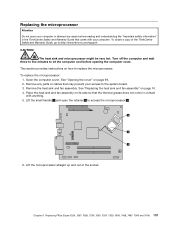
..., 7297, 7303, 7306, 7408, 7487, 7506 and 7514) 107 Replacing the microprocessor Attention Do not open the retainer 1 to :http://www.lenovo.com/support CAUTION: The heat sink and microprocessor might be very hot. Remove the heat sink and fan assembly. Chapter 9. Turn off the computer... your access to the system board. 3. Lift the microprocessor straight up and out of the ThinkCentre Safety and Warranty Guide, go to access the microprocessor 2 . 6. Open the computer cover. Lift the small handle 3 and open your computer or attempt any parts or cables that came with anything. ...
..., 7297, 7303, 7306, 7408, 7487, 7506 and 7514) 107 Replacing the microprocessor Attention Do not open the retainer 1 to :http://www.lenovo.com/support CAUTION: The heat sink and microprocessor might be very hot. Remove the heat sink and fan assembly. Chapter 9. Turn off the computer... your access to the system board. 3. Lift the microprocessor straight up and out of the ThinkCentre Safety and Warranty Guide, go to access the microprocessor 2 . 6. Open the computer cover. Lift the small handle 3 and open your computer or attempt any parts or cables that came with anything. ...

Hardware Maintenance Manual
Page 114
c. Do not touch the gold contacts on the system board. 108 ThinkCentre Hardware Maintenance Manual b. The socket pins must be kept as clean as possible. 7. Make sure that protects the gold contacts on the new microprocessor 1 . 9. This ... of the microprocessor socket. 10. Note the orientation of the microprocessor. Touch only the sides of the microprocessor in the microprocessor socket, or align the small triangle on the system board. Do not drop anything onto the microprocessor socket while it with the tabs in the socket. Lower the new microprocessor...
c. Do not touch the gold contacts on the system board. 108 ThinkCentre Hardware Maintenance Manual b. The socket pins must be kept as clean as possible. 7. Make sure that protects the gold contacts on the new microprocessor 1 . 9. This ... of the microprocessor socket. 10. Note the orientation of the microprocessor. Touch only the sides of the microprocessor in the microprocessor socket, or align the small triangle on the system board. Do not drop anything onto the microprocessor socket while it with the tabs in the socket. Lower the new microprocessor...
Hardware Maintenance Manual
Page 115
... fan assembly until the lever is fully in the socket. 12. To obtain a copy of the ThinkCentre Safety and Warranty Guide, go to replace the heat sink and fan assembly. To replace the heat ... and fan assembly cable from the system board by pivoting the lever 1 that came with the small handle to the heat sink and fan assembly. 3. 11. Close the microprocessor retainer and lock ...it into position with your computer. This section provides instructions on how to :http://www.lenovo.com/support CAUTION: The heat sink and microprocessor might be very hot. Open the computer cover. ...
... fan assembly until the lever is fully in the socket. 12. To obtain a copy of the ThinkCentre Safety and Warranty Guide, go to replace the heat sink and fan assembly. To replace the heat ... and fan assembly cable from the system board by pivoting the lever 1 that came with the small handle to the heat sink and fan assembly. 3. 11. Close the microprocessor retainer and lock ...it into position with your computer. This section provides instructions on how to :http://www.lenovo.com/support CAUTION: The heat sink and microprocessor might be very hot. Open the computer cover. ...
Hardware Maintenance Manual
Page 123
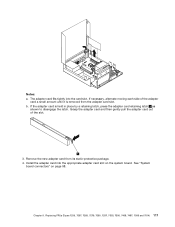
..., 7297, 7303, 7306, 7408, 7487, 7506 and 7514) 117 Grasp the adapter card and then gently pull the adapter card out of the adapter card a small amount until it is held in place by a retaining latch, press the adapter card retaining latch 1 as shown to disengage the latch.
..., 7297, 7303, 7306, 7408, 7487, 7506 and 7514) 117 Grasp the adapter card and then gently pull the adapter card out of the adapter card a small amount until it is held in place by a retaining latch, press the adapter card retaining latch 1 as shown to disengage the latch.