
User Manual
Page 5
...sequence 28 Exiting from a POST/BIOS update failure . . . 30 Appendix B. Notices 41 Television output notice 42 Trademarks 42 Index 43 © Lenovo 2005. iii v General safety guidelines vi Service vi Power cords and power adapters vii Extension cords and related devices . . . . . Updating ... components 11 Identifying parts on the rear of your computer 7 Locating the connectors on the system board . . . . . 11 Installing a memory module 12 Installing adapters 14 Installing internal drives 15 Drive specifications 16 Installing a drive in bay 1 or bay 2 . . . . . ...
...sequence 28 Exiting from a POST/BIOS update failure . . . 30 Appendix B. Notices 41 Television output notice 42 Trademarks 42 Index 43 © Lenovo 2005. iii v General safety guidelines vi Service vi Power cords and power adapters vii Extension cords and related devices . . . . . Updating ... components 11 Identifying parts on the rear of your computer 7 Locating the connectors on the system board . . . . . 11 Installing a memory module 12 Installing adapters 14 Installing internal drives 15 Drive specifications 16 Installing a drive in bay 1 or bay 2 . . . . . ...
User Manual
Page 17
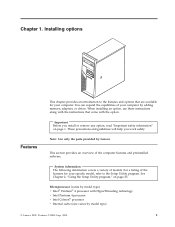
...will help you install or remove any option, read "Important safety information" on page 25. Note: Use only the parts provided by adding memory, adapters, or drives. When installing an option, use these instructions along with the instructions that are available for your specific model, refer to... processor v Internal cache (size varies by model type) v Intel® Pentium® 4 processor with the option. Microprocessor (varies by model type) © Lenovo 2005. This section provides an overview of models. You can expand the capabilities of the features for your computer by...
...will help you install or remove any option, read "Important safety information" on page 25. Note: Use only the parts provided by adding memory, adapters, or drives. When installing an option, use these instructions along with the instructions that are available for your specific model, refer to... processor v Internal cache (size varies by model type) v Intel® Pentium® 4 processor with the option. Microprocessor (varies by model type) © Lenovo 2005. This section provides an overview of models. You can expand the capabilities of the features for your computer by...
User Manual
Page 18
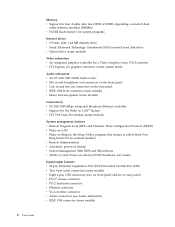
... four double data rate (DDR or DDR2, depending on model) dual inline memory modules (DIMMs) v 512 KB flash memory for system programs Internal drives v 3.5-inch, slim, 1.44 MB diskette drive v Serial Advanced Technology Attachment (SATA) internal hard disk drive v Optical drive (some models) Video ...
... four double data rate (DDR or DDR2, depending on model) dual inline memory modules (DIMMs) v 512 KB flash memory for system programs Internal drives v 3.5-inch, slim, 1.44 MB diskette drive v Serial Advanced Technology Attachment (SATA) internal hard disk drive v Optical drive (some models) Video ...

User Manual
Page 20
... an IEEE 1394 adapter) v Internal options - Hard disk drive - v Within Canada, call 1-800-426-2968, your Lenovo reseller or Lenovo marketing representative. 4 User Guide Peripheral component interconnect (PCI) adapters - Monitors - USB devices, such as external speakers for ...the sound system - Security device, such as a padlock - PCI Express x16 graphics adapter - System memory, called dual inline memory modules...
... an IEEE 1394 adapter) v Internal options - Hard disk drive - v Within Canada, call 1-800-426-2968, your Lenovo reseller or Lenovo marketing representative. 4 User Guide Peripheral component interconnect (PCI) adapters - Monitors - USB devices, such as external speakers for ...the sound system - Security device, such as a padlock - PCI Express x16 graphics adapter - System memory, called dual inline memory modules...
User Manual
Page 22
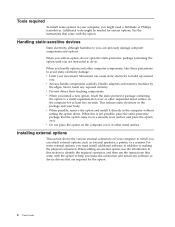
Handle adapters and memory modules by the edges. Never touch any software or device drivers that the option came in on a smooth, level surface and place the option on ...
Handle adapters and memory modules by the edges. Never touch any software or device drivers that the option came in on a smooth, level surface and place the option on ...
User Manual
Page 27
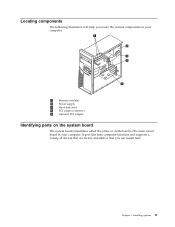
Chapter 1. Installing options 11 It provides basic computer functions and supports a variety of devices that are factory-installed or that you locate the various components in your computer. 1 Memory modules 2 Power supply 3 Hard disk drive 4 PCI adapter connector 5 Optional PCI adapter Identifying parts on the system board The system board (sometimes called the planar or motherboard) is the main circuit board in your computer. Locating components The following illustration will help you can install later.
Chapter 1. Installing options 11 It provides basic computer functions and supports a variety of devices that are factory-installed or that you locate the various components in your computer. 1 Memory modules 2 Power supply 3 Hard disk drive 4 PCI adapter connector 5 Optional PCI adapter Identifying parts on the system board The system board (sometimes called the planar or motherboard) is the main circuit board in your computer. Locating components The following illustration will help you can install later.

User Manual
Page 28
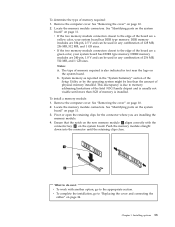
...your computer operates in dual channel mode. The type of memory required depends on the system board. 1 12V power connector 2 Diskette drive connector 3 Speaker connector 4 Memory module connector 4 5 Memory module connector 3 6 Memory module connector 2 7 Memory module connector 1 8 Clear CMOS/Recovery jumper 9 Front Panel... 21 Battery 22 Microprocessor 23 Microprocessor fan connector 24 Microprocessor heat sink Installing a memory module Your computer has four connectors for installing dual inline memory modules that provide up to a maximum of 4.0 GB of parts on the ...
...your computer operates in dual channel mode. The type of memory required depends on the system board. 1 12V power connector 2 Diskette drive connector 3 Speaker connector 4 Memory module connector 4 5 Memory module connector 3 6 Memory module connector 2 7 Memory module connector 1 8 Clear CMOS/Recovery jumper 9 Front Panel... 21 Battery 22 Microprocessor 23 Microprocessor fan connector 24 Microprocessor heat sink Installing a memory module Your computer has four connectors for installing dual inline memory modules that provide up to a maximum of 4.0 GB of parts on the ...
User Manual
Page 29
.... See "Removing the cover" on page 11. See "Identifying parts on the system board" on page 10. 2. v If the two memory module connectors closest to memory addressing limitations of 256 MB, 512 MB, and 1 GB sizes. Remove the computer cover. Pivot or open the retaining clips for the connector ...are 184-pin, 2.5 V and can be used in any combination of the Intel 915G Family chipset and is due to the edge of memory required: 1. Push the memory module straight down into the connector until more than the amount of 128 MB, 256 MB, 512 MB, and 1 GB sizes. Installing ...
.... See "Removing the cover" on page 11. See "Identifying parts on the system board" on page 10. 2. v If the two memory module connectors closest to memory addressing limitations of 256 MB, 512 MB, and 1 GB sizes. Remove the computer cover. Pivot or open the retaining clips for the connector ...are 184-pin, 2.5 V and can be used in any combination of the Intel 915G Family chipset and is due to the edge of memory required: 1. Push the memory module straight down into the connector until more than the amount of 128 MB, 256 MB, 512 MB, and 1 GB sizes. Installing ...
User Manual
Page 38
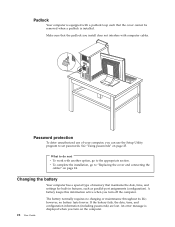
... (including passwords) are lost. Make sure that the padlock you install does not interfere with computer cables. ® Password protection To deter unauthorized use of memory that maintains the date, time, and settings for built-in features, such as parallel-port assignments (configuration). v To complete the installation, go to the appropriate...
... (including passwords) are lost. Make sure that the padlock you install does not interfere with computer cables. ® Password protection To deter unauthorized use of memory that maintains the date, time, and settings for built-in features, such as parallel-port assignments (configuration). v To complete the installation, go to the appropriate...

User Manual
Page 41
...not have to set passwords to prevent unauthorized persons from gaining access to your computer, you should read and understand the following information: © Lenovo 2005. Notes: a. The Setup Utility might override any of the various types of each screen. The keys used to use the keyboard. ... a USB keyboard and the Setup Utility program does not display using the Setup Utility program, you can set any passwords, read -only memory (EEPROM) of your computer is not displayed until you type your computer, regardless of which operating system you decide to perform various tasks...
...not have to set passwords to prevent unauthorized persons from gaining access to your computer, you should read and understand the following information: © Lenovo 2005. Notes: a. The Setup Utility might override any of the various types of each screen. The keys used to use the keyboard. ... a USB keyboard and the Setup Utility program does not display using the Setup Utility program, you can set any passwords, read -only memory (EEPROM) of your computer is not displayed until you type your computer, regardless of which operating system you decide to perform various tasks...
User Manual
Page 45
...to the language and then press Enter. 4. Type in the following procedure) is on already, you turn it is subject to the Lenovo Web site, Web page content (including the links referenced in the seven character serial number of software that is built into your keyboard ...which corresponds to the system programs. When updates are released, they are available as flash memory). Type in a .txt file that is included with the update files. Updating (flashing) BIOS from a POST/BIOS update failure. The update ...
...to the language and then press Enter. 4. Type in the following procedure) is on already, you turn it is subject to the Lenovo Web site, Web page content (including the links referenced in the seven character serial number of software that is built into your keyboard ...which corresponds to the system programs. When updates are released, they are available as flash memory). Type in a .txt file that is included with the update files. Updating (flashing) BIOS from a POST/BIOS update failure. The update ...
User Manual
Page 49
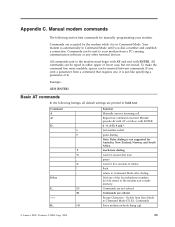
...Manually answer incoming call. Do not precede A/ with AT or follow with ENTER. Command) Force modem on-hook (hang up) © Lenovo 2005. If you dial a number and establish a connection. Repeat last command executed. Switch from a PC running communication software or any other ... dialing Note: Pulse dialing is not supported for five seconds of the four telephone numbers (n=0-3) stored in the modem non-volatile memory. Appendix C. Manual modem commands The following listings, all default settings are echoed Escape Characters - touch-tone dialing wait for second...
...Manually answer incoming call. Do not precede A/ with AT or follow with ENTER. Command) Force modem on-hook (hang up) © Lenovo 2005. If you dial a number and establish a connection. Repeat last command executed. Switch from a PC running communication software or any other ... dialing Note: Pulse dialing is not supported for five seconds of the four telephone numbers (n=0-3) stored in the modem non-volatile memory. Appendix C. Manual modem commands The following listings, all default settings are echoed Escape Characters - touch-tone dialing wait for second...
User Manual
Page 50
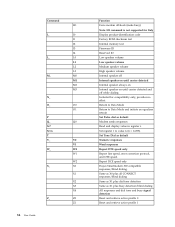
... Guide Function Force modem off-hook (make busy) Note: H1 command is not supported for Italy Display product-identification code Factory ROM checksum test Internal memory test Firmware ID Reserved ID Low speaker volume Low speaker volume Medium speaker volume High speaker volume Internal speaker off Internal speaker on until carrier...
... Guide Function Force modem off-hook (make busy) Note: H1 command is not supported for Italy Display product-identification code Factory ROM checksum test Internal memory test Firmware ID Reserved ID Low speaker volume Low speaker volume Medium speaker volume High speaker volume Internal speaker off Internal speaker on until carrier...
User Manual
Page 59
... 12 security features 21 K keyboard connector 9 L locating components 11 M memory dual inline memory modules (DIMMs) 12 installing 12 system 12 microphone connector 9 modem commands Basic AT 33 Extended AT 35 Fax Class 1 37 Fax Class 2 37 MNP/V.42/V.... 2, 15 optical 4 removable media 4 specifications 16 E environment, operating 5 Ethernet connector 9 H hard disk drive security 25 I important safety information v information resources xiii input/output (I/O) features 2 © Lenovo 2005. Portions © IBM Corp. 2005.
... 12 security features 21 K keyboard connector 9 L locating components 11 M memory dual inline memory modules (DIMMs) 12 installing 12 system 12 microphone connector 9 modem commands Basic AT 33 Extended AT 35 Fax Class 1 37 Fax Class 2 37 MNP/V.42/V.... 2, 15 optical 4 removable media 4 specifications 16 E environment, operating 5 Ethernet connector 9 H hard disk drive security 25 I important safety information v information resources xiii input/output (I/O) features 2 © Lenovo 2005. Portions © IBM Corp. 2005.
User Manual
Page 60
R recovering from a POST/BIOS update failure 30 removing the cover 10 replacing the cover 24 S SATA connectors 12 security features 3, 21 hard disk drive 25 padlock 22 security profile by device 27 serial connector 9 setup utility 25 Setup Utility 25 system board connectors 12 identifying parts 11 location 12 memory 4, 12 system programs 29 U USB connectors 9 using passwords 25 security profile by device 27 Setup Utility program 25 V video, subsystem 2 44 User Guide
R recovering from a POST/BIOS update failure 30 removing the cover 10 replacing the cover 24 S SATA connectors 12 security features 3, 21 hard disk drive 25 padlock 22 security profile by device 27 serial connector 9 setup utility 25 Setup Utility 25 system board connectors 12 identifying parts 11 location 12 memory 4, 12 system programs 29 U USB connectors 9 using passwords 25 security profile by device 27 Setup Utility program 25 V video, subsystem 2 44 User Guide

User Manual
Page 5
... 1 commands 35 Fax Class 2 commands 35 Voice commands 36 Appendix D. Notices 41 Television output notice 42 Trademarks 42 Index 43 © Lenovo 2006. Portions © IBM Corp. 2005. Installing options 1 Features 1 Specifications 4 Supported operating positions 5 Available options 5 Handling static-sensitive... a password . . . 23 Resetting the hard disk drive and power-on the system board . . . . . 11 Installing memory 12 Installing a PCI adapter 14 Installing an optical drive 16 Security features 16 Integrated cable lock 17 Password protection 17 Changing the battery...
... 1 commands 35 Fax Class 2 commands 35 Voice commands 36 Appendix D. Notices 41 Television output notice 42 Trademarks 42 Index 43 © Lenovo 2006. Portions © IBM Corp. 2005. Installing options 1 Features 1 Specifications 4 Supported operating positions 5 Available options 5 Handling static-sensitive... a password . . . 23 Resetting the hard disk drive and power-on the system board . . . . . 11 Installing memory 12 Installing a PCI adapter 14 Installing an optical drive 16 Security features 16 Integrated cable lock 17 Password protection 17 Changing the battery...
User Manual
Page 17
...computer features and preinstalled software. See Chapter 2, "Using the Setup Utility program," on page v. Note: Use only parts provided by adding memory or adapters. Portions © IBM Corp. 2005. 1 These precautions and guidelines will help you install or remove any option, read "Important... with the instructions that are available for two double data rate 2 (DDR2) dual inline memory modules (DIMMs) Internal drives v Internal hard disk drive v Optical drive (some models) © Lenovo 2006. When installing an option, use the Setup Utility. Important Before you work safely. ...
...computer features and preinstalled software. See Chapter 2, "Using the Setup Utility program," on page v. Note: Use only parts provided by adding memory or adapters. Portions © IBM Corp. 2005. 1 These precautions and guidelines will help you install or remove any option, read "Important... with the instructions that are available for two double data rate 2 (DDR2) dual inline memory modules (DIMMs) Internal drives v Internal hard disk drive v Optical drive (some models) © Lenovo 2006. When installing an option, use the Setup Utility. Important Before you work safely. ...
User Manual
Page 21
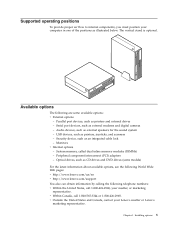
.... Monitors v Internal options - System memory, called dual inline memory modules (DIMMs) - Optical drives, such as printers, joysticks, and scanners - USB devices, such as CD drives and DVD drives (some available options: v External options - Supported operating positions To provide proper air flow to internal components, you must position your Lenovo reseller or Lenovo marketing representative.
.... Monitors v Internal options - System memory, called dual inline memory modules (DIMMs) - Optical drives, such as printers, joysticks, and scanners - USB devices, such as CD drives and DVD drives (some available options: v External options - Supported operating positions To provide proper air flow to internal components, you must position your Lenovo reseller or Lenovo marketing representative.
User Manual
Page 22
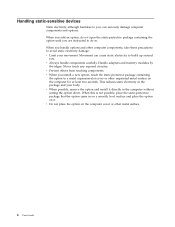
... it directly in the package and your movement. v Always handle components carefully. Never touch any exposed circuitry. v Prevent others from touching components. Handle adapters and memory modules by the edges. When you add an option, do so. v When possible, remove the option and install it . Movement can seriously damage computer components...
... it directly in the package and your movement. v Always handle components carefully. Never touch any exposed circuitry. v Prevent others from touching components. Handle adapters and memory modules by the edges. When you add an option, do so. v When possible, remove the option and install it . Movement can seriously damage computer components...
User Manual
Page 28
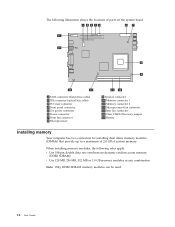
...bay cable) 3 PCI riser connector 4 Front panel connector 5 12v power connector 6 Power connector 7 Front fan connector 8 Microprocessor 9 Speaker connector 10 Memory connector 1 11 Memory connector 2 12 Microprocessor fan connector 13 Rear fan connector 14 Clear CMOS/Recovery jumper 15 Battery Installing... memory Your computer has two connectors for installing dual inline memory modules (DIMMs) that provide up to a maximum of 2.0 GB of system memory. The following rules apply: v Use 184-pin double data rate ...
...bay cable) 3 PCI riser connector 4 Front panel connector 5 12v power connector 6 Power connector 7 Front fan connector 8 Microprocessor 9 Speaker connector 10 Memory connector 1 11 Memory connector 2 12 Microprocessor fan connector 13 Rear fan connector 14 Clear CMOS/Recovery jumper 15 Battery Installing... memory Your computer has two connectors for installing dual inline memory modules (DIMMs) that provide up to a maximum of 2.0 GB of system memory. The following rules apply: v Use 184-pin double data rate ...


