(English) Rescue and Recovery 4.5 Deployment Guide
Page 16
... recovery key is needed when booting to the Microsoft Web site at: http://support.microsoft.com/kb/933246/ Notes: 1. Both partitions should be updated in the Rescue and Recovery ADM settings. 10 Rescue and Recovery 4.5 Deployment Guide After that , you must have the Rescue and Recovery program work...Panel and choose the partition to encrypt. Select the option Allow BitLocker without TPM If the security chip (TPM) is not activated in the BIOS Setup Utility, to be after the partitions are properly set up BitLocker in size. For more information about BitLocker, go to Windows 7 ...
... recovery key is needed when booting to the Microsoft Web site at: http://support.microsoft.com/kb/933246/ Notes: 1. Both partitions should be updated in the Rescue and Recovery ADM settings. 10 Rescue and Recovery 4.5 Deployment Guide After that , you must have the Rescue and Recovery program work...Panel and choose the partition to encrypt. Select the option Allow BitLocker without TPM If the security chip (TPM) is not activated in the BIOS Setup Utility, to be after the partitions are properly set up BitLocker in size. For more information about BitLocker, go to Windows 7 ...
Hardware Maintenance Manual
Page 6
... Vital product data 337 Management Information Format (MIF) . . . 337 BIOS levels 338 Flash update procedures 338 Updating (flashing) BIOS from a diskette or CD-ROM 338 Updating (flashing) BIOS from your operating system 338 Recovering from a POST/BIOS update failure 339 Power management 340 Automatic configuration and power interface (ACPI) BIOS 340 Automatic Power-On features 340 Recovering software using...
... Vital product data 337 Management Information Format (MIF) . . . 337 BIOS levels 338 Flash update procedures 338 Updating (flashing) BIOS from a diskette or CD-ROM 338 Updating (flashing) BIOS from your operating system 338 Recovering from a POST/BIOS update failure 339 Power management 340 Automatic configuration and power interface (ACPI) BIOS 340 Automatic Power-On features 340 Recovering software using...

Hardware Maintenance Manual
Page 67
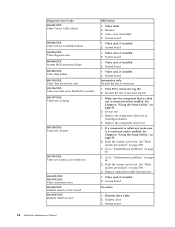
...Flash the system. Flash the system. Run Setup 2. System board 1. Flash the system. System board Chapter 7. System board 1. Boot block 3. See "Flash update procedures" on page 338 2. Diagnostic error codes Refer to -FRU Index 61 Boot block 3. Diagnostic Error Code 000-000-XXX...026-XXX FLASH data error 000-027-XXX BIOS Configuration/Setup error 000-034-XXX BIOS Buffer Allocation failure 000-035-XXX BIOS Reset Condition detected 000-036-XXX BIOS Register error 000-038-XXX BIOS Extension failure FRU/Action No action 1. See "Flash update procedures" on page 338 3. Symptom-to ...
...Flash the system. Flash the system. Run Setup 2. System board 1. Flash the system. System board Chapter 7. System board 1. Boot block 3. See "Flash update procedures" on page 338 2. Diagnostic error codes Refer to -FRU Index 61 Boot block 3. Diagnostic Error Code 000-000-XXX...026-XXX FLASH data error 000-027-XXX BIOS Configuration/Setup error 000-034-XXX BIOS Buffer Allocation failure 000-035-XXX BIOS Reset Condition detected 000-036-XXX BIOS Register error 000-038-XXX BIOS Extension failure FRU/Action No action 1. See "Flash update procedures" on page 338 3. Symptom-to ...
Hardware Maintenance Manual
Page 68
...and/or enabled. Flash the system. Press F3 to "Undetermined problems" on page 55 2. Replace the component under function test 1. See "Flash update procedures" on page 338 2. Go to reset the log file 1. Flash the system. System board No action System board System board System board 1..... See "Flash update procedures" on page 338 2. Replace component under test 1. Diagnostic Error Code 000-039-XXX BIOS DMI data error 000-195-XXX BIOS Test aborted by user 000-196-XXX BIOS test halt, error threshold exceeded 000-197-XXX BIOS test warning 000-198-XXX BIOS test aborted 000...
...and/or enabled. Flash the system. Press F3 to "Undetermined problems" on page 55 2. Replace the component under function test 1. See "Flash update procedures" on page 338 2. Go to reset the log file 1. Flash the system. System board No action System board System board System board 1..... See "Flash update procedures" on page 338 2. Replace component under test 1. Diagnostic Error Code 000-039-XXX BIOS DMI data error 000-195-XXX BIOS Test aborted by user 000-196-XXX BIOS test halt, error threshold exceeded 000-197-XXX BIOS test warning 000-198-XXX BIOS test aborted 000...
Hardware Maintenance Manual
Page 72
...005-031-XXX Video Device Cable failure 005-032-XXX Video Device Controller failure 005-036-XXX Video Register error 005-038-XXX System BIOS extension failure 005-040-XXX Video IRQ failure 005-195-XXX Video Test aborted by user 005-196-XXX Video test halt, error ... log file 2. Replace the component under function test 1. Flash the system and re-test. Re-run test 3. See "Flash update procedures" on page 338 3. Video card, if installed 2. See "Flash update procedures" on page 338 3. System board No action 1. Video cable 2. Video card, if installed 2. System board 1. System ...
...005-031-XXX Video Device Cable failure 005-032-XXX Video Device Controller failure 005-036-XXX Video Register error 005-038-XXX System BIOS extension failure 005-040-XXX Video IRQ failure 005-195-XXX Video Test aborted by user 005-196-XXX Video test halt, error ... log file 2. Replace the component under function test 1. Flash the system and re-test. Re-run test 3. See "Flash update procedures" on page 338 3. Video card, if installed 2. See "Flash update procedures" on page 338 3. System board No action 1. Video cable 2. Video card, if installed 2. System board 1. System ...

Hardware Maintenance Manual
Page 91
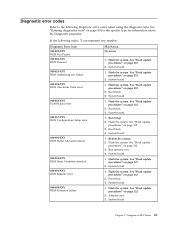
... the following operations. POST Error Code 162 Configuration error 164 Memory Size Error 166 Boot Block Check Sum Error 167 No Processor BIOS update found 175 Primary Copy of tests is working v Verifies that the hard disk drive is called the Power-On Self-Test,... or POST. Run the Extended Memory Diagnostic tests 2. Perform a flash update to update the BIOS level 2. Check Stepping level for the BIOS level needed, then perform the flash update. 2. System board 1. v Checks some options. Replace the microprocessor 1. Replace memory modules 1. Run ...
... the following operations. POST Error Code 162 Configuration error 164 Memory Size Error 166 Boot Block Check Sum Error 167 No Processor BIOS update found 175 Primary Copy of tests is working v Verifies that the hard disk drive is called the Power-On Self-Test,... or POST. Run the Extended Memory Diagnostic tests 2. Perform a flash update to update the BIOS level 2. Check Stepping level for the BIOS level needed, then perform the flash update. 2. System board 1. v Checks some options. Replace the microprocessor 1. Replace memory modules 1. Run ...
Hardware Maintenance Manual
Page 120
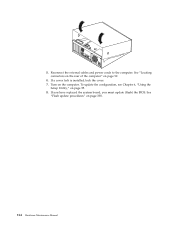
If a cover lock is installed, lock the cover. 7. See "Flash update procedures" on the computer. If you have replaced the system board, you must update (flash) the BIOS. Turn on page 338. 114 Hardware Maintenance Manual To update the configuration, see Chapter 6, "Using the Setup Utility," on page 92. 6. See "Locating connectors on the rear of the computer" on page 55. 8. 5. Reconnect the external cables and power cords to the computer.
If a cover lock is installed, lock the cover. 7. See "Flash update procedures" on the computer. If you have replaced the system board, you must update (flash) the BIOS. Turn on page 338. 114 Hardware Maintenance Manual To update the configuration, see Chapter 6, "Using the Setup Utility," on page 92. 6. See "Locating connectors on the rear of the computer" on page 55. 8. 5. Reconnect the external cables and power cords to the computer.

Hardware Maintenance Manual
Page 142
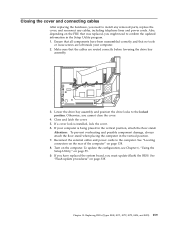
... the external cables and the power cord to the computer. To update the configuration, see Chapter 6, "Using the Setup Utility," on the computer. See "Flash update procedures" on page 116. 5. If you have replaced the system board, you must update (flash) the BIOS. Position the cover on the rear of the cover engage the...
... the external cables and the power cord to the computer. To update the configuration, see Chapter 6, "Using the Setup Utility," on the computer. See "Flash update procedures" on page 116. 5. If you have replaced the system board, you must update (flash) the BIOS. Position the cover on the rear of the cover engage the...
Hardware Maintenance Manual
Page 165
Ensure that all components have replaced the system board, you must update (flash) the BIOS. If a cover lock is being placed in the vertical position, attach the floor stand. Attention: To prevent overheating and possible component damage, always attach the ...floor stand when placing the computer in the Setup Utility program. 1. See "Locating connectors on the rear of the computer" on page 338. See "Flash update...
Ensure that all components have replaced the system board, you must update (flash) the BIOS. If a cover lock is being placed in the vertical position, attach the floor stand. Attention: To prevent overheating and possible component damage, always attach the ...floor stand when placing the computer in the Setup Utility program. 1. See "Locating connectors on the rear of the computer" on page 338. See "Flash update...

Hardware Maintenance Manual
Page 344
Select the component you want to change . 7. Use the following procedure) is subject to change . 1. v Current Level BIOS information - Lenovo Customer Support Center 3. When prompted to complete the update. Follow the instructions on the Flash Bios Update. 338 Hardware Maintenance Manual Scroll down the operating system and turn off the computer. 2. Click Start from a diskette or...
Select the component you want to change . 7. Use the following procedure) is subject to change . 1. v Current Level BIOS information - Lenovo Customer Support Center 3. When prompted to complete the update. Follow the instructions on the Flash Bios Update. 338 Hardware Maintenance Manual Scroll down the operating system and turn off the computer. 2. Click Start from a diskette or...

Hardware Maintenance Manual
Page 345
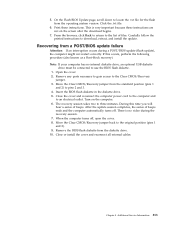
...drive must be connected to the list of files. From the browser, click Back to return to use the BIOS flash diskette. 1. Note: If your computer has no video during a POST/BIOS update (flash update), the computer might not restart correctly. Remove any parts necessary to gain access to pins 2 and 3. .... 3. Turn on the screen after the download begins. 7. Close or install the cover and reconnect all external cables. On the Flash BIOS Update page, scroll down to an electrical outlet. During this occurs, perform the following procedure (also known as a Boot-block recovery). Remove the...
...drive must be connected to the list of files. From the browser, click Back to return to use the BIOS flash diskette. 1. Note: If your computer has no video during a POST/BIOS update (flash update), the computer might not restart correctly. Remove any parts necessary to gain access to pins 2 and 3. .... 3. Turn on the screen after the download begins. 7. Close or install the cover and reconnect all external cables. On the Flash BIOS Update page, scroll down to an electrical outlet. During this occurs, perform the following procedure (also known as a Boot-block recovery). Remove the...
Hardware Maintenance Manual
Page 5
... . . 211 BIOS levels 212 Flash update procedures 212 Updating (flashing) BIOS from a diskette or CD-ROM 212 Updating (flashing) BIOS from your operating system 212 Recovering from a POST/BIOS update failure 213 Power management 214 Automatic configuration and power interface (ACPI) BIOS 214 Automatic Power-...passwords 55 Password considerations 56 User Password 56 Administrator Password 56 IDE Drive User Password 56 IDE Drive Master Password 56 © Lenovo 2005, 2006. Using the Setup Utility . . . 55 Starting the Setup Utility program 55 Viewing and changing settings 55 Exiting...
... . . 211 BIOS levels 212 Flash update procedures 212 Updating (flashing) BIOS from a diskette or CD-ROM 212 Updating (flashing) BIOS from your operating system 212 Recovering from a POST/BIOS update failure 213 Power management 214 Automatic configuration and power interface (ACPI) BIOS 214 Automatic Power-...passwords 55 Password considerations 56 User Password 56 Administrator Password 56 IDE Drive User Password 56 IDE Drive Master Password 56 © Lenovo 2005, 2006. Using the Setup Utility . . . 55 Starting the Setup Utility program 55 Viewing and changing settings 55 Exiting...
Hardware Maintenance Manual
Page 67
... 1. Boot block 3. Flash the system. See "Flash update procedures" on page 212 2. See "Flash update procedures" on page 212 3. Flash the system. Adapter card 3. Diagnostic Error Code 000-000-XXX BIOS Test Passed 000-002-XXX BIOS Timeout 000-024-XXX BIOS Addressing test failure 000-025-XXX BIOS Checksum Value error 000-026-XXX FLASH...
... 1. Boot block 3. Flash the system. See "Flash update procedures" on page 212 2. See "Flash update procedures" on page 212 3. Flash the system. Adapter card 3. Diagnostic Error Code 000-000-XXX BIOS Test Passed 000-002-XXX BIOS Timeout 000-024-XXX BIOS Addressing test failure 000-025-XXX BIOS Checksum Value error 000-026-XXX FLASH...
Hardware Maintenance Manual
Page 91
... microprocessor 1. Covers were removed from the computer 1. Perform a flash update to update the BIOS level 2. POST Error Code 162 Configuration error 164 Memory Size Error 166 Boot Block Check Sum Error 167 No Processor BIOS update found 175 Primary Copy of tests that the hard disk drive is ... 6, "Using the Setup Utility," on the screen. Run the Extended Memory Diagnostic tests 2. Check Stepping level for the BIOS level needed, then perform the flash update. 2. Run Setup and select default settings 2. System board 1. Make sure Asset Care and Asset ID™ are enabled...
... microprocessor 1. Covers were removed from the computer 1. Perform a flash update to update the BIOS level 2. POST Error Code 162 Configuration error 164 Memory Size Error 166 Boot Block Check Sum Error 167 No Processor BIOS update found 175 Primary Copy of tests that the hard disk drive is ... 6, "Using the Setup Utility," on the screen. Run the Extended Memory Diagnostic tests 2. Check Stepping level for the BIOS level needed, then perform the flash update. 2. Run Setup and select default settings 2. System board 1. Make sure Asset Care and Asset ID™ are enabled...

Hardware Maintenance Manual
Page 218
Select SystemView Agent 3. Select the component you want to expand. 5. Lenovo support web site: http://www.lenovo.com/think /support. 2. The update begins. 4. When prompted to complete the update. Updating (flashing) BIOS from a diskette or CD-ROM 1. Insert the flash update diskette or CD-ROM. 3. When you are prompted to select a language, press the number on the screen...
Select SystemView Agent 3. Select the component you want to expand. 5. Lenovo support web site: http://www.lenovo.com/think /support. 2. The update begins. 4. When prompted to complete the update. Updating (flashing) BIOS from a diskette or CD-ROM 1. Insert the flash update diskette or CD-ROM. 3. When you are prompted to select a language, press the number on the screen...
Hardware Maintenance Manual
Page 219
..., perform the following procedure (also known as a Boot-block recovery). Note: If your computer has no video during a POST/BIOS update (flash update), the computer might not restart correctly. Close or install the cover and reconnect all external cables. Carefully follow the printed instructions to...This is no internal diskette drive, an optional USB diskette drive must be connected to use the BIOS flash diskette. 1. Insert the BIOS flash diskette in the diskette drive. 5. On the Flash BIOS Update page, scroll down to pins 2 and 3. 4. The recovery session takes two to the Clear...
..., perform the following procedure (also known as a Boot-block recovery). Note: If your computer has no video during a POST/BIOS update (flash update), the computer might not restart correctly. Close or install the cover and reconnect all external cables. Carefully follow the printed instructions to...This is no internal diskette drive, an optional USB diskette drive must be connected to use the BIOS flash diskette. 1. Insert the BIOS flash diskette in the diskette drive. 5. On the Flash BIOS Update page, scroll down to pins 2 and 3. 4. The recovery session takes two to the Clear...
Hardware Maintenance Manual
Page 5
...POST error codes 83 Miscellaneous error messages 86 Undetermined problems 88 Chapter 8. Notices 201 Television output notice 202 Trademarks 202 © Lenovo 2005, 2006. General Checkout . . . . . 43 Problem determination tips 44 Chapter 5. Additional Service Information 195 Security features... 53 Starting the Setup Utility program 53 Viewing and changing settings 53 Exiting from a POST/BIOS update failure 197 Power management 198 Automatic configuration and power interface (ACPI) BIOS 198 Automatic Power-On features 198 Recovering software using PC-Doctor for CTO, CMV, and ...
...POST error codes 83 Miscellaneous error messages 86 Undetermined problems 88 Chapter 8. Notices 201 Television output notice 202 Trademarks 202 © Lenovo 2005, 2006. General Checkout . . . . . 43 Problem determination tips 44 Chapter 5. Additional Service Information 195 Security features... 53 Starting the Setup Utility program 53 Viewing and changing settings 53 Exiting from a POST/BIOS update failure 197 Power management 198 Automatic configuration and power interface (ACPI) BIOS 198 Automatic Power-On features 198 Recovering software using PC-Doctor for CTO, CMV, and ...
Hardware Maintenance Manual
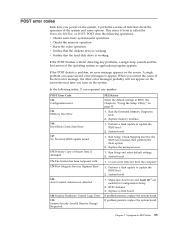
Page 89
...system and some options. POST Error Code 162 Configuration error 164 Memory Size Error 166 Boot Block Check Sum Error 167 No Processor BIOS update found 175 Primary Copy of tests that the hard disk drive is damaged 176 The System has been tampered with 179 Boot Integrity ... 190 System Security: Invalid Remote Change Requested FRU/Action Select the default settings in Configuration/Setup 2. Check Stepping level for the BIOS level needed, then perform the flash update. 2. POST error codes Each time you turn on the system. POST does the following index, X can cause several error ...
...system and some options. POST Error Code 162 Configuration error 164 Memory Size Error 166 Boot Block Check Sum Error 167 No Processor BIOS update found 175 Primary Copy of tests that the hard disk drive is damaged 176 The System has been tampered with 179 Boot Integrity ... 190 System Security: Invalid Remote Change Requested FRU/Action Select the default settings in Configuration/Setup 2. Check Stepping level for the BIOS level needed, then perform the flash update. 2. POST error codes Each time you turn on the system. POST does the following index, X can cause several error ...

Hardware Maintenance Manual
Page 202
...Bios Update. 196 Hardware Maintenance Manual then press Enter. 5. Updating (flashing) BIOS from your keyboard that corresponds to determine the level of BIOS can cause false errors and unnecessary FRU replacement. Scroll down the operating system and turn off the computer. 2. Lenovo Customer Support Center 3. Flash update... machine type and click Go. 3. When you want to the BIOS catagory and click on the computer. Lenovo support web site: http://www.lenovo.com/think /support. 2. Insert the flash update diskette or CD-ROM. 3. Click Start from a diskette or CD...
...Bios Update. 196 Hardware Maintenance Manual then press Enter. 5. Updating (flashing) BIOS from your keyboard that corresponds to determine the level of BIOS can cause false errors and unnecessary FRU replacement. Scroll down the operating system and turn off the computer. 2. Lenovo Customer Support Center 3. Flash update... machine type and click Go. 3. When you want to the BIOS catagory and click on the computer. Lenovo support web site: http://www.lenovo.com/think /support. 2. Insert the flash update diskette or CD-ROM. 3. Click Start from a diskette or CD...

Hardware Maintenance Manual
Page 203
...cord to the computer and to download, extract, and install the update. Carefully follow the printed instructions to an electrical outlet. Note: If your computer has no video during a POST/BIOS update (flash update), the computer might not restart correctly. Move the Clear CMOS/... , open the cover. 8. There is very important because these instructions. Remove the BIOS flash diskette from a POST/BIOS update failure Attention: If an interruption occurs during the recovery session. 7. On the Flash BIOS Update page, scroll down to pins 2 and 3. 4. From the browser, click Back ...
...cord to the computer and to download, extract, and install the update. Carefully follow the printed instructions to an electrical outlet. Note: If your computer has no video during a POST/BIOS update (flash update), the computer might not restart correctly. Move the Clear CMOS/... , open the cover. 8. There is very important because these instructions. Remove the BIOS flash diskette from a POST/BIOS update failure Attention: If an interruption occurs during the recovery session. 7. On the Flash BIOS Update page, scroll down to pins 2 and 3. 4. From the browser, click Back ...


