

Hardware Maintenance Manual
Page 5
... (clearing CMOS 146 Vital product data 146 Management Information Format (MIF) . . . 147 BIOS levels 147 Flash update procedures 148 Updating (flashing) BIOS from a diskette . . . 148 Updating (flashing) BIOS from your operating system 148 Recovering from the IBM Setup Utility program . . . 19 Using... program . . . . . 19 Viewing and changing settings 19 Exiting from a POST/BIOS update failure 148 Power management 150 Automatic configuration and power interface (ACPI) BIOS 150 iii Contents Chapter 1. IBM Enhanced Diagnostics 13 Diagnostics program download 13 Running IBM Enhanced ...
... (clearing CMOS 146 Vital product data 146 Management Information Format (MIF) . . . 147 BIOS levels 147 Flash update procedures 148 Updating (flashing) BIOS from a diskette . . . 148 Updating (flashing) BIOS from your operating system 148 Recovering from the IBM Setup Utility program . . . 19 Using... program . . . . . 19 Viewing and changing settings 19 Exiting from a POST/BIOS update failure 148 Power management 150 Automatic configuration and power interface (ACPI) BIOS 150 iii Contents Chapter 1. IBM Enhanced Diagnostics 13 Diagnostics program download 13 Running IBM Enhanced ...

Hardware Maintenance Manual
Page 12
... 6 Hardware Maintenance Manual Video subsystem An integrated Intel Extreme Graphics 2 controller for an internal PCI modem) v Remote Administration v Automatic power-on startup v System Management (SM) BIOS and SM software v Ability to store POST hardware test results Input/output features v 25-pin, Extended Capabilities Port (ECP)/Extended Parallel Port (EPP) v Two 9-pin...
... 6 Hardware Maintenance Manual Video subsystem An integrated Intel Extreme Graphics 2 controller for an internal PCI modem) v Remote Administration v Automatic power-on startup v System Management (SM) BIOS and SM software v Ability to store POST hardware test results Input/output features v 25-pin, Extended Capabilities Port (ECP)/Extended Parallel Port (EPP) v Two 9-pin...

Hardware Maintenance Manual
Page 17
...and unnecessary replacement of the system board. Power-on all external devices. 2. Attention The drives in the IBM Setup Utility program (see "BIOS levels" on the system. Be extremely careful during write operations such as copying, saving or formatting. Data or programs can be defective....count and checkpoint code display when a successful POST occurs, do the following response: © Copyright IBM Corp. 2005 11 A down-level BIOS might have been rearranged or the drive startup sequence changed. v If an installed device is displayed, go to Chapter 7, "Symptom-to "...
...and unnecessary replacement of the system board. Power-on all external devices. 2. Attention The drives in the IBM Setup Utility program (see "BIOS levels" on the system. Be extremely careful during write operations such as copying, saving or formatting. Data or programs can be defective....count and checkpoint code display when a successful POST occurs, do the following response: © Copyright IBM Corp. 2005 11 A down-level BIOS might have been rearranged or the drive startup sequence changed. v If an installed device is displayed, go to Chapter 7, "Symptom-to "...

Hardware Maintenance Manual
Page 18
... an error, replace the part that the diagnostic program calls out or go to "Diagnostic error codes" on page 49. Select APM. 4. Be sure APM BIOS Mode is not, press Left Arrow (←) or Right Arrow (→) to Disabled. v Readable instructions or the Main Menu. If it is set to change...
... an error, replace the part that the diagnostic program calls out or go to "Diagnostic error codes" on page 49. Select APM. 4. Be sure APM BIOS Mode is not, press Left Arrow (←) or Right Arrow (→) to Disabled. v Readable instructions or the Main Menu. If it is set to change...

Hardware Maintenance Manual
Page 33
... any PCI adapters are installed, remove the PCI riser and adapter cards. Chapter 6. Rotate the drives upward as memory, the battery, and the Clear CMOS/BIOS recovery jumper, you disconnect from the riser card. If any cable connectors and the routing of the cables before you might need to different or...
... any PCI adapters are installed, remove the PCI riser and adapter cards. Chapter 6. Rotate the drives upward as memory, the battery, and the Clear CMOS/BIOS recovery jumper, you disconnect from the riser card. If any cable connectors and the routing of the cables before you might need to different or...

Hardware Maintenance Manual
Page 34
... panel connector disk drive connectors (2) 4 PCI riser connector 11 Power connector 5 Battery 12 PATA Primary IDE connector (hard disk drive and optical drive) 6 Clear CMOS/BIOS recovery 13 Power connector jumper 7 Speaker connector 14 Microprocessor 15 CD audio connector 28 Hardware Maintenance Manual It provides basic computer functions and supports a variety...
... panel connector disk drive connectors (2) 4 PCI riser connector 11 Power connector 5 Battery 12 PATA Primary IDE connector (hard disk drive and optical drive) 6 Clear CMOS/BIOS recovery 13 Power connector jumper 7 Speaker connector 14 Microprocessor 15 CD audio connector 28 Hardware Maintenance Manual It provides basic computer functions and supports a variety...

Hardware Maintenance Manual
Page 52
..." on the FRU that is installed, you have been reassembled correctly and that all components have replaced the system board, you must update (flash) the BIOS. Reconnect the external cables and power cords to the computer: 1. To update the configuration, see "Starting the IBM Setup Utility program" on page 148. 9. If...
..." on the FRU that is installed, you have been reassembled correctly and that all components have replaced the system board, you must update (flash) the BIOS. Reconnect the external cables and power cords to the computer: 1. To update the configuration, see "Starting the IBM Setup Utility program" on page 148. 9. If...

Hardware Maintenance Manual
Page 55
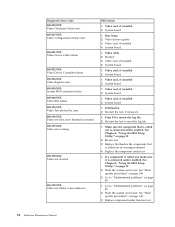
... procedures" on page 148 2. Boot block 4. See "Flash update procedures" on page 148 3. Diagnostic Error Code 000-000-XXX BIOS Test Passed 000-002-XXX BIOS Timeout 000-024-XXX BIOS Addressing test failure 000-025-XXX BIOS Checksum Value error 000-026-XXX FLASH data error 000-027-XXX... BIOS Configuration/Setup error 000-034-XXX BIOS Buffer Allocation failure 000-035-XXX BIOS Reset Condition detected 000-036-XXX BIOS Register error 000-038-XXX BIOS Extension failure FRU/Action 1. Flash the system. Flash the system. Run memory...
... procedures" on page 148 2. Boot block 4. See "Flash update procedures" on page 148 3. Diagnostic Error Code 000-000-XXX BIOS Test Passed 000-002-XXX BIOS Timeout 000-024-XXX BIOS Addressing test failure 000-025-XXX BIOS Checksum Value error 000-026-XXX FLASH data error 000-027-XXX... BIOS Configuration/Setup error 000-034-XXX BIOS Buffer Allocation failure 000-035-XXX BIOS Reset Condition detected 000-036-XXX BIOS Register error 000-038-XXX BIOS Extension failure FRU/Action 1. Flash the system. Flash the system. Run memory...

Hardware Maintenance Manual
Page 56
... Code 000-039-XXX BIOS DMI data error 000-195-XXX BIOS Test aborted by user 000-196-XXX BIOS test halt, error threshold exceeded 000-197-XXX BIOS test warning 000-198-XXX BIOS test aborted 000-199-XXX BIOS test failed, cause unknown 000-250-XXX BIOS APM failure 000-270-XXX BIOS ACPI failure 001...
... Code 000-039-XXX BIOS DMI data error 000-195-XXX BIOS Test aborted by user 000-196-XXX BIOS test halt, error threshold exceeded 000-197-XXX BIOS test warning 000-198-XXX BIOS test aborted 000-199-XXX BIOS test failed, cause unknown 000-250-XXX BIOS APM failure 000-270-XXX BIOS ACPI failure 001...
Hardware Maintenance Manual
Page 60
... error 005-031-XXX Video Device Cable failure 005-032-XXX Video Device Controller failure 005-036-XXX Video Register error 005-038-XXX System BIOS extension failure 005-040-XXX Video IRQ failure 005-195-XXX Video Test aborted by user 005-196-XXX Video test halt, error threshold exceeded...
... error 005-031-XXX Video Device Cable failure 005-032-XXX Video Device Controller failure 005-036-XXX Video Register error 005-038-XXX System BIOS extension failure 005-040-XXX Video IRQ failure 005-195-XXX Video Test aborted by user 005-196-XXX Video test halt, error threshold exceeded...

Hardware Maintenance Manual
Page 76
... 2. System Board 1. System Board 1. Keyboard 1. Battery 2. System Board 1. System Board 1. See the following table to diagnose beep symptoms. Beep Symptom 1-1-3 CMOS read-write error 1-2-2-3 ROM BIOS check error 1-2-1 Programmable Interval Timer failed 1-2-2 DMA Initialization failed 1-2-3 DMA page register write/read failed 1-2-4 RAM refresh verification failed 1-3-3-1 1st 64K RAM test failed 1-3-2 1st...
... 2. System Board 1. System Board 1. Keyboard 1. Battery 2. System Board 1. System Board 1. See the following table to diagnose beep symptoms. Beep Symptom 1-1-3 CMOS read-write error 1-2-2-3 ROM BIOS check error 1-2-1 Programmable Interval Timer failed 1-2-2 DMA Initialization failed 1-2-3 DMA page register write/read failed 1-2-4 RAM refresh verification failed 1-3-3-1 1st 64K RAM test failed 1-3-2 1st...

Hardware Maintenance Manual
Page 80
...memory size change. (See "Starting the IBM Setup Utility program" on page 19.) 2. Processor 1. C2 Security 1. Covers were removed from a POST/BIOS update failure" on page 31)System Board 5. CMOS Backup Battery (see "Replacing the battery" on page 148. 2. If not, suspect that Ethernet...177 Corrupted Administrator Password 74 Hardware Maintenance Manual FRU/Action 1. CMOS Backup Battery (see that device. 3. Check System Summary menu for the BIOS level needed, then perform the flash update. 2. Run Flash Recovery using Boot Block. See "Recovering from the computer 1. System Board 1. ...
...memory size change. (See "Starting the IBM Setup Utility program" on page 19.) 2. Processor 1. C2 Security 1. Covers were removed from a POST/BIOS update failure" on page 31)System Board 5. CMOS Backup Battery (see "Replacing the battery" on page 148. 2. If not, suspect that Ethernet...177 Corrupted Administrator Password 74 Hardware Maintenance Manual FRU/Action 1. CMOS Backup Battery (see that device. 3. Check System Summary menu for the BIOS level needed, then perform the flash update. 2. Run Flash Recovery using Boot Block. See "Recovering from the computer 1. System Board 1. ...
Hardware Maintenance Manual
Page 151
Chapter 9. Power-on password A power-on . Power-on page 28 to find the Virtual clear CMOS/BIOS recovery jumper. 3. Administrator password The administrator password is powered on password denies access to the computer by holding the power button for 10 seconds. 6. When a ...
Chapter 9. Power-on password A power-on . Power-on page 28 to find the Virtual clear CMOS/BIOS recovery jumper. 3. Administrator password The administrator password is powered on password denies access to the computer by holding the power button for 10 seconds. 6. When a ...

Hardware Maintenance Manual
Page 152
Locate the Clear CMOS/BIOS recovery jumper on page 46. 7. Install the PCI riser and adapters if removed. 5. See "Closing the cover and connecting the cables" on the system board. ... computer has a unique Vital Product Data (VPD) code stored in the Setup Configuration. The computer is unusable until the password is disabled. Move the CMOS/BIOS recovery jumper back to the maintenance or configure position (pins 2 and 3). 4. To erase a forgotten password: 1. Move the jumper from the standard position (pins 1 and 2) to...
Locate the Clear CMOS/BIOS recovery jumper on page 46. 7. Install the PCI riser and adapters if removed. 5. See "Closing the cover and connecting the cables" on the system board. ... computer has a unique Vital Product Data (VPD) code stored in the Setup Configuration. The computer is unusable until the password is disabled. Move the CMOS/BIOS recovery jumper back to the maintenance or configure position (pins 2 and 3). 4. To erase a forgotten password: 1. Move the jumper from the standard position (pins 1 and 2) to...

Hardware Maintenance Manual
Page 153
... the following procedure. 1. v Sources for obtaining the latest level BIOS available 1. Levels 1 and 2 Support 4. ® RETAIN v Sources for determining the latest level BIOS available 1. Levels 1 and 2 Support To update (flash) the BIOS, see "Flash update procedures" on the component you want to ... 5. Retain-a-Group acts as a focal point to obtain the latest level of BIOS. IBM Support Center 3. Some customers may request their servicers to determine the level of BIOS installed. It is a central data warehouse offering serial number data management. Select ...
... the following procedure. 1. v Sources for obtaining the latest level BIOS available 1. Levels 1 and 2 Support 4. ® RETAIN v Sources for determining the latest level BIOS available 1. Levels 1 and 2 Support To update (flash) the BIOS, see "Flash update procedures" on the component you want to ... 5. Retain-a-Group acts as a focal point to obtain the latest level of BIOS. IBM Support Center 3. Some customers may request their servicers to determine the level of BIOS installed. It is a central data warehouse offering serial number data management. Select ...

Hardware Maintenance Manual
Page 154
... computer and the monitor. 9. Under Download files - Locate the Clear CMOS/Recovery jumper on the World Wide Web. 2. Updating (flashing) BIOS from a diskette 1. Print these instructions. Unplug all power cords from the operating system. See Replacing the cover and connecting the cables in... page content (including the links referenced in the following procedure (also known as printers, monitors, and external drives. 2. Insert the POST/BIOS update (flash) diskette into the diskette drive (drive A) in the address field and press Enter. 2. In Downloadable file by date, click...
... computer and the monitor. 9. Under Download files - Locate the Clear CMOS/Recovery jumper on the World Wide Web. 2. Updating (flashing) BIOS from a diskette 1. Print these instructions. Unplug all power cords from the operating system. See Replacing the cover and connecting the cables in... page content (including the links referenced in the following procedure (also known as printers, monitors, and external drives. 2. Insert the POST/BIOS update (flash) diskette into the diskette drive (drive A) in the address field and press Enter. 2. In Downloadable file by date, click...
Hardware Maintenance Manual
Page 155
Remove any adapters that impede access to restart the operating system. Close the cover and reconnect any adapters that were disconnected. 16. 10. Turn on page 25. 12. Unplug the power cords from electrical outlets. 11. Replace the Clear CMOS/Recovery jumper to its original position. 14. Chapter 9. Open the cover. Replace any cables that were removed. 15. See "Opening the cover" on the computer to the BIOS Configuration jumper. 13. Additional Service Information 149
Remove any adapters that impede access to restart the operating system. Close the cover and reconnect any adapters that were disconnected. 16. 10. Turn on page 25. 12. Unplug the power cords from electrical outlets. 11. Replace the Clear CMOS/Recovery jumper to its original position. 14. Chapter 9. Open the cover. Replace any cables that were removed. 15. See "Opening the cover" on the computer to the BIOS Configuration jumper. 13. Additional Service Information 149

Hardware Maintenance Manual
Page 156
...computer such as a monitor, does not have to see "Starting the IBM Setup Utility program" on . - Not all operating systems support ACPI BIOS mode. Select Off for the system to shut down. Screen image is restored after a few seconds when any activity is blank, but can ...to control the power management features of time. Automatic configuration and power interface (ACPI) BIOS Being an ACPI BIOS system, the operating system is off. Select On for Advanced Power Management (APM) BIOS mode are ignored. Start the Configuration/Setup Utility program (see if it can be viewed...
...computer such as a monitor, does not have to see "Starting the IBM Setup Utility program" on . - Not all operating systems support ACPI BIOS mode. Select Off for the system to shut down. Screen image is restored after a few seconds when any activity is blank, but can ...to control the power management features of time. Automatic configuration and power interface (ACPI) BIOS Being an ACPI BIOS system, the operating system is off. Select On for Advanced Power Management (APM) BIOS mode are ignored. Start the Configuration/Setup Utility program (see if it can be viewed...

Hardware Maintenance Manual
Page 157
... not, press Left Arrow (←) or Right Arrow (→) to serial port (COM1), the computer will be either a single event or a daily event. 3. Select APM BIOS Mode within the Power Management menu allow PCI cards that support this feature set to Enabled or Disabled. Select values for the three categories of...
... not, press Left Arrow (←) or Right Arrow (→) to serial port (COM1), the computer will be either a single event or a daily event. 3. Select APM BIOS Mode within the Power Management menu allow PCI cards that support this feature set to Enabled or Disabled. Select values for the three categories of...
Hardware Maintenance Manual
Page 193
... used instead of the IBM product, program, or service. Type and version level v Hardware configuration - Are the exact machine type and models 2. BIOS level v Operating system software - Have the same BIOS level 3. Have the same Reference/Diagnostics Diskette (version) 7. Related service information 187 What, when, where, single, or multiple systems? - Have the...
... used instead of the IBM product, program, or service. Type and version level v Hardware configuration - Are the exact machine type and models 2. BIOS level v Operating system software - Have the same BIOS level 3. Have the same Reference/Diagnostics Diskette (version) 7. Related service information 187 What, when, where, single, or multiple systems? - Have the...


