User Guide
Page 5
... on the system board . . . . . 10 Chapter 2. Notices 65 Television output notice 66 Trademarks 66 Index 67 © Copyright Lenovo 2009 iii Product overview 1 Features 1 Specifications 4 Software overview 5 Software provided with your Windows operating system 5 Locations 6 Locating connectors on ... . . 11 Installing external options 12 Opening the computer cover 12 Accessing the system board components and drives 14 Installing or replacing a memory module . . . 14 Installing or replacing an adapter card . . . . 16 Installing internal drives 18 Replacing the hard disk ...
... on the system board . . . . . 10 Chapter 2. Notices 65 Television output notice 66 Trademarks 66 Index 67 © Copyright Lenovo 2009 iii Product overview 1 Features 1 Specifications 4 Software overview 5 Software provided with your Windows operating system 5 Locations 6 Locating connectors on ... . . 11 Installing external options 12 Opening the computer cover 12 Accessing the system board components and drives 14 Installing or replacing a memory module . . . 14 Installing or replacing an adapter card . . . . 16 Installing internal drives 18 Replacing the hard disk ...

User Guide
Page 9
...(SSD) (some models) Video subsystem v Integrated graphics for your computer by adding memory modules, drives, or adapter cards. See Chapter 4, "Using the Setup Utility," on the system board for system programs (varies by Lenovo. Microprocessor v Intel® Celeron® processor v Intel Core™ 2 Duo... processor v Intel Core 2 Quad processor v Intel Pentium® dual-core processor v Internal cache (size varies by model type) Memory v Supports up to read and ...
...(SSD) (some models) Video subsystem v Integrated graphics for your computer by adding memory modules, drives, or adapter cards. See Chapter 4, "Using the Setup Utility," on the system board for system programs (varies by Lenovo. Microprocessor v Intel® Celeron® processor v Intel Core™ 2 Duo... processor v Intel Core 2 Quad processor v Intel Pentium® dual-core processor v Internal cache (size varies by model type) Memory v Supports up to read and ...
User Guide
Page 17
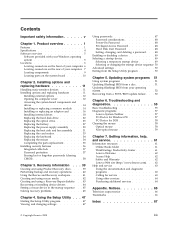
Locating components To open the computer cover, see "Opening the computer cover" on page 12. Product overview 9 Component locations 1 Hard disk drive (some models) 2 Microprocessor, heat sink and fan assembly 3 Internal speaker (some models) 4 Optical drive 5 Memory slots (4) 6 Power supply assembly Chapter 1. Figure 3 shows the location of the various components in your computer. Figure 3.
Locating components To open the computer cover, see "Opening the computer cover" on page 12. Product overview 9 Component locations 1 Hard disk drive (some models) 2 Microprocessor, heat sink and fan assembly 3 Internal speaker (some models) 4 Optical drive 5 Memory slots (4) 6 Power supply assembly Chapter 1. Figure 3 shows the location of the various components in your computer. Figure 3.

User Guide
Page 18
... speaker connector 5 Cover presence switch (also called Intrusion switch) connector 6 Microprocessor fan connector 7 Thermal sensor connector 8 Microprocessor 9 4-pin power connector 10 Front panel connector 11 Memory slots (4) 12 24-pin power connector 13 Serial (COM 2) connector 14 Front audio connector 15 SATA connectors (2) 16 System fan connector 17 Front USB connector...
... speaker connector 5 Cover presence switch (also called Intrusion switch) connector 6 Microprocessor fan connector 7 Thermal sensor connector 8 Microprocessor 9 4-pin power connector 10 Front panel connector 11 Memory slots (4) 12 24-pin power connector 13 Serial (COM 2) connector 14 Front audio connector 15 SATA connectors (2) 16 System fan connector 17 Front USB connector...
User Guide
Page 19
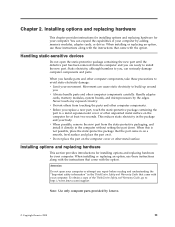
... options and replacing hardware for your movement. To obtain a copy of your computer by Lenovo. © Copyright Lenovo 2009 11 Movement can expand the capabilities of the ThinkCentre Safety and Warranty Guide, go to a metal expansion-slot cover or other computer components....Installing options and replacing hardware This chapter provides instructions for installing options and replacing hardware for your body. Handle adapter cards, memory modules, system boards, and microprocessors by the edges. Chapter 2. Never touch any repair before reading and understanding the "...
... options and replacing hardware for your movement. To obtain a copy of your computer by Lenovo. © Copyright Lenovo 2009 11 Movement can expand the capabilities of the ThinkCentre Safety and Warranty Guide, go to a metal expansion-slot cover or other computer components....Installing options and replacing hardware This chapter provides instructions for installing options and replacing hardware for your body. Handle adapter cards, memory modules, system boards, and microprocessors by the edges. Chapter 2. Never touch any repair before reading and understanding the "...
User Guide
Page 22
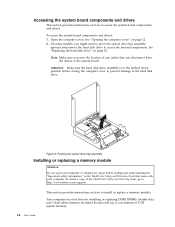
...: 1. Open the computer cover. Your computer has four slots for installing or replacing DDR3 DIMMs (double data rate 3 dual inline memory modules) that came with your computer. Accessing the system board components and drives This section provides instructions on how to access the internal...down position before reading and understanding the "Important safety information" in the ThinkCentre Safety and Warranty Guide that provide up to a maximum of the ThinkCentre Safety and Warranty Guide, go to: http://www.lenovo.com/support 14 User Guide This section provides instructions on how to ...
...: 1. Open the computer cover. Your computer has four slots for installing or replacing DDR3 DIMMs (double data rate 3 dual inline memory modules) that came with your computer. Accessing the system board components and drives This section provides instructions on how to access the internal...down position before reading and understanding the "Important safety information" in the ThinkCentre Safety and Warranty Guide that provide up to a maximum of the ThinkCentre Safety and Warranty Guide, go to: http://www.lenovo.com/support 14 User Guide This section provides instructions on how to ...
User Guide
Page 23
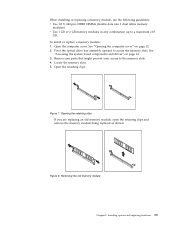
... 7. v Use 1 GB or 2 GB memory modules in any parts that might prevent your access to access the memory slots. Open the retaining clips. Removing the old memory module Chapter 2. Pivot the optical drive bay assembly upward to the memory slots. 4. See "Accessing the system board...cover" on page 14. 3. When installing or replacing a memory module, use the following guidelines: v Use 1.8 V, 240-pin, DDR3 DIMMs (double data rate 3 dual inline memory modules). To install or replace a memory module: 1. Locate the memory slots. 5. Opening the retaining clips If you are replacing ...
... 7. v Use 1 GB or 2 GB memory modules in any parts that might prevent your access to access the memory slots. Open the retaining clips. Removing the old memory module Chapter 2. Pivot the optical drive bay assembly upward to the memory slots. 4. See "Accessing the system board...cover" on page 14. 3. When installing or replacing a memory module, use the following guidelines: v Use 1.8 V, 240-pin, DDR3 DIMMs (double data rate 3 dual inline memory modules). To install or replace a memory module: 1. Locate the memory slots. 5. Opening the retaining clips If you are replacing ...

User Guide
Page 24
... straight down into the slot until the retaining clips close. Position the new memory module over the memory slot. Installing the memory module What to do next: v To work with another option, go to: http://www.lenovo.com/support This section provides instructions on how to install or replace an adapter card. Your ...or replacing an adapter card Attention Do not open your computer or attempt any repair before reading and understanding the "Important safety information" in the ThinkCentre Safety and Warranty Guide that the notch 1 on the memory module aligns correctly with your computer.
... straight down into the slot until the retaining clips close. Position the new memory module over the memory slot. Installing the memory module What to do next: v To work with another option, go to: http://www.lenovo.com/support This section provides instructions on how to install or replace an adapter card. Your ...or replacing an adapter card Attention Do not open your computer or attempt any repair before reading and understanding the "Important safety information" in the ThinkCentre Safety and Warranty Guide that the notch 1 on the memory module aligns correctly with your computer.

User Guide
Page 35
..., such as parallel-port assignments (configuration). To obtain a copy of the ThinkCentre Safety and Warranty Guide, go to the "Lithium battery notice" in the ThinkCentre Safety and Warranty Guide for built-in the ThinkCentre Safety and Warranty Guide that maintains the date, time, and settings for information...2. Install the new optical drive into the drive bay until it snaps into position. Figure 21. Go to the rear of memory that came with your computer. Installing options and replacing hardware 27 6. however, no charging or maintenance throughout its life; Refer to : ...
..., such as parallel-port assignments (configuration). To obtain a copy of the ThinkCentre Safety and Warranty Guide, go to the "Lithium battery notice" in the ThinkCentre Safety and Warranty Guide for built-in the ThinkCentre Safety and Warranty Guide that maintains the date, time, and settings for information...2. Install the new optical drive into the drive bay until it snaps into position. Figure 21. Go to the rear of memory that came with your computer. Installing options and replacing hardware 27 6. however, no charging or maintenance throughout its life; Refer to : ...
User Guide
Page 59
... 6. Note: You can download a self starting your computer using the POST/BIOS updates are available as flash memory). System BIOS program updates are available at http://www.lenovo.com. Insert the disc into your keyboard that corresponds to create a system-program-update (flash) disc or ...files. Your computer system board has a module called electrically erasable programmable read-only memory (EEPROM, also referred to select a language, press the number on the Lenovo Web site at : http://www.lenovo.com/support To update (flash) the BIOS from other layers of tests and procedures...
... 6. Note: You can download a self starting your computer using the POST/BIOS updates are available as flash memory). System BIOS program updates are available at http://www.lenovo.com. Insert the disc into your keyboard that corresponds to create a system-program-update (flash) disc or ...files. Your computer system board has a module called electrically erasable programmable read-only memory (EEPROM, also referred to select a language, press the number on the Lenovo Web site at : http://www.lenovo.com/support To update (flash) the BIOS from other layers of tests and procedures...

User Guide
Page 76
... 14 security features 36 internal drives 1 K keyboard connector 8 keyboard, replacing 34 L Lenovo System Toolbox 57 Lenovo Web site 62 Lenovo Welcome 62 locating components 9 M media, creating and using rescue 42 memory module installing 14 system board 14 Microphone connector 8 mouse cleaning 58 non-optical 59 optical mouse 58 mouse connector 8 mouse, replacing 34 N non...
... 14 security features 36 internal drives 1 K keyboard connector 8 keyboard, replacing 34 L Lenovo System Toolbox 57 Lenovo Web site 62 Lenovo Welcome 62 locating components 9 M media, creating and using rescue 42 memory module installing 14 system board 14 Microphone connector 8 mouse cleaning 58 non-optical 59 optical mouse 58 mouse connector 8 mouse, replacing 34 N non...
User Guide
Page 77
static-sensitive devices, handling 11 system management 2 programs 51 system board components, accessing 14 connectors 10 locating parts 10 location 10 memory module 14 T television output notice 66 temporary startup device 49 ThinkVantage productivity center 61 trademarks 66 troubleshooting, basic 55 troubleshooting, diagnostics 55 U updating (flashing) BIOS ... using 43 rescue media, creating and 42 Setup Utility 47 V VGA monitor connector 8 video subsystem 1 viewing and changing settings 47 W warranty information 62 Web site, Lenovo 62 workspace, backup and recovery 41 Index 69
static-sensitive devices, handling 11 system management 2 programs 51 system board components, accessing 14 connectors 10 locating parts 10 location 10 memory module 14 T television output notice 66 temporary startup device 49 ThinkVantage productivity center 61 trademarks 66 troubleshooting, basic 55 troubleshooting, diagnostics 55 U updating (flashing) BIOS ... using 43 rescue media, creating and 42 Setup Utility 47 V VGA monitor connector 8 video subsystem 1 viewing and changing settings 47 W warranty information 62 Web site, Lenovo 62 workspace, backup and recovery 41 Index 69


