Lenovo IdeaPad Z565 Battery
View Results Below
Free Lenovo IdeaPad Z565 manuals!
Problems with Lenovo IdeaPad Z565?
Ask a Question
Free Lenovo IdeaPad Z565 manuals!
Problems with Lenovo IdeaPad Z565?
Ask a Question
Related Manual Pages


Related Videos

Lenovo Ideapad Z565 Battery Replacement Guide Install or Replace Z560 Z570 Z575 G565 G570 G575
Duration: 1:39
Total Views: 9,157
Duration: 1:39
Total Views: 9,157
Similar Questions

Battery Gone Out Of Charge
Battery totally gone out of chrge and put on charging for hours but power did not come back? why p...
Battery totally gone out of chrge and put on charging for hours but power did not come back? why p...
(Posted by prem64 11 years ago)

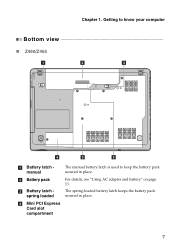
Battery Replacement
is it doable to change battery? if it is, how?
is it doable to change battery? if it is, how?
(Posted by kwonhyuktaek 11 years ago)

My Lenovo G580 Didn't Charge The Battery..just Bought For 2 Weeks...lsc Say Batt
my lenovo g580 didn't charge the battery..just bought for 2 weeks...lsc say battery is bad.....how i...
my lenovo g580 didn't charge the battery..just bought for 2 weeks...lsc say battery is bad.....how i...
(Posted by mauhary 11 years ago)