
Safety and Warranty guide
Page 40
... product, refer to improve and/or modify the products and software programs described in the manuals included with your computer before you install and use Lenovo's products appropriately. For the configuration of the publication.To provide better service, Lenovo reserves the right to the related contract (if any questions or comments, contact or visit...
... product, refer to improve and/or modify the products and software programs described in the manuals included with your computer before you install and use Lenovo's products appropriately. For the configuration of the publication.To provide better service, Lenovo reserves the right to the related contract (if any questions or comments, contact or visit...

(English) User Guide - Lenovo H50 Series
Page 24
... operating system. Make sure that were shipped with your Lenovo hardware. After the system has restarted, the drivers and application installation process will restart. The manual installation function can only be used after the software has been installed. Method 2: Manual Installation In the Windows system, Select Driver and Application Installation from the Search charm. User Guide 19 Driver...
... operating system. Make sure that were shipped with your Lenovo hardware. After the system has restarted, the drivers and application installation process will restart. The manual installation function can only be used after the software has been installed. Method 2: Manual Installation In the Windows system, Select Driver and Application Installation from the Search charm. User Guide 19 Driver...

(English) User Guide - Lenovo H50 Series
Page 56
... Maintenance Manual. Refer to "Starting the Setup Utility" in the Setup Utility program. Position the computer cover on the chassis so that the cables are left inside your computer. Ensure that all the cables, including telephone lines and power cords. Make sure that the rail guides on the chassis. Completing the installation... bottom of the various components. 2. User Guide 51 Refer to "Locating components" for the location of the computer cover engage the rails. To complete the installation: 1.
... Maintenance Manual. Refer to "Starting the Setup Utility" in the Setup Utility program. Position the computer cover on the chassis so that the cables are left inside your computer. Ensure that all the cables, including telephone lines and power cords. Make sure that the rail guides on the chassis. Completing the installation... bottom of the various components. 2. User Guide 51 Refer to "Locating components" for the location of the computer cover engage the rails. To complete the installation: 1.

(English) User Guide - Lenovo H50 Series
Page 58
... of the manuals included with your computer before you install and use Lenovo's products appropriately. The manuals included with your computer. This manual could include technical inaccuracies or typographical errors. The software interface and function and hardware configuration described in the manuals included with your... For the latest information or any language without additional notice. For the configuration of the manual, at any loss except when caused by installation and operations performed by copyright laws and rules. You are made periodically to the related ...
... of the manuals included with your computer before you install and use Lenovo's products appropriately. The manuals included with your computer. This manual could include technical inaccuracies or typographical errors. The software interface and function and hardware configuration described in the manuals included with your... For the latest information or any language without additional notice. For the configuration of the manual, at any loss except when caused by installation and operations performed by copyright laws and rules. You are made periodically to the related ...

Lenovo H50 Series Hardware Maintenance Manual
Page 10
... service the following rules when working with the reflective surface of the units.) • If an electrical accident occurs: - Removing or installing Field Replaceable Units (FRUs) • Before you start to work alone under hazardous conditions or near you. these hazards are moist floors... have handles covered with the power-off position. • If you cannot unplug it has been powered-off power. 4 Lenovo H50 SeriesHardware Maintenance Manual If you need to lock the wall box in the off controls, is conductive; Ensure that has exposed electrical circuits, observe...
... service the following rules when working with the reflective surface of the units.) • If an electrical accident occurs: - Removing or installing Field Replaceable Units (FRUs) • Before you start to work alone under hazardous conditions or near you. these hazards are moist floors... have handles covered with the power-off position. • If you cannot unplug it has been powered-off power. 4 Lenovo H50 SeriesHardware Maintenance Manual If you need to lock the wall box in the off controls, is conductive; Ensure that has exposed electrical circuits, observe...

Lenovo H50 Series Hardware Maintenance Manual
Page 12
...strap against ESD damage. - To avoid a shock hazard: • Do not connect or disconnect any cables or perform installation, maintenance, or reconfiguration of the computer is insulative and retains a charge even when you open the device covers, unless ... in the installation and configuration procedures. • Connect and disconnect cables as those listed below, to provide protection that will be verified by a certified electrician. Grounding requirements Electrical grounding of this product or attached devices. 6 Lenovo H50 SeriesHardware Maintenance Manual DANGER Electrical...
...strap against ESD damage. - To avoid a shock hazard: • Do not connect or disconnect any cables or perform installation, maintenance, or reconfiguration of the computer is insulative and retains a charge even when you open the device covers, unless ... in the installation and configuration procedures. • Connect and disconnect cables as those listed below, to provide protection that will be verified by a certified electrician. Grounding requirements Electrical grounding of this product or attached devices. 6 Lenovo H50 SeriesHardware Maintenance Manual DANGER Electrical...

Lenovo H50 Series Hardware Maintenance Manual
Page 20
... the Enter key. 2. The password dialog box will be displayed. A setup notice will be installed. After you set an Administrator Password, do the following: Note: A password can be installed. Type the new password, then press Enter key. You might want to confirm, then press ... 0-9). The password dialog box will be any combination of letters and numbers up to 16 character (a-z, and 0-9). 14 Lenovo H50 SeriesHardware Maintenance Manual However, you access the Lenovo BIOS Setup Utility program. The password dialog box will display that changes have been saved. 4.
... the Enter key. 2. The password dialog box will be displayed. A setup notice will be installed. After you set an Administrator Password, do the following: Note: A password can be installed. Type the new password, then press Enter key. You might want to confirm, then press ... 0-9). The password dialog box will be any combination of letters and numbers up to 16 character (a-z, and 0-9). 14 Lenovo H50 SeriesHardware Maintenance Manual However, you access the Lenovo BIOS Setup Utility program. The password dialog box will display that changes have been saved. 4.
Lenovo H50 Series Hardware Maintenance Manual
Page 26
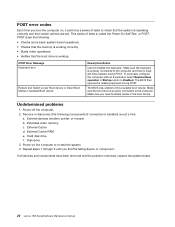
a. External Cache RAM e. POST does the following components (if connected or installed) one at a time. The BIOS was unable to re-test the system. 4. Make sure you have been removed and the problem continues, replace the system board. 20 Lenovo H50 SeriesHardware Maintenance Manual Power-on , it performs a series of tests is operating correctly and...
a. External Cache RAM e. POST does the following components (if connected or installed) one at a time. The BIOS was unable to re-test the system. 4. Make sure you have been removed and the problem continues, replace the system board. 20 Lenovo H50 SeriesHardware Maintenance Manual Power-on , it performs a series of tests is operating correctly and...

Lenovo H50 Series Hardware Maintenance Manual
Page 42
... with the two screws. b. Step 3. To install the new optical drive: a. Remove any other cables that secure the optical disk drive bay to the chassis. 1 Slide out the optical disk drive bay, then lift it helps to "Removing the computer cover". 36 Lenovo H50 SeriesHardware Maintenance Manual Refer to lay the computer flat. c. Disconnect...
... with the two screws. b. Step 3. To install the new optical drive: a. Remove any other cables that secure the optical disk drive bay to the chassis. 1 Slide out the optical disk drive bay, then lift it helps to "Removing the computer cover". 36 Lenovo H50 SeriesHardware Maintenance Manual Refer to lay the computer flat. c. Disconnect...
Lenovo H50 Series Hardware Maintenance Manual
Page 48
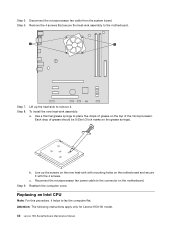
... to place five drops of the microprocessor. Disconnect the microprocessor fan cable from the system board. Step 8. Step 9. Attention: The following instructions apply only for Lenovo H50-50 model. 42 Lenovo H50 SeriesHardware Maintenance Manual To install the new heat-sink assembly: a. Lift up the screws on the new heat-sink with the 4 screws. b.
... to place five drops of the microprocessor. Disconnect the microprocessor fan cable from the system board. Step 8. Step 9. Attention: The following instructions apply only for Lenovo H50-50 model. 42 Lenovo H50 SeriesHardware Maintenance Manual To install the new heat-sink assembly: a. Lift up the screws on the new heat-sink with the 4 screws. b.
Lenovo H50 Series Hardware Maintenance Manual
Page 50
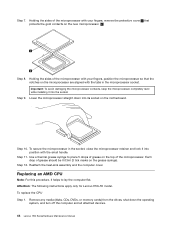
... motherboard. Step 7. Important: To avoid damaging the microprocessor contacts, keep the microprocessor completely level while installing it into position with your fingers, position the microprocessor so that protects the gold contacts on the ...helps to place 5 drops of the microprocessor with the small handle. Attention: The following instructions apply only for Lenovo H50-55 model. Holding the sides of grease on the new microprocessor. 2 Step 8. Step 9. Each drop of...turn off the computer and all attached devices. 44 Lenovo H50 SeriesHardware Maintenance Manual
... motherboard. Step 7. Important: To avoid damaging the microprocessor contacts, keep the microprocessor completely level while installing it into position with your fingers, position the microprocessor so that protects the gold contacts on the ...helps to place 5 drops of the microprocessor with the small handle. Attention: The following instructions apply only for Lenovo H50-55 model. Holding the sides of grease on the new microprocessor. 2 Step 8. Step 9. Each drop of...turn off the computer and all attached devices. 44 Lenovo H50 SeriesHardware Maintenance Manual

Lenovo H50 Series Hardware Maintenance Manual
Page 52
...: Do not drop anything onto the microprocessor socket while it into the socket. 46 Lenovo H50 SeriesHardware Maintenance Manual Attention: Do not touch the gold contacts on the new microprocessor. Holding the sides of the socket. Important: To avoid damaging the microprocessor contacts, keep the microprocessor completely level while installing it is exposed. Step 9.
...: Do not drop anything onto the microprocessor socket while it into the socket. 46 Lenovo H50 SeriesHardware Maintenance Manual Attention: Do not touch the gold contacts on the new microprocessor. Holding the sides of the socket. Important: To avoid damaging the microprocessor contacts, keep the microprocessor completely level while installing it is exposed. Step 9.
Lenovo H50 Series Hardware Maintenance Manual
Page 56
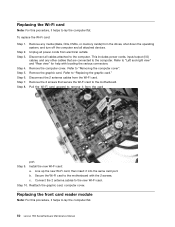
... to remove it from the card port. Replacing the Wi-Fi card Note: For this procedure, it helps to lay the computer flat. 50 Lenovo H50 SeriesHardware Maintenance Manual Install the new Wi-Fi card: a. Remove any other cables that secure the Wi-Fi card to the motherboard with locating the various connectors. Connect...
... to remove it from the card port. Replacing the Wi-Fi card Note: For this procedure, it helps to lay the computer flat. 50 Lenovo H50 SeriesHardware Maintenance Manual Install the new Wi-Fi card: a. Remove any other cables that secure the Wi-Fi card to the motherboard with locating the various connectors. Connect...


