

Hardware Maintenance Manual for H200
Page 4
... this manual This manual contains service and reference information for those machines which have internet access, FRU part numbers are familiar with Lenovo computer products. Veuillez lire toutes les consignes de type DANGER et ATTENTION du présent document avant d'exécuter les... instructions. This manual includes a complete FRU part number listing for trained servicers who are also available at: http:/www.lenovo.com/support. It is invalid for Lenovo IdeaCentre K computers listed on the cover. If you have the TV card. Lesen Sie unbedingt alle Hinweise vom Typ "ACHTUNG...
... this manual This manual contains service and reference information for those machines which have internet access, FRU part numbers are familiar with Lenovo computer products. Veuillez lire toutes les consignes de type DANGER et ATTENTION du présent document avant d'exécuter les... instructions. This manual includes a complete FRU part number listing for trained servicers who are also available at: http:/www.lenovo.com/support. It is invalid for Lenovo IdeaCentre K computers listed on the cover. If you have the TV card. Lesen Sie unbedingt alle Hinweise vom Typ "ACHTUNG...

Hardware Maintenance Manual for H200
Page 5
... to transition to have RoHS compliant parts. then click Continue. The list of FRUs at the following Web site: http://www.lenovo.com/support •• To view the key commodities: 1. Point your system. then click the entry for a machine type: 1. Under Important information, click Parts information. 5. ... Under Parts information, click Parts lookup. 3. hard disk drive, system board, microprocessor, LCD, and memory) •• eSupport can be used to http://www.lenovo.com/support. 2. Hardware Maintenance Manual Using eSupport For Key Commodities (Examples -
... to transition to have RoHS compliant parts. then click Continue. The list of FRUs at the following Web site: http://www.lenovo.com/support •• To view the key commodities: 1. Point your system. then click the entry for a machine type: 1. Under Important information, click Parts information. 5. ... Under Parts information, click Parts lookup. 3. hard disk drive, system board, microprocessor, LCD, and memory) •• eSupport can be used to http://www.lenovo.com/support. 2. Hardware Maintenance Manual Using eSupport For Key Commodities (Examples -

Hardware Maintenance Manual for H200
Page 6
...some RoHS compliant FRUs. Products marketed before June 2006 Products marketed after June, 2006, failed RoHS compliant parts must always be used. RoHS compliant Lenovo IdeaCentre K parts have unique FRU part numbers. Before or after June 2006 Current or Replacement Current or Replacement original part FRU original part FRU Non...Non-RoHS Must be RoHS Must be RoHS Non-RoHS Can be RoHS Non-RoHS Can sub to RoHS RoHS Must be ready to support Lenovo's requirements and schedule. About this manual implementation date and expects its suppliers to these products and any product...
...some RoHS compliant FRUs. Products marketed before June 2006 Products marketed after June, 2006, failed RoHS compliant parts must always be used. RoHS compliant Lenovo IdeaCentre K parts have unique FRU part numbers. Before or after June 2006 Current or Replacement Current or Replacement original part FRU original part FRU Non...Non-RoHS Must be RoHS Must be RoHS Non-RoHS Can be RoHS Non-RoHS Can sub to RoHS RoHS Must be ready to support Lenovo's requirements and schedule. About this manual implementation date and expects its suppliers to these products and any product...

Hardware Maintenance Manual for H200
Page 15
...;C Transit: -40° to 55°C Humidity: Operating: 35% to 80% Transit: 20% to 93% (40°C) Altitude: 86KPa to all machine types supported by this publication. Type Lenovo 3000 H This section lists the physical specifications. Specifications This section lists the physical specifications for your computer. Hardware Maintenance Manual General information 3 This...
...;C Transit: -40° to 55°C Humidity: Operating: 35% to 80% Transit: 20% to 93% (40°C) Altitude: 86KPa to all machine types supported by this publication. Type Lenovo 3000 H This section lists the physical specifications. Specifications This section lists the physical specifications for your computer. Hardware Maintenance Manual General information 3 This...

Hardware Maintenance Manual for H200
Page 17
... hangs and no error is displayed, continue at step 7. 7. If possible, have this configuration ever worked? - Has this information available when requesting assistance from Service Support and Engineering functions. •• Machine type and model •• Processor or hard disk upgrades •• Failure symptom - Print (print screen) configuration currently...
... hangs and no error is displayed, continue at step 7. 7. If possible, have this configuration ever worked? - Has this information available when requesting assistance from Service Support and Engineering functions. •• Machine type and model •• Processor or hard disk upgrades •• Failure symptom - Print (print screen) configuration currently...

Hardware Maintenance Manual for H200
Page 22
...to confirm the password, type the password again. Start the Setup Utility program (see "Starting the Setup Utility program" on . Select Onboard PS/2 Mouse Support. 4. You can set to save the settings, select Discard Changes and Exit or Discard Changes. To delete a previously set user password, do not .... 19 Press Enter and a message will display that Enter New Password. See the information displayed on the right side of PS/2 Mouse Support is disabled and will display that indicates the password has been disabled. 3. To set Device, do the following device: PS/2 Mouse...
...to confirm the password, type the password again. Start the Setup Utility program (see "Starting the Setup Utility program" on . Select Onboard PS/2 Mouse Support. 4. You can set to save the settings, select Discard Changes and Exit or Discard Changes. To delete a previously set user password, do not .... 19 Press Enter and a message will display that Enter New Password. See the information displayed on the right side of PS/2 Mouse Support is disabled and will display that indicates the password has been disabled. 3. To set Device, do the following device: PS/2 Mouse...
Hardware Maintenance Manual for H200
Page 39
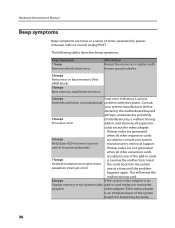
... tones separated by a malfunctioning Processor error add-in cards 7 beeps is causing the malfunction. Consult your system 8042 Gate A20 test error (cannot manufacturer's technical support. Remove all expansion cards except the video adapter. • If beep codes are generated when all other expansion cards 6 beeps are absent, one at a time...
... tones separated by a malfunctioning Processor error add-in cards 7 beeps is causing the malfunction. Consult your system 8042 Gate A20 test error (cannot manufacturer's technical support. Remove all expansion cards except the video adapter. • If beep codes are generated when all other expansion cards 6 beeps are absent, one at a time...

Hardware Maintenance Manual for H200
Page 40
... the screen the next time you turn on the system. 37 Symptom-to appear. When you power-on the screen. Consult your system manufacturer's technical support. • If beep codes are not generated 11 beeps when all other error messages probably will reveal the malfunctioning card. Insert the cards back into...
... the screen the next time you turn on the system. 37 Symptom-to appear. When you power-on the screen. Consult your system manufacturer's technical support. • If beep codes are not generated 11 beeps when all other error messages probably will reveal the malfunctioning card. Insert the cards back into...
Hardware Maintenance Manual for H200
Page 41
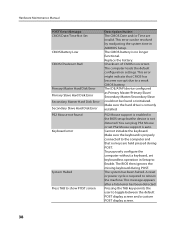
... is enabled in AMIBIOS Setup. The system has been halted. Replace the battery. The computer loads the default configuration settings. PS2 Mouse support is properly connected to a weak CMOS battery. The CMOS battery is not detected. This error might indicate that CMOS has become corrupt ... be found Keyboard error System Halted Press TAB to reboot the machine. To purposely configure the computer without a keyboard, set PS2 Mouse support is correctly installed. The BIOS then ignores the missing keyboard during POST. Make sure the hard drive is auto. The IDE/ATAPI device...
... is enabled in AMIBIOS Setup. The system has been halted. Replace the battery. The computer loads the default configuration settings. PS2 Mouse support is properly connected to a weak CMOS battery. The CMOS battery is not detected. This error might indicate that CMOS has become corrupt ... be found Keyboard error System Halted Press TAB to reboot the machine. To purposely configure the computer without a keyboard, set PS2 Mouse support is correctly installed. The BIOS then ignores the missing keyboard during POST. Make sure the hard drive is auto. The IDE/ATAPI device...

Hardware Maintenance Manual for H200
Page 43
...connectors on the rear of the chassis. 40 Remove the two screws that secure the computer cover at http://consumersupport.lenovo.com Note Use only parts provided by Lenovo. Removing the computer cover Important Turn off all cables attached to the computer. To obtain copies of the Safety ...and Warranty Guide or HMM, go to the Support Web site at the rear of the computer". 4. Disconnect all attached devices, and the ...
...connectors on the rear of the chassis. 40 Remove the two screws that secure the computer cover at http://consumersupport.lenovo.com Note Use only parts provided by Lenovo. Removing the computer cover Important Turn off all cables attached to the computer. To obtain copies of the Safety ...and Warranty Guide or HMM, go to the Support Web site at the rear of the computer". 4. Disconnect all attached devices, and the ...

Hardware Maintenance Manual for H200
Page 45
... installation". Hardware Maintenance Manual 3. Refer to "Removing the computer cover". 42 To obtain copies of the Safety and Warranty Guide or HMM, go to the Support Web site at the bottom and top of the bezel with your computer or in the chassis, and then snap it into position at http...
... installation". Hardware Maintenance Manual 3. Refer to "Removing the computer cover". 42 To obtain copies of the Safety and Warranty Guide or HMM, go to the Support Web site at the bottom and top of the bezel with your computer or in the chassis, and then snap it into position at http...

Hardware Maintenance Manual for H200
Page 47
Refer to the Support Web site at http://consumersupport.lenovo.com To replace the hard disk drive: 1. Remove the four screws that was included with your computer or in the Safety and Warranty Guide that ...
Refer to the Support Web site at http://consumersupport.lenovo.com To replace the hard disk drive: 1. Remove the four screws that was included with your computer or in the Safety and Warranty Guide that ...

Hardware Maintenance Manual for H200
Page 48
... and Warranty Guide that secure the optical drive from the rear of the chassis. 45 Connect the power and data cables to the Support Web site at http://consumersupport.lenovo.com To replace an optical drive 1. Remove the computer cover. Push the optical drive straight out of the front of the optical...
... and Warranty Guide that secure the optical drive from the rear of the chassis. 45 Connect the power and data cables to the Support Web site at http://consumersupport.lenovo.com To replace an optical drive 1. Remove the computer cover. Push the optical drive straight out of the front of the optical...

Hardware Maintenance Manual for H200
Page 49
Connect the data and power cables to the Support Web site at http://consumersupport.lenovo.com To replace the keyboard: 1. Unplug all attached devices and the computer. 2. connector at either 4. Locate the connector for the computer. Refer to a USB connector ...
Connect the data and power cables to the Support Web site at http://consumersupport.lenovo.com To replace the keyboard: 1. Unplug all attached devices and the computer. 2. connector at either 4. Locate the connector for the computer. Refer to a USB connector ...

Hardware Maintenance Manual for H200
Page 50
... Safety and Warranty Guide or HMM, go to lay the computer on the rear of the computer. Note: For this procedure, it helps to the Support Web site at either 4. Disconnect the failing mouse cable from electrical outlets. 3. Before removing any repair before reading the "Important safety information" in the Safety... (diskettes, CDs, or memory cards) from the drives, shut down your computer or in the Hardware Maintenance Manual (HMM) for the mouse. at http://consumersupport.lenovo.com To replace the mouse: 1.
... Safety and Warranty Guide or HMM, go to lay the computer on the rear of the computer. Note: For this procedure, it helps to the Support Web site at either 4. Disconnect the failing mouse cable from electrical outlets. 3. Before removing any repair before reading the "Important safety information" in the Safety... (diskettes, CDs, or memory cards) from the drives, shut down your computer or in the Hardware Maintenance Manual (HMM) for the mouse. at http://consumersupport.lenovo.com To replace the mouse: 1.

Hardware Maintenance Manual for H200
Page 54
Not all operating systems support ACPI BIOS mode. Automatic configuration and power interface (ACPI) BIOS Being an ACPI BIOS system, the operating system is allowed to control the power management ... On RTC Alarm: You can be either a single event or a daily event. •• PCI/PCI-E/LAN Wake Up: This feature allows PME cards which support this cappability to Enabled, the computer will turn on the computer automatically. •• Resume On Ring: With this feature set to wake this system...
Not all operating systems support ACPI BIOS mode. Automatic configuration and power interface (ACPI) BIOS Being an ACPI BIOS system, the operating system is allowed to control the power management ... On RTC Alarm: You can be either a single event or a daily event. •• PCI/PCI-E/LAN Wake Up: This feature allows PME cards which support this cappability to Enabled, the computer will turn on the computer automatically. •• Resume On Ring: With this feature set to wake this system...

Hardware Maintenance Manual for H200
Page 55
Not all operating systems support ACPI BIOS mode. Power Management features The Power Management features within the Power menu allow you to wake the system. •• RTC Resume: You ..., PCI-E cards and On- 11 Hardware Maintenance Manual Additional Service Information (Type RS690) This chapter provides additional information that turn on automatically. board LAN which support this capability to enable and disable features that the service representative might find helpful. Automatic configuration and power interface (ACPI) BIOS Being an ACPI BIOS...
Not all operating systems support ACPI BIOS mode. Power Management features The Power Management features within the Power menu allow you to wake the system. •• RTC Resume: You ..., PCI-E cards and On- 11 Hardware Maintenance Manual Additional Service Information (Type RS690) This chapter provides additional information that turn on automatically. board LAN which support this capability to enable and disable features that the service representative might find helpful. Automatic configuration and power interface (ACPI) BIOS Being an ACPI BIOS...

Hardware Maintenance Manual for H200
Page 56
... and time at which the computer will be either a single event or a daily event. •• PCI Wake Up: This feature allows PCI cards which support this cappability to wake this feature set to Enabled, the computer will turn on automatically. Power Management features The Power Management features within the Power... for Advanced Power Management (APM) BIOS mode is allowed to enable and disable features that the service representative might find helpful. Not all operating systems support ACPI BIOS mode. 12Chapter 8.
... and time at which the computer will be either a single event or a daily event. •• PCI Wake Up: This feature allows PCI cards which support this cappability to wake this feature set to Enabled, the computer will turn on automatically. Power Management features The Power Management features within the Power... for Advanced Power Management (APM) BIOS mode is allowed to enable and disable features that the service representative might find helpful. Not all operating systems support ACPI BIOS mode. 12Chapter 8.

3000 H200 User Guide
Page 12
Connect the cable to use the connector on the graphics adapter. • If you have an adapter installed that supports the DVI monitor. Note: If your model has two monitor connectors, be sure to the connector as shown. • If you only have a DVI connector ...
Connect the cable to use the connector on the graphics adapter. • If you have an adapter installed that supports the DVI monitor. Note: If your model has two monitor connectors, be sure to the connector as shown. • If you only have a DVI connector ...

3000 H200 User Guide
Page 14
...to 5.1 surround.) This model of the computer. 1.4.7 Audio configuration instruction: (This instruction is only for PC models whose mainboard supports audio transforming from audio channels in connector Front channel Center-LEF The configurations are as prompted. 4. After the configuration, ...5.1 surround can be located on the front of computer supports transforming stereo sound into 5.1 surround sound. Use the following as follows: 1. Audio line-out This connector sends audio signals from the...
...to 5.1 surround.) This model of the computer. 1.4.7 Audio configuration instruction: (This instruction is only for PC models whose mainboard supports audio transforming from audio channels in connector Front channel Center-LEF The configurations are as prompted. 4. After the configuration, ...5.1 surround can be located on the front of computer supports transforming stereo sound into 5.1 surround sound. Use the following as follows: 1. Audio line-out This connector sends audio signals from the...


