
Hardware Maintenance Manual - Notebook
Page 32
Lenovo G400s/G405s/G400s Touch/G500s/G505s/G500s Touch Hardware Maintenance Manual Table 1. Specifications (continued) Feature Hard disk drive Solid-state drive Optical drive I/O port MODEM slot Audio Video Ethernet (on the system board) PCI Express Mini Card slot WLAN WWAN Bluetooth wireless Touch pad Description • 320GB, 5400rpm • 500GB, 5400rpm • 750GB, 5400rpm • 1TB, 5400rpm.../WIFI × 1 • SSD × 1 • Intel 11gn(1x1) • Intel 11gn+BT combo card • N/A • combined in combo card • One-piece multi-touch touch pad 28
Lenovo G400s/G405s/G400s Touch/G500s/G505s/G500s Touch Hardware Maintenance Manual Table 1. Specifications (continued) Feature Hard disk drive Solid-state drive Optical drive I/O port MODEM slot Audio Video Ethernet (on the system board) PCI Express Mini Card slot WLAN WWAN Bluetooth wireless Touch pad Description • 320GB, 5400rpm • 500GB, 5400rpm • 750GB, 5400rpm • 1TB, 5400rpm.../WIFI × 1 • SSD × 1 • Intel 11gn(1x1) • Intel 11gn+BT combo card • N/A • combined in combo card • One-piece multi-touch touch pad 28
Hardware Maintenance Manual - Notebook
Page 57
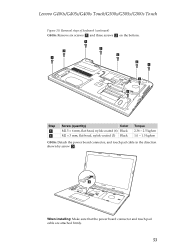
Lenovo G400s/G405s/G400s Touch/G500s/G505s/G500s Touch Figure 10. Removal steps of keyboard (continued) G400s: Remove six screws a and three screws b on the bottom. 1 1 1 2 2 2 1 1 1 Step a a Screw (quantity) Color M2.5 × 6 mm, flat-head, nylok-coated (6) Black M2 × 3 mm, flat-head, nylok-coated (3) Black Torque 2.38 ~ 2.5 kgfcm 1.0 ~ 1.5 kgfcm G500s: Detach the power board connector, and touch pad cable in the direction shown by arrow c . c When installing: Make sure that the power board connector and touch pad cable are attached firmly. 53
Lenovo G400s/G405s/G400s Touch/G500s/G505s/G500s Touch Figure 10. Removal steps of keyboard (continued) G400s: Remove six screws a and three screws b on the bottom. 1 1 1 2 2 2 1 1 1 Step a a Screw (quantity) Color M2.5 × 6 mm, flat-head, nylok-coated (6) Black M2 × 3 mm, flat-head, nylok-coated (3) Black Torque 2.38 ~ 2.5 kgfcm 1.0 ~ 1.5 kgfcm G500s: Detach the power board connector, and touch pad cable in the direction shown by arrow c . c When installing: Make sure that the power board connector and touch pad cable are attached firmly. 53

Hardware Maintenance Manual - Notebook
Page 59
For access, remove these FRUs in mind. • Be careful not to put it only on page 52 55 Lenovo G400s/G405s/G400s Touch/G500s/G505s/G500s Touch 1110 System board Important notices for handling the system board: When handling the system board, bear the following in order: • "1010 Battery pack" on...for wireless LAN/WAN" on page 44 • "1080 Fan assembly" on page 46 • "1090 Keyboard" on page 47 • "1100 Keyboard bezel" on a padded surface such as metal, wood, or composite. • Avoid rough handling of any kind. • In the whole process, make sure not to drop or...
For access, remove these FRUs in mind. • Be careful not to put it only on page 52 55 Lenovo G400s/G405s/G400s Touch/G500s/G505s/G500s Touch 1110 System board Important notices for handling the system board: When handling the system board, bear the following in order: • "1010 Battery pack" on...for wireless LAN/WAN" on page 44 • "1080 Fan assembly" on page 46 • "1090 Keyboard" on page 47 • "1100 Keyboard bezel" on a padded surface such as metal, wood, or composite. • Avoid rough handling of any kind. • In the whole process, make sure not to drop or...

Hardware Maintenance Manual - Notebook
Page 79
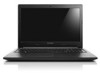
Lenovo G400s/G405s/G400s Touch/G500s/G505s/G500s Touch Locations Front view a Integrated camera b Wireless antennas c Computer display Multi-touch display (on select models) d Power button e Novo button f System status indicators g Built-in microphone h Touch pad i Numeric keypad (G500s/G505s/G500s Touch) G400s/G405s: a b c e d f g h f G400s Touch: a b c e d f g h f 75
Lenovo G400s/G405s/G400s Touch/G500s/G505s/G500s Touch Locations Front view a Integrated camera b Wireless antennas c Computer display Multi-touch display (on select models) d Power button e Novo button f System status indicators g Built-in microphone h Touch pad i Numeric keypad (G500s/G505s/G500s Touch) G400s/G405s: a b c e d f g h f G400s Touch: a b c e d f g h f 75
User Guide - Lenovo G400s, G400s Touch, G500s, G500s Touch, G405s, G505s (Windows 8.1 Preloaded)
Page 9
... h Touchpad Caps lock indicator Num lock indicator (G500s/G505s/G500s Touch only) Captures sound which you want the cursor to move the cursor on select visual output. Multi-touch function is off or in which can enable/disable the touchpad by pressing . Lenovo OneKey Recovery system" on page 6 5 Touchpad .... Note: You can be used for video communication. Getting to know your fingertip over the pad in the direction in hibernation mode, press this button to start the Lenovo OneKey Recovery system or the BIOS setup utility, or to that of the left/right mouse ...
... h Touchpad Caps lock indicator Num lock indicator (G500s/G505s/G500s Touch only) Captures sound which you want the cursor to move the cursor on select visual output. Multi-touch function is off or in which can enable/disable the touchpad by pressing . Lenovo OneKey Recovery system" on page 6 5 Touchpad .... Note: You can be used for video communication. Getting to know your fingertip over the pad in the direction in hibernation mode, press this button to start the Lenovo OneKey Recovery system or the BIOS setup utility, or to that of the left/right mouse ...

User Guide - Notebooks
Page 9
f System status indicators g Built-in microphone h Touchpad Caps lock indicator Num lock indicator (G500s/G505s/G500s Touch only) Captures sound which you want the cursor to enter the boot menu. b Wireless antennas Connect to the wireless adapter to know your computer a...communication. Notes: • For details, see "Using the keyboard" on page 27. • If your fingertip over the pad in the direction in hibernation mode, press this button to start the Lenovo OneKey Recovery system or the BIOS setup utility, or to move the cursor on the screen, slide your computer...
f System status indicators g Built-in microphone h Touchpad Caps lock indicator Num lock indicator (G500s/G505s/G500s Touch only) Captures sound which you want the cursor to enter the boot menu. b Wireless antennas Connect to the wireless adapter to know your computer a...communication. Notes: • For details, see "Using the keyboard" on page 27. • If your fingertip over the pad in the direction in hibernation mode, press this button to start the Lenovo OneKey Recovery system or the BIOS setup utility, or to move the cursor on the screen, slide your computer...


