User Guide
Page 2
... read and understand all of extremely hazardous or potentially lethal situations. Refer to programs, devices, or data. Reading and understanding this important information. © Copyright Lenovo 2012. All rights reserved. Danger: Be aware of the related safety information for this product for reference only and may be changed without notice.
... read and understand all of extremely hazardous or potentially lethal situations. Refer to programs, devices, or data. Reading and understanding this important information. © Copyright Lenovo 2012. All rights reserved. Danger: Be aware of the related safety information for this product for reference only and may be changed without notice.
User Guide
Page 4
Contents Important Safety Information Using the Computer Hardware 1 Front view of the computer 2 Left and right views of the computer 3 Rear view of the computer 4 Installing the computer stand 5 Computer stand 6 Connecting your computer 7 Connecting the power cord 8 Important information about using the computer 9 Wired keyboard (selected models only 10 Connecting to the Internet 10 Using Windows 8 11 Switching between the main Windows 8 interfaces 12 The Charms Bar 12 Shutting down the computer 12 Switching between apps 12 Closing an app 13 Opening other system programs 13 ...
Contents Important Safety Information Using the Computer Hardware 1 Front view of the computer 2 Left and right views of the computer 3 Rear view of the computer 4 Installing the computer stand 5 Computer stand 6 Connecting your computer 7 Connecting the power cord 8 Important information about using the computer 9 Wired keyboard (selected models only 10 Connecting to the Internet 10 Using Windows 8 11 Switching between the main Windows 8 interfaces 12 The Charms Bar 12 Shutting down the computer 12 Switching between apps 12 Closing an app 13 Opening other system programs 13 ...
User Guide
Page 5
Troubleshooting and Confirming Setup 19 Troubleshooting Display Problems 20 Troubleshooting Audio Problems 21 Troubleshooting Software Problems 22 Troubleshooting Problems with Optical Drives and Hard Disks 23 Special considerations for troubleshooting Windows 24 Windows Help and Support 24 BIOS setup utility 25 Performing Daily Maintenance Tasks 26 Hardware Replacement Guide 27 Overview 28 Replacing hardware 31 Appendix 41 Declaration 41 Trademarks 42 Energy Star Statement 43 Enabling ErP compliance mode 44 ii Contents
Troubleshooting and Confirming Setup 19 Troubleshooting Display Problems 20 Troubleshooting Audio Problems 21 Troubleshooting Software Problems 22 Troubleshooting Problems with Optical Drives and Hard Disks 23 Special considerations for troubleshooting Windows 24 Windows Help and Support 24 BIOS setup utility 25 Performing Daily Maintenance Tasks 26 Hardware Replacement Guide 27 Overview 28 Replacing hardware 31 Appendix 41 Declaration 41 Trademarks 42 Energy Star Statement 43 Enabling ErP compliance mode 44 ii Contents

User Guide
Page 6
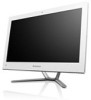
User Guide 1 Using the Computer Hardware This chapter contains the following topics: Introduction to the computer hardware Information on computer connections Note: The descriptions in this chapter might be different from what you see on your computer, depending on the computer model and configuration.
User Guide 1 Using the Computer Hardware This chapter contains the following topics: Introduction to the computer hardware Information on computer connections Note: The descriptions in this chapter might be different from what you see on your computer, depending on the computer model and configuration.
User Guide
Page 7
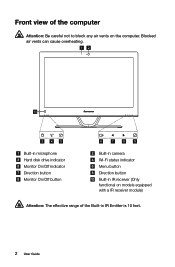
Blocked air vents can cause overheating. 12 10 3 45 Built-in microphone Hard disk drive indicator Monitor On/Off indicator Direction button Monitor On/Off button 6 7 8 9 Built-in camera Wi-Fi status indicator Menu button Direction button Built-in IR Emitter is 10 feet. 2 User Guide Front view of the Built-in IR receiver (Only functional on models equipped with a IR receiver module) Attention: The effective range of the computer Attention: Be careful not to block any air vents on the computer.
Blocked air vents can cause overheating. 12 10 3 45 Built-in microphone Hard disk drive indicator Monitor On/Off indicator Direction button Monitor On/Off button 6 7 8 9 Built-in camera Wi-Fi status indicator Menu button Direction button Built-in IR Emitter is 10 feet. 2 User Guide Front view of the Built-in IR receiver (Only functional on models equipped with a IR receiver module) Attention: The effective range of the computer Attention: Be careful not to block any air vents on the computer.

User Guide
Page 8
Blocked air vents may cause thermal problems. 7 8 1 2 3 4 5 6 USB connector Microphone connector Memory card reader Optical drive eject button Headphone connector USB connector Power button Optical drive Attention: Do not insert 3-inch discs into the optical drive. User Guide 3 Left and right views of the computer Attention: Be sure not to block any air vents on the computer.
Blocked air vents may cause thermal problems. 7 8 1 2 3 4 5 6 USB connector Microphone connector Memory card reader Optical drive eject button Headphone connector USB connector Power button Optical drive Attention: Do not insert 3-inch discs into the optical drive. User Guide 3 Left and right views of the computer Attention: Be sure not to block any air vents on the computer.

User Guide
Page 9
Rear view of the computer 9 8 1 2 3 4 56 7 TV tuner connector (selected models only, 2 connectors for Japan) Power connector USB connector HDMI-out connector (selected models only) Air vents TV tuner connector (selected models only, 2 connectors for Japan) Ethernet connector USB connector Security cable slot 4 User Guide
Rear view of the computer 9 8 1 2 3 4 56 7 TV tuner connector (selected models only, 2 connectors for Japan) Power connector USB connector HDMI-out connector (selected models only) Air vents TV tuner connector (selected models only, 2 connectors for Japan) Ethernet connector USB connector Security cable slot 4 User Guide
User Guide
Page 10
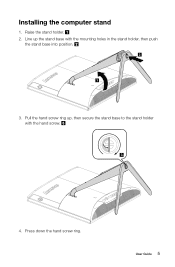
User Guide 5 Line up , then secure the stand base to the stand holder with the mounting holes in the stand holder, then push the stand base into position. 2 1 3. Press down the hand screw ring. Pull the hand screw ring up the stand base with the hand screw. 3 4. Installing the computer stand 1. Raise the stand holder. 2.
User Guide 5 Line up , then secure the stand base to the stand holder with the mounting holes in the stand holder, then push the stand base into position. 2 1 3. Press down the hand screw ring. Pull the hand screw ring up the stand base with the hand screw. 3 4. Installing the computer stand 1. Raise the stand holder. 2.
User Guide
Page 11
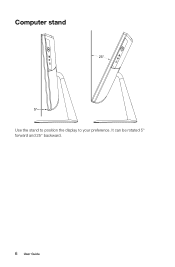
Computer stand Use the stand to position the display to your preference. It can be rotated 5° forward and 25° backward. 6 User Guide
Computer stand Use the stand to position the display to your preference. It can be rotated 5° forward and 25° backward. 6 User Guide
User Guide
Page 12
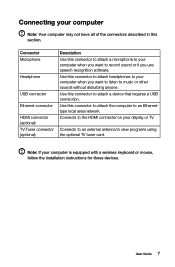
User Guide 7 Use this connector to attach a device that requires a USB connection. Connects to an external antenna to view programs using the optional TV tuner card. Use this connector to attach the computer to an Ethernettype local area network. Connects to the HDMI connector on your computer is equipped with a wireless keyboard or mouse, follow the installation instructions for those devices. Use this connector to attach a microphone to your computer when you use speech-recognition software. Connector Microphone Headphone USB connector Ethernet connector HDMI connector ...
User Guide 7 Use this connector to attach a device that requires a USB connection. Connects to an external antenna to view programs using the optional TV tuner card. Use this connector to attach the computer to an Ethernettype local area network. Connects to the HDMI connector on your computer is equipped with a wireless keyboard or mouse, follow the installation instructions for those devices. Use this connector to attach a microphone to your computer when you use speech-recognition software. Connector Microphone Headphone USB connector Ethernet connector HDMI connector ...
User Guide
Page 13
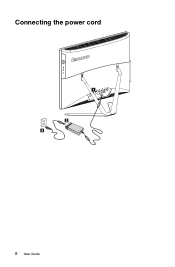
Connecting the power cord 8 User Guide
Connecting the power cord 8 User Guide

User Guide
Page 14
User Guide 9 Hold the computer tightly when you carry it. Important information about using the computer Press the power button on the side of the computer to turn on the computer.
User Guide 9 Hold the computer tightly when you carry it. Important information about using the computer Press the power button on the side of the computer to turn on the computer.

User Guide
Page 15
Your computer has the Lenovo Rescue System installed. F2 -- IPSs and ISP offerings vary by opening your country. Consult your...connects your ISP for detailed setup instructions. Note: Broadband modem and router installation procedures vary depending on the computer until the Lenovo Rescue System open. To connect your router. Tap or click Connect, then follow the steps on this key to its ... wireless home network. Wired keyboard (selected models only) LVT -- In addition to launch the LVT (Lenovo Vantage Technology) program, Lenovo's pre-loaded Home PC software.
Your computer has the Lenovo Rescue System installed. F2 -- IPSs and ISP offerings vary by opening your country. Consult your...connects your ISP for detailed setup instructions. Note: Broadband modem and router installation procedures vary depending on the computer until the Lenovo Rescue System open. To connect your router. Tap or click Connect, then follow the steps on this key to its ... wireless home network. Wired keyboard (selected models only) LVT -- In addition to launch the LVT (Lenovo Vantage Technology) program, Lenovo's pre-loaded Home PC software.
User Guide
Page 16
For any question related to the operating system, please contact Microsoft directly. Please use it in accordance with the End User License Agreement (EULA) between apps Closing an app Opening other system programs Windows Help and Support Attention: The Windows 8 operating system is provided by Microsoft Corporation. User Guide 11 Using Windows 8 This chapter contains the following topics: Switching between the main Windows 8 interfaces The Charms Bar Shutting down the computer Switching between you and Microsoft.
For any question related to the operating system, please contact Microsoft directly. Please use it in accordance with the End User License Agreement (EULA) between apps Closing an app Opening other system programs Windows Help and Support Attention: The Windows 8 operating system is provided by Microsoft Corporation. User Guide 11 Using Windows 8 This chapter contains the following topics: Switching between the main Windows 8 interfaces The Charms Bar Shutting down the computer Switching between you and Microsoft.

User Guide
Page 17
Switching between apps Sometimes you want to get back to an app you are using , or quickly switch through your recent apps. To display the charms, do one of the following: • Select Start from the Charms Bar. • Move the cursor to the bottom left corner, then click to bring in the next app. 12 User Guide Switching between apps: Swipe in from the left edge of the screen or move the cursor to the top left corner, then select the Start Screen thumbnail when it is displayed. • Press the Windows key . The Charms Bar Charms provide new and faster ways to the top right ...
Switching between apps Sometimes you want to get back to an app you are using , or quickly switch through your recent apps. To display the charms, do one of the following: • Select Start from the Charms Bar. • Move the cursor to the bottom left corner, then click to bring in the next app. 12 User Guide Switching between apps: Swipe in from the left edge of the screen or move the cursor to the top left corner, then select the Start Screen thumbnail when it is displayed. • Press the Windows key . The Charms Bar Charms provide new and faster ways to the top right ...
User Guide
Page 18
Opening other system programs There is a fast way to open other system programs. To open the menu, do one of the following: • Move the cursor to the bottom left corner of the screen. To open the menu. • Press the Windows key + X. When the thumbnail appears, right-click with the operating system, see the Windows Help and Support file. When the cursor becomes a hand, drag the app page to explore. You can also get online help and support by clicking on your computer. When the app page becomes smaller, drag it to the bottom of the screen. • Swipe in from the ...
Opening other system programs There is a fast way to open other system programs. To open the menu, do one of the following: • Move the cursor to the bottom left corner of the screen. To open the menu. • Press the Windows key + X. When the thumbnail appears, right-click with the operating system, see the Windows Help and Support file. When the cursor becomes a hand, drag the app page to explore. You can also get online help and support by clicking on your computer. When the app page becomes smaller, drag it to the bottom of the screen. • Swipe in from the ...
User Guide
Page 20
User Guide 15 If you do this, all of the existing data on drive C: will be lost, but the content and format of the other partitions of the hard disk drive will result in NTFS format and install the operating system on the C: partition. Otherwise, the OneKey Recovery system cannot run. Using the Rescue System This chapter contains the following topics: OneKey Recovery Driver and Application Installation Attention: Using OneKey Recovery will remain unchanged. • If you want to install an operating system and back it up with OneKey Recovery, you must format the C: ...
User Guide 15 If you do this, all of the existing data on drive C: will be lost, but the content and format of the other partitions of the hard disk drive will result in NTFS format and install the operating system on the C: partition. Otherwise, the OneKey Recovery system cannot run. Using the Rescue System This chapter contains the following topics: OneKey Recovery Driver and Application Installation Attention: Using OneKey Recovery will remain unchanged. • If you want to install an operating system and back it up with OneKey Recovery, you must format the C: ...
User Guide
Page 21
...all of the data on the C: drive. Note: System Recovery will make the rescue system unusable. Follow the on the computer until the Lenovo Rescue System opens, then select OneKey Recovery. OneKey Recovery OneKey Recovery is an easy-to-use it to restore your computer to the system ...not interrupt the operation during the process of data, be deleted. After the system is deleted or damaged by someone other than authorized Lenovo service personnel, Lenovo will prompt you want to restore from and the disk where you to back up state. For more detailed information, see the ...
...all of the data on the C: drive. Note: System Recovery will make the rescue system unusable. Follow the on the computer until the Lenovo Rescue System opens, then select OneKey Recovery. OneKey Recovery OneKey Recovery is an easy-to-use it to restore your computer to the system ...not interrupt the operation during the process of data, be deleted. After the system is deleted or damaged by someone other than authorized Lenovo service personnel, Lenovo will prompt you want to restore from and the disk where you to back up state. For more detailed information, see the ...
User Guide
Page 22
... the procedure, install all the drivers and software manually by following the prompts. Method 2: Manual Installation In the Windows system, Click Lenovo Rescue System icon on the computer. 2. After starting the operating system. Do not install software which is already installed on the Windows...the pop-up dialog box. Notes: 1. The manual installation function can only be used after turning on -screen prompts to install the Lenovo drivers and applications. Method 1: Automatic Installation Repeatedly press and release the F2 key after the software has been installed. Then select Drivers...
... the procedure, install all the drivers and software manually by following the prompts. Method 2: Manual Installation In the Windows system, Click Lenovo Rescue System icon on the computer. 2. After starting the operating system. Do not install software which is already installed on the Windows...the pop-up dialog box. Notes: 1. The manual installation function can only be used after turning on -screen prompts to install the Lenovo drivers and applications. Method 1: Automatic Installation Repeatedly press and release the F2 key after the software has been installed. Then select Drivers...
User Guide
Page 24
User Guide 19 Troubleshooting and Confirming Setup This chapter contains the following topic: Ø Troubleshooting and Problem Resolution Note: The description of the TV tuner card in this manual is only applicable to machines that do not have the TV tuner card. It does not apply to machines which have a TV tuner card.
User Guide 19 Troubleshooting and Confirming Setup This chapter contains the following topic: Ø Troubleshooting and Problem Resolution Note: The description of the TV tuner card in this manual is only applicable to machines that do not have the TV tuner card. It does not apply to machines which have a TV tuner card.
