Hardware Maintenance Manual
Page 5
...X61, and X61s . . 41 FRU tests 43 Fn key combinations 45 Symptom-to-FRU index 47 Numeric error codes 47 Error messages 51 Beep symptoms 53 No-beep symptoms 53 LCD-related symptoms 54 Intermittent problems 55 Undetermined problems 55 FRU replacement notices 56 Screw notices 56 © Copyright Lenovo...84 1170 DC-in and RJ-11 connectors 85 1180 LCD assembly 86 1190 ...ThinkPad X60, X60s, X61, and X61s 119 Rear view for ThinkPad X60, X60s, X61, and X61s 120 Bottom view for ThinkPad X60, X60s, X61, and X61s 121 Rear View for ThinkPad X6 UltraBase . . . . 122 Bottom View for ThinkPad...
...X61, and X61s . . 41 FRU tests 43 Fn key combinations 45 Symptom-to-FRU index 47 Numeric error codes 47 Error messages 51 Beep symptoms 53 No-beep symptoms 53 LCD-related symptoms 54 Intermittent problems 55 Undetermined problems 55 FRU replacement notices 56 Screw notices 56 © Copyright Lenovo...84 1170 DC-in and RJ-11 connectors 85 1180 LCD assembly 86 1190 ...ThinkPad X60, X60s, X61, and X61s 119 Rear view for ThinkPad X60, X60s, X61, and X61s 120 Bottom view for ThinkPad X60, X60s, X61, and X61s 121 Rear View for ThinkPad X6 UltraBase . . . . 122 Bottom View for ThinkPad...

Hardware Maintenance Manual
Page 24
... power. - Check inside the unit for : a. Blowers and fans - Check exterior covers for cracked or bulging batteries. 5. A third-wire ground connector in a machine: - Use good judgment as to assist you can cause serious or fatal electrical shock) v Explosive hazards, such as a damaged CRT...frame ground. Send another person to measure third-wire ground continuity for worn, frayed, or pinched cables. 18 ThinkPad® X60, X60s, X61, and X61s If any potentially unsafe conditions, use good judgment to identify potential safety hazards due to protect users and service ...
... power. - Check inside the unit for : a. Blowers and fans - Check exterior covers for cracked or bulging batteries. 5. A third-wire ground connector in a machine: - Use good judgment as to assist you can cause serious or fatal electrical shock) v Explosive hazards, such as a damaged CRT...frame ground. Send another person to measure third-wire ground continuity for worn, frayed, or pinched cables. 18 ThinkPad® X60, X60s, X61, and X61s If any potentially unsafe conditions, use good judgment to identify potential safety hazards due to protect users and service ...
Hardware Maintenance Manual
Page 25
... person handling the part are wearing a wrist strap. Proper grounding of the electrical outlet can use of a grounded work surface. Note The use coax or connector-outside shells on your clothing. Protect against ESD damage is insulative and retains a charge even when you use an ESD common ground or reference point...
... person handling the part are wearing a wrist strap. Proper grounding of the electrical outlet can use of a grounded work surface. Note The use coax or connector-outside shells on your clothing. Protect against ESD damage is insulative and retains a charge even when you use an ESD common ground or reference point...

Hardware Maintenance Manual
Page 30
... the application of excessive force or from being dropped v Scratched (cosmetic) parts v Distortion, deformation, or discoloration of the cosmetic parts v Plastic parts, latches, pins, or connectors that the system was subjected to excessive force, or dropped. 24 ThinkPad® X60, X60s, X61, and X61s
... the application of excessive force or from being dropped v Scratched (cosmetic) parts v Distortion, deformation, or discoloration of the cosmetic parts v Plastic parts, latches, pins, or connectors that the system was subjected to excessive force, or dropped. 24 ThinkPad® X60, X60s, X61, and X61s
Hardware Maintenance Manual
Page 35
....) v The time set on the timer, and the user does not do any ® operation with the keyboard, the TrackPoint , the hard disk, the parallel connector, or the diskette drive within that action. - v The CPU stops. General descriptions 29 To enter standby mode, press Fn+F4. v Turn on the power switch...
....) v The time set on the timer, and the user does not do any ® operation with the keyboard, the TrackPoint , the hard disk, the parallel connector, or the diskette drive within that action. - v The CPU stops. General descriptions 29 To enter standby mode, press Fn+F4. v Turn on the power switch...
Hardware Maintenance Manual
Page 36
...turned on the timer, and if the user does not do any operation with the keyboard, the TrackPoint, the hard disk drive, the parallel connector, or the diskette drive within that time. Also, the computer goes into hibernation mode automatically in either of the following conditions: v If ...a "hibernation time" has been set on , the computer returns from the hard disk drive. 30 ThinkPad® X60, X60s, X61, and X61s When the power is restored from hibernation mode and resumes operation. Pressing Fn+F4 keys. The hibernation file in suspend mode. Related...
...turned on the timer, and if the user does not do any operation with the keyboard, the TrackPoint, the hard disk drive, the parallel connector, or the diskette drive within that time. Also, the computer goes into hibernation mode automatically in either of the following conditions: v If ...a "hibernation time" has been set on , the computer returns from the hard disk drive. 30 ThinkPad® X60, X60s, X61, and X61s When the power is restored from hibernation mode and resumes operation. Pressing Fn+F4 keys. The hibernation file in suspend mode. Related...

Hardware Maintenance Manual
Page 37
...even if the computer supports the docking station. Testing the computer The ThinkPad computer has a test program called PC-Doctor® for DOS (hereafter called PC-Doctor). For some devices are intended to the USB connector of errors and invalid system responses. 1. To avoid this problem, you... overview" on model-unique functions, refer to false indications of the computer. This section is in identifying and correcting problems with the ThinkPad computer. For details that is an overview of the BIOS Setup Utility before you run correctly. To test the Ultrabay™ device,...
...even if the computer supports the docking station. Testing the computer The ThinkPad computer has a test program called PC-Doctor® for DOS (hereafter called PC-Doctor). For some devices are intended to the USB connector of errors and invalid system responses. 1. To avoid this problem, you... overview" on model-unique functions, refer to false indications of the computer. This section is in identifying and correcting problems with the ThinkPad computer. For details that is an overview of the BIOS Setup Utility before you run correctly. To test the Ultrabay™ device,...
Hardware Maintenance Manual
Page 43
...1130 MDC 81 1140 Backup battery 82 1150 Second Fan 83 1160 Speaker 84 1170 DC-in and RJ-11 connectors 85 1180 LCD assembly 86 1190 Hard disk sub-card 92 1200 System board and lower case assembly with label... 117 Locations 119 Front view for ThinkPad X60, X60s, X61, and X61s 119 Rear view for ThinkPad X60, X60s, X61, and X61s 120 Bottom view for ThinkPad X60, X60s, X61, and X61s 121 Rear View for ThinkPad X6 UltraBase . . . . 122 Bottom View for ThinkPad X6 UltraBase . . . 122 ...list 232 Tools 232 Power cords 232 Notices 234 Trademarks 235 © Copyright Lenovo 2007, 2008 37
...1130 MDC 81 1140 Backup battery 82 1150 Second Fan 83 1160 Speaker 84 1170 DC-in and RJ-11 connectors 85 1180 LCD assembly 86 1190 Hard disk sub-card 92 1200 System board and lower case assembly with label... 117 Locations 119 Front view for ThinkPad X60, X60s, X61, and X61s 119 Rear view for ThinkPad X60, X60s, X61, and X61s 120 Bottom view for ThinkPad X60, X60s, X61, and X61s 121 Rear View for ThinkPad X6 UltraBase . . . . 122 Bottom View for ThinkPad X6 UltraBase . . . 122 ...list 232 Tools 232 Power cords 232 Notices 234 Trademarks 235 © Copyright Lenovo 2007, 2008 37
Hardware Maintenance Manual
Page 45
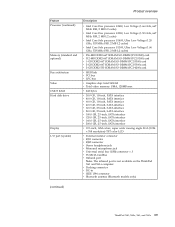
...-in v IEEE 1394 connector v Bluetooth antenna (Bluetooth models only) (continued) ThinkPad X60, X60s, X61, and X61s 39 Product overview Feature Processor (continued) Memory (standard and optional) Bus architecture Video CMOS RAM Hard disk ... colors, super wide viewing angle XGA (1024 × 768 resolution) TFT color LCD v External monitor connector v RJ11 connector v RJ45 connector v Stereo headphone jack v Monaural microphone jack v Universal serial bus (USB) connector × 3 v PCMCIA CardBus v Infrared port Note: The infrared port is not available on the ThinkPad X61 and X61s computer.
...-in v IEEE 1394 connector v Bluetooth antenna (Bluetooth models only) (continued) ThinkPad X60, X60s, X61, and X61s 39 Product overview Feature Processor (continued) Memory (standard and optional) Bus architecture Video CMOS RAM Hard disk ... colors, super wide viewing angle XGA (1024 × 768 resolution) TFT color LCD v External monitor connector v RJ11 connector v RJ45 connector v Stereo headphone jack v Monaural microphone jack v Universal serial bus (USB) connector × 3 v PCMCIA CardBus v Infrared port Note: The infrared port is not available on the ThinkPad X61 and X61s computer.

Hardware Maintenance Manual
Page 46
...series of cells (2P4S) Li-Ion battery pack (5.2 AH) (Hybrid) Note: The prismatic battery is not available on the ThinkPad X61 and X61s computer. v 802.11a/b/g (Wireless LAN) v 802.11b/g (Wireless LAN) v Wireless WAN v 802.11n (Wireless LAN) v One Type-II... connector v RJ11 connector v RJ45 connector v Parallel connector v Serial connector v Universal serial bus (USB) connector × 4 v DC-in v Stereo speakers v Monaural microphone jack v Stereo headphone jack v 56.6 Kbps v Internal monaural speaker v Software control volume v IrDA 1.1 Note: The infrared port is only for ThinkPad X60s and X61s...
...series of cells (2P4S) Li-Ion battery pack (5.2 AH) (Hybrid) Note: The prismatic battery is not available on the ThinkPad X61 and X61s computer. v 802.11a/b/g (Wireless LAN) v 802.11b/g (Wireless LAN) v Wireless WAN v 802.11n (Wireless LAN) v One Type-II... connector v RJ11 connector v RJ45 connector v Parallel connector v Serial connector v Universal serial bus (USB) connector × 4 v DC-in v Stereo speakers v Monaural microphone jack v Stereo headphone jack v 56.6 Kbps v Internal monaural speaker v Software control volume v IrDA 1.1 Note: The infrared port is only for ThinkPad X60s and X61s...
Hardware Maintenance Manual
Page 59
... 47. A hard-disk password is and no POST. System board. beeps, and one short beep. Make sure that every connector is set . System board. Type the password and press Enter. ThinkPad X60, X60s, X61, and X61s 53 DIMM. System board. 2. Reinstall the operating system. Five short beeps and a blank screen. connected tightly and correctly...
... 47. A hard-disk password is and no POST. System board. beeps, and one short beep. Make sure that every connector is set . System board. Type the password and press Enter. ThinkPad X60, X60s, X61, and X61s 53 DIMM. System board. 2. Reinstall the operating system. Five short beeps and a blank screen. connected tightly and correctly...
Hardware Maintenance Manual
Page 60
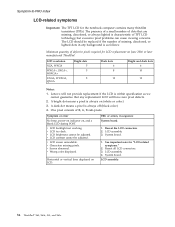
... we cannot guarantee that any background is characteristic of defective pixels required for LCD replacement on (white or color.) 3. Lenovo will not provide replacement if the LCD is within specification as follows: Minimum quantity of TFT LCD technology, but excessive...index LCD-related symptoms Important: The TFT LCD for "LCD-related symptoms." 2. Reseat the LCD connectors. 2. LCD assembly. 3. v Wrong color displayed. LCD assembly. 54 ThinkPad® X60, X60s, X61, and X61s One pixel consists of missing, discolored, or lighted dots in sequence System board. 1. v ...
... we cannot guarantee that any background is characteristic of defective pixels required for LCD replacement on (white or color.) 3. Lenovo will not provide replacement if the LCD is within specification as follows: Minimum quantity of TFT LCD technology, but excessive...index LCD-related symptoms Important: The TFT LCD for "LCD-related symptoms." 2. Reseat the LCD connectors. 2. LCD assembly. 3. v Wrong color displayed. LCD assembly. 54 ThinkPad® X60, X60s, X61, and X61s One pixel consists of missing, discolored, or lighted dots in sequence System board. 1. v ...
Hardware Maintenance Manual
Page 72
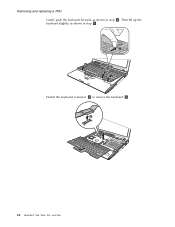
Then lift up the keyboard slightly, as shown in step 3 . 2 3 3 3 Detach the keyboard connector 4 to remove the keyboard 5 . 4 5 66 ThinkPad® X60, X60s, X61, and X61s Removing and replacing a FRU Gently push the keyboard forward, as shown in step 2 .
Then lift up the keyboard slightly, as shown in step 3 . 2 3 3 3 Detach the keyboard connector 4 to remove the keyboard 5 . 4 5 66 ThinkPad® X60, X60s, X61, and X61s Removing and replacing a FRU Gently push the keyboard forward, as shown in step 2 .
Hardware Maintenance Manual
Page 73
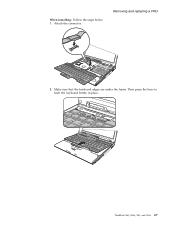
When installing: Follow the steps below. 1. Removing and replacing a FRU 2. Attach the connector. Make sure that the keyboard edges are under the frame. ThinkPad X60, X60s, X61, and X61s 67 Then press the keys to latch the keyboard firmly in place.
When installing: Follow the steps below. 1. Removing and replacing a FRU 2. Attach the connector. Make sure that the keyboard edges are under the frame. ThinkPad X60, X60s, X61, and X61s 67 Then press the keys to latch the keyboard firmly in place.

Hardware Maintenance Manual
Page 85
ThinkPad X60, X60s, X61, and X61s 79 If you are installing a 802.11n wireless LAN card, attach the grey cable to the left connector and the black cable to the center connector, the connection speed will be lower. For ThinkPad X61 and X61s computers: Removing and replacing a FRU Step 2 Screw (quantity) M2 × 2.5 mm, wafer-head, nylon-coated (2) Color Silver Torque 0.157 Nm (1.6 kgfcm) When installing: If you attach either cable to the right connector.
ThinkPad X60, X60s, X61, and X61s 79 If you are installing a 802.11n wireless LAN card, attach the grey cable to the left connector and the black cable to the center connector, the connection speed will be lower. For ThinkPad X61 and X61s computers: Removing and replacing a FRU Step 2 Screw (quantity) M2 × 2.5 mm, wafer-head, nylon-coated (2) Color Silver Torque 0.157 Nm (1.6 kgfcm) When installing: If you attach either cable to the right connector.

Hardware Maintenance Manual
Page 86
... LAN 3rd antenna cable connection For ThinkPad X60 and X60s computers: For ThinkPad X61 and X61s computers: 2 2 3 Step 2 Screw (quantity) M2 × 2.5 mm, wafer-head, nylon-coated (2) Color Silver Torque 0.157 Nm (1.6 kgfcm) When installing: If you are installing a 802.11a/b/g or 802.11b/g card, first insert the connector end of the white cable into...
... LAN 3rd antenna cable connection For ThinkPad X60 and X60s computers: For ThinkPad X61 and X61s computers: 2 2 3 Step 2 Screw (quantity) M2 × 2.5 mm, wafer-head, nylon-coated (2) Color Silver Torque 0.157 Nm (1.6 kgfcm) When installing: If you are installing a 802.11a/b/g or 802.11b/g card, first insert the connector end of the white cable into...
Hardware Maintenance Manual
Page 88
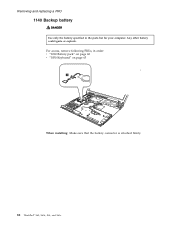
Any other battery could ignite or explode. For access, remove following FRUs, in the parts list for your computer. Removing and replacing a FRU 1140 Backup battery DANGER Use only the battery specified in order: v "1010 Battery pack" on page 60 v "1050 Keyboard" on page 65 1 2 When installing: Make sure that the battery connector is attached firmly. 82 ThinkPad® X60, X60s, X61, and X61s
Any other battery could ignite or explode. For access, remove following FRUs, in the parts list for your computer. Removing and replacing a FRU 1140 Backup battery DANGER Use only the battery specified in order: v "1010 Battery pack" on page 60 v "1050 Keyboard" on page 65 1 2 When installing: Make sure that the battery connector is attached firmly. 82 ThinkPad® X60, X60s, X61, and X61s
Hardware Maintenance Manual
Page 89
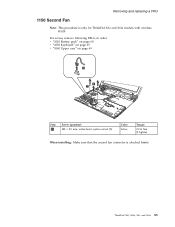
For access, remove following FRUs, in order: v "1010 Battery pack" on page 60 v "1050 Keyboard" on page 65 v "1060 Upper case" on page 69 2 3 4 Step 1 Screw (quantity) M2 × 2.5 mm, wafer-head, nylon-coated (2) Color Silver Torque 0.196 Nm (2 kgfcm) When installing: Make sure that the second fan connector is only for ThinkPad X61 and X61s models with wireless WAN. ThinkPad X60, X60s, X61, and X61s 83 Removing and replacing a FRU 1150 Second Fan Note: This procedure is attached firmly.
For access, remove following FRUs, in order: v "1010 Battery pack" on page 60 v "1050 Keyboard" on page 65 v "1060 Upper case" on page 69 2 3 4 Step 1 Screw (quantity) M2 × 2.5 mm, wafer-head, nylon-coated (2) Color Silver Torque 0.196 Nm (2 kgfcm) When installing: Make sure that the second fan connector is only for ThinkPad X61 and X61s models with wireless WAN. ThinkPad X60, X60s, X61, and X61s 83 Removing and replacing a FRU 1150 Second Fan Note: This procedure is attached firmly.
Hardware Maintenance Manual
Page 90
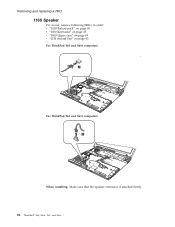
Removing and replacing a FRU 1160 Speaker For access, remove following FRUs, in order: v "1010 Battery pack" on page 60 v "1050 Keyboard" on page 65 v "1060 Upper case" on page 69 v "1150 Second Fan" on page 83 For ThinkPad X60 and X60s computers: 2 1 For ThinkPad X61 and X61s computers: 2 1 When installing: Make sure that the speaker connector is attached firmly. 84 ThinkPad® X60, X60s, X61, and X61s
Removing and replacing a FRU 1160 Speaker For access, remove following FRUs, in order: v "1010 Battery pack" on page 60 v "1050 Keyboard" on page 65 v "1060 Upper case" on page 69 v "1150 Second Fan" on page 83 For ThinkPad X60 and X60s computers: 2 1 For ThinkPad X61 and X61s computers: 2 1 When installing: Make sure that the speaker connector is attached firmly. 84 ThinkPad® X60, X60s, X61, and X61s
Hardware Maintenance Manual
Page 91
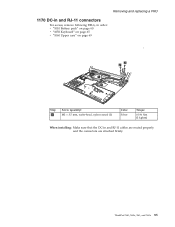
ThinkPad X60, X60s, X61, and X61s 85 Removing and replacing a FRU 1170 DC-in and RJ-11 connectors For access, remove following FRUs, in order: v "1010 Battery pack" on page 60 v "1050 Keyboard" on page 65 v "1060 Upper case" on page 69 2 2 3 1 4 1 4 Step 2 Screw (quantity) M2 × 3.5 mm, wafer-head, nylon-coated (2) Color Silver Torque 0.196 Nm (2 kgfcm) When installing: Make sure that the DC-in and RJ-11 cables are routed properly and the connectors are attached firmly.
ThinkPad X60, X60s, X61, and X61s 85 Removing and replacing a FRU 1170 DC-in and RJ-11 connectors For access, remove following FRUs, in order: v "1010 Battery pack" on page 60 v "1050 Keyboard" on page 65 v "1060 Upper case" on page 69 2 2 3 1 4 1 4 Step 2 Screw (quantity) M2 × 3.5 mm, wafer-head, nylon-coated (2) Color Silver Torque 0.196 Nm (2 kgfcm) When installing: Make sure that the DC-in and RJ-11 cables are routed properly and the connectors are attached firmly.


