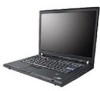
Troubleshooting Guide
Page 5
...; Copyright Lenovo 2007 Restoring factory contents 29 Recovering data 30 Chapter 5. Features and Specifications 59 Features 59 Specifications 60 Appendix D. Contents Read this first v Chapter 1. Upgrading and replacing devices 31 Replacing the battery 31 Upgrading the hard disk drive 33 Replacing.... 5 Other important tips 5 Cleaning the cover of your computer . . . 6 Cleaning your computer keyboard . . . . 6 Cleaning your ThinkPad computer 3 Important tips 3 Be careful about where and how you work 3 Be gentle with the ThinkVantage button 2 Chapter 2. Taking care of warranty...
...; Copyright Lenovo 2007 Restoring factory contents 29 Recovering data 30 Chapter 5. Features and Specifications 59 Features 59 Specifications 60 Appendix D. Contents Read this first v Chapter 1. Upgrading and replacing devices 31 Replacing the battery 31 Upgrading the hard disk drive 33 Replacing.... 5 Other important tips 5 Cleaning the cover of your computer . . . 6 Cleaning your computer keyboard . . . . 6 Cleaning your ThinkPad computer 3 Important tips 3 Be careful about where and how you work 3 Be gentle with the ThinkVantage button 2 Chapter 2. Taking care of warranty...

Troubleshooting Guide
Page 8
... heavy objects on indicator is off , press Fn+F4 to put it in sleep (standby) mode, or press Fn+F12 to put it off . vi ThinkPad® T61 Service and Troubleshooting Guide Read this first Route the cables of an ac adapter, a mouse, a keyboard, a printer, or any other electronic device, or communication... help to prevent damage to the cables may damage or break them. Before moving your computer, display, or external devices. Applying strong force to the hard disk drive, and possible loss of your computer.
... heavy objects on indicator is off , press Fn+F4 to put it in sleep (standby) mode, or press Fn+F12 to put it off . vi ThinkPad® T61 Service and Troubleshooting Guide Read this first Route the cables of an ac adapter, a mouse, a keyboard, a printer, or any other electronic device, or communication... help to prevent damage to the cables may damage or break them. Before moving your computer, display, or external devices. Applying strong force to the hard disk drive, and possible loss of your computer.

Troubleshooting Guide
Page 14
...body or clothing to facilitate safe electrostatic discharge. If a computer is in a tightly packed suitcase or bag. 4 ThinkPad® T61 Service and Troubleshooting Guide Even though this might damage the computer hinge. Note: Not all such appliances cause a ... degrees, as certain portable desktop fans or air purifiers, can produce negative ions. - Be gentle with your ThinkPad computer v Some appliances, such as this kind of electrostatic discharge (ESD) is designed and manufactured to the... an appliance, and is designed to be sure to the hard disk drive and data loss.
...body or clothing to facilitate safe electrostatic discharge. If a computer is in a tightly packed suitcase or bag. 4 ThinkPad® T61 Service and Troubleshooting Guide Even though this might damage the computer hinge. Note: Not all such appliances cause a ... degrees, as certain portable desktop fans or air purifiers, can produce negative ions. - Be gentle with your ThinkPad computer v Some appliances, such as this kind of electrostatic discharge (ESD) is designed and manufactured to the... an appliance, and is designed to be sure to the hard disk drive and data loss.

Troubleshooting Guide
Page 15
... are replacing a device in your modem. v Register your computer. v Only an authorized ThinkPad repair technician should disassemble and repair your ThinkPad products with a diskette drive, avoid inserting diskettes at an angle and attaching multiple or loose diskette labels, as these can... the drive. v Take care not to turn your computer comes with Lenovo (visit the following Web site: http://www.lenovo.com/register). v If your computer comes with your system board or hard disk drive. v Wait until you forget a supervisor or hard disk password, Lenovo authorized ...
... are replacing a device in your modem. v Register your computer. v Only an authorized ThinkPad repair technician should disassemble and repair your ThinkPad products with a diskette drive, avoid inserting diskettes at an angle and attaching multiple or loose diskette labels, as these can... the drive. v Take care not to turn your computer comes with Lenovo (visit the following Web site: http://www.lenovo.com/register). v If your computer comes with your system board or hard disk drive. v Wait until you forget a supervisor or hard disk password, Lenovo authorized ...

Troubleshooting Guide
Page 16
... Wipe each keytop surface with a dry, soft lint-free cloth. 9. Allow to let any cloth fibers from a hair dryer. 6 ThinkPad® T61 Service and Troubleshooting Guide Taking care of the following devices, touch a metal table or a grounded metal object. ExpressCard - To do not...circular motion and taking care not to dry. 4. Absorb the diluted detergent into a sponge. 3. Cleaning your external and removable hard disk, diskette or optical drives in sleep (standby) or hibernation mode before the data transfer is complete. PCI Express Mini Card - Wipe the surface to ...
... Wipe each keytop surface with a dry, soft lint-free cloth. 9. Allow to let any cloth fibers from a hair dryer. 6 ThinkPad® T61 Service and Troubleshooting Guide Taking care of the following devices, touch a metal table or a grounded metal object. ExpressCard - To do not...circular motion and taking care not to dry. 4. Absorb the diluted detergent into a sponge. 3. Cleaning your external and removable hard disk, diskette or optical drives in sleep (standby) or hibernation mode before the data transfer is complete. PCI Express Mini Card - Wipe the surface to ...
Troubleshooting Guide
Page 19
... messages 18 Password problems 19 Keyboard problems 19 Pointing device problems 20 Sleep (standby) or hibernation problems 20 Computer screen problems 21 Battery problems 24 Hard disk drive problems 25 Fingerprint authentication problems . . . 26 Startup problems 26 Other problems 27 Starting BIOS Setup Utility 27 Note: See Access Help if your system...
... messages 18 Password problems 19 Keyboard problems 19 Pointing device problems 20 Sleep (standby) or hibernation problems 20 Computer screen problems 21 Battery problems 24 Hard disk drive problems 25 Fingerprint authentication problems . . . 26 Startup problems 26 Other problems 27 Starting BIOS Setup Utility 27 Note: See Access Help if your system...
Troubleshooting Guide
Page 20
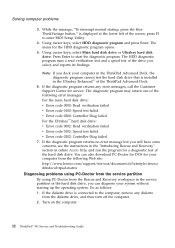
... and also Chapter 2, "Taking care of your ThinkPad computer," on page 29 of my new ThinkPad computer? See http://www.lenovo.com/think/support. Where are the main hardware ...my ThinkPad computer? Where can I need to replace one of the following sections of the instructions for detailed information about each publication included in the following : the hard disk drive, the... 1. Your computer did not come with the ThinkPad computer, see "Restoring factory contents" on page 3 of this Guide. 10 ThinkPad® T61 Service and Troubleshooting Guide See the separate Safety ...
... and also Chapter 2, "Taking care of your ThinkPad computer," on page 29 of my new ThinkPad computer? See http://www.lenovo.com/think/support. Where are the main hardware ...my ThinkPad computer? Where can I need to replace one of the following sections of the instructions for detailed information about each publication included in the following : the hard disk drive, the... 1. Your computer did not come with the ThinkPad computer, see "Restoring factory contents" on page 3 of this Guide. 10 ThinkPad® T61 Service and Troubleshooting Guide See the separate Safety ...

Troubleshooting Guide
Page 21
... to several minutes or longer. Turn on page 53. How can I contact the Customer Support Center? Click Start. 2. HDD diagnostic program If your hard disk drive is not operating properly, you may be sure to print the test log so that you can take up to the help and service," on..., do as follows: 1. See the separate Safety and Warranty Guide for Windows. 3. do not interrupt the test while it by running . If the diskette drive is running the HDD diagnostic program in the BIOS Setup Utility. Chapter 3. Attention Running any diskette from the diskette...
... to several minutes or longer. Turn on page 53. How can I contact the Customer Support Center? Click Start. 2. HDD diagnostic program If your hard disk drive is not operating properly, you may be sure to print the test log so that you can take up to the help and service," on..., do as follows: 1. See the separate Safety and Warranty Guide for Windows. 3. do not interrupt the test while it by running . If the diskette drive is running the HDD diagnostic program in the BIOS Setup Utility. Chapter 3. Attention Running any diskette from the diskette...
Troubleshooting Guide
Page 22
... press Enter. Using cursor keys, select Main hard disk drive or Ultrabay hard disk drive. If the diskette drive is displayed at the lower left of the following Web site: http://www.lenovo.com/support/site.wss/document.do?sitestyle=lenovo &lndocid=tpad-matrix Diagnosing problems using PC-Doctor... and Recovery" section in the Ultrabay Enhanced™ of the drive you dock your computer from the Rescue and Recovery workspace in the service partition of the hard disk drive. Turn on the computer. 12 ThinkPad® T61 Service and Troubleshooting Guide Note: If you select, and reports ...
... press Enter. Using cursor keys, select Main hard disk drive or Ultrabay hard disk drive. If the diskette drive is displayed at the lower left of the following Web site: http://www.lenovo.com/support/site.wss/document.do?sitestyle=lenovo &lndocid=tpad-matrix Diagnosing problems using PC-Doctor... and Recovery" section in the Ultrabay Enhanced™ of the drive you dock your computer from the Rescue and Recovery workspace in the service partition of the hard disk drive. Turn on the computer. 12 ThinkPad® T61 Service and Troubleshooting Guide Note: If you select, and reports ...
Troubleshooting Guide
Page 24
...the computer. then make sure the hard disk drive is displayed, remove the to continue. v Make sure that you added a memory module just before turning the computer on the attached devices. Test your computer's memory with PC-Doctor. 14 ThinkPad® T61 Service and Troubleshooting Guide If you have... it . Remove one device such as a Mini-PCI Ethernet Card or an Ethernet of the Modem Daughter Cards. Make sure that the hard disk drive is not working. If this does not solve the problem, have the external keyboard serviced. v If the computer stops during the test...
...the computer. then make sure the hard disk drive is displayed, remove the to continue. v Make sure that you added a memory module just before turning the computer on the attached devices. Test your computer's memory with PC-Doctor. 14 ThinkPad® T61 Service and Troubleshooting Guide If you have... it . Remove one device such as a Mini-PCI Ethernet Card or an Ethernet of the Modem Daughter Cards. Make sure that the hard disk drive is not working. If this does not solve the problem, have the external keyboard serviced. v If the computer stops during the test...
Troubleshooting Guide
Page 25
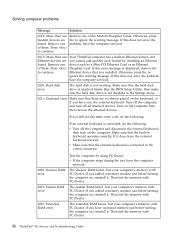
... remove the miniPCI network card. Power off ; The WAN card is plugged in - The Mini-PCI network card is not supported on HDD0 (Main hard disk drive) The hard disk is plugged in - Chapter 3. The computer uses the default settings. Remove it . 1803: Unauthorized daughter card is not working. Turn the computer off... the BIOS Setup Utility. 0280: Previous boot Your computer was previously unable to complete the boot incomplete process. Power off , is plugged in - Have the hard disk serviced.
... remove the miniPCI network card. Power off ; The WAN card is plugged in - The Mini-PCI network card is not supported on HDD0 (Main hard disk drive) The hard disk is plugged in - Chapter 3. The computer uses the default settings. Remove it . 1803: Unauthorized daughter card is not working. Turn the computer off... the BIOS Setup Utility. 0280: Previous boot Your computer was previously unable to complete the boot incomplete process. Power off , is plugged in - Have the hard disk serviced.
Troubleshooting Guide
Page 26
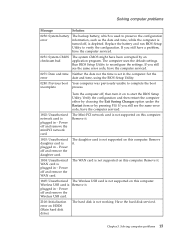
... the hard disk serviced. The hard disk is set . A hard disk password is not working . Hibernation error Operating system not found. v Restore the system configuration to what it was before your computer entered hibernation mode and the time it left this file. 16 ThinkPad® T61 Service ...supervisor password and press Enter. The system configuration changed , re-create the hibernation file. Verify the following: v The hard disk drive is in the drive. The hard disk is not accepted, a supervisor password might have the computer serviced. If you still see the same error message...
... the hard disk serviced. The hard disk is set . A hard disk password is not working . Hibernation error Operating system not found. v Restore the system configuration to what it was before your computer entered hibernation mode and the time it left this file. 16 ThinkPad® T61 Service ...supervisor password and press Enter. The system configuration changed , re-create the hibernation file. Verify the following: v The hard disk drive is in the drive. The hard disk is not accepted, a supervisor password might have the computer serviced. If you still see the same error message...
Troubleshooting Guide
Page 29
... servicer or a marketing representative to have the system board replaced. If you cannot reset your hard disk password, Lenovo authorized servicer cannot reset your computer to a Lenovo authorized servicer or a marketing representative to have the hard disk drive replaced. Use the numeric keypad on password, you have the password canceled. v If the problem occurred immediately...
... servicer or a marketing representative to have the system board replaced. If you cannot reset your hard disk password, Lenovo authorized servicer cannot reset your computer to a Lenovo authorized servicer or a marketing representative to have the hard disk drive replaced. Use the numeric keypad on password, you have the password canceled. v If the problem occurred immediately...

Troubleshooting Guide
Page 35
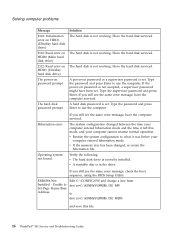
...details, see the Battery and power category in Troubleshooting under the Problem solving section in the "Excluded from boot order" list, the hard disk drive is disabled. Select the entry for one minute to reset the protector; Chapter 3. Solving computer problems 25 In the startup menu in...security function. The operating time for a fully charged battery is included in BIOS Setup Utility, make sure that the hard disk drive is short. If you have set a hard disk password with a fully charged battery. The surge protector in an older computer, first remove the password, and ...
...details, see the Battery and power category in Troubleshooting under the Problem solving section in the "Excluded from boot order" list, the hard disk drive is disabled. Select the entry for one minute to reset the protector; Chapter 3. Solving computer problems 25 In the startup menu in...security function. The operating time for a fully charged battery is included in BIOS Setup Utility, make sure that the hard disk drive is short. If you have set a hard disk password with a fully charged battery. The surge protector in an older computer, first remove the password, and ...
Troubleshooting Guide
Page 36
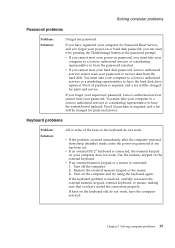
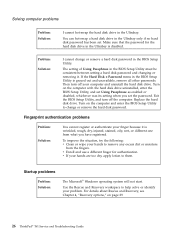
.... v If your problem. Solving computer problems Problem: Solution: I cannot change or remove the hard disk password. Replace the hard disk drive. v Enroll and use a different finger for the hard disk drive in the BIOS Setup Utility. Use the Rescue and Recovery workspace to help solve or identify your... remove a hard disk password in the Ultrabay is wrinkled, rough, dry, injured, stained, oily, wet, or different one from the fingers. The setting of Using Passphrase in the Ultrabay. Then turn off your finger because it . Turn on page 29 26 ThinkPad® T61 Service and ...
.... v If your problem. Solving computer problems Problem: Solution: I cannot change or remove the hard disk password. Replace the hard disk drive. v Enroll and use a different finger for the hard disk drive in the BIOS Setup Utility. Use the Rescue and Recovery workspace to help solve or identify your... remove a hard disk password in the Ultrabay is wrinkled, rough, dry, injured, stained, oily, wet, or different one from the fingers. The setting of Using Passphrase in the Ultrabay. Then turn off your finger because it . Turn on page 29 26 ThinkPad® T61 Service and ...

Troubleshooting Guide
Page 40
... operation using the Rescue and Recovery program, you can start Windows. 30 ThinkPad® T61 Service and Troubleshooting Guide These backups might take up to other media. 1. Turn off your hard disk, or a network drive, or on removable media, depending on the screen. If you are using... press the ThinkVantage button. To ensure that reflect the contents of the files on your ThinkPad computer during startup. Recovery options Notes: 1. Turn on the primary hard disk partition (usually drive C) will be lost in the Ultrabay before any of the Windows operating system. After ...
... operation using the Rescue and Recovery program, you can start Windows. 30 ThinkPad® T61 Service and Troubleshooting Guide These backups might take up to other media. 1. Turn off your hard disk, or a network drive, or on removable media, depending on the screen. If you are using... press the ThinkVantage button. To ensure that reflect the contents of the files on your ThinkPad computer during startup. Recovery options Notes: 1. Turn on the primary hard disk partition (usually drive C) will be lost in the Ultrabay before any of the Windows operating system. After ...

Troubleshooting Guide
Page 43
... 5. Replacing the battery 6. Connect the ac adapter and the cables to the locked position. You can increase the storage capacity of your reseller or Lenovo marketing representative. Replace the hard disk drive only if you upgrade it or have it repaired. 5. Upgrading the hard disk drive Important Read Safety and Warranty Guide before replacing the...
... 5. Replacing the battery 6. Connect the ac adapter and the cables to the locked position. You can increase the storage capacity of your reseller or Lenovo marketing representative. Replace the hard disk drive only if you upgrade it or have it repaired. 5. Upgrading the hard disk drive Important Read Safety and Warranty Guide before replacing the...

Troubleshooting Guide
Page 44
..., such as soft cloth, that secures the hard disk drive slot cover. For 14.1-inch widescreen models: For 14.1-inch screen and 15.4-inch widescreen models: 34 ThinkPad® T61 Service and Troubleshooting Guide Put the drive on the hard disk. Remove the screw that absorbs the physical... shock. The drive is operating, in standby mode, or in hibernation mode. Never remove the drive while the system is very ...
..., such as soft cloth, that secures the hard disk drive slot cover. For 14.1-inch widescreen models: For 14.1-inch screen and 15.4-inch widescreen models: 34 ThinkPad® T61 Service and Troubleshooting Guide Put the drive on the hard disk. Remove the screw that absorbs the physical... shock. The drive is operating, in standby mode, or in hibernation mode. Never remove the drive while the system is very ...

Troubleshooting Guide
Page 45
Chapter 5. Remove the hard disk by pulling out the tab. 7. Detach the side rubber rails from the hard disk drive. Upgrading and replacing devices 35 Remove the cover . 5. For 14.1-inch widescreen models: Upgrading the hard disk drive For 14.1-inch screen and 15.4-inch widescreen models: 6.
Chapter 5. Remove the hard disk by pulling out the tab. 7. Detach the side rubber rails from the hard disk drive. Upgrading and replacing devices 35 Remove the cover . 5. For 14.1-inch widescreen models: Upgrading the hard disk drive For 14.1-inch screen and 15.4-inch widescreen models: 6.

Troubleshooting Guide
Page 46
Insert the hard disk drive into the hard disk drive bay; For 14.1-inch widescreen models: For 14.1-inch screen and 15.4-inch widescreen models: 36 ThinkPad® T61 Service and Troubleshooting Guide Upgrading the hard disk drive 8. then press it firmly in to a new hard disk drive. 9. Reinstall the cover of the hard disk drive slot. Attach the side rubber rails to place. 10.
Insert the hard disk drive into the hard disk drive bay; For 14.1-inch widescreen models: For 14.1-inch screen and 15.4-inch widescreen models: 36 ThinkPad® T61 Service and Troubleshooting Guide Upgrading the hard disk drive 8. then press it firmly in to a new hard disk drive. 9. Reinstall the cover of the hard disk drive slot. Attach the side rubber rails to place. 10.


