Hardware Maintenance Manual
Page 3
... notice for Rescue and Recovery . . . . 31 Lenovo Solution Center 31 FRU tests 34 Power system checkout 35 Checking the ac adapter 35 Checking operational charging 35 Checking the battery pack 36 Checking the backup battery 36 Chapter 4. Related service information 39 Restoring the factory ...contents by using PC-Doctor for DOS. . . . 28 Lenovo ThinkVantage Toolbox (Lenovo System Toolbox 31 PC-Doctor for replacing ...
... notice for Rescue and Recovery . . . . 31 Lenovo Solution Center 31 FRU tests 34 Power system checkout 35 Checking the ac adapter 35 Checking operational charging 35 Checking the battery pack 36 Checking the backup battery 36 Chapter 4. Related service information 39 Restoring the factory ...contents by using PC-Doctor for DOS. . . . 28 Lenovo ThinkVantage Toolbox (Lenovo System Toolbox 31 PC-Doctor for replacing ...
Hardware Maintenance Manual
Page 9
... been removed or tampered with the power off, and the power cord disconnected. Disconnect the power cord. 3. Check the power cord for cracked or bulging batteries. 5. The power cord should be frayed or worn. 4. Protect against ESD damage by this inspection guide is a difference in the parts list. Send another person...
... been removed or tampered with the power off, and the power cord disconnected. Disconnect the power cord. 3. Check the power cord for cracked or bulging batteries. 5. The power cord should be frayed or worn. 4. Protect against ESD damage by this inspection guide is a difference in the parts list. Send another person...
Hardware Maintenance Manual
Page 10
... system function. Use product-specific ESD procedures when they are wearing a wrist strap. • Use a grounded work mat to eliminate static on a double-insulated or battery-operated system, use coax or connector-outside shells on ac-operated computers.
... system function. Use product-specific ESD procedures when they are wearing a wrist strap. • Use a grounded work mat to eliminate static on a double-insulated or battery-operated system, use coax or connector-outside shells on ac-operated computers.
Hardware Maintenance Manual
Page 36
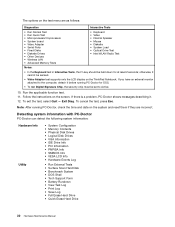
... Info • Hardware Events Log • Run External Tests • Surface Scan Hard Disk • Benchmark System • DOS Shell • Tech Support Form • Battery Rundown • View Test Log • Print Log • Save Log • Full Erase Hard Drive • Quick Erase Hard Drive 30 Hardware Maintenance Manual...
... Info • Hardware Events Log • Run External Tests • Surface Scan Hard Disk • Benchmark System • DOS Shell • Tech Support Form • Battery Rundown • View Test Log • Print Log • Save Log • Full Erase Hard Drive • Quick Erase Hard Drive 30 Hardware Maintenance Manual...
Hardware Maintenance Manual
Page 40
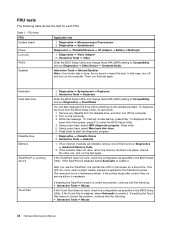
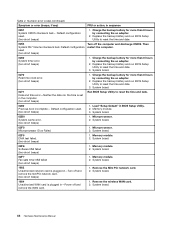
... displayed at the lower left of them and run Diagnostics ➙ Advanced Memory Tests. 2. Diagnostics ➙ Systemboard Diagnostics ➙ ThinkPad Devices ➙ AC Adapter ➙ Battery 1 (Battery2) 1. Diagnostics ➙ Systemboard ➙ Keyboard 2. Press enter. 5. If enabling the TrackPoint does not correct the problem, continue with the following: • Interactive Tests ➙...
... displayed at the lower left of them and run Diagnostics ➙ Advanced Memory Tests. 2. Diagnostics ➙ Systemboard Diagnostics ➙ ThinkPad Devices ➙ AC Adapter ➙ Battery 1 (Battery2) 1. Diagnostics ➙ Systemboard ➙ Keyboard 2. Press enter. 5. If enabling the TrackPoint does not correct the problem, continue with the following: • Interactive Tests ➙...
Hardware Maintenance Manual
Page 41
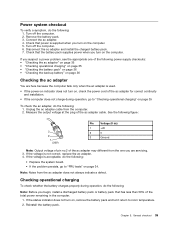
...acceptable, do the following: 1. General checkout 35 Note: Noise from the computer. 2. If the status indicator does not turn on, remove the battery pack and let it return to "Checking operational charging" on page 35 To check the ac adapter, do the following: • Replace the ...remaining in the computer. 1. Chapter 3. Power system checkout To verify a symptom, do the following: Note: Before you begin, install a discharged battery pack or battery pack that power is supplied when you turn on , check the power cord of the ac adapter cable. Turn off the computer. 6. If the...
...acceptable, do the following: 1. General checkout 35 Note: Noise from the computer. 2. If the status indicator does not turn on, remove the battery pack and let it return to "Checking operational charging" on page 35 To check the ac adapter, do the following: • Replace the ...remaining in the computer. 1. Chapter 3. Power system checkout To verify a symptom, do the following: Note: Before you begin, install a discharged battery pack or battery pack that power is supplied when you turn on , check the power cord of the ac adapter cable. Turn off the computer. 6. If the...
Hardware Maintenance Manual
Page 42
... remains; If the indicator still does not turn on , replace the system board. Remove it from the computer and leave it . 2. To check the battery pack, do not click), and the percentage of its capacity. The following correct voltages are shown in the icon tray of the Windows taskbar and... the ac adapter from having a shortened life. Turn the computer upside down , reinstall and recharge it may not be 4 to charge. This protects the battery pack from being overcharged or from it at least 3 hours, even if the indicator does not turn on . If the indicator still does not turn...
... remains; If the indicator still does not turn on , replace the system board. Remove it from the computer and leave it . 2. To check the battery pack, do not click), and the percentage of its capacity. The following correct voltages are shown in the icon tray of the Windows taskbar and... the ac adapter from having a shortened life. Turn the computer upside down , reinstall and recharge it may not be 4 to charge. This protects the battery pack from being overcharged or from it at least 3 hours, even if the indicator does not turn on . If the indicator still does not turn...
Hardware Maintenance Manual
Page 43
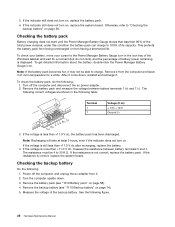
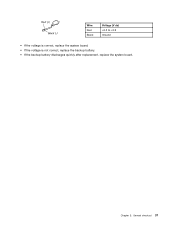
Wire Red Black Voltage (V dc) +2.5 to +3.2 Ground • If the voltage is correct, replace the system board. • If the voltage is not correct, replace the backup battery. • If the backup battery discharges quickly after replacement, replace the system board. General checkout 37 Chapter 3.
Wire Red Black Voltage (V dc) +2.5 to +3.2 Ground • If the voltage is correct, replace the system board. • If the voltage is not correct, replace the backup battery. • If the backup battery discharges quickly after replacement, replace the system board. General checkout 37 Chapter 3.
Hardware Maintenance Manual
Page 47
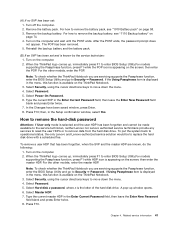
... ThinkPad logo comes up window opens. 6. then enter the POP. Select Security, using the cursor directional keys to remove the backup battery, see "1010 Battery pack" on the ThinkPad Notebook. 3. then, in the Enter Current Password field, then leave the Enter New Password field blank and...to Security ➙ Password. To put the system back to operational status, the only Lenovo and Lenovo-authorized service solution would be made available to the service technician, neither Lenovo nor Lenovo authorized service technicians provide any services to reset the user HDPs or to enter BIOS ...
... ThinkPad logo comes up window opens. 6. then enter the POP. Select Security, using the cursor directional keys to remove the backup battery, see "1010 Battery pack" on the ThinkPad Notebook. 3. then, in the Enter Current Password field, then leave the Enter New Password field blank and...to Security ➙ Password. To put the system back to operational status, the only Lenovo and Lenovo-authorized service solution would be made available to the service technician, neither Lenovo nor Lenovo authorized service technicians provide any services to reset the user HDPs or to enter BIOS ...
Hardware Maintenance Manual
Page 48
...; To return from hibernation mode, press the power button for more than 4 seconds. The most likely cause is powered off . Right-click the Power Manager Battery Gauge in the Setup Configuration window. Select Yes in the task bar. 2. Both user HDP and master HDP will have been removed. Click Start. 2. When...
...; To return from hibernation mode, press the power button for more than 4 seconds. The most likely cause is powered off . Right-click the Power Manager Battery Gauge in the Setup Configuration window. Select Yes in the task bar. 2. Both user HDP and master HDP will have been removed. Click Start. 2. When...
Hardware Maintenance Manual
Page 49
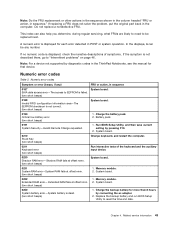
...failed. (two short beeps) 0189 Invalid RFID configuration information area-The EEPROM checksum is dead. (two short beeps) 1. Numeric error codes Table 2. Battery pack. 0191 System Security-Invalid Remote Change requested. 1. Extended RAM fails at offset nnnn. (two short beeps) 1. Chapter 4. Related service information.... 2. EAIA data access error-The access to be any ) FRU or action, in POST or system operation. Replace the backup battery and run BIOS Setup Utility to "Intermittent problems" on page 46. Note: Do the FRU replacement or other actions in the sequence...
...failed. (two short beeps) 0189 Invalid RFID configuration information area-The EEPROM checksum is dead. (two short beeps) 1. Numeric error codes Table 2. Battery pack. 0191 System Security-Invalid Remote Change requested. 1. Extended RAM fails at offset nnnn. (two short beeps) 1. Chapter 4. Related service information.... 2. EAIA data access error-The access to be any ) FRU or action, in POST or system operation. Replace the backup battery and run BIOS Setup Utility to "Intermittent problems" on page 46. Note: Do the FRU replacement or other actions in the sequence...
Hardware Maintenance Manual
Page 50
...3. System board. 44 Hardware Maintenance Manual Default configuration used (two short beeps) Turn off and remove the WAN card. 1. Charge the backup battery for more than 8 hours by connecting the ac adapter. 2. System board. 0270 Real-time clock error. (two short beeps) 1. System ...cache error. (two short beeps) 1. Remove the wireless WAN card. 2. Default configuration used . (two short beeps) 1. Charge the backup battery for more than 8 hours by connecting the ac adapter. 2. Load "Setup Default" in sequence 0251 System CMOS checksum bad- Memory module. 2. Charge the...
...3. System board. 44 Hardware Maintenance Manual Default configuration used (two short beeps) Turn off and remove the WAN card. 1. Charge the backup battery for more than 8 hours by connecting the ac adapter. 2. System board. 0270 Real-time clock error. (two short beeps) 1. System ...cache error. (two short beeps) 1. Remove the wireless WAN card. 2. Default configuration used . (two short beeps) 1. Charge the backup battery for more than 8 hours by connecting the ac adapter. 2. Load "Setup Default" in sequence 0251 System CMOS checksum bad- Memory module. 2. Charge the...

Hardware Maintenance Manual
Page 52
...Turn off the computer. 2. Replace any error is operating correctly. (See "Power system checkout" on 1 January, 2008 or later. • Lenovo will have no more errors exist. System board. 1. System board. Run the diagnostic test for the system board in sequence System board. 1. ... system simply is within specifications because we cannot guarantee that all of the failure is detected, replace the FRU shown by the computer. Battery pack d. See important note for damage. LCD assembly. 4. LCD assembly. Printer, mouse, and other external devices c. If any damaged...
...Turn off the computer. 2. Replace any error is operating correctly. (See "Power system checkout" on 1 January, 2008 or later. • Lenovo will have no more errors exist. System board. 1. System board. Run the diagnostic test for the system board in sequence System board. 1. ... system simply is within specifications because we cannot guarantee that all of the failure is detected, replace the FRU shown by the computer. Battery pack d. See important note for damage. LCD assembly. 4. LCD assembly. Printer, mouse, and other external devices c. If any damaged...
Hardware Maintenance Manual
Page 55
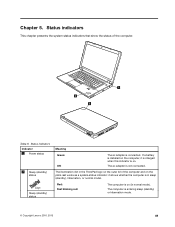
Chapter 5. If a battery is installed on the computer, it shows whether the computer is on (in the ThinkPad logo on . Status indicators This chapter presents the system status ...: Off: The ac adapter is on the outer lid of the computer. 1 2 2 Table 6. The ac adapter is entering sleep (standby) or hibernation mode. © Copyright Lenovo 2010, 2013 49 The illumination dot in normal mode). The computer is not connected. Red: Fast blinking red: The computer is in sleep (standby), hibernation...
Chapter 5. If a battery is installed on the computer, it shows whether the computer is on (in the ThinkPad logo on . Status indicators This chapter presents the system status ...: Off: The ac adapter is on the outer lid of the computer. 1 2 2 Table 6. The ac adapter is entering sleep (standby) or hibernation mode. © Copyright Lenovo 2010, 2013 49 The illumination dot in normal mode). The computer is not connected. Red: Fast blinking red: The computer is in sleep (standby), hibernation...

Hardware Maintenance Manual
Page 63
...with your responsibility; Before touching it in the direction as Self-service CRUs and others are available from electrical outlets, remove the battery pack, and then disconnect any FRU, review Chapter 7 "FRU replacement notices" on page 101. 8. CRU information and replacement ...instructions are shipped with your product. Begin by removing any notes that Lenovo installs an Optional-service CRU according to service any time upon request. Verify this by touching a ground point with the replacement CRU...
...with your responsibility; Before touching it in the direction as Self-service CRUs and others are available from electrical outlets, remove the battery pack, and then disconnect any FRU, review Chapter 7 "FRU replacement notices" on page 101. 8. CRU information and replacement ...instructions are shipped with your product. Begin by removing any notes that Lenovo installs an Optional-service CRU according to service any time upon request. Verify this by touching a ground point with the replacement CRU...
Hardware Maintenance Manual
Page 64
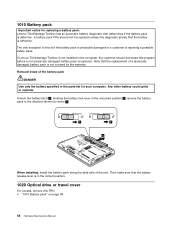
... is in the computer, the customer should not be replaced unless this diagnostic shows that determines if the battery pack is defective. Note that the battery release lever is reporting a possible safety issue. If Lenovo ThinkVantage Toolbox is not installed in the locked position. 1020 Optical drive or travel cover For access, remove...
... is in the computer, the customer should not be replaced unless this diagnostic shows that determines if the battery pack is defective. Note that the battery release lever is reporting a possible safety issue. If Lenovo ThinkVantage Toolbox is not installed in the locked position. 1020 Optical drive or travel cover For access, remove...
Hardware Maintenance Manual
Page 65
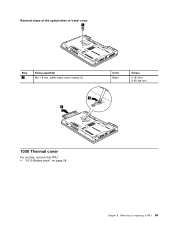
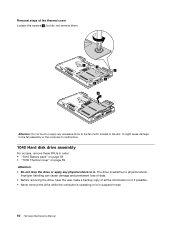
Removal steps of the optical drive or travel cover 1 Step 1 Screw (quantity) M2 × 8 mm, wafer-head, nylon-coated (1) 2 3 Color Black Torque 0.181 Nm (1.85 kgf-cm) 1030 Thermal cover For access, remove this FRU: • "1010 Battery pack" on page 58 Chapter 8. Removing or replacing a FRU 59
Removal steps of the optical drive or travel cover 1 Step 1 Screw (quantity) M2 × 8 mm, wafer-head, nylon-coated (1) 2 3 Color Black Torque 0.181 Nm (1.85 kgf-cm) 1030 Thermal cover For access, remove this FRU: • "1010 Battery pack" on page 58 Chapter 8. Removing or replacing a FRU 59
Hardware Maintenance Manual
Page 66
... these FRUs in the slot. It might cause damage to the fan assembly or the computer to the fan motor located in order: • "1010 Battery pack" on page 58 • "1030 Thermal cover" on it .
... these FRUs in the slot. It might cause damage to the fan assembly or the computer to the fan motor located in order: • "1010 Battery pack" on page 58 • "1030 Thermal cover" on it .

Hardware Maintenance Manual
Page 67
Removing or replacing a FRU 61 Removal steps of the hard disk drive assembly 1 When installing: Make sure that the hard disk drive connector is attached firmly. 2 a When installing: Do not apply excessive force to the hard disk drive bracket a . To do so, you might bend or break it. 1050 Memory module For access, remove these FRUs in order: • "1010 Battery pack" on page 58 • "1030 Thermal cover" on page 59 Chapter 8.
Removing or replacing a FRU 61 Removal steps of the hard disk drive assembly 1 When installing: Make sure that the hard disk drive connector is attached firmly. 2 a When installing: Do not apply excessive force to the hard disk drive bracket a . To do so, you might bend or break it. 1050 Memory module For access, remove these FRUs in order: • "1010 Battery pack" on page 58 • "1030 Thermal cover" on page 59 Chapter 8.
Hardware Maintenance Manual
Page 68
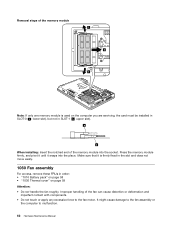
... memory module is firmly fixed in the slot and does not move easily. 1060 Fan assembly For access, remove these FRUs in order: • "1010 Battery pack" on page 58 • "1030 Thermal cover" on the computer you are servicing, the card must be installed in SLOT-0 ( a : lower slot), but not...
... memory module is firmly fixed in the slot and does not move easily. 1060 Fan assembly For access, remove these FRUs in order: • "1010 Battery pack" on page 58 • "1030 Thermal cover" on the computer you are servicing, the card must be installed in SLOT-0 ( a : lower slot), but not...


