
Owners Manual
Page 2
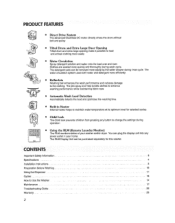
... can be purchased separately for selected cycles I Child Lock The Child lock prevents children from pressing any button to Use the Washer ... 14 Maintenance ... 17 Troubleshooting Guide 20 Warranty 23 Built-in your home, The RLM Display Unit can be removed more easily by the water shower during nnse cycle, The...
... can be purchased separately for selected cycles I Child Lock The Child lock prevents children from pressing any button to Use the Washer ... 14 Maintenance ... 17 Troubleshooting Guide 20 Warranty 23 Built-in your home, The RLM Display Unit can be removed more easily by the water shower during nnse cycle, The...
Owners Manual
Page 20
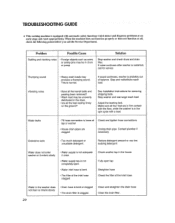
... If noise continues after washer is restarted, call the Service Department. When tile machine does not funcfiun properly or does n{)t funclion at tap or washer . TROUBLESHOOTING GUIDE * This washing machine is equipped with a load Water leaks Fii[ hose connection [s loose at all, check tile folh)wing points befibre yon call for...
... If noise continues after washer is restarted, call the Service Department. When tile machine does not funcfiun properly or does n{)t funclion at tap or washer . TROUBLESHOOTING GUIDE * This washing machine is equipped with a load Water leaks Fii[ hose connection [s loose at all, check tile folh)wing points befibre yon call for...
Owners Manual
Page 21
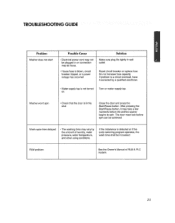
TROUBLESHOOTING GUIDE : Problem Washer does not start Poss_le Cause • Electrical power cord may not be plugged in wall outlet. Water supply tap is b]own, circuit ...
TROUBLESHOOTING GUIDE : Problem Washer does not start Poss_le Cause • Electrical power cord may not be plugged in wall outlet. Water supply tap is b]own, circuit ...
Owners Manual
Page 22
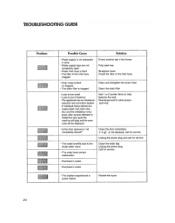
... Unplug the power plug Call for service • Overload in motor • Overload in motor • The washer experienced a power failure Restart the cycle 22 TROUBLESHOOTING GUIDE Problem Possible Cause Solution -
... Unplug the power plug Call for service • Overload in motor • Overload in motor • The washer experienced a power failure Restart the cycle 22 TROUBLESHOOTING GUIDE Problem Possible Cause Solution -
Service Manual
Page 3
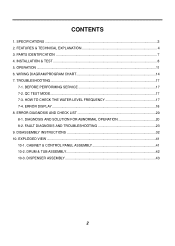
... ABNORMAL OPERATION 20 8-2. HOW TO CHECK THE WATER LEVEL FREQUENCY 17 7-4. PARTS IDENTIFICATION ...7 4. BEFORE PERFORMING SERVICE 17 7-2. ERROR DISPLAY ...18 8. WIRING DIAGRAM/PROGRAM CHART 14 7. TROUBLESHOOTING...17 7-1. INSTALLATION & TEST ...8 5. SPECIFICATIONS ...3 2. ERROR DIAGNOSIS AND CHECK LIST 20 8-1. DISASSEMBLY INSTRUCTIONS 32 10. DISPENSER ASSEMBLY 43 2 QC TEST MODE...17 7-3. DRUM & TUB ASSEMBLY 42...
... ABNORMAL OPERATION 20 8-2. HOW TO CHECK THE WATER LEVEL FREQUENCY 17 7-4. PARTS IDENTIFICATION ...7 4. BEFORE PERFORMING SERVICE 17 7-2. ERROR DISPLAY ...18 8. WIRING DIAGRAM/PROGRAM CHART 14 7. TROUBLESHOOTING...17 7-1. INSTALLATION & TEST ...8 5. SPECIFICATIONS ...3 2. ERROR DIAGNOSIS AND CHECK LIST 20 8-1. DISASSEMBLY INSTRUCTIONS 32 10. DISPENSER ASSEMBLY 43 2 QC TEST MODE...17 7-3. DRUM & TUB ASSEMBLY 42...
Service Manual
Page 9
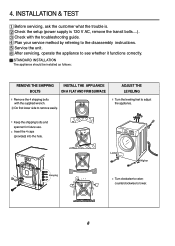
... The appliance should be installed as follows: REMOVE THE SHIPPING BOLTS INSTALL THE APPLIANCE ON A FLAT AND FIRM SURFACE Remove the 4 shipping bolts with the troubleshooting guide. 4. Keep the shipping bolts and spanner for future use. After servicing, operate the appliance to raise; Turn clockwise to see whether it functions correctly...
... The appliance should be installed as follows: REMOVE THE SHIPPING BOLTS INSTALL THE APPLIANCE ON A FLAT AND FIRM SURFACE Remove the 4 shipping bolts with the troubleshooting guide. 4. Keep the shipping bolts and spanner for future use. After servicing, operate the appliance to raise; Turn clockwise to see whether it functions correctly...
Service Manual
Page 18
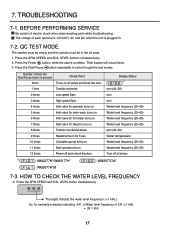
... Tumble counterclockwise. 9 times Heater turns on for example a display indicating 241: a Water level frequency of electric shock when disconnecting parts while troubleshooting. So, for 3 sec. 10 times Circulation pump turns on. 11 times Drain pump turns on all lamps. 1) : WM2277H*/WM2177H* ...*M 7-3. The washer must be empty and the controls must be in . 7-2. The digits indicate the water level frequency ( x.1 kHz ). TROUBLESHOOTING 7-1. Press the Start/Pause button repeatedly to cycle through the test modes. 7. BEFORE PERFORMING SERVICE Be careful of 241 x.1 kHz = 24.1...
... Tumble counterclockwise. 9 times Heater turns on for example a display indicating 241: a Water level frequency of electric shock when disconnecting parts while troubleshooting. So, for 3 sec. 10 times Circulation pump turns on. 11 times Drain pump turns on all lamps. 1) : WM2277H*/WM2177H* ...*M 7-3. The washer must be empty and the controls must be in . 7-2. The digits indicate the water level frequency ( x.1 kHz ). TROUBLESHOOTING 7-1. Press the Start/Pause button repeatedly to cycle through the test modes. 7. BEFORE PERFORMING SERVICE Be careful of 241 x.1 kHz = 24.1...
Service Manual
Page 24
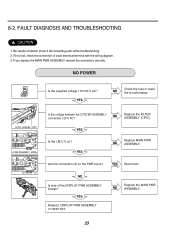
... of the DISPLAY PWB ASSEMBLY broken? Is the voltage between the 2 FILTER ASSEMBLY NO connectors 120 V AC? YES Reconnect. FAULT DIAGNOSIS AND TROUBLESHOOTING CAUTION 1. NO POWER Connector Is the supplied voltage 110/120 V AC? Are the connectors (2) on ? NO Is wire of each electrical ...ASSEMBLY. If you replace the MAIN PWB ASSEMBLY, reinsert the connectors correctly. Be careful of electric shock if disconnecting parts while troubleshooting. 2. 8-2. YES Replace DISPLAY PWB ASSEMBLY or repair wire. YES NO Check the fuse or reset the circuit breaker. Replace the FILTER...
... of the DISPLAY PWB ASSEMBLY broken? Is the voltage between the 2 FILTER ASSEMBLY NO connectors 120 V AC? YES Reconnect. FAULT DIAGNOSIS AND TROUBLESHOOTING CAUTION 1. NO POWER Connector Is the supplied voltage 110/120 V AC? Are the connectors (2) on ? NO Is wire of each electrical ...ASSEMBLY. If you replace the MAIN PWB ASSEMBLY, reinsert the connectors correctly. Be careful of electric shock if disconnecting parts while troubleshooting. 2. 8-2. YES Replace DISPLAY PWB ASSEMBLY or repair wire. YES NO Check the fuse or reset the circuit breaker. Replace the FILTER...

