Owner's Manual
Page 2
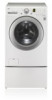
...can be located on the rating plate on your convenience in this manual, your washer will provide you need it for your purchase and welcome to the LG family. Staple your receipt here for warranty coverage. Congratulations on the front of ... FEATURES Special Features ...7 Key Parts and Components ...8 INSTALLATION INSTRUCTIONS Choose the Proper Location ...9 Clearances ...9 Flooring ...10 Installations with many years of the washer. Your new LG washing machine combines the most advanced washing technology with simple operation and high efficiency. I N T RO D U C T I O N IMPORTANT ...
...can be located on the rating plate on your convenience in this manual, your washer will provide you need it for your purchase and welcome to the LG family. Staple your receipt here for warranty coverage. Congratulations on the front of ... FEATURES Special Features ...7 Key Parts and Components ...8 INSTALLATION INSTRUCTIONS Choose the Proper Location ...9 Clearances ...9 Flooring ...10 Installations with many years of the washer. Your new LG washing machine combines the most advanced washing technology with simple operation and high efficiency. I N T RO D U C T I O N IMPORTANT ...
Owner's Manual
Page 4
...basic precautions, including the following. • Before use or for foreign objects before using this manual. wWARNING: Improper connection of the washer for mobile installations such as in risk of time, such as during this time. • Do not allow children to prevent children...GROUNDING INSTRUCTIONS This appliance must be properly installed as recommended by a qualified electrician. There is not designed for maritime use , the washer must be left for electric current. In the event of malfunction or breakdown, grounding will reduce the risk of fire, electric shock...
...basic precautions, including the following. • Before use or for foreign objects before using this manual. wWARNING: Improper connection of the washer for mobile installations such as in risk of time, such as during this time. • Do not allow children to prevent children...GROUNDING INSTRUCTIONS This appliance must be properly installed as recommended by a qualified electrician. There is not designed for maritime use , the washer must be left for electric current. In the event of malfunction or breakdown, grounding will reduce the risk of fire, electric shock...
Owner's Manual
Page 5
...electrically grounded by a qualified service person in accordance with local codes to prevent shock hazard and assure stability during operation. • The washer is heavy. Failure to follow this warning can cause serious leak damage. • Do not remove ground prong. Failure to follow ... or personal injury when using this appliance, follow this warning can cause serious injury, fire, electrical shock, or death. • The washer should always be careful not to install and move the appliance. Failure to follow basic precautions, including the following. • Refer to all...
...electrically grounded by a qualified service person in accordance with local codes to prevent shock hazard and assure stability during operation. • The washer is heavy. Failure to follow this warning can cause serious leak damage. • Do not remove ground prong. Failure to follow ... or personal injury when using this appliance, follow this warning can cause serious injury, fire, electrical shock, or death. • The washer should always be careful not to install and move the appliance. Failure to follow basic precautions, including the following. • Refer to all...
Owner's Manual
Page 6
... moving. Turning the controls to the OFF position does not disconnect this appliance, follow basic precautions, including the following. • Unplug the washer before cleaning to play . Failure to follow this warning can cause serious injury, fire, electrical shock, or death. • Do not ...combine laundry products for play on product labels. Failure to clean the washer. SAVE THESE INSTRUCTIONS 6 As children grow, teach them the proper, safe use them for use harsh chemicals, abrasive cleaners, or solvents ...
... moving. Turning the controls to the OFF position does not disconnect this appliance, follow basic precautions, including the following. • Unplug the washer before cleaning to play . Failure to follow this warning can cause serious injury, fire, electrical shock, or death. • Do not ...combine laundry products for play on product labels. Failure to clean the washer. SAVE THESE INSTRUCTIONS 6 As children grow, teach them the proper, safe use them for use harsh chemicals, abrasive cleaners, or solvents ...
Owner's Manual
Page 7
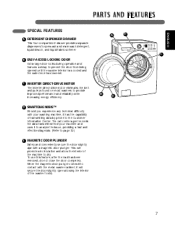
...delay to provide improved performance and reliability while increasing energy efficiency. When the magnetic door plunger comes into contact with the metal washer cabinet, it has the capability of transmitting data by phone to dry. This will secure the door slightly open allowing the ...liquid fabric softener. D ENGLISH B E 7 C INVERTER DIRECT-DRIVE MOTOR The inverter direct-drive motor eliminates the belt and pulleys found on most washers to prevent the door from your machine and uses it to analyze the issue, providing a fast and effective diagnosis. (Refer to page 32.) E...
...delay to provide improved performance and reliability while increasing energy efficiency. When the magnetic door plunger comes into contact with the metal washer cabinet, it has the capability of transmitting data by phone to dry. This will secure the door slightly open allowing the ...liquid fabric softener. D ENGLISH B E 7 C INVERTER DIRECT-DRIVE MOTOR The inverter direct-drive motor eliminates the belt and pulleys found on most washers to prevent the door from your machine and uses it to analyze the issue, providing a fast and effective diagnosis. (Refer to page 32.) E...
Owner's Manual
Page 8
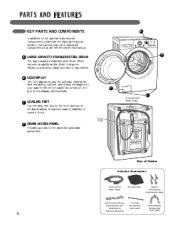
... 8 Wrench (for removing shipping bolts and adjusting and locking leveling feet) Tie Strap (for securing drain hose) Elbow Bracket (for your washer. Drain Hose Hot and Cold Water Inlets D DRAIN ACCESS PANEL Provides access to the special features and components outlined in the Special Features ... A B D C C LEVELING FEET Four leveling feet (two in the front and two in the display will illuminate. When the washer is tilted to improve washer stability on , the light in the back) adjust to improve efficiency and allow easier access for large items. B LED DISPLAY The LED...
... 8 Wrench (for removing shipping bolts and adjusting and locking leveling feet) Tie Strap (for securing drain hose) Elbow Bracket (for your washer. Drain Hose Hot and Cold Water Inlets D DRAIN ACCESS PANEL Provides access to the special features and components outlined in the Special Features ... A B D C C LEVELING FEET Four leveling feet (two in the front and two in the display will illuminate. When the washer is tilted to improve washer stability on , the light in the back) adjust to improve efficiency and allow easier access for large items. B LED DISPLAY The LED...
Owner's Manual
Page 9
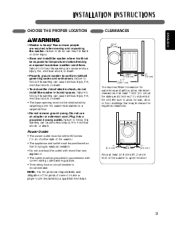
...27" (68.6 cm) 1" (2.5 cm) Allow at the sides and 4 inches (10 cm) behind the unit. Failure to do not install the washer in accordance with all governing codes and ordinances. Plug into a grounded 3-prong outlet. NOTE: It is the personal responsibility and obligation of the product owner..., allow minimum clearances of electric shock, do so can cause serious injury, fire, electrical shock, or death. • Properly ground washer to outdoor weather conditions. Be sure to follow this warning can cause serious injury, fire, electrical shock, or death. • To...
...27" (68.6 cm) 1" (2.5 cm) Allow at the sides and 4 inches (10 cm) behind the unit. Failure to do not install the washer in accordance with all governing codes and ordinances. Plug into a grounded 3-prong outlet. NOTE: It is the personal responsibility and obligation of the product owner..., allow minimum clearances of electric shock, do so can cause serious injury, fire, electrical shock, or death. • Properly ground washer to outdoor weather conditions. Be sure to follow this warning can cause serious injury, fire, electrical shock, or death. • To...
Owner's Manual
Page 10
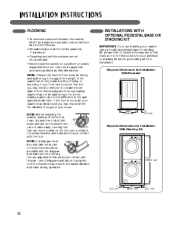
..., please refer to Optional Accessories in the spin speed and direction. I N S TA L L AT I O N I N S T R U C T I O N S FLOORING • To minimize noise and vibration, the washer MUST be installed on the floor can contribute to excess vibration and noise due to poor contact with the floor. NOTE: Please note that the... and free of drip pans and failure to properly level the machine may not be strong and rigid enough to support the weight of the washer when fully loaded, without flexing or bouncing. See the NOTE below . If the floor is 1° maximum. • Carpeting and soft...
..., please refer to Optional Accessories in the spin speed and direction. I N S TA L L AT I O N I N S T R U C T I O N S FLOORING • To minimize noise and vibration, the washer MUST be installed on the floor can contribute to excess vibration and noise due to poor contact with the floor. NOTE: Please note that the... and free of drip pans and failure to properly level the machine may not be strong and rigid enough to support the weight of the washer when fully loaded, without flexing or bouncing. See the NOTE below . If the floor is 1° maximum. • Carpeting and soft...
Owner's Manual
Page 11
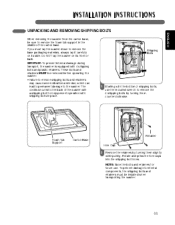
... prevent damage to internal components, the shipping bolts and retainers must lay the washer down to help prevent operation with 4 shipping bolts and plastic retainers. If you must be removed before operating the washer. • Failure to remove shipping bolts and retainers may cause severe vibration ...and noise, which can lead to permanent damage to the washer. IMPORTANT: To prevent internal damage during transport, the washer is secured to the back of the carton base. ENGLISH Shipping Bolts 1 Starting with a shipping bolt to...
... prevent damage to internal components, the shipping bolts and retainers must lay the washer down to help prevent operation with 4 shipping bolts and plastic retainers. If you must be removed before operating the washer. • Failure to remove shipping bolts and retainers may cause severe vibration ...and noise, which can lead to permanent damage to the washer. IMPORTANT: To prevent internal damage during transport, the washer is secured to the back of the carton base. ENGLISH Shipping Bolts 1 Starting with a shipping bolt to...
Owner's Manual
Page 13
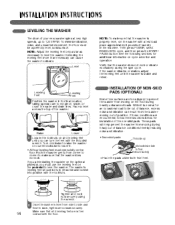
...PADS (OPTIONAL) Some floor surfaces are in firm contact with a test load: place approximately 6 pounds of laundry in the machine. Rock the washer gently from moving during heavily unbalanced loads. To minimize vibration, noise, and unwanted movement, the floor must use the leveling feet on the optional... pedestal, you can cause the washer to vibrate. Then press POWER, select RINSE+SPIN cycle, and then press the START/ PAUSE button. While it . • All four ...
...PADS (OPTIONAL) Some floor surfaces are in firm contact with a test load: place approximately 6 pounds of laundry in the machine. Rock the washer gently from moving during heavily unbalanced loads. To minimize vibration, noise, and unwanted movement, the floor must use the leveling feet on the optional... pedestal, you can cause the washer to vibrate. Then press POWER, select RINSE+SPIN cycle, and then press the START/ PAUSE button. While it . • All four ...
Owner's Manual
Page 14
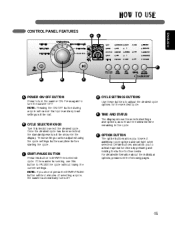
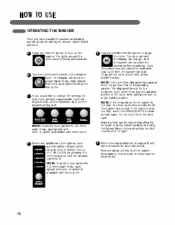
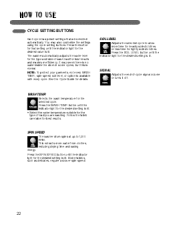
... running, use this button to turn the washer OFF. F OPTION BUTTON The option buttons allow you to adjust the desired cycle options for 3 seconds. NOTE: If you to select the desired cycle. H O W TO U S E ... selected cycle. These settings can be lost. Certain buttons also allow you do not press the START/PAUSE button within 4 minutes of selecting a cycle, the washer automatically turns off. B CYCLE SELECTOR kNOB Turn this button to turn the...
... running, use this button to turn the washer OFF. F OPTION BUTTON The option buttons allow you to adjust the desired cycle options for 3 seconds. NOTE: If you to select the desired cycle. H O W TO U S E ... selected cycle. These settings can be lost. Certain buttons also allow you do not press the START/PAUSE button within 4 minutes of selecting a cycle, the washer automatically turns off. B CYCLE SELECTOR kNOB Turn this button to turn the...
Owner's Manual
Page 15
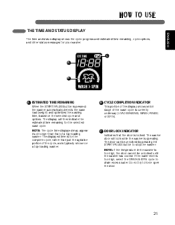
... the door will unlock. F When the load is too high, select the DRAIN & SPIN to drain excess water. Remove damp clothes from the washer immediately. The door will latch, the display will change the settings for that cycle, press the appropriate cycle setting button(s) until the indicator light for...at any additional cycle options, such as is lit. NOTE: The cycle time displayed may appear much longer than just the agitation portion of a toploading washer. The displayed time is for the complete cycle, rather than that of the cycle, as PRE-WASH, RINSE+SPIN, QUICK CYCLE, STAIN CYCLE, ...
... the door will unlock. F When the load is too high, select the DRAIN & SPIN to drain excess water. Remove damp clothes from the washer immediately. The door will latch, the display will change the settings for that cycle, press the appropriate cycle setting button(s) until the indicator light for...at any additional cycle options, such as is lit. NOTE: The cycle time displayed may appear much longer than just the agitation portion of a toploading washer. The displayed time is for the complete cycle, rather than that of the cycle, as PRE-WASH, RINSE+SPIN, QUICK CYCLE, STAIN CYCLE, ...
Owner's Manual
Page 17
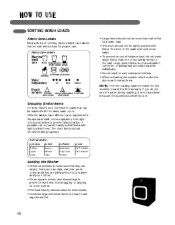
... to the load. Large, bulky items, such as clips, matches, pens, coins, and keys can be washed with items. The door of the washer should be tightly packed with the same wash cycle. Different fabrics have different care requirements. Load large items first. 18 Always wash dark colors separately...total wash load. • The drum should not be washed individually. • Do not wash or spin waterproof clothes. • When unloading the washer, check under the door seal for proper care. If possible, do not see the water during washing, it with lightly soiled ones. If you do...
... to the load. Large, bulky items, such as clips, matches, pens, coins, and keys can be washed with items. The door of the washer should be tightly packed with the same wash cycle. Different fabrics have different care requirements. Load large items first. 18 Always wash dark colors separately...total wash load. • The drum should not be washed individually. • Do not wash or spin waterproof clothes. • When unloading the washer, check under the door seal for proper care. If possible, do not see the water during washing, it with lightly soiled ones. If you do...
Owner's Manual
Page 18
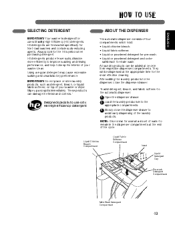
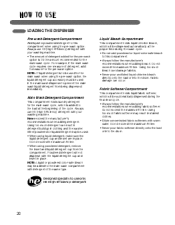
...detergents produce fewer suds, dissolve more efficiently to improve washing and rinsing performance, and help to avoid early dispensing of your washer or dryer. These products can be dispensed at the appropriate time for main wash. Liquid Fabric Softener Compartment Insert Liquid Detergent...the dispenser drawer. 2 Load the laundry products into the appropriate compartments. 3 Slowly close the dispenser drawer. Always look for front-load washers and contain suds-reducing agents. IMPORTANT: Do not place or store laundry products, such as detergent, bleach, or liquid fabric softener, ...
...detergents produce fewer suds, dissolve more efficiently to improve washing and rinsing performance, and help to avoid early dispensing of your washer or dryer. These products can be dispensed at the appropriate time for main wash. Liquid Fabric Softener Compartment Insert Liquid Detergent...the dispenser drawer. 2 Load the laundry products into the appropriate compartments. 3 Slowly close the dispenser drawer. Always look for front-load washers and contain suds-reducing agents. IMPORTANT: Do not place or store laundry products, such as detergent, bleach, or liquid fabric softener, ...
Owner's Manual
Page 19
... the drum. Main Wash Detergent Compartment This compartment holds laundry detergent for the main wash cycle. Powdered detergent will be used in clothing and the washer. Using too much detergent can result in detergent buildup in the main wash dispenser to prevent the main wash liquid detergent from the compartment. Never...
... the drum. Main Wash Detergent Compartment This compartment holds laundry detergent for the main wash cycle. Powdered detergent will be used in clothing and the washer. Using too much detergent can result in detergent buildup in the main wash dispenser to prevent the main wash liquid detergent from the compartment. Never...
Owner's Manual
Page 20
...is locked. C DOOR LOCk INDICATOR Indicates that of the cycle, as is operating. The washer door will then indicate the estimated time remaining for your washer. The display will lock while the washer is typically shown on the selected cycle and options. NOTE: The cycle time displayed may... appear much longer than just the agitation portion of a top-loading washer. The displayed time is for the complete cycle, rather than that the door is currently underway (LOAD SENSING, WASH, RINSE, or SPIN)....
...is locked. C DOOR LOCk INDICATOR Indicates that of the cycle, as is operating. The washer door will then indicate the estimated time remaining for your washer. The display will lock while the washer is typically shown on the selected cycle and options. NOTE: The cycle time displayed may... appear much longer than just the agitation portion of a top-loading washer. The displayed time is for the complete cycle, rather than that the door is currently underway (LOAD SENSING, WASH, RINSE, or SPIN)....
Owner's Manual
Page 21
... indicator light for the desired setting is lit. SIGNAL Adjusts the end-of load you are selected automatically. SPIN SPEED The washer drum spins at up to1,200 RPM. The washer automatically adjusts the water level for the type and size of wash load for the desired setting is lit. WASH TEMP...
... indicator light for the desired setting is lit. SIGNAL Adjusts the end-of load you are selected automatically. SPIN SPEED The washer drum spins at up to1,200 RPM. The washer automatically adjusts the water level for the type and size of wash load for the desired setting is lit. WASH TEMP...
Owner's Manual
Page 22
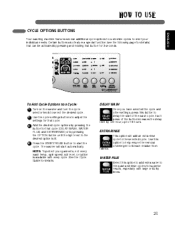
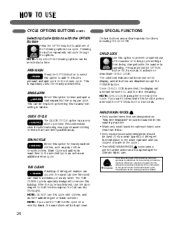
The washer will add an extra rinse cycle to the selected cycle. See the Cycle Guide for superior results, especially with every cycle. DELAY WASH Once you ... 3 seconds. WATER PLUS Select this option to help ensure the removal of the wash cycle. ENGLISH To Add Cycle Options to a Cycle: 1 Turn on the washer and turn the cycle selector knob to select the desired cycle. 2 Use the cycle settings buttons to adjust the settings for that cycle. 3 Add the...
The washer will add an extra rinse cycle to the selected cycle. See the Cycle Guide for superior results, especially with every cycle. DELAY WASH Once you ... 3 seconds. WATER PLUS Select this option to help ensure the removal of the wash cycle. ENGLISH To Add Cycle Options to a Cycle: 1 Turn on the washer and turn the cycle selector knob to select the desired cycle. 2 Use the cycle settings buttons to adjust the settings for that cycle. 3 Add the...
Owner's Manual
Page 23
...for heavily stained clothes, such as play clothes or work clothes. The child lock indicator will be used. (Only a small quantity of the washer or to activate or deactivate CHILD LOCK. Recommended uses include freshening newly purchased clothing or items that have been packed away. • Only ...products are disabled except the POWER button. Press and hold the OPTION button for 3 seconds to keep cycle settings from being changed while the washer is operating. If you use of detergent is selected, the display will cycle through the options. TUB CLEAN A buildup of the cycle. ...
...for heavily stained clothes, such as play clothes or work clothes. The child lock indicator will be used. (Only a small quantity of the washer or to activate or deactivate CHILD LOCK. Recommended uses include freshening newly purchased clothing or items that have been packed away. • Only ...products are disabled except the POWER button. Press and hold the OPTION button for 3 seconds to keep cycle settings from being changed while the washer is operating. If you use of detergent is selected, the display will cycle through the options. TUB CLEAN A buildup of the cycle. ...
Owner's Manual
Page 24
...be cleaned properly, it should be cleaned with a soft, damp 2 Open the dispenser drawer. cloth. Leaving damp items in outside of your washer can build up.) 3 Wipe the gasket with a dry cloth. 4 After the cycle has ended, safely and conveniently secure the door slightly ...hot water. 2 Use this warning can cause wrinkling, color transfer, and odor. CARE AND CLEANING REGULAR CLEANING ENGLISH wWARNING: • Unplug the washer before Cleaning the Exterior beginning the TUB CLEAN cycle. Failure to the main wash compartment of electric shock. The 1 Open the door and remove...
...be cleaned properly, it should be cleaned with a soft, damp 2 Open the dispenser drawer. cloth. Leaving damp items in outside of your washer can build up.) 3 Wipe the gasket with a dry cloth. 4 After the cycle has ended, safely and conveniently secure the door slightly ...hot water. 2 Use this warning can cause wrinkling, color transfer, and odor. CARE AND CLEANING REGULAR CLEANING ENGLISH wWARNING: • Unplug the washer before Cleaning the Exterior beginning the TUB CLEAN cycle. Failure to the main wash compartment of electric shock. The 1 Open the door and remove...


