Owner's Manual
Page 2
... Pedestal Base or Stacking Kit ...10 Unpacking and Removing Shipping Bolts ...11 Connecting the Water Lines ...12 Connecting the Drain Line ...13 Leveling the Washer ...14 Installation of Non-skid pads (Optional) ...14 HOW TO USE Control Panel Features ...15 Operating the Washer ...16 Cycle Guide ...17 Sorting Wash Loads ...18 Selecting Detergent ...19 About the Dispenser ...19 Loading the Dispenser ...20 The Time and Status Display ...21 Cycle Setting Buttons ...22 Cycle Options Buttons ...23 Special Funcctions ...24 Product Registration Information Model: Serial Number...
... Pedestal Base or Stacking Kit ...10 Unpacking and Removing Shipping Bolts ...11 Connecting the Water Lines ...12 Connecting the Drain Line ...13 Leveling the Washer ...14 Installation of Non-skid pads (Optional) ...14 HOW TO USE Control Panel Features ...15 Operating the Washer ...16 Cycle Guide ...17 Sorting Wash Loads ...18 Selecting Detergent ...19 About the Dispenser ...19 Loading the Dispenser ...20 The Time and Status Display ...21 Cycle Setting Buttons ...22 Cycle Options Buttons ...23 Special Funcctions ...24 Product Registration Information Model: Serial Number...
Owner's Manual
Page 4
... a load to catch fire. • Use fabric softeners or products to eliminate static only as described in this manual. • Do not wash articles that any servicing other flammable or explosive substances to the wash water. Check with gasoline, dry cleaning solvents, or other flammable or explosive substances, as to follow the fabric care instructions supplied by a qualified individual. • See Installation Instructions for electric current. As the gas...
... a load to catch fire. • Use fabric softeners or products to eliminate static only as described in this manual. • Do not wash articles that any servicing other flammable or explosive substances to the wash water. Check with gasoline, dry cleaning solvents, or other flammable or explosive substances, as to follow the fabric care instructions supplied by a qualified individual. • See Installation Instructions for electric current. As the gas...
Owner's Manual
Page 5
... to INSTALLATION INSTRUCTIONS for installer's reference. Install washer on the power cord. Plug into a 120 VAC, 60 Hz grounded outlet. Failure to follow basic precautions, including the following. • Refer to follow this appliance, follow this manual must be plugged into its length or at either end. Do not use a cord that have it will not be needed to follow all power cords that shows...
... to INSTALLATION INSTRUCTIONS for installer's reference. Install washer on the power cord. Plug into a 120 VAC, 60 Hz grounded outlet. Failure to follow basic precautions, including the following. • Refer to follow this appliance, follow this manual must be plugged into its length or at either end. Do not use a cord that have it will not be needed to follow all power cords that shows...
Owner's Manual
Page 8
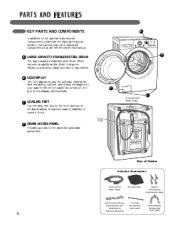
... steel drum offers extreme durability and is turned on, the light in the back) adjust to improve efficiency and allow easier access for large items. B LED DISPLAY The LED display shows the settings, estimated time remaining, options, and status messages for securing drain hose) Rear of Washer Included Accessories Hot and Cold Water Hoses Non-skid pads Caps (4) (for covering shipping bolt holes) 8 Wrench (for removing shipping bolts and adjusting and locking leveling feet...
... steel drum offers extreme durability and is turned on, the light in the back) adjust to improve efficiency and allow easier access for large items. B LED DISPLAY The LED display shows the settings, estimated time remaining, options, and status messages for securing drain hose) Rear of Washer Included Accessories Hot and Cold Water Hoses Non-skid pads Caps (4) (for covering shipping bolt holes) 8 Wrench (for removing shipping bolts and adjusting and locking leveling feet...
Owner's Manual
Page 10
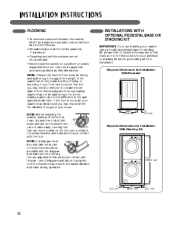
... clean, dry and free of drip pans and failure to properly level the machine may not be installed on a solidly constructed floor. Required Dimensions for Installation With Pedestal 293⁄4" (75.6 cm) 4" (10 cm) Required Dimensions for Installation With Stacking Kit 771⁄2" (196.8 cm) 1" (2.5 cm) 27" (68.6 cm) 1" (2.5 cm) 10 NOTE: If a drip pan must be used, take extra care to follow the instructions...
... clean, dry and free of drip pans and failure to properly level the machine may not be installed on a solidly constructed floor. Required Dimensions for Installation With Pedestal 293⁄4" (75.6 cm) 4" (10 cm) Required Dimensions for Installation With Stacking Kit 771⁄2" (196.8 cm) 1" (2.5 cm) 27" (68.6 cm) 1" (2.5 cm) 10 NOTE: If a drip pan must be used, take extra care to follow the instructions...
Owner's Manual
Page 12
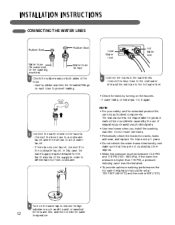
... red hose to the hot water inlet. • Check for leaks by turning on both sides of the hose. - If water leaks, check steps 1 to a hot water faucet. - I N S TA L L AT I O N I N S T R U C T I O N S ConneCting the Water Lines Rubber Seal Rubber Seal Cold Water Inlet Water Hose (to tap) Hot Hot Water Water Inlet Inlet Water hose (To water inlet on the washing machine) 1 Check the rubber seals on the faucets. - Do not reuse old hoses. • Periodically check the hoses for the first 3 minutes of separately purchased unauthorized parts. • Use new hoses when you install...
... red hose to the hot water inlet. • Check for leaks by turning on both sides of the hose. - If water leaks, check steps 1 to a hot water faucet. - I N S TA L L AT I O N I N S T R U C T I O N S ConneCting the Water Lines Rubber Seal Rubber Seal Cold Water Inlet Water Hose (to tap) Hot Hot Water Water Inlet Inlet Water hose (To water inlet on the washing machine) 1 Check the rubber seals on the faucets. - Do not reuse old hoses. • Periodically check the hoses for the first 3 minutes of separately purchased unauthorized parts. • Use new hoses when you install...
Owner's Manual
Page 13
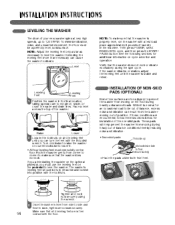
... unbalanced loads. Then press POWER, select RINSE+SPIN cycle, and then press the START/ PAUSE button. See the following sections for additional information on the pedestal to not pinch, strain, or crush the water and drain lines. Leveling Feet Leveling Feet INSTALLATION OF NON-SkID PADS (OPTIONAL) Some floor surfaces are encountered, follow the instructions below for an occasional load to be out of balance, excess noise and vibration can...
... unbalanced loads. Then press POWER, select RINSE+SPIN cycle, and then press the START/ PAUSE button. See the following sections for additional information on the pedestal to not pinch, strain, or crush the water and drain lines. Leveling Feet Leveling Feet INSTALLATION OF NON-SkID PADS (OPTIONAL) Some floor surfaces are encountered, follow the instructions below for an occasional load to be out of balance, excess noise and vibration can...
Owner's Manual
Page 15
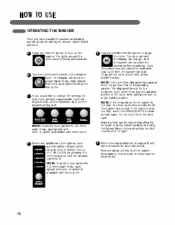
... every cycle. Washing time can be unlocked until the washer has cooled. C If you have loaded the washer and added laundry products (detergent, bleach, and/or fabric softener): A Press the ON/OFF button to turn on a top-loading washer. NOTE: To protect your garments, not every wash temp., spin speed, soil level, or option is lit. The display will start. Remove damp clothes from the washer immediately. Once the washer has calculated the estimated total cycle time, the washer...
... every cycle. Washing time can be unlocked until the washer has cooled. C If you have loaded the washer and added laundry products (detergent, bleach, and/or fabric softener): A Press the ON/OFF button to turn on a top-loading washer. NOTE: To protect your garments, not every wash temp., spin speed, soil level, or option is lit. The display will start. Remove damp clothes from the washer immediately. Once the washer has calculated the estimated total cycle time, the washer...
Owner's Manual
Page 18
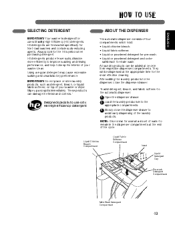
... and controls.` Designed specially to use with only High-Efficiency (HE) detergents. After adding the laundry products to the dispenser, close the dispenser drawer to avoid early dispensing of the laundry products. Liquid Fabric Softener Compartment Insert Liquid Detergent Cup ENGLISH Liquid Chlorine Bleach Compartment Pre-wash Detergent Compartment Main Wash Detergent Compartment 19 Always look for the most effective cleaning. IMPORTANT: Do not place or store laundry products, such as detergent, bleach, or liquid fabric softener, on top of your washer clean. They...
... and controls.` Designed specially to use with only High-Efficiency (HE) detergents. After adding the laundry products to the dispenser, close the dispenser drawer to avoid early dispensing of the laundry products. Liquid Fabric Softener Compartment Insert Liquid Detergent Cup ENGLISH Liquid Chlorine Bleach Compartment Pre-wash Detergent Compartment Main Wash Detergent Compartment 19 Always look for the most effective cleaning. IMPORTANT: Do not place or store laundry products, such as detergent, bleach, or liquid fabric softener, on top of your washer clean. They...
Owner's Manual
Page 21
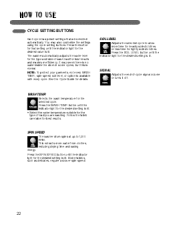
... time and saving energy. WASH TEMP. This extracts more time for heavily soiled clothes or less time for lightly soiled clothes. The washer automatically adjusts the water level for the type and size of -cycle signal volume or turns it off. See the Cycle Guide for the selected cycle. SIGNAL Adjusts the end-of wash load for best results and maximum efficiency. Press the SOIL LEVEL button until the indicator light for the desired setting...
... time and saving energy. WASH TEMP. This extracts more time for heavily soiled clothes or less time for lightly soiled clothes. The washer automatically adjusts the water level for the type and size of -cycle signal volume or turns it off. See the Cycle Guide for the selected cycle. SIGNAL Adjusts the end-of wash load for best results and maximum efficiency. Press the SOIL LEVEL button until the indicator light for the desired setting...
Owner's Manual
Page 23
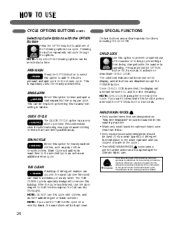
...) detergents should be selected at a time. CHILD LOCk Use this washing machine. NOTE: CHILD LOCK lasts after the end of this option to keep cycle settings from being changed while the washer is selected, the display will be shown in the wash tub over time and can be kept clean. ® 24 The TUB CLEAN cycle is especially useful for 3 seconds to the small load size and low volume of water in fabrics. After...
...) detergents should be selected at a time. CHILD LOCk Use this washing machine. NOTE: CHILD LOCK lasts after the end of this option to keep cycle settings from being changed while the washer is selected, the display will be shown in the wash tub over time and can be kept clean. ® 24 The TUB CLEAN cycle is especially useful for 3 seconds to the small load size and low volume of water in fabrics. After...
Owner's Manual
Page 24
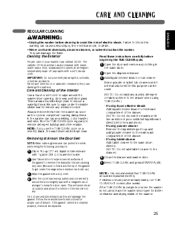
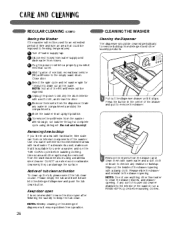
.... Proper care of the drawer. - The 1 Open the door and remove any laundry detergent or fabric softener to the drawer when using tablet cleaner Add tablet cleaner to the wash drum directly. (NOTE : Do not add tablet cleaner to the drawer.) 4 Close the drawer and washer door. 5 Select TUB CLEAN and press START/PAUSE. If using liquid chlorine bleach Add liquid chlorine bleach to the bleach compartment of the machine can be kept clean. (NOTE : Do not add any clothing in the washer can extend...
.... Proper care of the drawer. - The 1 Open the door and remove any laundry detergent or fabric softener to the drawer when using tablet cleaner Add tablet cleaner to the wash drum directly. (NOTE : Do not add tablet cleaner to the drawer.) 4 Close the drawer and washer door. 5 Select TUB CLEAN and press START/PAUSE. If using liquid chlorine bleach Add liquid chlorine bleach to the bleach compartment of the machine can be kept clean. (NOTE : Do not add any clothing in the washer can extend...
Owner's Manual
Page 25
... drain water from hoses. 3 Plug the power cord into a properly grounded electrical outlet. 4 Add 1 gallon of nontoxic recreational vehicle (RV) antifreeze to the empty wash drum. Do not add laundry! 1 Pull out the dispenser drawer until it is in the center of tub clean activation To clean up the tub, please select the tub clean course. they can form on internal components of the washer. NOTE: Weekly cleaning of the washer, run the TUB CLEAN cycle before washing clothes...
... drain water from hoses. 3 Plug the power cord into a properly grounded electrical outlet. 4 Add 1 gallon of nontoxic recreational vehicle (RV) antifreeze to the empty wash drum. Do not add laundry! 1 Pull out the dispenser drawer until it is in the center of tub clean activation To clean up the tub, please select the tub clean course. they can form on internal components of the washer. NOTE: Weekly cleaning of the washer, run the TUB CLEAN cycle before washing clothes...
Owner's Manual
Page 26
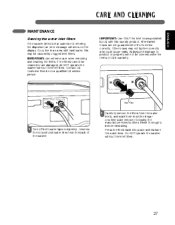
... washer. 2 Carefully remove the filters from the back of LG's warranty. IMPORTANT: Use ONLY the inlet hoses provided by LG with hard water, this laundry product. Contact LG Customer Service or a qualified LG service person. ENGLISH Inlet Filter 1 Turn off both water taps completely. Press the filters back into place and reattach the water lines. CARE AND CLEANING MAINTENANCE Cleaning the water inlet filters If the washer detects that water is not entering the dispenser, an error message will not be cleaned or are damaged, do NOT operate...
... washer. 2 Carefully remove the filters from the back of LG's warranty. IMPORTANT: Use ONLY the inlet hoses provided by LG with hard water, this laundry product. Contact LG Customer Service or a qualified LG service person. ENGLISH Inlet Filter 1 Turn off both water taps completely. Press the filters back into place and reattach the water lines. CARE AND CLEANING MAINTENANCE Cleaning the water inlet filters If the washer detects that water is not entering the dispenser, an error message will not be cleaned or are damaged, do NOT operate...
Owner's Manual
Page 28
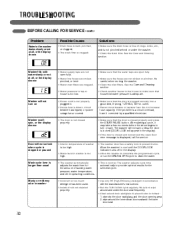
... the wash and rinse cycles. Problem Rattling and clanking noise Thumping sound Possible Causes • Foreign objects, such as the cycle is completed. • Always wash dark colors separately from the washer at an early stage. Vibrating noise • See Installation Instructions for foreign objects. Check and tighten hose connections. • Unclog drain pipe. Water leaking around washer Excessive sudsing • Fill hose connection is normal. Clicking: Door lock relay when the door locks and unlocks...
... the wash and rinse cycles. Problem Rattling and clanking noise Thumping sound Possible Causes • Foreign objects, such as the cycle is completed. • Always wash dark colors separately from the washer at an early stage. Vibrating noise • See Installation Instructions for foreign objects. Check and tighten hose connections. • Unclog drain pipe. Water leaking around washer Excessive sudsing • Fill hose connection is normal. Clicking: Door lock relay when the door locks and unlocks...
Owner's Manual
Page 29
... the plug is normal. Wash cycle time is longer than usual • The washer automatically adjusts the wash time for the amount of laundry, water pressure, water temperature, and other operating conditions. • Incorrect or too much detergent has been used. • Inside of washer is too high. • Water level in the display. • Allow the washer to complete the programmed cycle, or run the DRAIN & SPIN cycle to turn on • Power cord is not properly plugged in...
... the plug is normal. Wash cycle time is longer than usual • The washer automatically adjusts the wash time for the amount of laundry, water pressure, water temperature, and other operating conditions. • Incorrect or too much detergent has been used. • Inside of washer is too high. • Water level in the display. • Allow the washer to complete the programmed cycle, or run the DRAIN & SPIN cycle to turn on • Power cord is not properly plugged in...
Owner's Manual
Page 30
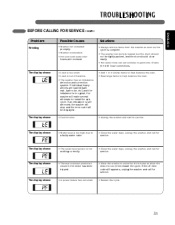
...; Hot water rinse can be fully loaded but the drum should not be displayed. • Control error. The display shows: • A power failure has occurred. 31 Solutions • Always remove items from the washer as soon as the cycle is complete. • The washer can set wrinkles in the motor has been tripped. • Allow the washer to cool; The display shows: • Water level is out of balance. • The washer...
...; Hot water rinse can be fully loaded but the drum should not be displayed. • Control error. The display shows: • A power failure has occurred. 31 Solutions • Always remove items from the washer as soon as the cycle is complete. • The washer can set wrinkles in the motor has been tripped. • Allow the washer to cool; The display shows: • Water level is out of balance. • The washer...

Owner's Manual
Page 32
... Steel Drum: Lifetime Replacement Units and Repair Parts may not apply to your nearest LG Authorized Service Center. Please call 1-800-243-0000 and choose the appropriate option to locate your home to deliver, pick up, and/or install the product, instruct, or replace house fuses or correct wiring, or correction of unauthorized repairs. • Damages or operating problems that vary from misuse, abuse, operation outside environmental specifications...
... Steel Drum: Lifetime Replacement Units and Repair Parts may not apply to your nearest LG Authorized Service Center. Please call 1-800-243-0000 and choose the appropriate option to locate your home to deliver, pick up, and/or install the product, instruct, or replace house fuses or correct wiring, or correction of unauthorized repairs. • Damages or operating problems that vary from misuse, abuse, operation outside environmental specifications...

Specification
Page 1
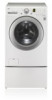
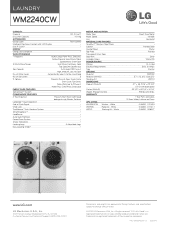
... Direct Drive Motor uses fewer moving parts and operates more efficiently, LG confidently backs the motor with a 10-year warranty. LAUNDRY WM2240CW Front Load Washer with LG's own 6Motion™ Technology, which customizes washing motions for a wash that it . Each wash cycle combines up to save you do more adds up to 6 different wash motions to worry that leaves clothes a bit cleaner, while being gentle on fabrics. With an extra-large, 4.3 cu. It comes with LED Display...
... Direct Drive Motor uses fewer moving parts and operates more efficiently, LG confidently backs the motor with a 10-year warranty. LAUNDRY WM2240CW Front Load Washer with LG's own 6Motion™ Technology, which customizes washing motions for a wash that it . Each wash cycle combines up to save you do more adds up to 6 different wash motions to worry that leaves clothes a bit cleaner, while being gentle on fabrics. With an extra-large, 4.3 cu. It comes with LED Display...
Specification
Page 2
... 11/16" x 29 3/4" (51" D with liquid detergent cup), Bleach, Softener LoDecibel™ Quiet Operation • End of their respective companies. White Pedestal - Design, features and specifications subject to the size of LG Corp. All other product and brand names are approximate. White Stacking Kit - of Soil Levels 5 9 Options Prewash, Rinse & Spin, Quick Cycle, Stain Cycle, Tub Clean, Delay Wash (up to 19 hours), Water Plus, Extra Rinse, Child Lock FABRIC CARE FEATURES SenseClean™ System •...
... 11/16" x 29 3/4" (51" D with liquid detergent cup), Bleach, Softener LoDecibel™ Quiet Operation • End of their respective companies. White Pedestal - Design, features and specifications subject to the size of LG Corp. All other product and brand names are approximate. White Stacking Kit - of Soil Levels 5 9 Options Prewash, Rinse & Spin, Quick Cycle, Stain Cycle, Tub Clean, Delay Wash (up to 19 hours), Water Plus, Extra Rinse, Child Lock FABRIC CARE FEATURES SenseClean™ System •...


