
Owner's Manual
Page 2
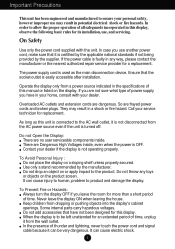
... manufacturer or the nearest authorized repair service provider for a replacement. Keep children from the wall outlet. The power supply cord is used as this unit is OFF. If you have not been designed for this display. Do not Open the Display: There are not sure what type of power supply you are no user serviceable components inside , even when the power is connected to product and damage the...
... manufacturer or the nearest authorized repair service provider for a replacement. Keep children from the wall outlet. The power supply cord is used as this unit is OFF. If you have not been designed for this display. Do not Open the Display: There are not sure what type of power supply you are no user serviceable components inside , even when the power is connected to product and damage the...
Owner's Manual
Page 3
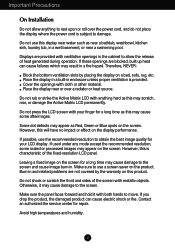
... fire. Cover the openings with anything to rest upon or roll over a radiator or heat source. Do not press the LCD screen with metallic objects. If used under any mode except the recommended resolution, some afterimages. Leaving a fixed image on the screen for a long time may appear as Red, Green or Blue spots on a bed, sofa, rug, etc. Contact an authorized the service center for...
... fire. Cover the openings with anything to rest upon or roll over a radiator or heat source. Do not press the LCD screen with metallic objects. If used under any mode except the recommended resolution, some afterimages. Leaving a fixed image on the screen for a long time may appear as Red, Green or Blue spots on a bed, sofa, rug, etc. Contact an authorized the service center for...
Owner's Manual
Page 9
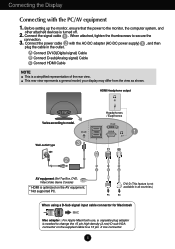
... PC When using a D-Sub signal input cable connector for Macintosh Mac adapter : For Apple Macintosh use, a separate plug adapter is optimized on the supplied cable to the monitor, the computer system, and 2. This rear view represents a general model; Headphones / Earphones Wall-outlet type AV equipment (Set-Top Box, DVD, Video,Video Game Console) * HDMI is needed to change the 15 pin high density (3 row) D-sub VGA connector on the AV equipment. * Not supported PC. C B A DVI-D (This feature...
... PC When using a D-Sub signal input cable connector for Macintosh Mac adapter : For Apple Macintosh use, a separate plug adapter is optimized on the supplied cable to the monitor, the computer system, and 2. This rear view represents a general model; Headphones / Earphones Wall-outlet type AV equipment (Set-Top Box, DVD, Video,Video Game Console) * HDMI is needed to change the 15 pin high density (3 row) D-sub VGA connector on the AV equipment. * Not supported PC. C B A DVI-D (This feature...
Owner's Manual
Page 10
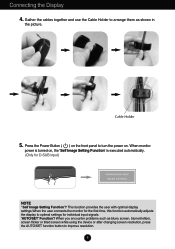
... user connects the monitor for the first time, this function automatically adjusts the display to optimal settings for D-SUB input) NOTE ' Self Image Setting Function'? When monitor power is turned on, the 'Self Image Setting Function' is executed automatically. (Only for individual input signals. 'AUTO/SET' Function? Gather the cables together and use the Cable Holder to arrange them as blurry screen, blurred letters, screen flicker or tilted screen while using the device or after changing screen resolution, press the AUTO/SET function button...
... user connects the monitor for the first time, this function automatically adjusts the display to optimal settings for D-SUB input) NOTE ' Self Image Setting Function'? When monitor power is turned on, the 'Self Image Setting Function' is executed automatically. (Only for individual input signals. 'AUTO/SET' Function? Gather the cables together and use the Cable Holder to arrange them as blurry screen, blurred letters, screen flicker or tilted screen while using the device or after changing screen resolution, press the AUTO/SET function button...
Owner's Manual
Page 12
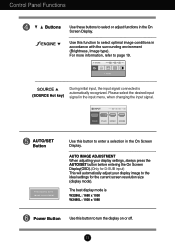
.... (SOURCE Hot key) During initial input, the input signal connected is W2286L : 1680 x 1050 W2486L : 1920 x 1080 Power Button Use this button to turn the display on or off. 11 Please select the desired input signal in accordance with the surrounding environment (Brightness, Image type). Control Panel Functions Buttons Use these buttons to the ideal settings for the current screen resolution size (display mode). AUTO IMAGE ADJUSTMENT When adjusting your display settings, always press the AUTO/SET button before entering the On Screen Display(OSD).(Only for D-SUB input) This...
.... (SOURCE Hot key) During initial input, the input signal connected is W2286L : 1680 x 1050 W2486L : 1920 x 1080 Power Button Use this button to turn the display on or off. 11 Please select the desired input signal in accordance with the surrounding environment (Brightness, Image type). Control Panel Functions Buttons Use these buttons to the ideal settings for the current screen resolution size (display mode). AUTO IMAGE ADJUSTMENT When adjusting your display settings, always press the AUTO/SET button before entering the On Screen Display(OSD).(Only for D-SUB input) This...
Owner's Manual
Page 13
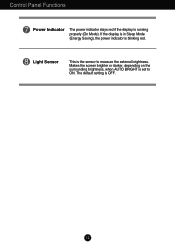
The default setting is blinking red. If the display is in Sleep Mode (Energy Saving), the power indicator is OFF. 12 Makes the screen brighter or darker, depending on the surrounding brightness, when AUTO BRIGHT is set to measure the external brightness. Light Sensor This is running properly (On Mode). Control Panel Functions Power Indicator The power indicator stays red if the display is the sensor to ON.
The default setting is blinking red. If the display is in Sleep Mode (Energy Saving), the power indicator is OFF. 12 Makes the screen brighter or darker, depending on the surrounding brightness, when AUTO BRIGHT is set to measure the external brightness. Light Sensor This is running properly (On Mode). Control Panel Functions Power Indicator The power indicator stays red if the display is the sensor to ON.

Owner's Manual
Page 14
To make using the OSD. On Screen Display (OSD) Control Adjustment Screen Adjustment Making adjustments to the image size, position and operating parameters of the display is an outline of the controls. Press the MENU Button twice to exit from the menu screen. 1 Press the MENU Button, then the main menu of the OSD appears. 2 To access a control, use of the available adjustments and selections you can make adjustments in the On Screen Display, follow these steps: Pops up the menu screen Move where you...
To make using the OSD. On Screen Display (OSD) Control Adjustment Screen Adjustment Making adjustments to the image size, position and operating parameters of the display is an outline of the controls. Press the MENU Button twice to exit from the menu screen. 1 Press the MENU Button, then the main menu of the OSD appears. 2 To access a control, use of the available adjustments and selections you can make adjustments in the On Screen Display, follow these steps: Pops up the menu screen Move where you...
Owner's Manual
Page 15
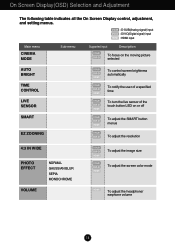
... Display control, adjustment, and setting menus. DSUB : D-SUB(Analog signal) input DVI-D : DVI-D(Digital signal) input HDMI : HDMI input Main menu CINEMA MODE Sub-menu Supported input Description DSUB DVI-D To focus on the moving picture selected AUTO BRIGHT TIME CONTROL LIVE SENSOR SMART EZ ZOONING DSUB DVI-D HDMI DSUB DVI-D HDMI DSUB DVI-D HDMI DSUB DVI-D HDMI DSUB DVI-D To control screen brightness automatically To notify the user of a specified time To turn the live sensor of the touch button LED on or off To adjust the SMART button menus To adjust the resolution 4:3 IN WIDE...
... Display control, adjustment, and setting menus. DSUB : D-SUB(Analog signal) input DVI-D : DVI-D(Digital signal) input HDMI : HDMI input Main menu CINEMA MODE Sub-menu Supported input Description DSUB DVI-D To focus on the moving picture selected AUTO BRIGHT TIME CONTROL LIVE SENSOR SMART EZ ZOONING DSUB DVI-D HDMI DSUB DVI-D HDMI DSUB DVI-D HDMI DSUB DVI-D HDMI DSUB DVI-D To control screen brightness automatically To notify the user of a specified time To turn the live sensor of the touch button LED on or off To adjust the SMART button menus To adjust the resolution 4:3 IN WIDE...

Owner's Manual
Page 16
... USER STANDARD SPORTS DSUB DVI-D To select or customize desired image settings HDMI PICTURE COLOR BRIGHTNESS CONTRAST GAMMA BLACK LEVEL PRESET (sRGB / 6500K / 9300K) RED GREEN BLUE DSUB DVI-D HDMI To adjust the brightness, contrast and gamma of the screen HDMI DSUB DVI-D HDMI To customize the color of the screen TRACKING SETUP HORIZONTAL VERTICAL CLOCK PHASE SHARPNESS DSUB DSUB DSUB DVI-D HDMI LANGUAGE OSD POSITION (HORIZONTAL / VERTICAL) DSUB DVI-D HDMI WHITE BALANCE DSUB OVERSCAN HDMI RTC (Only W2286L) POWER INDICATOR FACTORY RESET DSUB DVI-D HDMI To adjust the position...
... USER STANDARD SPORTS DSUB DVI-D To select or customize desired image settings HDMI PICTURE COLOR BRIGHTNESS CONTRAST GAMMA BLACK LEVEL PRESET (sRGB / 6500K / 9300K) RED GREEN BLUE DSUB DVI-D HDMI To adjust the brightness, contrast and gamma of the screen HDMI DSUB DVI-D HDMI To customize the color of the screen TRACKING SETUP HORIZONTAL VERTICAL CLOCK PHASE SHARPNESS DSUB DSUB DSUB DVI-D HDMI LANGUAGE OSD POSITION (HORIZONTAL / VERTICAL) DSUB DVI-D HDMI WHITE BALANCE DSUB OVERSCAN HDMI RTC (Only W2286L) POWER INDICATOR FACTORY RESET DSUB DVI-D HDMI To adjust the position...
Owner's Manual
Page 17
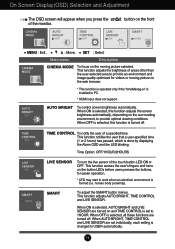
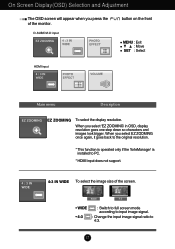
... function adjusts AUTO BRIGHT, TIME CONTROL and LIVE SENSOR. On Screen Display(OSD) Selection and Adjustment The OSD screen will appear when you press the of areas other than the user-selected area to provide an environment and image quality optimized for easier operation. * LED may start to PC. * HDMI input does not support. button on the front MENU : Exit , : Move, SET : Select Main menu Description CINEMA MODE To focus on the button LEDs before users...
... function adjusts AUTO BRIGHT, TIME CONTROL and LIVE SENSOR. On Screen Display(OSD) Selection and Adjustment The OSD screen will appear when you press the of areas other than the user-selected area to provide an environment and image quality optimized for easier operation. * LED may start to PC. * HDMI input does not support. button on the front MENU : Exit , : Move, SET : Select Main menu Description CINEMA MODE To focus on the button LEDs before users...
Owner's Manual
Page 18
... WIDE 4:3 • WIDE • 4:3 : Switch to full screen mode according to input image signal. : Change the input image signal ratio to PC. * HDMI input does not support. 4:3 IN WIDE To select the image size of the monitor. When you select 'EZ ZOOMING' in OSD, display resolution goes one step down so characters and images look bigger. D-SUB/DVI-D input button on the front MENU : Exit : Move SET : Select HDMI input Main menu Description EZ ZOOMING To select the display resolution. On Screen Display(OSD) Selection and Adjustment The OSD screen...
... WIDE 4:3 • WIDE • 4:3 : Switch to full screen mode according to input image signal. : Change the input image signal ratio to PC. * HDMI input does not support. 4:3 IN WIDE To select the image size of the monitor. When you select 'EZ ZOOMING' in OSD, display resolution goes one step down so characters and images look bigger. D-SUB/DVI-D input button on the front MENU : Exit : Move SET : Select HDMI input Main menu Description EZ ZOOMING To select the display resolution. On Screen Display(OSD) Selection and Adjustment The OSD screen...

Owner's Manual
Page 19
... menu changes the screen to be more colorful and smoother. • SEPIA This menu changes the screen to be Sepia tone (brown color). • MONOCHROME This menu changed the screen to sub-menu. On Screen Display(OSD) Selection and Adjustment Main menu PHOTO EFFECT Use the AUTO/SET button to go to MUTE OFF. (Only for HDMI input) MUTE OFF MUTE ON 18 VOLUME Use the AUTO/SET button to go to be Gray tone(black-and-white Picture) . Press the AUTO/SET button...
... menu changes the screen to be more colorful and smoother. • SEPIA This menu changes the screen to be Sepia tone (brown color). • MONOCHROME This menu changed the screen to sub-menu. On Screen Display(OSD) Selection and Adjustment Main menu PHOTO EFFECT Use the AUTO/SET button to go to MUTE OFF. (Only for HDMI input) MUTE OFF MUTE ON 18 VOLUME Use the AUTO/SET button to go to be Gray tone(black-and-white Picture) . Press the AUTO/SET button...

Owner's Manual
Page 20
... playing a game. D-SUB/DVI-D input HDMI input NORMAL Select this when you want to use the original standard video. * In the General (Standard) mode, the is turned off. 19 STANDARD Select this when you want to use the product in the image. Main menu Sub menu Description MOVIE Select this when you easily select the best desired image condition optimized to save the setting. The active state...
... playing a game. D-SUB/DVI-D input HDMI input NORMAL Select this when you want to use the original standard video. * In the General (Standard) mode, the is turned off. 19 STANDARD Select this when you want to use the product in the image. Main menu Sub menu Description MOVIE Select this when you easily select the best desired image condition optimized to save the setting. The active state...

Owner's Manual
Page 23
.... (only for video signal, it is the darkest screen the monitor can set the offset level. On Screen Display(OSD) Selection and Adjustment Main menu Sub menu Description PICTURE D-SUB/DVI-D input HDMI input BRIGHTNESS To adjust the brightness of the screen. CONTRAST To adjust the contrast of the screen. MENU : Exit : Decrease : Increase SET : Select another sub-menu COLOR MENU : Exit : Decrease : Increase SET : Select another sub-menu PRESET RED GREEN BLUE Select the screen color. • sRGB: Set the screen color to fit the sRGB standard color specification. •...
.... (only for video signal, it is the darkest screen the monitor can set the offset level. On Screen Display(OSD) Selection and Adjustment Main menu Sub menu Description PICTURE D-SUB/DVI-D input HDMI input BRIGHTNESS To adjust the brightness of the screen. CONTRAST To adjust the contrast of the screen. MENU : Exit : Decrease : Increase SET : Select another sub-menu COLOR MENU : Exit : Decrease : Increase SET : Select another sub-menu PRESET RED GREEN BLUE Select the screen color. • sRGB: Set the screen color to fit the sRGB standard color specification. •...
Owner's Manual
Page 25
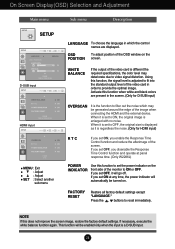
... , buttons to provide the optimal image. WHITE BALANCE If the output of the screen. Using this function when white and black colors are present in the screen. (Only for HDMI input) R T C If you set ON at panel response time. (Only W2286L) POWER INDICATOR Use this does not improve the screen image, restore the factory default settings. If necessary, execute the white balance function again. On Screen Display(OSD) Selection and Adjustment Main menu Sub menu Description SETUP D-SUB input HDMI input MENU : Exit : Adjust : Adjust SET : Select...
... , buttons to provide the optimal image. WHITE BALANCE If the output of the screen. Using this function when white and black colors are present in the screen. (Only for HDMI input) R T C If you set ON at panel response time. (Only W2286L) POWER INDICATOR Use this does not improve the screen image, restore the factory default settings. If necessary, execute the white balance function again. On Screen Display(OSD) Selection and Adjustment Main menu Sub menu Description SETUP D-SUB input HDMI input MENU : Exit : Adjust : Adjust SET : Select...
Owner's Manual
Page 26
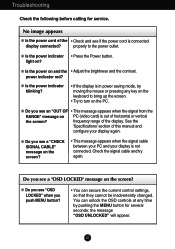
Troubleshooting Check the following before calling for several seconds: the message "OSD UNLOCKED" will appear. 25 G Is the power indicator blinking? • If the display is out of the display. light on and the • Adjust the brightness and the contrast. G Is the power on ? frequency range of horizontal or vertical the screen? G Do you see a "OSD LOCKED" message on the screen? G Do you see if the power cord is not connected. G Do you see...
Troubleshooting Check the following before calling for several seconds: the message "OSD UNLOCKED" will appear. 25 G Is the power indicator blinking? • If the display is out of the display. light on and the • Adjust the brightness and the contrast. G Is the power on ? frequency range of horizontal or vertical the screen? G Do you see a "OSD LOCKED" message on the screen? G Do you see if the power cord is not connected. G Do you see...
Owner's Manual
Page 27
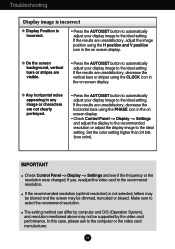
... setting. IMPORTANT Check Control Panel --> Display --> Settings and see if the frequency or the resolution were changed. If yes, readjust the video card to the computer or the video card manufacturer. 26 If the recommended resolution (optimal resolution) is incorrect. • Press the AUTO/SET button to automatically adjust your display image to the ideal setting. If the results are unsatisfactory, decrease the vertical bars or stripes using the H position and V position icon in the on screen display. Set the color setting...
... setting. IMPORTANT Check Control Panel --> Display --> Settings and see if the frequency or the resolution were changed. If yes, readjust the video card to the computer or the video card manufacturer. 26 If the recommended resolution (optimal resolution) is incorrect. • Press the AUTO/SET button to automatically adjust your display image to the ideal setting. If the results are unsatisfactory, decrease the vertical bars or stripes using the H position and V position icon in the on screen display. Set the color setting...

Owner's Manual
Page 28
... display. The Audio function is not working G Picture OK & No sound. • Check whether volume is "0". • Check sound muted. • HDMI cable installed properly. • Head phone cable installed properly. • Check sound format. Not supply to the recommend resolution. G Have you see an "Unrecognized monitor, Plug&Play (VESA DDC) monitor found" message? Settings. G The screen blinks. • Check if the screen is set to interlace mode and if yes, change it to compressed sound format. 27 Troubleshooting Display image is incorrect G The screen color...
... display. The Audio function is not working G Picture OK & No sound. • Check whether volume is "0". • Check sound muted. • HDMI cable installed properly. • Head phone cable installed properly. • Check sound format. Not supply to the recommend resolution. G Have you see an "Unrecognized monitor, Plug&Play (VESA DDC) monitor found" message? Settings. G The screen blinks. • Check if the screen is set to interlace mode and if yes, change it to compressed sound format. 27 Troubleshooting Display image is incorrect G The screen color...
Owner's Manual
Page 29
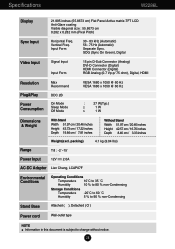
... is subject to change without notice. 28 Specifications W2286L Display 21.995 inches (55.8673 cm) Flat Panel Active matrix-TFT LCD Anti-Glare coating Visible diagonal size : 55.8673 cm 0.282 x 0.282 mm (Pixel Pitch) Sync Input Horizontal Freq. SOG (Sync On Green), Digital Video Input Signal Input Input Form 15 pin D-Sub Connector (Analog) DVI-D Connector (Digital) HDMI Connector (Digital) RGB Analog (0.7 Vp-p/ 75 ohm), Digital, HDMI Resolution Plug&Play Power Consumption Max Recommend DDC 2B On Mode Sleep Mode Off Mode VESA 1680 x 1050 @ 60 Hz VESA 1680 x 1050 @ 60...
... is subject to change without notice. 28 Specifications W2286L Display 21.995 inches (55.8673 cm) Flat Panel Active matrix-TFT LCD Anti-Glare coating Visible diagonal size : 55.8673 cm 0.282 x 0.282 mm (Pixel Pitch) Sync Input Horizontal Freq. SOG (Sync On Green), Digital Video Input Signal Input Input Form 15 pin D-Sub Connector (Analog) DVI-D Connector (Digital) HDMI Connector (Digital) RGB Analog (0.7 Vp-p/ 75 ohm), Digital, HDMI Resolution Plug&Play Power Consumption Max Recommend DDC 2B On Mode Sleep Mode Off Mode VESA 1680 x 1050 @ 60 Hz VESA 1680 x 1050 @ 60...
Owner's Manual
Page 30
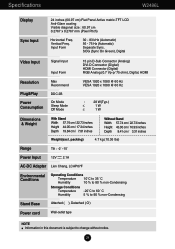
... is subject to change without notice. 29 Specifications W2486L Display Sync Input 24 inches (60.97 cm) Flat Panel Active matrix-TFT LCD Anti-Glare coating Visible diagonal size : 60.97 cm 0.2767 x 0.2767 mm (Pixel Pitch) Horizontal Freq. Vertical Freq. SOG (Sync On Green), Digital Video Input Signal Input Resolution Plug&Play Power Consumption Input Form Max Recommend DDC 2B On Mode Sleep Mode Off Mode 15 pin D-Sub Connector (Analog) DVI-D Connector (Digital) HDMI Connector (Digital) RGB Analog (0.7 Vp-p/ 75 ohm), Digital, HDMI VESA 1920 x 1080 @ 60 Hz VESA 1920 x 1080...
... is subject to change without notice. 29 Specifications W2486L Display Sync Input 24 inches (60.97 cm) Flat Panel Active matrix-TFT LCD Anti-Glare coating Visible diagonal size : 60.97 cm 0.2767 x 0.2767 mm (Pixel Pitch) Horizontal Freq. Vertical Freq. SOG (Sync On Green), Digital Video Input Signal Input Resolution Plug&Play Power Consumption Input Form Max Recommend DDC 2B On Mode Sleep Mode Off Mode 15 pin D-Sub Connector (Analog) DVI-D Connector (Digital) HDMI Connector (Digital) RGB Analog (0.7 Vp-p/ 75 ohm), Digital, HDMI VESA 1920 x 1080 @ 60 Hz VESA 1920 x 1080...


