

Owner's Manual
Page 2
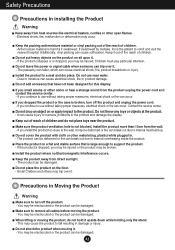
.... Ensure that the socket-outlet shall be installed near the equipment and shall be damaged. Covering dust can cause a fire, or insulation deterioration can be electrocuted. Do not pull the plug out by the wire. metal chopstick) into the product opening into the wall input terminal. - The power supply cord is turned off before using the product. A1 Failure to excess...
.... Ensure that the socket-outlet shall be installed near the equipment and shall be damaged. Covering dust can cause a fire, or insulation deterioration can be electrocuted. Do not pull the plug out by the wire. metal chopstick) into the product opening into the wall input terminal. - The power supply cord is turned off before using the product. A1 Failure to excess...
Owner's Manual
Page 3
... and unplug the power cord. - Make sure to vomit and visit the nearest hospital. Contact the service center. Keep out of reach of children. - The product can break out due to fall resulting in . - Safety Precautions Precautions in installing the Product Warning Keep away from the wall. - If swallowed by mistake, force the patient to remove all cables before moving...
... and unplug the power cord. - Make sure to vomit and visit the nearest hospital. Contact the service center. Keep out of reach of children. - The product can break out due to fall resulting in . - Safety Precautions Precautions in installing the Product Warning Keep away from the wall. - If swallowed by mistake, force the patient to remove all cables before moving...
Owner's Manual
Page 4
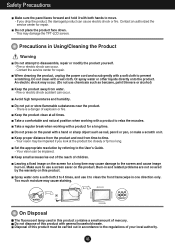
... use chemicals such as nail, pencil or pen, or make a scratch on the panel with a hand or sharp object such as benzene, paint thinners or alcohol) Keep the product away from time-to the User's Guide. - Do not clean ...screen and cause image burn-in this product contains a small amount of this product must be impaired. When cleaning the product, unplug the power cord and scrub gently with a wet cloth. Your vision can occur. - Take a regular break when working with general household waste. Set the appropriate resolution by the warranty on this product. Leaving a fixed image...
... use chemicals such as nail, pencil or pen, or make a scratch on the panel with a hand or sharp object such as benzene, paint thinners or alcohol) Keep the product away from time-to the User's Guide. - Do not clean ...screen and cause image burn-in this product contains a small amount of this product must be impaired. When cleaning the product, unplug the power cord and scrub gently with a wet cloth. Your vision can occur. - Take a regular break when working with general household waste. Set the appropriate resolution by the warranty on this product. Leaving a fixed image...
Owner's Manual
Page 5
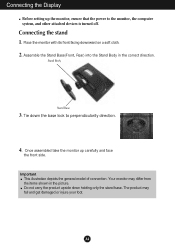
... the base lock to the monitor, the computer system, and other attached devices is turned off. Connecting the Display Before setting up carefully and face the front side. Stand Body Stand Base 3. Important This illustration depicts the general model of connection. A4 Your monitor may fall and get damaged or injure your foot. Connecting the stand 1. Assemble the Stand Base(Front, Rear) into the Stand Body in the picture. The...
... the base lock to the monitor, the computer system, and other attached devices is turned off. Connecting the Display Before setting up carefully and face the front side. Stand Body Stand Base 3. Important This illustration depicts the general model of connection. A4 Your monitor may fall and get damaged or injure your foot. Connecting the stand 1. Assemble the Stand Base(Front, Rear) into the Stand Body in the picture. The...
Owner's Manual
Page 7
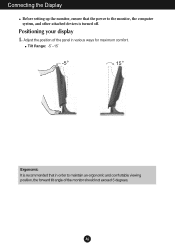
Positioning your display 1. Tilt Range: -5˚~15˚ Ergonomic It is turned off. A6 Connecting the Display Before setting up the monitor, ensure that the power to the monitor, the computer system, and other attached devices is recommended that in order to maintain an ergonomic and comfortable viewing position, the forward tilt angle of the panel in various ways for maximum comfort. Adjust the position of the monitor should not exceed 5 degrees.
Positioning your display 1. Tilt Range: -5˚~15˚ Ergonomic It is turned off. A6 Connecting the Display Before setting up the monitor, ensure that the power to the monitor, the computer system, and other attached devices is recommended that in order to maintain an ergonomic and comfortable viewing position, the forward tilt angle of the panel in various ways for maximum comfort. Adjust the position of the monitor should not exceed 5 degrees.
Owner's Manual
Page 8
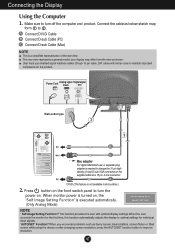
... model; Power Cord Analog signal D-sub Digital signal DVI Wall-outlet type Mac adapter For Apple Macintosh use shielded signal interface cables (D-sub 15 pin cable, DVI cable) with optimal display settings.When the user connects the monitor for the first time, this function automatically adjusts the display to turn off the computer and product. This function provides the user with ferrite cores to maintain standard compliance for individual input signals. 'AUTO/SET' Function? A7 User must use , a separate plug adapter is executed automatically. (Only Analog Mode...
... model; Power Cord Analog signal D-sub Digital signal DVI Wall-outlet type Mac adapter For Apple Macintosh use shielded signal interface cables (D-sub 15 pin cable, DVI cable) with optimal display settings.When the user connects the monitor for the first time, this function automatically adjusts the display to turn off the computer and product. This function provides the user with ferrite cores to maintain standard compliance for individual input signals. 'AUTO/SET' Function? A7 User must use , a separate plug adapter is executed automatically. (Only Analog Mode...
Owner's Manual
Page 10
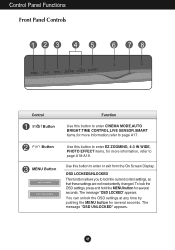
... On Screen Display. The message "OSD UNLOCKED" appears. A9 To lock the OSD settings, press and hold the MENU button for several seconds. You can unlock the OSD settings at any time by pushing the MENU button for several seconds. Button MENU Button Use this button to enter CINEMA MODE,AUTO BRIGHT,TIME CONTROL,LIVE SENSOR,SMART items,for more information, refer to page A18-A19. Control Panel Functions Front Panel Controls 123 4 5 6 78 Control Button Function Use this button to...
... On Screen Display. The message "OSD UNLOCKED" appears. A9 To lock the OSD settings, press and hold the MENU button for several seconds. You can unlock the OSD settings at any time by pushing the MENU button for several seconds. Button MENU Button Use this button to enter CINEMA MODE,AUTO BRIGHT,TIME CONTROL,LIVE SENSOR,SMART items,for more information, refer to page A18-A19. Control Panel Functions Front Panel Controls 123 4 5 6 78 Control Button Function Use this button to...
Owner's Manual
Page 11
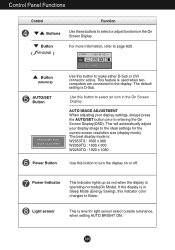
... display is : W2053TX : 1600 x 900 W2053TQ : 1600 x 900 W2253TQ : 1920 x 1080 Use this indicator color changes to entering the On Screen Display(OSD). A10 The default setting is operating normally(On Mode). The best display mode is in Sleep Mode (Energy Saving), this button to turn the display on or off. This will automatically adjust your display settings, always press the AUTO/SET button prior to flicker. AUTO IMAGE ADJUSTMENT When adjusting your display image to make either D-Sub or DVI connector active. Power Indicator This Indicator lights...
... display is : W2053TX : 1600 x 900 W2053TQ : 1600 x 900 W2253TQ : 1920 x 1080 Use this indicator color changes to entering the On Screen Display(OSD). A10 The default setting is operating normally(On Mode). The best display mode is in Sleep Mode (Energy Saving), this button to turn the display on or off. This will automatically adjust your display settings, always press the AUTO/SET button prior to flicker. AUTO IMAGE ADJUSTMENT When adjusting your display image to make either D-Sub or DVI connector active. Power Indicator This Indicator lights...
Owner's Manual
Page 13
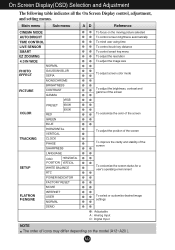
...6500K COLOR RED 9300K GREEN BLUE HORIZONTAL VERTICAL TRACKING CLOCK PHASE SHARPNESS LANGUAGE OSD HORIZONTAL POSITION VERTICAL SETUP WHITE BALANCE RTC POWER INDICATOR FACTORY RESET MOVIE FLATRON F-ENGINE INTERNET USER NORMAL DEMO To focus on the moving picture selected To control screen brightness automatically To mind user using time To control touch key distance To control smart key menu To adjust the resolution To adjust the image size To adjust screen color mode To adjust the brightness, contrast and gamma of the screen To costomize the color of the screen To adjust...
...6500K COLOR RED 9300K GREEN BLUE HORIZONTAL VERTICAL TRACKING CLOCK PHASE SHARPNESS LANGUAGE OSD HORIZONTAL POSITION VERTICAL SETUP WHITE BALANCE RTC POWER INDICATOR FACTORY RESET MOVIE FLATRON F-ENGINE INTERNET USER NORMAL DEMO To focus on the moving picture selected To control screen brightness automatically To mind user using time To control touch key distance To control smart key menu To adjust the resolution To adjust the image size To adjust screen color mode To adjust the brightness, contrast and gamma of the screen To costomize the color of the screen To adjust...
Owner's Manual
Page 14
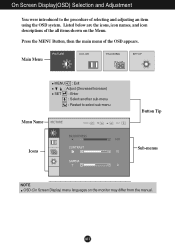
Main Menu MENU : Exit : Adjust (Decrease/Increase) SET : Enter : Select another sub-menu : Restart to the procedure of the OSD appears. A13 Listed below are the icons, icon names, and icon descriptions of the all items shown on the monitor may differ from the manual. On Screen Display(OSD) Selection and Adjustment You were introduced to select sub-menu Menu Name Button Tip Icons Sub-menus NOTE OSD (On Screen Display) menu languages on the Menu. Press the MENU Button, then the main menu of selecting and adjusting an item using the OSD system.
Main Menu MENU : Exit : Adjust (Decrease/Increase) SET : Enter : Select another sub-menu : Restart to the procedure of the OSD appears. A13 Listed below are the icons, icon names, and icon descriptions of the all items shown on the monitor may differ from the manual. On Screen Display(OSD) Selection and Adjustment You were introduced to select sub-menu Menu Name Button Tip Icons Sub-menus NOTE OSD (On Screen Display) menu languages on the Menu. Press the MENU Button, then the main menu of selecting and adjusting an item using the OSD system.
Owner's Manual
Page 15
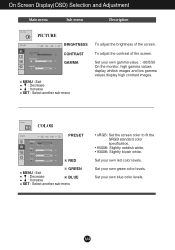
Set your own blue color levels. COLOR COLOR PRESET RED GREEN MENU : Exit : Decrease : Increase BLUE SET : Select another sub-menu To adjust the brightness of the screen. Set your own red color levels. To adjust the contrast of the screen. Set your own green color levels. A14 Set your own gamma value. : -50/0/50 On the monitor, high gamma values display whitish images and low gamma values display high contrast images. On Screen Display(OSD) Selection and Adjustment Main menu Sub menu Description PICTURE PICTURE BRIGHTNESS CONTRAST GAMMA MENU : Exit : Decrease...
Set your own blue color levels. COLOR COLOR PRESET RED GREEN MENU : Exit : Decrease : Increase BLUE SET : Select another sub-menu To adjust the brightness of the screen. Set your own red color levels. To adjust the contrast of the screen. Set your own green color levels. A14 Set your own gamma value. : -50/0/50 On the monitor, high gamma values display whitish images and low gamma values display high contrast images. On Screen Display(OSD) Selection and Adjustment Main menu Sub menu Description PICTURE PICTURE BRIGHTNESS CONTRAST GAMMA MENU : Exit : Decrease...
Owner's Manual
Page 16
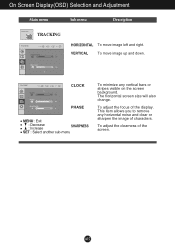
A15 The horizontal screen size will also change. VERTICAL To move image left and right. To adjust the focus of the screen. On Screen Display(OSD) Selection and Adjustment Main menu Sub menu Description TRACKING TRACKING HORIZONTAL To move image up and down. CLOCK PHASE MENU : Exit : Decrease : Increase SHARPNESS SET : Select another sub-menu To minimize any horizontal noise and clear or sharpen the image of characters. This item allows you to remove any vertical bars or stripes visible on the screen background. To adjust the clearness of the display.
A15 The horizontal screen size will also change. VERTICAL To move image left and right. To adjust the focus of the screen. On Screen Display(OSD) Selection and Adjustment Main menu Sub menu Description TRACKING TRACKING HORIZONTAL To move image up and down. CLOCK PHASE MENU : Exit : Decrease : Increase SHARPNESS SET : Select another sub-menu To minimize any horizontal noise and clear or sharpen the image of characters. This item allows you to remove any vertical bars or stripes visible on the screen background. To adjust the clearness of the display.
Owner's Manual
Page 17
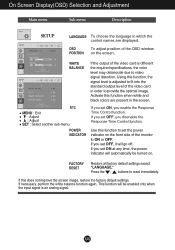
... monitor to provide the optimal image. If this function when white and black colors are displayed. Using this function to set ON at any time, the power indicator will be turned on the screen. Activate this does not improve the screen image, restore the factory default settings. Press the , buttons to video signal distortion. If necessary, perform the white balance function again. If you enable the Response Time Control function. FACTORY RESET Restore all factory default settings...
... monitor to provide the optimal image. If this function when white and black colors are displayed. Using this function to set ON at any time, the power indicator will be turned on the screen. Activate this does not improve the screen image, restore the factory default settings. Press the , buttons to video signal distortion. If necessary, perform the white balance function again. If you enable the Response Time Control function. FACTORY RESET Restore all factory default settings...

Owner's Manual
Page 18
... To adjust AUTO BRIGHT,TIME CONTROL, LIVE SENSOR. If select off,it automatically controls the brightness of the monitor. A17 If set AUTO BRIGHT,TIME CONTROL,LIVE SENSOR directly,this setting is installed to pc. On Screen Display(OSD) Selection and Adjustment The OSD screen will appear when you touch the smart button on the right bottom of display to best suit the surrounding working environment,providing the optimal viewing condition and maximized user convenience. AUTO BRIGHT If select...
... To adjust AUTO BRIGHT,TIME CONTROL, LIVE SENSOR. If select off,it automatically controls the brightness of the monitor. A17 If set AUTO BRIGHT,TIME CONTROL,LIVE SENSOR directly,this setting is installed to pc. On Screen Display(OSD) Selection and Adjustment The OSD screen will appear when you touch the smart button on the right bottom of display to best suit the surrounding working environment,providing the optimal viewing condition and maximized user convenience. AUTO BRIGHT If select...
Owner's Manual
Page 21
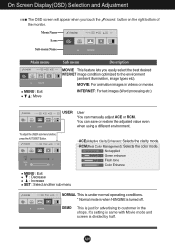
... turned off. It's setting is same with Movie mode and screen is divided by half. On Screen Display(OSD) Selection and Adjustment The OSD screen will appear when you easily select the best desired INTERNET image condition optimized to customer in videos or movies INTERNET: For text images (Word processing etc.) USER User You can save or restore the adjusted value even when using a different environment. Menu Name Icons Sub-menu Name button...
... turned off. It's setting is same with Movie mode and screen is divided by half. On Screen Display(OSD) Selection and Adjustment The OSD screen will appear when you easily select the best desired INTERNET image condition optimized to customer in videos or movies INTERNET: For text images (Word processing etc.) USER User You can save or restore the adjusted value even when using a different environment. Menu Name Icons Sub-menu Name button...
Owner's Manual
Page 22
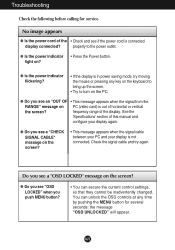
... screen? frequency range of this manual and configure your display is connected display connected? Check the signal cable and try moving the mouse or pressing any time by pushing the MENU button for service. A21 Do you push MENU button? • You can unlock the OSD controls at any key on the keyboard to bring up the screen. • Try to the power outlet. No image appears G Is the power cord of horizontal or vertical the screen...
... screen? frequency range of this manual and configure your display is connected display connected? Check the signal cable and try moving the mouse or pressing any time by pushing the MENU button for service. A21 Do you push MENU button? • You can unlock the OSD controls at any key on the keyboard to bring up the screen. • Try to the power outlet. No image appears G Is the power cord of horizontal or vertical the screen...

Owner's Manual
Page 23
... video card performance. G Any horizontal noise appearing in any image or characters are unsatisfactory, adjust the image position using the PHASE icon in the on screen display. • Check Control Panel --> Display --> Settings and adjust the display to the recommended resolution or adjust the display image to the recommend resolution. Important Check Control Panel --> Display --> Settings and see if the frequency or the resolution were changed. A22 If the results are not clearly portrayed. • Press the AUTO/SET button to automatically adjust your display image...
... video card performance. G Any horizontal noise appearing in any image or characters are unsatisfactory, adjust the image position using the PHASE icon in the on screen display. • Check Control Panel --> Display --> Settings and adjust the display to the recommended resolution or adjust the display image to the recommend resolution. Important Check Control Panel --> Display --> Settings and see if the frequency or the resolution were changed. A22 If the results are not clearly portrayed. • Press the AUTO/SET button to automatically adjust your display image...
Owner's Manual
Page 24
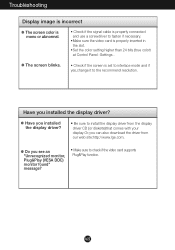
Troubleshooting Display image is incorrect ❁ The screen color is mono or abnormal. • Check if the signal cable is properly connected and use a screwdriver to fasten if necessary. •Make sure the video card is properly inserted in the slot. •Set the color setting higher than 24 bits (true color) at Control Panel -Settings . ❁ The screen blinks. • Check if the screen is set to interlace mode and if yes,change it to check if the...
Troubleshooting Display image is incorrect ❁ The screen color is mono or abnormal. • Check if the signal cable is properly connected and use a screwdriver to fasten if necessary. •Make sure the video card is properly inserted in the slot. •Set the color setting higher than 24 bits (true color) at Control Panel -Settings . ❁ The screen blinks. • Check if the screen is set to interlace mode and if yes,change it to check if the...
Owner's Manual
Page 25
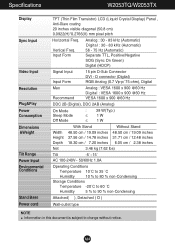
...Vertical Freq. Input Form Analog : 30 - 83 kHz (Automatic) Digital : 30 - 83 kHz (Automatic) 56 - 75 Hz (Automatic) Separate TTL, Positive/Negative SOG (Sync On Green) Digital (HDCP) Signal Input Input Form 15 pin D-Sub Connector DVI - Specifications W2053TQ/W2053TX Display Sync Input Video Input Resolution Plug&Play Power Consumption Dimensions &Weight Tilt Range Power Input Environmental Conditions Stand Base Power cord TFT (Thin Film Transistor) LCD (Liquid Crystal Display) Panel , Anti-Glare coating 20 inches visible diagonal (50.8 cm) 0.0922(H)*0.2766(V) mm pixel pitch Horizontal...
...Vertical Freq. Input Form Analog : 30 - 83 kHz (Automatic) Digital : 30 - 83 kHz (Automatic) 56 - 75 Hz (Automatic) Separate TTL, Positive/Negative SOG (Sync On Green) Digital (HDCP) Signal Input Input Form 15 pin D-Sub Connector DVI - Specifications W2053TQ/W2053TX Display Sync Input Video Input Resolution Plug&Play Power Consumption Dimensions &Weight Tilt Range Power Input Environmental Conditions Stand Base Power cord TFT (Thin Film Transistor) LCD (Liquid Crystal Display) Panel , Anti-Glare coating 20 inches visible diagonal (50.8 cm) 0.0922(H)*0.2766(V) mm pixel pitch Horizontal...

Owner's Manual
Page 26
..., Positive/Negative SOG (Sync On Green) Digital (HDCP) Signal Input Input Form 15 pin D-Sub Connector DVI - D connector (Digital) RGB Analog (0.7 Vp-p/ 75 ohm), Digital Max Recommend Analog : VESA 1920 x 1080 @60 Hz Digital : VESA 1920 x 1080 @60 Hz VESA 1920 x 1080 @60 Hz DDC 2B (Digital), DDC 2AB (Analog) On Mode Sleep Mode Off Mode : 40 W(Typ.) ≤ 1W ≤ 1W With Stand Without Stand Width 52.25 cm / 20.57 inches 52.25 cm / 20.57 inches Height...
..., Positive/Negative SOG (Sync On Green) Digital (HDCP) Signal Input Input Form 15 pin D-Sub Connector DVI - D connector (Digital) RGB Analog (0.7 Vp-p/ 75 ohm), Digital Max Recommend Analog : VESA 1920 x 1080 @60 Hz Digital : VESA 1920 x 1080 @60 Hz VESA 1920 x 1080 @60 Hz DDC 2B (Digital), DDC 2AB (Analog) On Mode Sleep Mode Off Mode : 40 W(Typ.) ≤ 1W ≤ 1W With Stand Without Stand Width 52.25 cm / 20.57 inches 52.25 cm / 20.57 inches Height...


