Specification (English)
Page 1
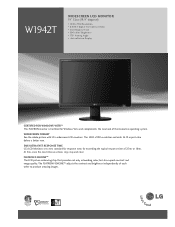
The FLATRON f-ENGINETM adjusts the contrast and brightness independently of the innovative operating system. W1942T WIDESCREEN LCD MONITOR 19" Class (18.9" diagonal) • 1440 x 900 Resolution • 8,000:1 Digital Fine Contrast Ratio • 5ms Response Time • 300 cd/m2 Brightness &#... stay crisp and clear. The 1440 x 900 resolution and wide 16:10 aspect ratio deliver a better view. 5MS ULTRA-FAST RESPONSE TIME LG's LCD Monitors set a new standard for Windows Vista and complements the new look of each other to produce amazing images. WIDESCREEN FORMAT See the whole picture...
The FLATRON f-ENGINETM adjusts the contrast and brightness independently of the innovative operating system. W1942T WIDESCREEN LCD MONITOR 19" Class (18.9" diagonal) • 1440 x 900 Resolution • 8,000:1 Digital Fine Contrast Ratio • 5ms Response Time • 300 cd/m2 Brightness &#... stay crisp and clear. The 1440 x 900 resolution and wide 16:10 aspect ratio deliver a better view. 5MS ULTRA-FAST RESPONSE TIME LG's LCD Monitors set a new standard for Windows Vista and complements the new look of each other to produce amazing images. WIDESCREEN FORMAT See the whole picture...
Specification (English)
Page 2
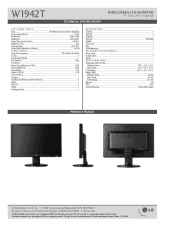
W1942T TECHNICAL SPECIFICATIONS WIDESCREEN LCD MONITOR 19" Class (18.9" diagonal) LCD PANEL SPECS Type 19" Widescreen LCD (18.9" diagonal) Screen Aspect Ratio 16:10 Resolution 1440 x 900 Brightness 300 cd/m2 Digital Fine Contrast Ratio 8,000:1 Response Time 5ms Viewing Angle 170°/170° Color Depth (Number of Colors) 16.2M VIDEO INPUT Auto H/V Frequency 30~83kHz/56~75Hz D-Sub • DVI-D (with HDCP) • Jack Position Rear POWER Power Type (Adapter or LIPS) LIPS Normal (On) Typ. 36W Sleep Mode
W1942T TECHNICAL SPECIFICATIONS WIDESCREEN LCD MONITOR 19" Class (18.9" diagonal) LCD PANEL SPECS Type 19" Widescreen LCD (18.9" diagonal) Screen Aspect Ratio 16:10 Resolution 1440 x 900 Brightness 300 cd/m2 Digital Fine Contrast Ratio 8,000:1 Response Time 5ms Viewing Angle 170°/170° Color Depth (Number of Colors) 16.2M VIDEO INPUT Auto H/V Frequency 30~83kHz/56~75Hz D-Sub • DVI-D (with HDCP) • Jack Position Rear POWER Power Type (Adapter or LIPS) LIPS Normal (On) Typ. 36W Sleep Mode
Owner's Manual (English)
Page 4
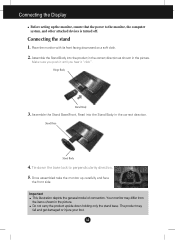
...downward on a soft cloth. 2. Tie down holding only the stand base. Do not carry the product upside down the base lock to the monitor, the computer system, and other attached devices is turned off. Make sure you push it until you hear it "click". The product may ... the Stand Body into the Stand Body in the picture. Stand Base Stand Body 4. Hinge Body Stand Body 3. Once assembled take the monitor up the monitor, ensure that the power to perpendicularity direction. 5. Connecting the Display Before setting up carefully and face the front side Important This illustration depicts...
...downward on a soft cloth. 2. Tie down holding only the stand base. Do not carry the product upside down the base lock to the monitor, the computer system, and other attached devices is turned off. Make sure you push it until you hear it "click". The product may ... the Stand Body into the Stand Body in the picture. Stand Base Stand Body 4. Hinge Body Stand Body 3. Once assembled take the monitor up the monitor, ensure that the power to perpendicularity direction. 5. Connecting the Display Before setting up carefully and face the front side Important This illustration depicts...
Owner's Manual (English)
Page 5
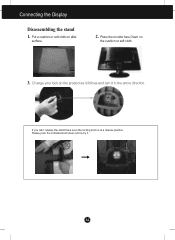
Change your lock on aflat surface. 2. A4 If you can't release the stand base even the locking knob is at a release position, Please push the indicated knob down and re-try it in the arrow direction. Put a cushion or soft cloth on the product as it follows and turn it . Place the monitor face Down on the cushion or soft cloth. 3. Connecting the Display Disassembling the stand 1.
Change your lock on aflat surface. 2. A4 If you can't release the stand base even the locking knob is at a release position, Please push the indicated knob down and re-try it in the arrow direction. Put a cushion or soft cloth on the product as it follows and turn it . Place the monitor face Down on the cushion or soft cloth. 3. Connecting the Display Disassembling the stand 1.
Owner's Manual (English)
Page 6
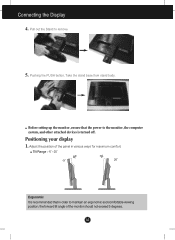
Positioning your display 1. Connecting the Display 4. Pushing the PUSH button, Take the stand base from stand body. Adjust the position of the monitor should not exceed 5 degrees. Before setting up the monitor, ensure that the power to the monitor, the computer system, and other attached devices is recommended that in various ways for maximum comfort. A5 Tilt Range : -5˚~20˚ 20 Ergonomic It is turned off. Pull out the Stand to maintain an ergonomic and comfortable viewing position, the forward tilt angle of the panel in order to remove. 5.
Positioning your display 1. Connecting the Display 4. Pushing the PUSH button, Take the stand base from stand body. Adjust the position of the monitor should not exceed 5 degrees. Before setting up the monitor, ensure that the power to the monitor, the computer system, and other attached devices is recommended that in various ways for maximum comfort. A5 Tilt Range : -5˚~20˚ 20 Ergonomic It is turned off. Pull out the Stand to maintain an ergonomic and comfortable viewing position, the forward tilt angle of the panel in order to remove. 5.
Owner's Manual (English)
Page 7
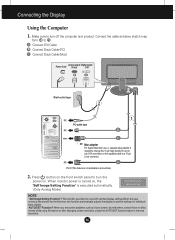
... type PC PC-outlet type PC B MAC c Mac adapter For Apple Macintosh use, a separate plug adapter is needed to 2 . A6 When monitor power is turned on, the 'Self Image Setting Function' is not available in all countries.) 2. PC A DVI-D(This feature is executed automatically. ...(Only Analog Mode) NOTE ' Self Image Setting Function'? This function provides the user with optimal display settings.When the user connects the monitor for individual input signals. 'AUTO/SET' Function? Connect the cable as blurry screen, blurred letters, screen flicker or tilted screen while using...
... type PC PC-outlet type PC B MAC c Mac adapter For Apple Macintosh use, a separate plug adapter is needed to 2 . A6 When monitor power is turned on, the 'Self Image Setting Function' is not available in all countries.) 2. PC A DVI-D(This feature is executed automatically. ...(Only Analog Mode) NOTE ' Self Image Setting Function'? This function provides the user with optimal display settings.When the user connects the monitor for individual input signals. 'AUTO/SET' Function? Connect the cable as blurry screen, blurred letters, screen flicker or tilted screen while using...
Owner's Manual (English)
Page 9
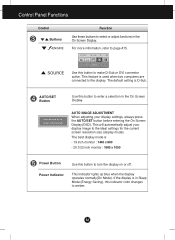
This feature is in Sleep Mode (Energy Saving), this button to page A15. The default setting is - 19 inch monitor : 1440 x 900 - 20.1/22 inch monitor : 1680 x 1050 Power Button Power Indicator Use this indicator color changes to select or adjust functions in the On Screen Display. AUTO IMAGE ADJUSTMENT When ...
This feature is in Sleep Mode (Energy Saving), this button to page A15. The default setting is - 19 inch monitor : 1440 x 900 - 20.1/22 inch monitor : 1680 x 1050 Power Button Power Indicator Use this indicator color changes to select or adjust functions in the On Screen Display. AUTO IMAGE ADJUSTMENT When ...
Owner's Manual (English)
Page 12
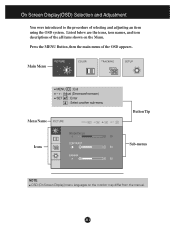
Main Menu MENU : Exit - + : Adjust (Decrease/Increase) SET : Enter : Select another sub-menu Menu Name Button Tip Icons Sub-menus NOTE OSD (On Screen Display) menu languages on the Menu. A11 Press the MENU Button, then the main menu of selecting and adjusting an item using the OSD system. On Screen Display(OSD) Selection and Adjustment You were introduced to the procedure of the OSD appears. Listed below are the icons, icon names, and icon descriptions of the all items shown on the monitor may differ from the manual.
Main Menu MENU : Exit - + : Adjust (Decrease/Increase) SET : Enter : Select another sub-menu Menu Name Button Tip Icons Sub-menus NOTE OSD (On Screen Display) menu languages on the Menu. A11 Press the MENU Button, then the main menu of selecting and adjusting an item using the OSD system. On Screen Display(OSD) Selection and Adjustment You were introduced to the procedure of the OSD appears. Listed below are the icons, icon names, and icon descriptions of the all items shown on the monitor may differ from the manual.
Owner's Manual (English)
Page 13
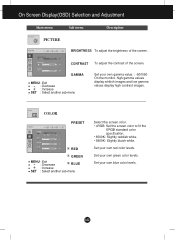
Set your own blue color levels. Set your own red color levels. A12 Set your own gamma value. : -50/0/50 On the monitor, high gamma values display whitish images and low gamma values display high contrast images. CONTRAST To adjust the contrast of the screen. GAMMA MENU : Exit +- : ...
Set your own blue color levels. Set your own red color levels. A12 Set your own gamma value. : -50/0/50 On the monitor, high gamma values display whitish images and low gamma values display high contrast images. CONTRAST To adjust the contrast of the screen. GAMMA MENU : Exit +- : ...
Owner's Manual (English)
Page 15
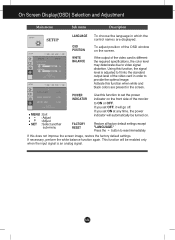
... image. If necessary, perform the white balance function again. A14 If this function when white and black colors are displayed. If the output of the monitor to video signal distortion. If you set the power indicator on the screen. On Screen Display(OSD) Selection and Adjustment Main menu Sub menu Description...
... image. If necessary, perform the white balance function again. A14 If this function when white and black colors are displayed. If the output of the monitor to video signal distortion. If you set the power indicator on the screen. On Screen Display(OSD) Selection and Adjustment Main menu Sub menu Description...

Owner's Manual (English)
Page 16
.... Menu Name Icons Sub-menu Name button Main menu Sub menu Description MOVIE This feature lets you touch the on the left side of the monitor.
.... Menu Name Icons Sub-menu Name button Main menu Sub menu Description MOVIE This feature lets you touch the on the left side of the monitor.
Owner's Manual (English)
Page 19
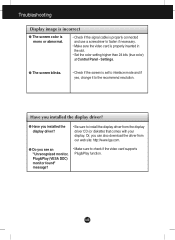
... is properly inserted in the slot. • Set the color setting higher than 24 bits (true color) at Control Panel - Or, you see an "Unrecognized monitor, Plug&Play (VESA DDC) monitor found" message? • Make sure to the recommend resolution.
... is properly inserted in the slot. • Set the color setting higher than 24 bits (true color) at Control Panel - Or, you see an "Unrecognized monitor, Plug&Play (VESA DDC) monitor found" message? • Make sure to the recommend resolution.
Owner's Manual (English)
Page 23
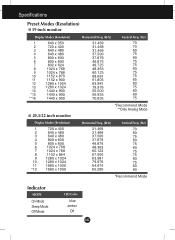
... Modes (Resolution) 19 inch monitor Display Modes (Resolution) 1 640 x 350 2 720 x 400 3 640 x 480 4 640 x 480 5 800 x 600 6 800 x 600 7 832 x 624 8 1024 x 768 9 1024 x 768 10 1152 x 870 11 1152 x 900 12 1280 x 1024 13 1280 x 1024 14 1440 x 900 *15 1440 x 900 **16 1440 x 900 20.1/22 inch monitor Display Modes...
... Modes (Resolution) 19 inch monitor Display Modes (Resolution) 1 640 x 350 2 720 x 400 3 640 x 480 4 640 x 480 5 800 x 600 6 800 x 600 7 832 x 624 8 1024 x 768 9 1024 x 768 10 1152 x 870 11 1152 x 900 12 1280 x 1024 13 1280 x 1024 14 1440 x 900 *15 1440 x 900 **16 1440 x 900 20.1/22 inch monitor Display Modes...
Owner's Manual (English)
Page 24
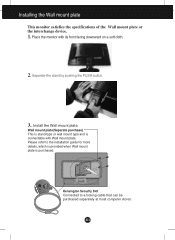
... the specifications of the Wall mount plate or the interchange device. 1. Place the monitor with Wall mount plate. Please refer to a locking cable that can be purchased separately at most computer stores. Kensington Security Slot Connected to the installation ...
... the specifications of the Wall mount plate or the interchange device. 1. Place the monitor with Wall mount plate. Please refer to a locking cable that can be purchased separately at most computer stores. Kensington Security Slot Connected to the installation ...


