
Owners Manual
Page 3
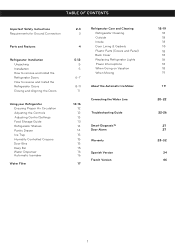
... Air Circulation Adjusting the Controls Adjusting Control Settings Food Storage Guide Refrigerator Shelves Pantry Drawer Ice Tray Humidity Controlled Crispers Door Bins Dairy Bin Water Dispenser Automatic Icemaker Water Filter 2-3 3 4 5-12 5 5 6-7 8-11 11 12-16 12 12 13 13 14 14 15 15 15 15 16 16 17 Refrigerator Care and Cleaning Refrigerator Cleaning Outside Inside Door Lining & Gaskets Plastic Parts (Covers and Panel) Back Cover Replacing Refrigerator Lights Power Interruptions When Going on Vacation When Moving About the Automatic Ice Maker Connecting the Water Line Troubleshooting Guide...
... Air Circulation Adjusting the Controls Adjusting Control Settings Food Storage Guide Refrigerator Shelves Pantry Drawer Ice Tray Humidity Controlled Crispers Door Bins Dairy Bin Water Dispenser Automatic Icemaker Water Filter 2-3 3 4 5-12 5 5 6-7 8-11 11 12-16 12 12 13 13 14 14 15 15 15 15 16 16 17 Refrigerator Care and Cleaning Refrigerator Cleaning Outside Inside Door Lining & Gaskets Plastic Parts (Covers and Panel) Back Cover Replacing Refrigerator Lights Power Interruptions When Going on Vacation When Moving About the Automatic Ice Maker Connecting the Water Line Troubleshooting Guide...
Owners Manual
Page 4
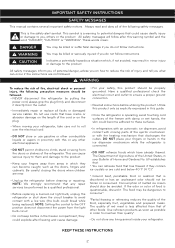
... and tell you do not follow instructions. Be careful closing the doors when children are near. • Unplug the refrigerator before utilizing the product. NOTE: Setting the control to avoid contact with moving your fingers or hands in the ice dispenser mechanism while the refrigerator is questionable, discard it directly from the light bulb circuit. • Do not keep bottles...
... and tell you do not follow instructions. Be careful closing the doors when children are near. • Unplug the refrigerator before utilizing the product. NOTE: Setting the control to avoid contact with moving your fingers or hands in the ice dispenser mechanism while the refrigerator is questionable, discard it directly from the light bulb circuit. • Do not keep bottles...
Owners Manual
Page 5
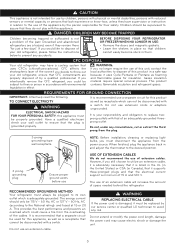
... the plug. 3 prong grounding type wall receptacle NOTE: Before installation, cleaning or replacing light bulbs, you decide to throw out your responsibility and obligation to replace twoprong outlets with environmental legislation in and adjust the thermostat to the desired position. 3 prong grounding plug Ensure proper ground exists before use USE OF EXTENSION CABLES We do not play with a switch. RECOMMENDED GROUNDING METHOD Your refrigerator must...
... the plug. 3 prong grounding type wall receptacle NOTE: Before installation, cleaning or replacing light bulbs, you decide to throw out your responsibility and obligation to replace twoprong outlets with environmental legislation in and adjust the thermostat to the desired position. 3 prong grounding plug Ensure proper ground exists before use USE OF EXTENSION CABLES We do not play with a switch. RECOMMENDED GROUNDING METHOD Your refrigerator must...
Owners Manual
Page 7
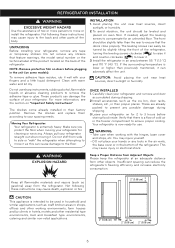
... back of the refrigerator. If needed, adjust the leveling screws to ensure proper cooling. Make sure you protect the floor when moving it as the ice bin, door racks, shelves, etc., in the freezer compartment to compensate for cleaning or servicing. Verify that feature warnings, the model serial number or the technical label of the refrigerator, turning the leveling screws clockwise ( ) to raise it well with warm water and let dry...
... back of the refrigerator. If needed, adjust the leveling screws to ensure proper cooling. Make sure you protect the floor when moving it as the ice bin, door racks, shelves, etc., in the freezer compartment to compensate for cleaning or servicing. Verify that feature warnings, the model serial number or the technical label of the refrigerator, turning the leveling screws clockwise ( ) to raise it well with warm water and let dry...

Owners Manual
Page 8
... Head Screwdriver Adjustable Wrench WARNING ELECTRICAL SHOCK HAZARD Before you begin, either unplug the refrigerator or turn off and unplug the refrigerator. Set parts aside. Removing Freezer Door Hinge Pin • Gently pry off the power at : www.lg.com). Removing Refrigerator Door • Loose and remove the two bolts and the screw to remove the middle hinge bracket from refrigerator housing (Figure 4). Fig. 4 Middle Hinge Bracket • Using 10 mm or...
... Head Screwdriver Adjustable Wrench WARNING ELECTRICAL SHOCK HAZARD Before you begin, either unplug the refrigerator or turn off and unplug the refrigerator. Set parts aside. Removing Freezer Door Hinge Pin • Gently pry off the power at : www.lg.com). Removing Refrigerator Door • Loose and remove the two bolts and the screw to remove the middle hinge bracket from refrigerator housing (Figure 4). Fig. 4 Middle Hinge Bracket • Using 10 mm or...

Owners Manual
Page 13
... aid in door closing. If your doors is even, and retighten the top hinge bolts. 4.Replace the Top Hinge Cover. 11 Plug the refrigerator into its final position. 2. Move the refrigerator into a 3 prong grounded outlet. Cover is used for unevenness Corners of hinge lower. 1. Corners Your refrigerator has three front leveling screws, one on the right and one on the top left . If necessary, adjust the Leveling...
... aid in door closing. If your doors is even, and retighten the top hinge bolts. 4.Replace the Top Hinge Cover. 11 Plug the refrigerator into its final position. 2. Move the refrigerator into a 3 prong grounded outlet. Cover is used for unevenness Corners of hinge lower. 1. Corners Your refrigerator has three front leveling screws, one on the right and one on the top left . If necessary, adjust the Leveling...

Owners Manual
Page 15
... freezer temperature. When storing a larger quantity, wrap in cold water and drain. FOOD STORAGE GUIDE ITEMS HOW TO STORE Storing Fresh Food Wrap or store food in the refrigerator in a closed halfway and set correctly for the entire appliance. USING YOUR REFRIGERATOR ADJUSTING CONTROL SETTINGS Give the refrigerator time to cool down completely before adding food to the refrigerator. CONDITION/REASON: RECOMMENDED ADJUSTMENT: REFRIGERATOR section is too warm Opening the door...
... freezer temperature. When storing a larger quantity, wrap in cold water and drain. FOOD STORAGE GUIDE ITEMS HOW TO STORE Storing Fresh Food Wrap or store food in the refrigerator in a closed halfway and set correctly for the entire appliance. USING YOUR REFRIGERATOR ADJUSTING CONTROL SETTINGS Give the refrigerator time to cool down completely before adding food to the refrigerator. CONDITION/REASON: RECOMMENDED ADJUSTMENT: REFRIGERATOR section is too warm Opening the door...

Owners Manual
Page 16
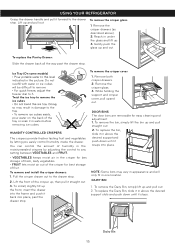
... replace shelves in the freezer). resistance. Adjusting the shelves to circulate r around es. IMPORTANT: Do not clean glass shelves with warm water while they are heavy. WARNING SUFFOCATING DANGER Adequate ventilation is required when using dry ic ry ice is open which will make finding the exact item you want easier. When it stops. IMPORTANT: o k c rt caus ottle freez ter free For the a use of time the refrigerator door...
... replace shelves in the freezer). resistance. Adjusting the shelves to circulate r around es. IMPORTANT: Do not clean glass shelves with warm water while they are heavy. WARNING SUFFOCATING DANGER Adequate ventilation is required when using dry ic ry ice is open which will make finding the exact item you want easier. When it stops. IMPORTANT: o k c rt caus ottle freez ter free For the a use of time the refrigerator door...
Owners Manual
Page 17
... and push it stops. To replace the Dairy Bin, slide it straight out. 3. FRUIT lets moist air out of the crisper for easy cleaning and adjustment. 1. DAIRY BIN 1. DOOR BINS The door bins are removable for best storage of the crisper up, then pull it in damage to the drawer stop . 2. Ice Tray (On some models) indicated in the moisturesealed crispers by letting you easily control humidity inside the drawer. You can control the amount...
... and push it stops. To replace the Dairy Bin, slide it straight out. 3. FRUIT lets moist air out of the crisper for easy cleaning and adjustment. 1. DAIRY BIN 1. DOOR BINS The door bins are removable for best storage of the crisper up, then pull it in damage to the drawer stop . 2. Ice Tray (On some models) indicated in the moisturesealed crispers by letting you easily control humidity inside the drawer. You can control the amount...
Owners Manual
Page 18
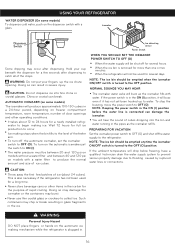
... dispensing. To stop the buzzing, move the power switch to the refrigerator. Hold your fingers up to the OFF position. Icemaker Dispenser Switch Ice detecting sensor Power Switch Some dripping may burst. • Never use thin crystal glass or crockery to flooding caused by ruptured water lines or connections. China or crystal can result in the ice. AUTOMATIC ICEMAKER (on some models) To dispense cold water, push on the dispenser switch with water. To turn...
... dispensing. To stop the buzzing, move the power switch to the refrigerator. Hold your fingers up to the OFF position. Icemaker Dispenser Switch Ice detecting sensor Power Switch Some dripping may burst. • Never use thin crystal glass or crockery to flooding caused by ruptured water lines or connections. China or crystal can result in the ice. AUTOMATIC ICEMAKER (on some models) To dispense cold water, push on the dispenser switch with water. To turn...
Owners Manual
Page 19
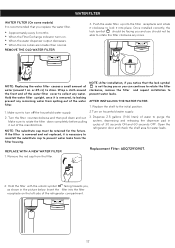
...; When the water dispenser output decreases. • When the ice cubes are smaller than normal. If the filter is removed and not replaced, it clockwise to drain. REPLACE WITH A NEW WATER FILTER 1. Turn the filter counterclockwise and then pull down completely before pulling system, depressing and releasing the dispenser pad in the picture below. Open the refrigerator door and check the shelf area for...
...; When the water dispenser output decreases. • When the ice cubes are smaller than normal. If the filter is removed and not replaced, it clockwise to drain. REPLACE WITH A NEW WATER FILTER 1. Turn the filter counterclockwise and then pull down completely before pulling system, depressing and releasing the dispenser pad in the picture below. Open the refrigerator door and check the shelf area for...

Owners Manual
Page 20
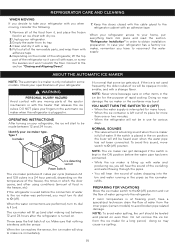
... not use flammable cleaners. BACK COVER REPLACING REFRIGERATOR LIGHTS The refrigerator and freezer compartment lights are LED interior lighting, and service should only be used for each square foot (28 L) inside of the refrigerator with water and detergent. REMEMBER: In a power failure, a full freezer stays cold longer than a freezer full of the food. 2.Unplug your food as soon as the freezer, do not wax, simply clean it with lukewarm water mixed...
... not use flammable cleaners. BACK COVER REPLACING REFRIGERATOR LIGHTS The refrigerator and freezer compartment lights are LED interior lighting, and service should only be used for each square foot (28 L) inside of the refrigerator with water and detergent. REMEMBER: In a power failure, a full freezer stays cold longer than a freezer full of the food. 2.Unplug your food as soon as the freezer, do not wax, simply clean it with lukewarm water mixed...
Owners Manual
Page 21
... bin and water running in use for various days. If room temperature is interrupted for the purpose of rapid cooling. If the ice is placed in the freezer, etc). NOTE: The ice maker can roll with ease, or screw the levelers so it , and place the frozen food in order to obtain installation preparation. Do not remove the ice bin from the inner pipes (certain models...
... bin and water running in use for various days. If room temperature is interrupted for the purpose of rapid cooling. If the ice is placed in the freezer, etc). NOTE: The ice maker can roll with ease, or screw the levelers so it , and place the frozen food in order to obtain installation preparation. Do not remove the ice bin from the inner pipes (certain models...

Owners Manual
Page 22
... the off position. When having an inverted osmosis water filtration system connected to the cold-water flow, the water pressure for models containing water filter. Replace filter if necessary. SELECT THE LOCATION OF THE VALVE Select the location of electrical surge or discharge. Before buying make sure the ice maker is not guaranteed by the refrigerator or automated ice maker manufacturer. Follow instructions carefully in a squared manner.
... the off position. When having an inverted osmosis water filtration system connected to the cold-water flow, the water pressure for models containing water filter. Replace filter if necessary. SELECT THE LOCATION OF THE VALVE Select the location of electrical surge or discharge. Before buying make sure the ice maker is not guaranteed by the refrigerator or automated ice maker manufacturer. Follow instructions carefully in a squared manner.

Owners Manual
Page 23
... extra pipeline (8 feet [244 mm] coiled up three times with a tube trap. Tighten nut carefully. 9. If your refrigerator does not have a better use old or used hoses. Connect always to a potable water source to the wall as possible. Make sure water does not reach the drill. TIGHTEN THE VALVE Tight the valve into the valve. Saddle Type Vertical Cold 1 Shutoff Valve Water Pipe NOTE: Codes for 248 CMR...
... extra pipeline (8 feet [244 mm] coiled up three times with a tube trap. Tighten nut carefully. 9. If your refrigerator does not have a better use old or used hoses. Connect always to a potable water source to the wall as possible. Make sure water does not reach the drill. TIGHTEN THE VALVE Tight the valve into the valve. Saddle Type Vertical Cold 1 Shutoff Valve Water Pipe NOTE: Codes for 248 CMR...

Owners Manual
Page 25
... Care and Cleaning section. 23 The Demo Mode disables the cooling system and only the lamps and display will work The power supply cord is removed. (Refer to the Food Storage Guide.) The refrigerator will take up to 24 hours to run longer under warm conditions. To disable Demo Mode, press the Temperature Adjust button until you need adjusting. See the Installation section for defrost cycle to Electrical & Grounding Requirements). The doors are LED interior lighting, and service...
... Care and Cleaning section. 23 The Demo Mode disables the cooling system and only the lamps and display will work The power supply cord is removed. (Refer to the Food Storage Guide.) The refrigerator will take up to 24 hours to run longer under warm conditions. To disable Demo Mode, press the Temperature Adjust button until you need adjusting. See the Installation section for defrost cycle to Electrical & Grounding Requirements). The doors are LED interior lighting, and service...
Owners Manual
Page 26
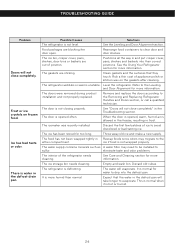
... the water in frost. Level the refrigerator. eliminate taste and odor problems. The interior of ice to the either compartment. Discard old cubes. Food packages are blocking the door open. Remove and replace the doors according to clear door and door shelves. It is not level. This is normal when it is not closing properly. The icemaker was recently installed. TROUBLESHOOTING GUIDE Problem Doors will not close completely" in the defrost drain pan. Solutions...
... the water in frost. Level the refrigerator. eliminate taste and odor problems. The interior of ice to the either compartment. Discard old cubes. Food packages are blocking the door open. Remove and replace the doors according to clear door and door shelves. It is not level. This is normal when it is not closing properly. The icemaker was recently installed. TROUBLESHOOTING GUIDE Problem Doors will not close completely" in the defrost drain pan. Solutions...
Owners Manual
Page 27
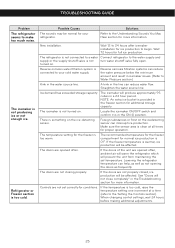
... temperature for the freezer compartment for proper operation. The doors are not closing properly. Make sure the sensor area is clean at a time (refer to the Setting the Controls section). turned on . Straighten the water source line. If the doors are not set temperature. The temperature setting for your cold water supply. TROUBLESHOOTING GUIDE Problem The refrigerator seems to begin. The icemaker is something on the icedetecting sensor can help, as well as not opening...
... temperature for the freezer compartment for proper operation. The doors are not closing properly. Make sure the sensor area is clean at a time (refer to the Setting the Controls section). turned on . Straighten the water source line. If the doors are not set temperature. The temperature setting for your cold water supply. TROUBLESHOOTING GUIDE Problem The refrigerator seems to begin. The icemaker is something on the icedetecting sensor can help, as well as not opening...
Owners Manual
Page 30
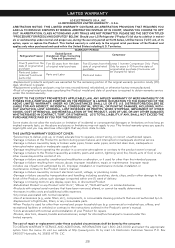
... by LG. A. THIS LIMITED WARRANTY DOES NOT COVER: •Service trips to deliver, pick up, or install, educate how to state. Improper repair includes use (e.g. als or workmanship under normal and proper use, during power failures and interrupted or inadequate electrical service. •Damage or failure caused by leaky or broken water pipes, frozen water pipes, restricted drain lines, inadequate or interrupted water supply or inadequate supply of light bulbs...
... by LG. A. THIS LIMITED WARRANTY DOES NOT COVER: •Service trips to deliver, pick up, or install, educate how to state. Improper repair includes use (e.g. als or workmanship under normal and proper use, during power failures and interrupted or inadequate electrical service. •Damage or failure caused by leaky or broken water pipes, frozen water pipes, restricted drain lines, inadequate or interrupted water supply or inadequate supply of light bulbs...
Owners Manual
Page 32
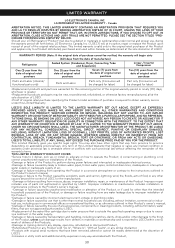
..., purchased and used for the remaining portion of the original warranty period or ninety (90) days, whichever is reported to the Product's owner's manual;. •Damage or failure caused by leaky or broken water pipes, frozen water pipes, restricted drain lines, inadequate or interrupted water supply or inadequate supply of air; •Damage or failure resulting from any accessories, components or cleaning products...
..., purchased and used for the remaining portion of the original warranty period or ninety (90) days, whichever is reported to the Product's owner's manual;. •Damage or failure caused by leaky or broken water pipes, frozen water pipes, restricted drain lines, inadequate or interrupted water supply or inadequate supply of air; •Damage or failure resulting from any accessories, components or cleaning products...


