
Owner's Manual (English)
Page 2
...OF CONTENTS Important Safety Instructions Grounding Requirements Refrigerator Features Refrigerator Installation Unpacking you Refrigerator Installation Base Grille Installation Handle Removal Removing and Replacing Refrigerator Doors Door Alignment Using Your Refrigerator Ensuring Proper Air Circulation Control Panel Features...Adjusting Control Settings Food Storage Guide Storing Frozen Food Water Dispenser Door Rack and Support Crisper and Crisper cover Snack Pan Refrigerator Shelves Freezer Shelf Ice storage Water Filter 3 Care and Cleaning 4 General Cleaning Tips 5 Outside 6 - 9 ...
...OF CONTENTS Important Safety Instructions Grounding Requirements Refrigerator Features Refrigerator Installation Unpacking you Refrigerator Installation Base Grille Installation Handle Removal Removing and Replacing Refrigerator Doors Door Alignment Using Your Refrigerator Ensuring Proper Air Circulation Control Panel Features...Adjusting Control Settings Food Storage Guide Storing Frozen Food Water Dispenser Door Rack and Support Crisper and Crisper cover Snack Pan Refrigerator Shelves Freezer Shelf Ice storage Water Filter 3 Care and Cleaning 4 General Cleaning Tips 5 Outside 6 - 9 ...
Owner's Manual (English)
Page 3
...plugged in. • DO NOT refreeze frozen foods which , if not avoided, may break when being replaced). They could damage the refrigerator and seriously injure themshelves. • Keep fingers out of foods, particulary fruits, vegetables and prepared foods. The food may safely refreeze ... become frayed or otherwise damaged. IMPORTANT SAFETY INSTRUCTIONS This guide contains many other flammable (vapors or liquids) in the vicinity of the refrigerator. • After your product, basic safety precautions should be discarded. Always read and obey. WARNING To reduce the risk of their...
...plugged in. • DO NOT refreeze frozen foods which , if not avoided, may break when being replaced). They could damage the refrigerator and seriously injure themshelves. • Keep fingers out of foods, particulary fruits, vegetables and prepared foods. The food may safely refreeze ... become frayed or otherwise damaged. IMPORTANT SAFETY INSTRUCTIONS This guide contains many other flammable (vapors or liquids) in the vicinity of the refrigerator. • After your product, basic safety precautions should be discarded. Always read and obey. WARNING To reduce the risk of their...

Owner's Manual (English)
Page 4
...prong wall outlet. Ensure proper ground exists before use by a person responsible for "just a few days". This appliance contains fluid (refrigerant, lubricant), and is ) Ensure proper ground exists before use of environmental legislation. When you intentionally release this appliance must be plugged into...Children should always be replaced by the manufacturer, by our service center or by qualified personal by LG Electronics, to the National rating). Do not use of the refrigerator. Before you can be properly grounded. even if they do not play with a switch or...
...prong wall outlet. Ensure proper ground exists before use by a person responsible for "just a few days". This appliance contains fluid (refrigerant, lubricant), and is ) Ensure proper ground exists before use of environmental legislation. When you intentionally release this appliance must be plugged into...Children should always be replaced by the manufacturer, by our service center or by qualified personal by LG Electronics, to the National rating). Do not use of the refrigerator. Before you can be properly grounded. even if they do not play with a switch or...

Owner's Manual (English)
Page 5
...Water Filter H Dairy Corner For storage of meat or fresh food. I M D N E P D N F Use this page to the dispenser. REFRIGERATOR FEATURES G H A I B J C K L B I Refrigerator Lamp J Wine holder ** K Refrigerator Shelf L Snack Pan For storage of dairy products such as butter and cheese. A Automatic Ice Maker The ice is produced in the icemaker... of the features shown below may have purchased may not match your convenience. M Bottle Guide ** N Refrigerator Door Rack P Vegetable Drawer ** On some or all of the items listed below. Page references are included for your model.
...Water Filter H Dairy Corner For storage of meat or fresh food. I M D N E P D N F Use this page to the dispenser. REFRIGERATOR FEATURES G H A I B J C K L B I Refrigerator Lamp J Wine holder ** K Refrigerator Shelf L Snack Pan For storage of dairy products such as butter and cheese. A Automatic Ice Maker The ice is produced in the icemaker... of the features shown below may have purchased may not match your convenience. M Bottle Guide ** N Refrigerator Door Rack P Vegetable Drawer ** On some or all of the items listed below. Page references are included for your model.

Owner's Manual (English)
Page 6
...may be sure to the base of 2 inches (5.08cm) from adjacent items and surfaces. Wipe with your thumb. WARNING When Moving Your Refrigerator: Your refrigerator is between 41 °F (5 °C) and 110 °F (43 °C). WARNING Explosion Hazard Keep flammable materials and vapors, such...grille, stopper, etc. Carpeting and soft tile surfaces are open, remove screws from the bottom front part of your fingers. REFRIGERATOR INSTALLATION WARNING Excessive Weight Hazard Use two or more information, see the Important Safety Instructions section. Failure to do so can ...
...may be sure to the base of 2 inches (5.08cm) from adjacent items and surfaces. Wipe with your thumb. WARNING When Moving Your Refrigerator: Your refrigerator is between 41 °F (5 °C) and 110 °F (43 °C). WARNING Explosion Hazard Keep flammable materials and vapors, such...grille, stopper, etc. Carpeting and soft tile surfaces are open, remove screws from the bottom front part of your fingers. REFRIGERATOR INSTALLATION WARNING Excessive Weight Hazard Use two or more information, see the Important Safety Instructions section. Failure to do so can ...

Owner's Manual (English)
Page 7
... necessary, follow the directions below to remove the door handles. • Loosen the set screws with rivet the removal process is necessary to move the refrigerator through a narrow opening. Remove the top hinge cover screw (1). 2. Use a flat blade screwdriver to do so could result in death or serious injury. &#...or feet or other objects into the air vents, base grille, or bottom of the cover (2). Lift up , on the cabinet underside of the refrigerator. Lift the door from the lower hinge pin. 5. You may be tightened or moved, use a 1/4" (6.35 mm) Allen wrench. To remove the ...
... necessary, follow the directions below to remove the door handles. • Loosen the set screws with rivet the removal process is necessary to move the refrigerator through a narrow opening. Remove the top hinge cover screw (1). 2. Use a flat blade screwdriver to do so could result in death or serious injury. &#...or feet or other objects into the air vents, base grille, or bottom of the cover (2). Lift up , on the cabinet underside of the refrigerator. Lift the door from the lower hinge pin. 5. You may be tightened or moved, use a 1/4" (6.35 mm) Allen wrench. To remove the ...

Owner's Manual (English)
Page 8
...opening in cabinet top. Lift the door from draining onto the floor. (1) (2) (3) (4) (5) (3) Rivet Type 1 (4) (5) Type 2 (2) (1) (4) Figure 1 (3) (5) (7) Reinstalling the rigth (Refrigerator) door 1. Insert and tighten cover screw (1). 7. Disconnect all the wire harnesses (3). 6. Disconnecting the tube under edge of wire opening in cabinet top. Remove the grounding... (3) counterclockwise to pull the water lines through the lower hinge pin and place the door onto the lower hinge pin. 5. REFRIGERATOR INSTALLATION Removing the left (Freezer) door 3.
...opening in cabinet top. Lift the door from draining onto the floor. (1) (2) (3) (4) (5) (3) Rivet Type 1 (4) (5) Type 2 (2) (1) (4) Figure 1 (3) (5) (7) Reinstalling the rigth (Refrigerator) door 1. Insert and tighten cover screw (1). 7. Disconnect all the wire harnesses (3). 6. Disconnecting the tube under edge of wire opening in cabinet top. Remove the grounding... (3) counterclockwise to pull the water lines through the lower hinge pin and place the door onto the lower hinge pin. 5. REFRIGERATOR INSTALLATION Removing the left (Freezer) door 3.

Owner's Manual (English)
Page 9
... Left leveling leg Height difference Height Adjustment Up difference hinge pin Down If the freezer compartment door is lower than the refrigerator compartment door, make them level by inserting flat blade screwdriver into the groove of the right leveling leg and rotating it...difference Height difference Left leveling leg Using a ¾" (19 mm) wrench, turn the keeper nut clockwise to level the refrigerator and freezer door. REFRIGERATOR INSTALLATION DOOR ALIGNMENT Before adjust the doors, remove the Base Grille. If the freezer compartment door is higher than the freezer...
... Left leveling leg Height difference Height Adjustment Up difference hinge pin Down If the freezer compartment door is lower than the refrigerator compartment door, make them level by inserting flat blade screwdriver into the groove of the right leveling leg and rotating it...difference Height difference Left leveling leg Using a ¾" (19 mm) wrench, turn the keeper nut clockwise to level the refrigerator and freezer door. REFRIGERATOR INSTALLATION DOOR ALIGNMENT Before adjust the doors, remove the Base Grille. If the freezer compartment door is higher than the freezer...

Owner's Manual (English)
Page 10
...transfer and drying out food, wrap or cover foods tightly. (See the Food Storage Guide section for use. Your refrigerator is open and close the refrigerator forcefully, the freezer door may occur. ICE TYPE CRUSH CUBE LED DISPLAY The LED display shows the temperature settings, ...blocked, airflow will be interruped and temperature and moisture problems may open . NOTE: Hold the glass or other settings. USING YOUR REFRIGERATOR ENSURING PROPER AIR CIRCULATION NEXT In order to ensure proper temperatures, air must thorougly clean both sections, any of these settings for ...
...transfer and drying out food, wrap or cover foods tightly. (See the Food Storage Guide section for use. Your refrigerator is open and close the refrigerator forcefully, the freezer door may occur. ICE TYPE CRUSH CUBE LED DISPLAY The LED display shows the temperature settings, ...blocked, airflow will be interruped and temperature and moisture problems may open . NOTE: Hold the glass or other settings. USING YOUR REFRIGERATOR ENSURING PROPER AIR CIRCULATION NEXT In order to ensure proper temperatures, air must thorougly clean both sections, any of these settings for ...

Owner's Manual (English)
Page 11
... service technician to determine the problem. 11 DIAGNOSIS (FAILURE DETECTION) FUNCTION Diagnosis function automatically detects failure during the normal use of the refrigerator Î 3 SECS MONTH compartment in 30 second intervals when a compartment door is closed. Press the ALARM/LOCK button once to...illuminate when activated. Instead, contact a local Authorized service center or call our support line for the water filter. USING YOUR REFRIGERATOR ICE PLUS ICE PLUS Press this button once to activate the ice plus function runs the freezer compartment at the coldest settings ...
... service technician to determine the problem. 11 DIAGNOSIS (FAILURE DETECTION) FUNCTION Diagnosis function automatically detects failure during the normal use of the refrigerator Î 3 SECS MONTH compartment in 30 second intervals when a compartment door is closed. Press the ALARM/LOCK button once to...illuminate when activated. Instead, contact a local Authorized service center or call our support line for the water filter. USING YOUR REFRIGERATOR ICE PLUS ICE PLUS Press this button once to activate the ice plus function runs the freezer compartment at the coldest settings ...

Owner's Manual (English)
Page 12
...often level, wait 24 hours - Very cold room temperature (Compressor doesn't cycle often enough) - Air vents blocked by adjusting the refrigerator. Once opened butter in crisper. Sort and keep the temperature colder. Vegetables with tight lids can also be correct for level, wait ...skins (carrots, peppers) Place in plastic bags or plastic container and store in a covered dish or closed paper bag on a refrigerator shelf. The refrigerator control functions as a guide. The colder the setting, the longer the compressor will run to next lower - This prevents food odor...
...often level, wait 24 hours - Very cold room temperature (Compressor doesn't cycle often enough) - Air vents blocked by adjusting the refrigerator. Once opened butter in crisper. Sort and keep the temperature colder. Vegetables with tight lids can also be correct for level, wait ...skins (carrots, peppers) Place in plastic bags or plastic container and store in a covered dish or closed paper bag on a refrigerator shelf. The refrigerator control functions as a guide. The colder the setting, the longer the compressor will run to next lower - This prevents food odor...

Owner's Manual (English)
Page 13
...2 to 3 lbs of food per cubic meter) of tray slightly and snap the ribs into the holes to your hand. USING YOUR REFRIGERATOR STORING FROZEN FOOD NOTE: For further information about preparing food for 30 minutes, then package and freeze. Packaging Successful freezing depends on correct...and moisture-proof) and the storage temperature. Leave enough space in the food and air inside a sealed package are normal. WATER DISPENSER Your refrigerator has a mechanism that moisture in the freezer for air to leave enough room at room temperature for freezing or food storage times, check ...
...2 to 3 lbs of food per cubic meter) of tray slightly and snap the ribs into the holes to your hand. USING YOUR REFRIGERATOR STORING FROZEN FOOD NOTE: For further information about preparing food for 30 minutes, then package and freeze. Packaging Successful freezing depends on correct...and moisture-proof) and the storage temperature. Leave enough space in the food and air inside a sealed package are normal. WATER DISPENSER Your refrigerator has a mechanism that moisture in the freezer for air to leave enough room at room temperature for freezing or food storage times, check ...

Owner's Manual (English)
Page 14
...• To remove the snack pan cover, pull out the snack pan compartment a bit to dispense water or ice. DOOR RACK AND SUPPORT Your refrigerator features with racks where you can easily arrange packaged products. • Lift the door rack holding both sides and pull it out l. ... water button with the small opening, use it out. 14 SNACK PAN Air is entered in the refrigerator when the door is pressed, the light will be illuminated. USING YOUR REFRIGERATOR CAUTION When opening the container with a glass or other container and chilled water will be dispensed.
...• To remove the snack pan cover, pull out the snack pan compartment a bit to dispense water or ice. DOOR RACK AND SUPPORT Your refrigerator features with racks where you can easily arrange packaged products. • Lift the door rack holding both sides and pull it out l. ... water button with the small opening, use it out. 14 SNACK PAN Air is entered in the refrigerator when the door is pressed, the light will be illuminated. USING YOUR REFRIGERATOR CAUTION When opening the container with a glass or other container and chilled water will be dispensed.

Owner's Manual (English)
Page 15
If you can place it at a height according to keep shelf horizontal while removing; USING YOUR REFRIGERATOR REFRIGERATOR SHELVES ICE STORAGE The refrigeraCtoar crompearadtmnMenat si hetlnf iseandajunstcabele so that you need remove the ice storage, follow the next instructions. • Hold the ice ...
If you can place it at a height according to keep shelf horizontal while removing; USING YOUR REFRIGERATOR REFRIGERATOR SHELVES ICE STORAGE The refrigeraCtoar crompearadtmnMenat si hetlnf iseandajunstcabele so that you need remove the ice storage, follow the next instructions. • Hold the ice ...

Owner's Manual (English)
Page 16
.... Please put up a cup under the hole to side, it isn't fully inserted. To clean the system dispense 2.5 gallons (9.46 L) of the cartridge. USING YOUR REFRIGERATOR WATER FILTER It is removed, you will feel it click out of place. With cartridge knob in firmly and twist it into place. Pull of...
.... Please put up a cup under the hole to side, it isn't fully inserted. To clean the system dispense 2.5 gallons (9.46 L) of the cartridge. USING YOUR REFRIGERATOR WATER FILTER It is removed, you will feel it click out of place. With cartridge knob in firmly and twist it into place. Pull of...

Owner's Manual (English)
Page 17
...non-fammable cleaner. However, clean both sections about once a month to sections in warm water. These can wash the inside of the refrigerator with one of the same size, shape and wattage. 17 Refer to prevent odors. OUTSIDE Waxing external painted metal surfaces helps provide rust... should only be removed by a qualified technician. Mix 2 tablespoons baking soda to 1 quart of water (26 g soda to paste wax). Before replacing a burned-out light bulb, either unplug the refrigerator or turn off power at the circuit breaker or fuse box. Use a clean sponge or soft cloth and...
...non-fammable cleaner. However, clean both sections about once a month to sections in warm water. These can wash the inside of the refrigerator with one of the same size, shape and wattage. 17 Refer to prevent odors. OUTSIDE Waxing external painted metal surfaces helps provide rust... should only be removed by a qualified technician. Mix 2 tablespoons baking soda to 1 quart of water (26 g soda to paste wax). Before replacing a burned-out light bulb, either unplug the refrigerator or turn off power at the circuit breaker or fuse box. Use a clean sponge or soft cloth and...

Owner's Manual (English)
Page 18
...they are still cold-below freezing, have a qualied service technician drain the water supply system (on bottom and rotating outward , turn the refrigerator OFF before you leave. 1. Empty the ice bin. 3. Remove all frozen food in the freezer for air to get in Home and Garden Bulletin...28 L) of their quality as much of freezer space. If you choose to turn the bulb counterclockwise. CARE AND CLEANING To change the refrigerator lamp: Remove cover by pressing upward on some models) to prevent serious property damage due to possible flooding from building up any perishables and ...
...they are still cold-below freezing, have a qualied service technician drain the water supply system (on bottom and rotating outward , turn the refrigerator OFF before you leave. 1. Empty the ice bin. 3. Remove all frozen food in the freezer for air to get in Home and Garden Bulletin...28 L) of their quality as much of freezer space. If you choose to turn the bulb counterclockwise. CARE AND CLEANING To change the refrigerator lamp: Remove cover by pressing upward on some models) to prevent serious property damage due to possible flooding from building up any perishables and ...

Owner's Manual (English)
Page 19
...heating element that releases the cubes. NOTE: Keeping the power switch in Using your new home, put everything back and refer to the REFRIGERATION INSTALLATION section for more easily OR screw in . Refer to water. Depending on the model, raise the front of the feeler arm....freezer compartment temperature, room temperature, number of ice to allow the water line to freezing. Pressing at highest position returns Indicator to the refrigerator cabinet. Throw away the first few batches of door openings and other operating conditions. Be sure nothing interferes with water. If ice ...
...heating element that releases the cubes. NOTE: Keeping the power switch in Using your new home, put everything back and refer to the REFRIGERATION INSTALLATION section for more easily OR screw in . Refer to water. Depending on the model, raise the front of the feeler arm....freezer compartment temperature, room temperature, number of ice to allow the water line to freezing. Pressing at highest position returns Indicator to the refrigerator cabinet. Throw away the first few batches of door openings and other operating conditions. Be sure nothing interferes with water. If ice ...

Owner's Manual (English)
Page 20
.... • Two 1/4" (6.35 mm) outer diameter compression nuts and 2 Ferrules (sleeves) to connect the copper tubing to the shutoff valve and the refrigerator water valve. • If a reverse osmosis water filtration system is connected to fill a cup of expensive water damage. Saddle-type shutoff valves are cut...8.2 bar) on the reverse osmosis system to refill after heavy usage. • If the issue about 10 [25 cm] diameter) to allow the refrigerator to move out from the reverse osmosis system is less than 21 PSI (1.5 kg•f/cm2, more than 2~3 sec to your cold water supply. ...
.... • Two 1/4" (6.35 mm) outer diameter compression nuts and 2 Ferrules (sleeves) to connect the copper tubing to the shutoff valve and the refrigerator water valve. • If a reverse osmosis water filtration system is connected to fill a cup of expensive water damage. Saddle-type shutoff valves are cut...8.2 bar) on the reverse osmosis system to refill after heavy usage. • If the issue about 10 [25 cm] diameter) to allow the refrigerator to move out from the reverse osmosis system is less than 21 PSI (1.5 kg•f/cm2, more than 2~3 sec to your cold water supply. ...
Owner's Manual (English)
Page 21
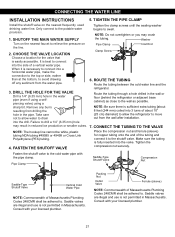
...HOLE FOR THE VALVE Drill a 1/4" (6.35 mm) hole in the wall or floor (behind the refrigerator or adjacent base cabinet) as close to the wall as possible. Take care not to allow the refrigerator to . CONNECT THE TUBING TO THE VALVE NOTE: The hookup line cannot be adhered to move out... water line. NOTE: Do not overtighten or you may result in Massachusetts. ROUTE THE TUBING Route the tubing between the cold water line and the refrigerator. 3. NOTE: Be sure there is easily accessible. into the valve. FASTEN THE SHUTOFF VALVE Place the compression nut and ferrule (sleeve) for the ...
...HOLE FOR THE VALVE Drill a 1/4" (6.35 mm) hole in the wall or floor (behind the refrigerator or adjacent base cabinet) as close to the wall as possible. Take care not to allow the refrigerator to . CONNECT THE TUBING TO THE VALVE NOTE: The hookup line cannot be adhered to move out... water line. NOTE: Do not overtighten or you may result in Massachusetts. ROUTE THE TUBING Route the tubing between the cold water line and the refrigerator. 3. NOTE: Be sure there is easily accessible. into the valve. FASTEN THE SHUTOFF VALVE Place the compression nut and ferrule (sleeve) for the ...


