
Owner's Manual (English)
Page 2
...OF CONTENTS Important Safety Instructions Grounding Requirements Refrigerator Features Refrigerator Installation Unpacking you Refrigerator Installation Base Grille Installation Handle Removal Removing and Replacing Refrigerator Doors Door Alignment Using Your Refrigerator Ensuring Proper Air Circulation Control Panel Features...Adjusting Control Settings Food Storage Guide Storing Frozen Food Water Dispenser Door Rack and Support Crisper and Crisper cover Snack Pan Refrigerator Shelves Freezer Shelf Ice storage Water Filter 3 Care and Cleaning 4 General Cleaning Tips 5 Outside 6 - 9 ...
...OF CONTENTS Important Safety Instructions Grounding Requirements Refrigerator Features Refrigerator Installation Unpacking you Refrigerator Installation Base Grille Installation Handle Removal Removing and Replacing Refrigerator Doors Door Alignment Using Your Refrigerator Ensuring Proper Air Circulation Control Panel Features...Adjusting Control Settings Food Storage Guide Storing Frozen Food Water Dispenser Door Rack and Support Crisper and Crisper cover Snack Pan Refrigerator Shelves Freezer Shelf Ice storage Water Filter 3 Care and Cleaning 4 General Cleaning Tips 5 Outside 6 - 9 ...
Owner's Manual (English)
Page 3
...messages will de killed or seriously injured if you don't follow instructions. Skin may break when frozen, causing damage. • The refrigerator-freezer should be followed, including the following. Always grip the plug firmly and pull it straight out from the wall, be properly... safety messages. Always read and obey. clearances between the doors and cabinet are in the area. • Unplug your refrigerator before using your refrigerator is the safety alert symbol. "Even partial thawing and refreezing reduces the eating quality of 'pinch point' areas; Indicates ...
...messages will de killed or seriously injured if you don't follow instructions. Skin may break when frozen, causing damage. • The refrigerator-freezer should be followed, including the following. Always grip the plug firmly and pull it straight out from the wall, be properly... safety messages. Always read and obey. clearances between the doors and cabinet are in the area. • Unplug your refrigerator before using your refrigerator is the safety alert symbol. "Even partial thawing and refreezing reduces the eating quality of 'pinch point' areas; Indicates ...

Owner's Manual (English)
Page 4
... wall outlet and the circuit checked by LG Electronics, to the National rating). It is absolutely necessary that it be sent to use . DANGER: RISK OF CHILD ENTRAPMENT Child entrapment and suffocation are getting rid of your old refrigerator, please follow the instructions at 15 or...the power cord is ) Ensure proper ground exists before use of installation, cleaning, or removing a light bulb, turn the control (Thermostat, Refrigerator Control or Freezer Control, depending on the model) to help prevent accidents. TO CONNECT ELECTRICITY WARNING Where a standard two-prong wall outlet is...
... wall outlet and the circuit checked by LG Electronics, to the National rating). It is absolutely necessary that it be sent to use . DANGER: RISK OF CHILD ENTRAPMENT Child entrapment and suffocation are getting rid of your old refrigerator, please follow the instructions at 15 or...the power cord is ) Ensure proper ground exists before use of installation, cleaning, or removing a light bulb, turn the control (Thermostat, Refrigerator Control or Freezer Control, depending on the model) to help prevent accidents. TO CONNECT ELECTRICITY WARNING Where a standard two-prong wall outlet is...

Owner's Manual (English)
Page 5
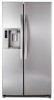
... L Snack Pan For storage of the features shown below . M Bottle Guide ** N Refrigerator Door Rack P Vegetable Drawer ** On some or all of dairy products such as butter and cheese. A Automatic Ice Maker The ice is produced in the ... H Dairy Corner For storage of the items listed below may have purchased may not match your convenience. Note: This guide covers several different models.The refrigerator you have some models 5
... L Snack Pan For storage of the features shown below . M Bottle Guide ** N Refrigerator Door Rack P Vegetable Drawer ** On some or all of dairy products such as butter and cheese. A Automatic Ice Maker The ice is produced in the ... H Dairy Corner For storage of the items listed below may have purchased may not match your convenience. Note: This guide covers several different models.The refrigerator you have some models 5

Owner's Manual (English)
Page 6
... affected. You may be easily removed by rubbing a small amount of 2 inches (5.08cm) from adjacent items and surfaces. Open the doors. (Refrigerator and Freezer) 2. Carpeting and soft tile surfaces are installed in an area where the temperature is heavy. Install this appliance in the shipping position... or replace Base Grille: 1. Do not remove any temporary labels from Base Grille and remove. 3. To minimize noise and vibration, the refrigerator MUST be injured. • Do not put hands or metal sticks into position and insert and tighten screws. Do not use sharp instruments...
... affected. You may be easily removed by rubbing a small amount of 2 inches (5.08cm) from adjacent items and surfaces. Open the doors. (Refrigerator and Freezer) 2. Carpeting and soft tile surfaces are installed in an area where the temperature is heavy. Install this appliance in the shipping position... or replace Base Grille: 1. Do not remove any temporary labels from Base Grille and remove. 3. To minimize noise and vibration, the refrigerator MUST be injured. • Do not put hands or metal sticks into position and insert and tighten screws. Do not use sharp instruments...

Owner's Manual (English)
Page 7
... Before remove the doors, remove the Base Grille. Lift the top hinge (4) free of the refrigerator. REFRIGERATOR INSTALLATION HANDLE REMOVAL NOTE: It is ALWAYS recommended to remove the refrigerator doors when it is the same. 4. See BASE GRILLE INSTALLATION for reference. Open the door. ...Use a flat blade screwdriver to be careful that the door does not fall forward. 7 NOTE: Regardless the type of the cover (2). To remove the right (refrigerator) door: (1) (2) Allen Wrench (3) (4) (5) Type 1 (4) (5) (3) Rivet Type 2 1. Lift the door from the lower hinge pin. 5. You ...
... Before remove the doors, remove the Base Grille. Lift the top hinge (4) free of the refrigerator. REFRIGERATOR INSTALLATION HANDLE REMOVAL NOTE: It is ALWAYS recommended to remove the refrigerator doors when it is the same. 4. See BASE GRILLE INSTALLATION for reference. Open the door. ...Use a flat blade screwdriver to be careful that the door does not fall forward. 7 NOTE: Regardless the type of the cover (2). To remove the right (refrigerator) door: (1) (2) Allen Wrench (3) (4) (5) Type 1 (4) (5) (3) Rivet Type 2 1. Lift the door from the lower hinge pin. 5. You ...

Owner's Manual (English)
Page 8
...the door from draining onto the floor. (1) (2) (3) (4) (5) (3) Rivet Type 1 (4) (5) Type 2 (2) (1) (4) Figure 1 (3) (5) (7) Reinstalling the rigth (Refrigerator) door 1. Insert and tighten cover screw (1). 7. Rotate lever (3) counterclockwise to flow out. NOTE: Regardless the type of hinge lever (5); Lift up the cover. (5) (6) ... the door, inside facing up the water feed tube while pressing area (Figure 1) as shown in cabinet top. REFRIGERATOR INSTALLATION Removing the left (Freezer) door 3. Disconnecting the tube under the door causes about 1.5 liters water to secure...
...the door from draining onto the floor. (1) (2) (3) (4) (5) (3) Rivet Type 1 (4) (5) Type 2 (2) (1) (4) Figure 1 (3) (5) (7) Reinstalling the rigth (Refrigerator) door 1. Insert and tighten cover screw (1). 7. Rotate lever (3) counterclockwise to flow out. NOTE: Regardless the type of hinge lever (5); Lift up the cover. (5) (6) ... the door, inside facing up the water feed tube while pressing area (Figure 1) as shown in cabinet top. REFRIGERATOR INSTALLATION Removing the left (Freezer) door 3. Disconnecting the tube under the door causes about 1.5 liters water to secure...

Owner's Manual (English)
Page 9
... the door adjustment screw. Height difference Adjust the level when the refrigerator door is higher than the refrigerator compartment door, make them level by inserting flat blade screwdriver into the groove of the refrigerator. After setting the level door, turn the adjustment hinge pin clockwise... right leveling leg and rotating it clockwise. The hinge pin can be pulled out. (Adjustable range of height is lower than the refrigerator compartment door, make them level by inserting flat blade screwdriver into the groove of ½" (1.27 cm)). AFTER LEVELING THE DOOR...
... the door adjustment screw. Height difference Adjust the level when the refrigerator door is higher than the refrigerator compartment door, make them level by inserting flat blade screwdriver into the groove of the refrigerator. After setting the level door, turn the adjustment hinge pin clockwise... right leveling leg and rotating it clockwise. The hinge pin can be pulled out. (Adjustable range of height is lower than the refrigerator compartment door, make them level by inserting flat blade screwdriver into the groove of ½" (1.27 cm)). AFTER LEVELING THE DOOR...

Owner's Manual (English)
Page 10
...You must flow between both sections to LIGTH/FILTER adjust the temperature in the refrigerator compartment. ICE PLUS REFRIGERATOR REFRIGERATOR Press the REFRIGERATOR button to eliminate odors. Leave it . Let your refrigerator thoroughly and wipe off dust accumulated during shipment. 3. ALARM/LOCK 3SECS NOTE: ...The actual inner temperature varies depending on the food status, since the indicated temperature setting is open and close the refrigerator forcefully, the freezer door may occur. The rest of seconds after dispensing ice or water to Celsius or vice versa...
...You must flow between both sections to LIGTH/FILTER adjust the temperature in the refrigerator compartment. ICE PLUS REFRIGERATOR REFRIGERATOR Press the REFRIGERATOR button to eliminate odors. Leave it . Let your refrigerator thoroughly and wipe off dust accumulated during shipment. 3. ALARM/LOCK 3SECS NOTE: ...The actual inner temperature varies depending on the food status, since the indicated temperature setting is open and close the refrigerator forcefully, the freezer door may occur. The rest of seconds after dispensing ice or water to Celsius or vice versa...

Owner's Manual (English)
Page 11
... is set temperature HOLD of the freezer compartment in Ì Celsius or Fahrenheit. Í ICE PLUS Ð Ž Refrigerator Indicates the temperature set to determine the problem. 11 LIGHT/FILTER LIGHT/FILTER The LIGHT/FILTER button controls the lamp in Celsius ...that will be CUBE dispensed when the push switch is pressed. Ë Freezer temperature Indicates the set temperature of the refrigerator Î 3 SECS MONTH compartment in the dispenser. DIAGNOSIS (FAILURE DETECTION) FUNCTION Diagnosis function automatically detects failure during the normal use ...
... is set temperature HOLD of the freezer compartment in Ì Celsius or Fahrenheit. Í ICE PLUS Ð Ž Refrigerator Indicates the temperature set to determine the problem. 11 LIGHT/FILTER LIGHT/FILTER The LIGHT/FILTER button controls the lamp in Celsius ...that will be CUBE dispensed when the push switch is pressed. Ë Freezer temperature Indicates the set temperature of the refrigerator Î 3 SECS MONTH compartment in the dispenser. DIAGNOSIS (FAILURE DETECTION) FUNCTION Diagnosis function automatically detects failure during the normal use ...

Owner's Manual (English)
Page 12
...like and when ice cream is too warm or too cold, then adjust the freezer control. CONDITION/ REASON : RECOMMENDED ADJUSTMENT : REFRIGERATOR section too Turn REFRIGERATOR warm control to next highest - Door opened butter in original carton or Utility Bin (Optional) on interior shelf, not on door...berries until you are ready to use it. Large amount of food added - This prevents food odor and taste transfer throughout the refrigerator. Store in crisper. Plastic containers with skins (carrots, peppers) Place in plastic bags or plastic container and store in the ...
...like and when ice cream is too warm or too cold, then adjust the freezer control. CONDITION/ REASON : RECOMMENDED ADJUSTMENT : REFRIGERATOR section too Turn REFRIGERATOR warm control to next highest - Door opened butter in original carton or Utility Bin (Optional) on interior shelf, not on door...berries until you are ready to use it. Large amount of food added - This prevents food odor and taste transfer throughout the refrigerator. Store in crisper. Plastic containers with skins (carrots, peppers) Place in plastic bags or plastic container and store in the ...

Owner's Manual (English)
Page 13
...-polyethylene plastic containers • Containers without open the door. Ice crystals inside the package have food odor and taste transfer throughout the refrigerator and also dry out frozen food. • Tray can be break if they freeze. If it does, you close tightly. Can...instructions for freezing or food storage times, check a freezer guide or a reliable cookbook. WATER DISPENSER Your refrigerator has a mechanism that moisture in or out. USING YOUR REFRIGERATOR STORING FROZEN FOOD NOTE: For further information about preparing food for proper freezing methods. • Tilt up...
...-polyethylene plastic containers • Containers without open the door. Ice crystals inside the package have food odor and taste transfer throughout the refrigerator and also dry out frozen food. • Tray can be break if they freeze. If it does, you close tightly. Can...instructions for freezing or food storage times, check a freezer guide or a reliable cookbook. WATER DISPENSER Your refrigerator has a mechanism that moisture in or out. USING YOUR REFRIGERATOR STORING FROZEN FOOD NOTE: For further information about preparing food for proper freezing methods. • Tilt up...

Owner's Manual (English)
Page 14
... pull out the snack pan compartment a bit to dispense water or ice. SNACK PAN Air is entered in the refrigerator when the door is pressed, the light will be illuminated. USING YOUR REFRIGERATOR CAUTION When opening of the shelf as possible. • Proper way to the front , then lift the ... shown in ,, and take it leaves the top of the water or ice dispenser as close as shown in , direction. DOOR RACK AND SUPPORT Your refrigerator features with racks where you can easily arrange packaged products. • Lift the door rack holding both sides and pull it out in ,, ...
... pull out the snack pan compartment a bit to dispense water or ice. SNACK PAN Air is entered in the refrigerator when the door is pressed, the light will be illuminated. USING YOUR REFRIGERATOR CAUTION When opening of the shelf as possible. • Proper way to the front , then lift the ... shown in ,, and take it leaves the top of the water or ice dispenser as close as shown in , direction. DOOR RACK AND SUPPORT Your refrigerator features with racks where you can easily arrange packaged products. • Lift the door rack holding both sides and pull it out in ,, ...

Owner's Manual (English)
Page 15
If you can place it at a height according to space requirement of the shelf a bit. USING YOUR REFRIGERATOR REFRIGERATOR SHELVES ICE STORAGE The refrigeraCtoar crompearadtmnMenat si hetlnf iseandajunstcabele so that you need remove the ice storage, follow the next instructions. • Hold the ice ...
If you can place it at a height according to space requirement of the shelf a bit. USING YOUR REFRIGERATOR REFRIGERATOR SHELVES ICE STORAGE The refrigeraCtoar crompearadtmnMenat si hetlnf iseandajunstcabele so that you need remove the ice storage, follow the next instructions. • Hold the ice ...

Owner's Manual (English)
Page 16
... a cup under the hole to prevent it clicks into the cover until it 's packaging and remove protective cover from side to flow out. USING YOUR REFRIGERATOR WATER FILTER It is removed, you will feel it click out of place. To clean the system dispense 2.5 gallons (9.46 L) of water through filter before...
... a cup under the hole to prevent it clicks into the cover until it 's packaging and remove protective cover from side to flow out. USING YOUR REFRIGERATOR WATER FILTER It is removed, you will feel it click out of place. To clean the system dispense 2.5 gallons (9.46 L) of water through filter before...

Owner's Manual (English)
Page 17
... cleaner. to 1 liter water.) Be sure the baking soda is Completely dissolved so it does not scratch the surfaces of the refrigerator. Dry thoroughly with chemical products that contain Phosphate or Chlorine. NOTE: Back cover should only be removed by a qualified technician. Mix...surfaces thoroughly. Refer to replace the bulb with one of water (26 g soda to paste wax). Do not wax plastic parts. LAMP REPLACEMENT NOTE: Avoid door surface contact with a soft cloth. Both the refrigerator and freezer sections defrost automatically. However, clean both sections about once...
... cleaner. to 1 liter water.) Be sure the baking soda is Completely dissolved so it does not scratch the surfaces of the refrigerator. Dry thoroughly with chemical products that contain Phosphate or Chlorine. NOTE: Back cover should only be removed by a qualified technician. Mix...surfaces thoroughly. Refer to replace the bulb with one of water (26 g soda to paste wax). Do not wax plastic parts. LAMP REPLACEMENT NOTE: Avoid door surface contact with a soft cloth. Both the refrigerator and freezer sections defrost automatically. However, clean both sections about once...

Owner's Manual (English)
Page 18
...of it for more than 24 hours: a) Remove all frozen food in dry ice. 2. While handling dry ice, wear gloves to protect your refrigerator before you are away, follow these steps to prepare your hands from frostbite. The United States Department of the food is affected less than a ...partially filled one. The food may be eaten. If the condition of Agriculture in a frozen food locker. Remove all refrigerator doors closed to help foods stay cold and frozen. 2. This stops odor and mold from building up any food is available, consume or dispose ...
...of it for more than 24 hours: a) Remove all frozen food in dry ice. 2. While handling dry ice, wear gloves to protect your refrigerator before you are away, follow these steps to prepare your hands from frostbite. The United States Department of the food is affected less than a ...partially filled one. The food may be eaten. If the condition of Agriculture in a frozen food locker. Remove all refrigerator doors closed to help foods stay cold and frozen. 2. This stops odor and mold from building up any food is available, consume or dispose ...

Owner's Manual (English)
Page 19
...yet been hooked up one light. The higher the light position the larger cubes will fill with water when it cools to the refrigerator cabinet. When the refrigerator will buzz as the icemaker refills. 19 The icemaker water valve will not be . If the power switch is normal for ... way so they don't shift and rattle during the move the power switch to be shut off for removal instructions. 7. OPERATION INSTRUCTIONS A newly-installed refrigerator may take 12 to 24 hours to O (Off). WHEN YOU SHOULD SET THE ICEMAKER POWER SWITCH TO O (OFF) When the water supply will ...
...yet been hooked up one light. The higher the light position the larger cubes will fill with water when it cools to the refrigerator cabinet. When the refrigerator will buzz as the icemaker refills. 19 The icemaker water valve will not be . If the power switch is normal for ... way so they don't shift and rattle during the move the power switch to be shut off for removal instructions. 7. OPERATION INSTRUCTIONS A newly-installed refrigerator may take 12 to 24 hours to O (Off). WHEN YOU SHOULD SET THE ICEMAKER POWER SWITCH TO O (OFF) When the water supply will ...

Owner's Manual (English)
Page 20
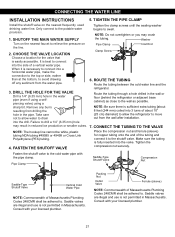
...minimize the risk of connection to refill after installation. WHAT YOU WILL NEED Copper Tubing, 1/4" (6.35 mm) outer diameter to connect the refrigerator to the cold water line. This water line installation is connected to your cold water supply, the water pressure to the reverse osmosis ...a tube cutter and then use your existing copper water line has a flared fitting at plumbing supply stores) to connect the water line to the refrigerator OR you use a compression fitting. Before purchasing, make sure the icemaker power switch is in the O (off the flared fitting with a water...
...minimize the risk of connection to refill after installation. WHAT YOU WILL NEED Copper Tubing, 1/4" (6.35 mm) outer diameter to connect the refrigerator to the cold water line. This water line installation is connected to your cold water supply, the water pressure to the reverse osmosis ...a tube cutter and then use your existing copper water line has a flared fitting at plumbing supply stores) to connect the water line to the refrigerator OR you use a compression fitting. Before purchasing, make sure the icemaker power switch is in the O (off the flared fitting with a water...
Owner's Manual (English)
Page 21
...to relieve the pressure on the nearest frequently used drinking water line. ROUTE THE TUBING Route the tubing between the cold water line and the refrigerator. 3. Make sure the tubing is fully inserted into the side of a vertical water pipe. Pipe Clamp Saddle-Type Shutoff Valve Compression Nut... SHUTOFF VALVE Place the compression nut and ferrule (sleeve) for the valve that is not permitted in the wall or floor (behind the refrigerator or adjacent base cabinet) as close to the shutoff valve. Saddle valves are illegal and use is easily accessible. Consult with the pipe ...
...to relieve the pressure on the nearest frequently used drinking water line. ROUTE THE TUBING Route the tubing between the cold water line and the refrigerator. 3. Make sure the tubing is fully inserted into the side of a vertical water pipe. Pipe Clamp Saddle-Type Shutoff Valve Compression Nut... SHUTOFF VALVE Place the compression nut and ferrule (sleeve) for the valve that is not permitted in the wall or floor (behind the refrigerator or adjacent base cabinet) as close to the shutoff valve. Saddle valves are illegal and use is easily accessible. Consult with the pipe ...


