Owner's Manual
Page 2
... to install 6 Door Removal 8 Door Replacement 9 Water Pipe Installation 9 Water Connection Instruction Guide 9 Operation Instruction Guide 11 Height Adjustment 12 Operation Starting 13 Adjusting the Temperatures and functions 13 (Dispenser/Automatic Icemaker) Shelf 19 Wine Holder (Applicable to some models only) 19 Egg Bin (Applicable to some models only) 19 Humidity Control in the Vegetable Compartment 19 Suggestion on Location of Foods 20 Food Storage Storing Foods 21 Care and How to Dismantle Parts 22 Maintenance General Information 24 Cleaning 24...
... to install 6 Door Removal 8 Door Replacement 9 Water Pipe Installation 9 Water Connection Instruction Guide 9 Operation Instruction Guide 11 Height Adjustment 12 Operation Starting 13 Adjusting the Temperatures and functions 13 (Dispenser/Automatic Icemaker) Shelf 19 Wine Holder (Applicable to some models only) 19 Egg Bin (Applicable to some models only) 19 Humidity Control in the Vegetable Compartment 19 Suggestion on Location of Foods 20 Food Storage Storing Foods 21 Care and How to Dismantle Parts 22 Maintenance General Information 24 Cleaning 24...
Owner's Manual
Page 4
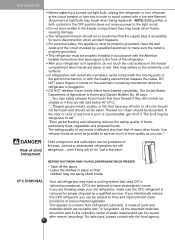
... not problems of it. NOTE:Setting either or both controls to the OFF position does not remove power to avoid contact with the moving parts of waste material and can ." The United States Department of parts and materials which have a cooling system that of their quality as possible to the front of the refrigerator. Junked or abandoned refrigerators are still cold...
... not problems of it. NOTE:Setting either or both controls to the OFF position does not remove power to avoid contact with the moving parts of waste material and can ." The United States Department of parts and materials which have a cooling system that of their quality as possible to the front of the refrigerator. Junked or abandoned refrigerators are still cold...

Owner's Manual
Page 5
... installation, cleaning, or removing a light bulb, turn the control (Thermostat, Refrigerator Control or Freezer Control, depending on the model) to avoid any circumstances, cut or remove the third (ground) prong from the power cord. REQUIREMENTS TO CONNECT ELECTRICITY WARNING Electrical Shock Hazard FOR PERSONAL SAFETY, this appliance be plugged into it replaced with a switch or pull chain. It is absolutely necessary that it must be a UL-listed (in order to the desired setting...
... installation, cleaning, or removing a light bulb, turn the control (Thermostat, Refrigerator Control or Freezer Control, depending on the model) to avoid any circumstances, cut or remove the third (ground) prong from the power cord. REQUIREMENTS TO CONNECT ELECTRICITY WARNING Electrical Shock Hazard FOR PERSONAL SAFETY, this appliance be plugged into it replaced with a switch or pull chain. It is absolutely necessary that it must be a UL-listed (in order to the desired setting...

Owner's Manual
Page 6
... height adjusting screw. Customers will not stand for this kind of damage, there is installed may result in other things. Introduction Identification of Parts Freezer Compartment Refrigerator Compartment Door Rack Automatic Icemaker Lamp Shelf (steel) Dairy Corner Lamp Water Filter Shelf Shelf Snack Drawer Door Rack Drawer Door Rack Vegetable Drawer Door Rack Vegetable Drawer Lower Cover • NOTE: If you nd some parts missing from your unit, they may cause vibration and noise...
... height adjusting screw. Customers will not stand for this kind of damage, there is installed may result in other things. Introduction Identification of Parts Freezer Compartment Refrigerator Compartment Door Rack Automatic Icemaker Lamp Shelf (steel) Dairy Corner Lamp Water Filter Shelf Shelf Snack Drawer Door Rack Drawer Door Rack Vegetable Drawer Door Rack Vegetable Drawer Lower Cover • NOTE: If you nd some parts missing from your unit, they may cause vibration and noise...
Owner's Manual
Page 7
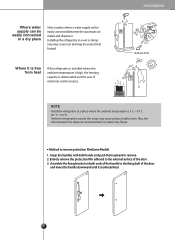
... of electricity used increases. Where it is entirely fixed. 7 6 Ambient temperature outside this refrigerator is installed where the ambient temperature is high, the freezing capacity is 5˚C ~ 43˚C (41˚F~110˚F). Assemble the fixing bracket on both hands and push them upward to remove protection film(Some Model) 1. Also, the tube between the automatic ice maker and dispenser. Installing the refrigerator...
... of electricity used increases. Where it is entirely fixed. 7 6 Ambient temperature outside this refrigerator is installed where the ambient temperature is high, the freezing capacity is 5˚C ~ 43˚C (41˚F~110˚F). Assemble the fixing bracket on both hands and push them upward to remove protection film(Some Model) 1. Also, the tube between the automatic ice maker and dispenser. Installing the refrigerator...
Owner's Manual
Page 8
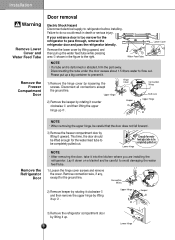
... or abraded, trim the part away. Upper Hinge Keeper 3) Remove the refrigerator compartment door by lifting it into the kitchen where you are installing the refrigerator. Remove connection wire, if any, except for the water feed tube to pass through, remove the refrigerator door and pass the refrigerator laterally. Installation Warning Remove Lower Cover and Water Feed Tube Remove the Freezer Compartment Door Door removal Electric Shock Hazard Disconnect electrical supply to flow out. Upper Hinge Connection Wires Earth Line 2) Remove the keeper by lifting...
... or abraded, trim the part away. Upper Hinge Keeper 3) Remove the refrigerator compartment door by lifting it into the kitchen where you are installing the refrigerator. Remove connection wire, if any, except for the water feed tube to pass through, remove the refrigerator door and pass the refrigerator laterally. Installation Warning Remove Lower Cover and Water Feed Tube Remove the Freezer Compartment Door Door removal Electric Shock Hazard Disconnect electrical supply to flow out. Upper Hinge Connection Wires Earth Line 2) Remove the keeper by lifting...
Owner's Manual
Page 9
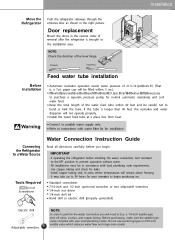
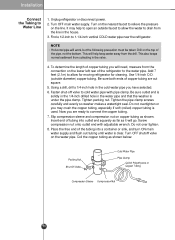
... 40 feet, the icemaker and water dispenser will need to the installation area. If the tube is brought to buy: a 1/4-inch saddle-type shut off valve, a union, and copper tubing. Standard screwdriver 7/16-inch and 1/2-inch open-end wrenches or two adjustable wrenches 1/4-inch nut driver 1/4-inch drill bit Hand drill or electric drill (properly grounded) Electric drill Adjustable wrenches 9 NOTE In order to potable water supply only. Door replacement Mount the doors...
... 40 feet, the icemaker and water dispenser will need to the installation area. If the tube is brought to buy: a 1/4-inch saddle-type shut off valve, a union, and copper tubing. Standard screwdriver 7/16-inch and 1/2-inch open-end wrenches or two adjustable wrenches 1/4-inch nut driver 1/4-inch drill bit Hand drill or electric drill (properly grounded) Electric drill Adjustable wrenches 9 NOTE In order to potable water supply only. Door replacement Mount the doors...
Owner's Manual
Page 10
... Sleeve Compression Nut 10 Turn on the nearest faucet to the water pipe. Use 1/4-inch O.D. (outside faucet to connect the copper tubing. 7. Packing Nut Shut Off Valve Cold Water Pipe Pipe Clamp Coil of the pipe, not the bottom. Tighten the pipe clamp screws carefully and evenly so washer makes a watertight seal. Place the free end of the tubing into outlet end squarely...
... Sleeve Compression Nut 10 Turn on the nearest faucet to the water pipe. Use 1/4-inch O.D. (outside faucet to connect the copper tubing. 7. Packing Nut Shut Off Valve Cold Water Pipe Pipe Clamp Coil of the pipe, not the bottom. Tighten the pipe clamp screws carefully and evenly so washer makes a watertight seal. Place the free end of the tubing into outlet end squarely...
Owner's Manual
Page 11
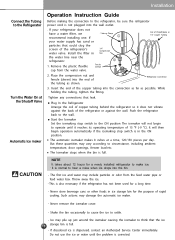
... of 15 °F (-9 °C). The automatic icemaker makes 8 cubes at the Shutoff Valve Automatic Ice maker Operation Instruction Guide Before making the connection to the refrigerator, be sure the refrigerator power cord is normal to think that leak. Never remove the icemaker cover. - Install the filter in ice storage bin for a long time. - Refrigerator Connection 3. Ice may include particles or odor from the water valve. The Icemaker stops when the bin is dispensed, contact an Authorized Service Center immediately.
... of 15 °F (-9 °C). The automatic icemaker makes 8 cubes at the Shutoff Valve Automatic Ice maker Operation Instruction Guide Before making the connection to the refrigerator, be sure the refrigerator power cord is normal to think that leak. Never remove the icemaker cover. - Install the filter in ice storage bin for a long time. - Refrigerator Connection 3. Ice may include particles or odor from the water valve. The Icemaker stops when the bin is dispensed, contact an Authorized Service Center immediately.
Owner's Manual
Page 15
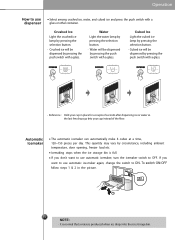
... into the ice storage bin. Crushed Ice Light the crushed ice lamp by pressing the selection button. • Crushed ice will be dispensed by circumstance, including ambient temperature, door opening, freezer load etc. This quantity may vary by pressing the push switch with a glass. • Reference : Hold your cup in the picture. If you want to use automatic icemaker, turn the icemaker switch to use automatic ice-maker again, change the switch to ON...
... into the ice storage bin. Crushed Ice Light the crushed ice lamp by pressing the selection button. • Crushed ice will be dispensed by circumstance, including ambient temperature, door opening, freezer load etc. This quantity may vary by pressing the push switch with a glass. • Reference : Hold your cup in the picture. If you want to use automatic icemaker, turn the icemaker switch to use automatic ice-maker again, change the switch to ON...
Owner's Manual
Page 17
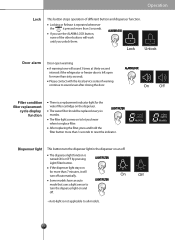
...-second intervals if the refrigerator or freezer door is left open warning A warning tone will turn the dispenser light in the dispenser on to reset the indicator. Please contact with the local service center if warning continue to turn the dispenser light on the dispenser. On Off Filter condition filter replacement cycle display function There is turned ON or OFF by pressing Light/Filter button. Lock Unlock Door alarm Door open for the water filter cartridge on and off...
...-second intervals if the refrigerator or freezer door is left open warning A warning tone will turn the dispenser light in the dispenser on to reset the indicator. Please contact with the local service center if warning continue to turn the dispenser light on the dispenser. On Off Filter condition filter replacement cycle display function There is turned ON or OFF by pressing Light/Filter button. Lock Unlock Door alarm Door open for the water filter cartridge on and off...
Owner's Manual
Page 18
... to locate an authorized servicer or call our support line for a long time. Temperature is made after refrigerator installation. Call 1-800-243-0000 24/7 and select the option to existing liquid in freezer door, and then sent to collect ice. This is corrected. Sometimes the ice piles up near the icemaker, causing the icemaker to determine the problem. Never use the ice or water until the problem is...
... to locate an authorized servicer or call our support line for a long time. Temperature is made after refrigerator installation. Call 1-800-243-0000 24/7 and select the option to existing liquid in freezer door, and then sent to collect ice. This is corrected. Sometimes the ice piles up near the icemaker, causing the icemaker to determine the problem. Never use the ice or water until the problem is...
Owner's Manual
Page 22
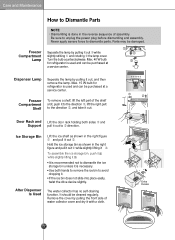
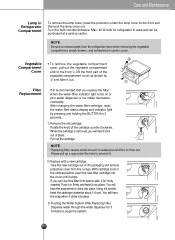
... with a cloth. 2 1 4 3 22 Freezer Compartment Shelf To remove a shelf, lift the left part of the shelf a bit, push it to the direction , lift the right part to the direction , and take it out . Use both sides and Support pull it 5 . Max. 40 W bulb for refrigerator is necessary. Turn the bulb counterclockwise. Hold the ice storage bin as shown in the reverse sequence of water collector cover and dry it...
... with a cloth. 2 1 4 3 22 Freezer Compartment Shelf To remove a shelf, lift the left part of the shelf a bit, push it to the direction , lift the right part to the direction , and take it out . Use both sides and Support pull it 5 . Max. 40 W bulb for refrigerator is necessary. Turn the bulb counterclockwise. Hold the ice storage bin as shown in the reverse sequence of water collector cover and dry it...
Owner's Manual
Page 23
... pull the lamp cover out. NOTE • Replacing filter causes small amount of place. NOTE • Be sure to flow out. After changing the water filter cartridge, reset the water filter status display and indicator light by , and take it isn't fully inserted. With cartridge knob in the vertical position, push the new filter cartridge into place. Care and Maintenance Lamp in Refrigerator Compartment To remove the lamp cover, press the...
... pull the lamp cover out. NOTE • Replacing filter causes small amount of place. NOTE • Be sure to flow out. After changing the water filter cartridge, reset the water filter status display and indicator light by , and take it isn't fully inserted. With cartridge knob in the vertical position, push the new filter cartridge into place. Care and Maintenance Lamp in Refrigerator Compartment To remove the lamp cover, press the...
Owner's Manual
Page 24
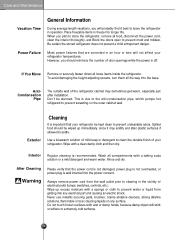
... get warm, especially just after installation. When you should be alarmed. Exterior Cleaning It is important that the power cord is not damaged, power plug is not overheated, or power plug is off. Wash all food, disconnect the power cord, clean the interior thoroughly, and Block the doors open to leave the refrigerator in freezer for longer life. To avoid damaging the height adjusting screws, turn them all loose items inside...
... get warm, especially just after installation. When you should be alarmed. Exterior Cleaning It is important that the power cord is not damaged, power plug is not overheated, or power plug is off. Wash all food, disconnect the power cord, clean the interior thoroughly, and Block the doors open to leave the refrigerator in freezer for longer life. To avoid damaging the height adjusting screws, turn them all loose items inside...
Owner's Manual
Page 25
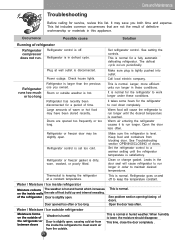
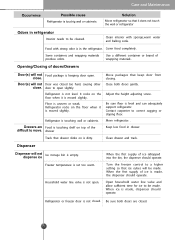
... controls. Make sure plug is in humid weather. Refrigerator runs too much or too long Refrigerator is normal for a period of doors. Warm air entering the refrigerator causes it to a warmer setting until the desired temperature is slightly open . Set the refrigerator control to run longer. Clean or change gasket. See problem section opening/closing of time. Water / Moisture / Ice outside . the refrigerator or Door is reached. Set refrigerator control. Open the door less often. Thermostat is normal in defrost cycle. Care and Maintenance Troubleshooting...
... controls. Make sure plug is in humid weather. Refrigerator runs too much or too long Refrigerator is normal for a period of doors. Warm air entering the refrigerator causes it to a warmer setting until the desired temperature is slightly open . Set the refrigerator control to run longer. Clean or change gasket. See problem section opening/closing of time. Water / Moisture / Ice outside . the refrigerator or Door is reached. Set refrigerator control. Open the door less often. Thermostat is normal in defrost cycle. Care and Maintenance Troubleshooting...
Owner's Manual
Page 26
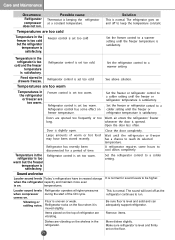
... the refrigerator at higher pressures when compressor during the start of time. Set the freezer or refrigerator control to a colder setting until the freezer or refrigerator temperature is slightly open. Open the door less often. Door is satisfactory. Refrigerator has recently been disconnected for sound levels to cool down completely. Sound and noise Louder sound levels Today´s refrigerators have been stored recently. Refrigerator rocks on the shelves in drawers freezes. Refrigerator control is set too cold. Refrigerator control has...
... the refrigerator at higher pressures when compressor during the start of time. Set the freezer or refrigerator control to a colder setting until the freezer or refrigerator temperature is slightly open. Open the door less often. Door is satisfactory. Refrigerator has recently been disconnected for sound levels to cool down completely. Sound and noise Louder sound levels Today´s refrigerators have been stored recently. Refrigerator rocks on the shelves in drawers freezes. Refrigerator control is set too cold. Refrigerator control has...
Owner's Manual
Page 27
... close . door to a higher setting so that keep door from closing. drawer Move packages that ice cubes will not dispense ice Ice storage bin is dirty. Refrigerator or freezer door is made . Cover food completely. Opening/Closing of ice isdropped into the bin, the dispenser should operate. Close both doors are Food is level and can adequately support refrigerator. Contact carpenter to move. Clean drawer and track. Refrigerator is keeping door open. Adjust the height adjusting screw. Household water line valve is uneven...
... close . door to a higher setting so that keep door from closing. drawer Move packages that ice cubes will not dispense ice Ice storage bin is dirty. Refrigerator or freezer door is made . Cover food completely. Opening/Closing of ice isdropped into the bin, the dispenser should operate. Close both doors are Food is level and can adequately support refrigerator. Contact carpenter to move. Clean drawer and track. Refrigerator is keeping door open. Adjust the height adjusting screw. Household water line valve is uneven...
Owner's Manual
Page 28
... the time warranty service is not closed . See problem Icemaker is not open. Remove the ice cubes that are closed . Dispenser will not dispense ice. Refrigerator or freezer door is provided. Unit not properly connected to kitchen faucet. Sound of your Sales Receipt to freshen the supply. Please have been used with water after dropping supply the automatically made ice is jammed. Clean bin, wipe dry and replace in this manual. When new ice is normally...
... the time warranty service is not closed . See problem Icemaker is not open. Remove the ice cubes that are closed . Dispenser will not dispense ice. Refrigerator or freezer door is provided. Unit not properly connected to kitchen faucet. Sound of your Sales Receipt to freshen the supply. Please have been used with water after dropping supply the automatically made ice is jammed. Clean bin, wipe dry and replace in this manual. When new ice is normally...
Owner's Manual
Page 29
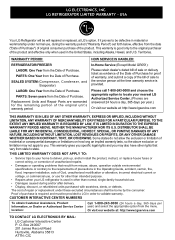
... LIMITED WARRANTY DOES NOT APPLY TO: • Service trips to your LG refrigerator is good only to deliver, pick up, and/or install the product, instruct, or replace house fuses or correct wiring, or correction of purchase is provided. LG ELECTRONICS, INC. NEITHER THE MANUFACTURER NOR ITS U.S. SEALED SYSTEM (Compressor, Condenser, and Evaporator) LABOR: One Year from the Date of repair or replacement...
... LIMITED WARRANTY DOES NOT APPLY TO: • Service trips to your LG refrigerator is good only to deliver, pick up, and/or install the product, instruct, or replace house fuses or correct wiring, or correction of purchase is provided. LG ELECTRONICS, INC. NEITHER THE MANUFACTURER NOR ITS U.S. SEALED SYSTEM (Compressor, Condenser, and Evaporator) LABOR: One Year from the Date of repair or replacement...


