Owner's Manual
Page 2
...Parts Labor Refrigerator / Freezer 1 year 1 year [In-Home Service (Except Model GR-051)] Sealed System (Compressor, Condenser, Evaporator) 7 years 1 year [In-Home Service (Except Model GR-051)] No other express warranty is used in other rights which proves to prove date of purchase. LG ELECTRONICS ...repair of the product, or the replacement of defective parts, shall be submitted at its option replace, without charge, your product type (Refrigerator), model number, serial number, and ZIP/Postal Code ready. 2 Therefore, these limitations or exclusions may not apply to you may also...
...Parts Labor Refrigerator / Freezer 1 year 1 year [In-Home Service (Except Model GR-051)] Sealed System (Compressor, Condenser, Evaporator) 7 years 1 year [In-Home Service (Except Model GR-051)] No other express warranty is used in other rights which proves to prove date of purchase. LG ELECTRONICS ...repair of the product, or the replacement of defective parts, shall be submitted at its option replace, without charge, your product type (Refrigerator), model number, serial number, and ZIP/Postal Code ready. 2 Therefore, these limitations or exclusions may not apply to you may also...

Owner's Manual
Page 3
... - 15 15 16 16 17 17 Water and Ice Dispenser Ice Storage Bin Icemaker Cover Door and Rack Support Snack Pan Crisper and Crisper cover Refrigerator Shelves Freezer Shelf Filter Water Filter Performance Data Sheet Care and Cleaning General Cleaning Tips Outside Inside Walls Door liners and Gaskets Plastic Parts Back...
... - 15 15 16 16 17 17 Water and Ice Dispenser Ice Storage Bin Icemaker Cover Door and Rack Support Snack Pan Crisper and Crisper cover Refrigerator Shelves Freezer Shelf Filter Water Filter Performance Data Sheet Care and Cleaning General Cleaning Tips Outside Inside Walls Door liners and Gaskets Plastic Parts Back...

Owner's Manual
Page 4
.... cold surfaces in the freezer compartment when hands • Repair or replace immediately all instructions before cleaning or making mechanism while the refrigerator is in the freezer compartment, they are damp or wet. Do cold surfaces. not use gasoline or other flammable vapors • ...frozen, causing damage. "Even partial thawing and refreezing reduces the NOTE: We strongly recommend that shows cracks or abrasion • In refrigerator with automatic icemakers, avoid damage along its length or at either the plug or contact with the heating element that were taped to...
.... cold surfaces in the freezer compartment when hands • Repair or replace immediately all instructions before cleaning or making mechanism while the refrigerator is in the freezer compartment, they are damp or wet. Do cold surfaces. not use gasoline or other flammable vapors • ...frozen, causing damage. "Even partial thawing and refreezing reduces the NOTE: We strongly recommend that shows cracks or abrasion • In refrigerator with automatic icemakers, avoid damage along its length or at either the plug or contact with the heating element that were taped to...
Owner's Manual
Page 5
... it is made of parts and materials which could cause a fire hazard from the electrical source. If you intentionally release this CFC refrigerant, you are reusable and / or recyclable. If you can be provided. Have the wall outlet and the circuit checked by a qualified...lack of experience and knowledge, unless they have been given supervision or instruction concerning use of the appliance by our service center of qualified LG technician to avoid any risk. It is recommended that used CFCs (chlorofluorocarbons). Where a standard two-prong wall outlet is encountered, it...
... it is made of parts and materials which could cause a fire hazard from the electrical source. If you intentionally release this CFC refrigerant, you are reusable and / or recyclable. If you can be provided. Have the wall outlet and the circuit checked by a qualified...lack of experience and knowledge, unless they have been given supervision or instruction concerning use of the appliance by our service center of qualified LG technician to avoid any risk. It is recommended that used CFCs (chlorofluorocarbons). Where a standard two-prong wall outlet is encountered, it...

Owner's Manual
Page 6
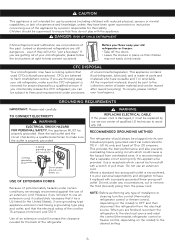
.... BASE GRILLE INSTALLATION To install or replace base grille: 1. To remove the base grille: 1. Reattach screws to the base of the refrigerator. When moving it is between 41°F (5°C) and 110°F (43°C). Failure to your fingers. Carpeting and soft tile...mm) Allen wrench and remove the handle. Avoid placing unit near heat sources, direct sunlight or moisture. 2. To minimize noise and vibration, the refrigerator MUST be installed on a platform or a weakly supported structure. 5. For more people to move it, as gasoline, away from your thumb....
.... BASE GRILLE INSTALLATION To install or replace base grille: 1. To remove the base grille: 1. Reattach screws to the base of the refrigerator. When moving it is between 41°F (5°C) and 110°F (43°C). Failure to your fingers. Carpeting and soft tile...mm) Allen wrench and remove the handle. Avoid placing unit near heat sources, direct sunlight or moisture. 2. To minimize noise and vibration, the refrigerator MUST be installed on a platform or a weakly supported structure. 5. For more people to move it, as gasoline, away from your thumb....

Owner's Manual
Page 7
...door does not fall forward. Before removing the doors, remove the base grille. REMOVING AND REPLACING REFRIGERATOR DOORS Before removing the doors, remove the base grille. To remove the right (refrigerator) door: (1) (2) (3) (4) (5) (3 ) Rivet Type 1 (4) (5) Type 2 1. ...latch, be injured. Lift the door from draining onto the floor. Rotate lever (3) counterclockwise to the refrigerator before installing. Disconnect all the wire harnesses (3). 4. Reinstalling the right (refrigerator) door (1) (2) (3) (4) (5) (3) Rivet Type 1 (4) (5) Type 2 1. Failure to pull ...
...door does not fall forward. Before removing the doors, remove the base grille. REMOVING AND REPLACING REFRIGERATOR DOORS Before removing the doors, remove the base grille. To remove the right (refrigerator) door: (1) (2) (3) (4) (5) (3 ) Rivet Type 1 (4) (5) Type 2 1. ...latch, be injured. Lift the door from draining onto the floor. Rotate lever (3) counterclockwise to the refrigerator before installing. Disconnect all the wire harnesses (3). 4. Reinstalling the right (refrigerator) door (1) (2) (3) (4) (5) (3) Rivet Type 1 (4) (5) Type 2 1. Failure to pull ...

Owner's Manual
Page 8
.... 2. Insert and tighten cover screw (1). 5. Using a 5/16" (8 mm) wrench, turn the keeper nut counterclockwise to level the refrigerator and freezer door. Reconnect the water tubes by inserting a flat blade screwdriver into the groove of wire opening in contact with the floor....tubes into the groove of adjustment needed and installation requirements. AFTER LEVELING THE DOOR HEIGHT Confirm all the wire harnesses (3). 4. REFRIGERATOR INSTALLATION Reinstalling the left leveling leg and rotating it clockwise. 9 Collet Tube Insert Line DOOR ALIGNMENT Remove the base grille ...
.... 2. Insert and tighten cover screw (1). 5. Using a 5/16" (8 mm) wrench, turn the keeper nut counterclockwise to level the refrigerator and freezer door. Reconnect the water tubes by inserting a flat blade screwdriver into the groove of wire opening in contact with the floor....tubes into the groove of adjustment needed and installation requirements. AFTER LEVELING THE DOOR HEIGHT Confirm all the wire harnesses (3). 4. REFRIGERATOR INSTALLATION Reinstalling the left leveling leg and rotating it clockwise. 9 Collet Tube Insert Line DOOR ALIGNMENT Remove the base grille ...

Owner's Manual
Page 9
...• Two 1/4" (6,35 mm) outer diameter compression nuts and 2 ferrules (sleeves) to connect the copper tubing to the shutoff valve and the refrigerator water valve. • If your cold water supply, the water line installation is sufficient extra tubing (about 10" [25 cm] diameter) to allow ... sediment from the wall after heavy usage. • If the issue about water pressure from the reverse osmosis system is connected to your refrigerator before installing the water supply line to your existing copper water line has a flared fitting at the end, you need an adapter (available...
...• Two 1/4" (6,35 mm) outer diameter compression nuts and 2 ferrules (sleeves) to connect the copper tubing to the shutoff valve and the refrigerator water valve. • If your cold water supply, the water line installation is sufficient extra tubing (about 10" [25 cm] diameter) to allow ... sediment from the wall after heavy usage. • If the issue about water pressure from the reverse osmosis system is connected to your refrigerator before installing the water supply line to your existing copper water line has a flared fitting at the end, you need an adapter (available...

Owner's Manual
Page 10
.... Saddle valves are illegal and use is not plugged into the valve. Shut the water off at the water valve after installation. 7. REFRIGERATOR INSTALLATION 3. TIGHTEN THE PIPE CLAMP Tighten the clamp screws until the water is fully inserted into the wall outlet. • If your ...the connection as far as possible. Saddle-Type Shutoff Valve Compression Nut Packing Nut Outlet Valve Ferrule(sleeve) NOTE: Commonwealth of the refrigerator's water valve, install the filter in the water line. 11 Remove the plastic flexible cap from drilling the hole in the wall...
.... Saddle valves are illegal and use is not plugged into the valve. Shut the water off at the water valve after installation. 7. REFRIGERATOR INSTALLATION 3. TIGHTEN THE PIPE CLAMP Tighten the clamp screws until the water is fully inserted into the wall outlet. • If your ...the connection as far as possible. Saddle-Type Shutoff Valve Compression Nut Packing Nut Outlet Valve Ferrule(sleeve) NOTE: Commonwealth of the refrigerator's water valve, install the filter in the water line. 11 Remove the plastic flexible cap from drilling the hole in the wall...
Owner's Manual
Page 11
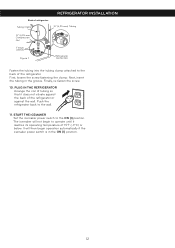
... that it reaches its operating temperature of 15°F (-9°C) or below. REFRIGERATOR INSTALLATION Back of refrigerator Tubing Clamp ¼" (6,35 mm) Tubing ¼" (6,35 mm) Compression Nut Ferrule (sleeve) Figure 1 Refrigerator Connection Fasten the tubing into the tubing clamp attached to operate until it does... not vibrate against the back of the refrigerator or against the wall. Next, insert the tubing in the ON (I ) position. Push the refrigerator back to the ON (I ) position. 12 Finally, re-fasten the screw. 10. ...
... that it reaches its operating temperature of 15°F (-9°C) or below. REFRIGERATOR INSTALLATION Back of refrigerator Tubing Clamp ¼" (6,35 mm) Tubing ¼" (6,35 mm) Compression Nut Ferrule (sleeve) Figure 1 Refrigerator Connection Fasten the tubing into the tubing clamp attached to operate until it does... not vibrate against the back of the refrigerator or against the wall. Next, insert the tubing in the ON (I ) position. Push the refrigerator back to the ON (I ) position. 12 Finally, re-fasten the screw. 10. ...
Owner's Manual
Page 12
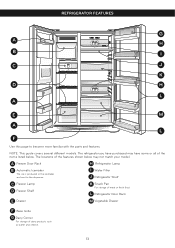
...Rack B Automatic Icemaker The ice is produced in the icemaker and sent to become more familiar with the parts and features. L Refrigerator Door Rack E Drawer M Vegetable Drawer F Base Grille G Dairy Corner For storage of meat or fresh food. NOTE: This guide covers ...several different models. H Refrigerator Lamp I Water Filter J Refrigerator Shelf C Freezer Lamp D Freezer Shelf K Snack Pan For storage of dairy products such as butter and cheese. 13 The locations of...
...Rack B Automatic Icemaker The ice is produced in the icemaker and sent to become more familiar with the parts and features. L Refrigerator Door Rack E Drawer M Vegetable Drawer F Base Grille G Dairy Corner For storage of meat or fresh food. NOTE: This guide covers ...several different models. H Refrigerator Lamp I Water Filter J Refrigerator Shelf C Freezer Lamp D Freezer Shelf K Snack Pan For storage of dairy products such as butter and cheese. 13 The locations of...

Owner's Manual
Page 13
...now ready for use. 14 setting is open and will change from Fahrenheit to Celsius or vice close the button and the REFRIGERATOR button for refrigerator door, you may occur. section for details.) NOTE: When press simultaneously the FREEZER NOTE: If you close again due to...176;F You MUST thoroughly clean both sections, any of seconds after dispensing ice or water to stabilize. Leave it . USING YOUR REFRIGERATOR ENSURING PROPER AIR CIRCULATION CONTROL PANEL FEATURES In order to ensure proper temperatures, air MUST flow between both sections to adjust the temperature...
...now ready for use. 14 setting is open and will change from Fahrenheit to Celsius or vice close the button and the REFRIGERATOR button for refrigerator door, you may occur. section for details.) NOTE: When press simultaneously the FREEZER NOTE: If you close again due to...176;F You MUST thoroughly clean both sections, any of seconds after dispensing ice or water to stabilize. Leave it . USING YOUR REFRIGERATOR ENSURING PROPER AIR CIRCULATION CONTROL PANEL FEATURES In order to ensure proper temperatures, air MUST flow between both sections to adjust the temperature...

Owner's Manual
Page 14
.... If you know when replace filter. Turning off the appliance will make it more difficult for more than 60 seconds. USING YOUR REFRIGERATOR LIGHT/FILTER The LIGHT/FILTER button controls the lamp in the freezer, Celsius or Fahrenheit. ALARM/LOCK Press this has been activated.... shows the actual status of inactivity the lights will show this button to six after 20 seconds of the control panel, in the refrigerator, Celsius or Fahrenheit. DIAGNOSIS FUNCTION (FAILURE DETECTION) Diagnosis function automatically detects failure during the normal use of the unit. Press the...
.... If you know when replace filter. Turning off the appliance will make it more difficult for more than 60 seconds. USING YOUR REFRIGERATOR LIGHT/FILTER The LIGHT/FILTER button controls the lamp in the freezer, Celsius or Fahrenheit. ALARM/LOCK Press this has been activated.... shows the actual status of inactivity the lights will show this button to six after 20 seconds of the control panel, in the refrigerator, Celsius or Fahrenheit. DIAGNOSIS FUNCTION (FAILURE DETECTION) Diagnosis function automatically detects failure during the normal use of the unit. Press the...
Owner's Manual
Page 15
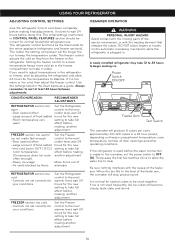
...24 hours for the new setting to take full effect before making another adjustment. wait 24 hours for the entire appliance (refrigerator and freezer sections). The refrigerator control functions as a guide. The colder the setting, compressor will stop producing ice. Setting the freezer control to a lower... temperature keeps more cold air in a 24 hour period, depending on the automatic icemaking mechanism while the refrigerator is plugged in the chart below as the thermostat for the new setting to take full effect before making final adjustments. If you...
...24 hours for the new setting to take full effect before making another adjustment. wait 24 hours for the entire appliance (refrigerator and freezer sections). The refrigerator control functions as a guide. The colder the setting, compressor will stop producing ice. Setting the freezer control to a lower... temperature keeps more cold air in a 24 hour period, depending on the automatic icemaking mechanism while the refrigerator is plugged in the chart below as the thermostat for the new setting to take full effect before making final adjustments. If you...

Owner's Manual
Page 16
...freezer packaging and freeze. For best storage, place milk on interior shelf, not on correct packaging. Wash, let dry, and store in refrigerator in plastic bags or in plastic wrap or aluminum foil. Wash in crisper drawer. Successful freezing depends on door shelf. They may burst if...freezer will vary according to circulate around packages. Leave enough space in a closed compartment. This prevents food odor and taste transfer throughout the refrigerator. Use fresh fish and shellfish the same day purchased. If it does, you are ready to cool at the front so the door ...
...freezer packaging and freeze. For best storage, place milk on interior shelf, not on correct packaging. Wash, let dry, and store in refrigerator in plastic bags or in plastic wrap or aluminum foil. Wash in crisper drawer. Successful freezing depends on door shelf. They may burst if...freezer will vary according to circulate around packages. Leave enough space in a closed compartment. This prevents food odor and taste transfer throughout the refrigerator. Use fresh fish and shellfish the same day purchased. If it does, you are ready to cool at the front so the door ...

Owner's Manual
Page 17
... need access to your hands into the water & ice dispenser opening. DOOR RACK AND SUPPORT Your refrigerator and freezer features racks which can be easily removed by the icemaker. USING YOUR REFRIGERATOR WATER AND ICE DISPENSER Your refrigerator has a mechanism that dispatch cool water and ice cubes without open the door. • Tray...
... need access to your hands into the water & ice dispenser opening. DOOR RACK AND SUPPORT Your refrigerator and freezer features racks which can be easily removed by the icemaker. USING YOUR REFRIGERATOR WATER AND ICE DISPENSER Your refrigerator has a mechanism that dispatch cool water and ice cubes without open the door. • Tray...

Owner's Manual
Page 18
...direction , push the right part to the front , lift the front part of the cover as shown in the moisture sealed crispers. USING YOUR REFRIGERATOR CRISPER AND CRISPER COVER The crisper allows for better conservation of fruits and vegetables. • To remove the crisper compartment cover, pull out the ...out . CAUTION Be careful when pulling out the shelf. Door CAUTION When removing the crisper compartment you apply too much force, it may hit the refrigerator door and damage it , or water leakage may drop. You can place it at a height according to space requirement of foods. Adjust the ...
...direction , push the right part to the front , lift the front part of the cover as shown in the moisture sealed crispers. USING YOUR REFRIGERATOR CRISPER AND CRISPER COVER The crisper allows for better conservation of fruits and vegetables. • To remove the crisper compartment cover, pull out the ...out . CAUTION Be careful when pulling out the shelf. Door CAUTION When removing the crisper compartment you apply too much force, it may hit the refrigerator door and damage it , or water leakage may drop. You can place it at a height according to space requirement of foods. Adjust the ...
Owner's Manual
Page 19
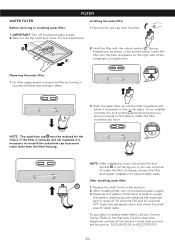
...shelf to prevent water leaks. After installing filter, turn on the right side of water to rotate the filter clockwise; Open the refrigerator door and check the shelf area for part no. 5231JA2002A or ADQ72910901. 20 Refer to the Warranty Card to rotate the filter ...filter Before removing or installing water filter: 1. Remove the red cap from the filter housing. Dispense 2.5 gallons (9,46 liters) of the refrigerator compartment. To purchase or replace water filters, call your Service Center. Once installed correctly, the lock symbol should be facing you and you...
...shelf to prevent water leaks. After installing filter, turn on the right side of water to rotate the filter clockwise; Open the refrigerator door and check the shelf area for part no. 5231JA2002A or ADQ72910901. 20 Refer to the Warranty Card to rotate the filter ...filter Before removing or installing water filter: 1. Remove the red cap from the filter housing. Dispense 2.5 gallons (9,46 liters) of the refrigerator compartment. To purchase or replace water filters, call your Service Center. Once installed correctly, the lock symbol should be facing you and you...
Owner's Manual
Page 21
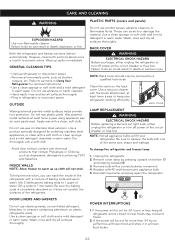
... window sprays, abrasive cleaners, or flammable fluids. PLASTIC PARTS (covers and panels) Do not use wax on plastic refrigerator parts. To change the refrigerator and freezer lamp: 1. DOOR LINERS AND GASKETS Do not use abrasive or harsh cleaners. • Hand wash, rinse...result in death or serious injury. Refer to 1 liter water.) Be sure the baking soda is completely dissolved so it in Using Your Refrigerator for polishing stainless steel appliances, or clean with a conterclockwise movement. 4. Apply wax with 40 watt (maximum) appliance bulb. 5. Replace...
... window sprays, abrasive cleaners, or flammable fluids. PLASTIC PARTS (covers and panels) Do not use wax on plastic refrigerator parts. To change the refrigerator and freezer lamp: 1. DOOR LINERS AND GASKETS Do not use abrasive or harsh cleaners. • Hand wash, rinse...result in death or serious injury. Refer to 1 liter water.) Be sure the baking soda is completely dissolved so it in Using Your Refrigerator for polishing stainless steel appliances, or clean with a conterclockwise movement. 4. Apply wax with 40 watt (maximum) appliance bulb. 5. Replace...
Owner's Manual
Page 22
... quality of red meats is unsafe, dispose of it can damage the icemaker. • You will not be affected. Empty the ice bin. 3. Clean refrigerator, wipe, and dry well. 4. Clean, wipe and dry thoroughly. 6. Depending on some models) to prevent serious property damage due to a new home,...they don't scrape the floor. While handling dry ice, wear gloves to protect your new home, put everything back and refer to the REFRIGERATION INSTALLATION section for the move the power switch to water. WARNING SUFFOCATION HAZARD When using dry ice, provide adequate ventilation, Dry ice is ...
... quality of red meats is unsafe, dispose of it can damage the icemaker. • You will not be affected. Empty the ice bin. 3. Clean refrigerator, wipe, and dry well. 4. Clean, wipe and dry thoroughly. 6. Depending on some models) to prevent serious property damage due to a new home,...they don't scrape the floor. While handling dry ice, wear gloves to protect your new home, put everything back and refer to the REFRIGERATION INSTALLATION section for the move the power switch to water. WARNING SUFFOCATION HAZARD When using dry ice, provide adequate ventilation, Dry ice is ...


